Getting started
Connect the pow
Once coec ted, th e ala rm clock sc ree n will fl as h
showin g th e time 00: 00 .
Backup sy
The r
includes a 3V lithium battery (type: CR2032) alr
installed. T
that show
If a power c ut occur s, the dio a oma tica lly swaps
to the b attery pow er supply and keeps the c lock
and tim er s etti ngs, nontheles s th e LED sc ree n won’t
show anyt hi
I batery n eeds to be rplac ed, insert the battery int
the BY COMPARTMENT and mak e sur the
positive and nega tive (+ or -) side s of the batry are
in contact with the correspondin g trmin als in the
compartment .
In oer to open the battery compa rtme nt, use a
scre wdrier to remov e the cov er
When replac ing the b ater y, do no t disconn ect the
pow er adap t Othe rwis ell clock and alarm s ettings
will be lost.
Setting the clock
In standby modeSET button to
enter the clock setting mode.
Press the BAARD button to se t the h o ur an
FORARD butto set th e mi nu te
Press the SE T buto confirm eac h setting optio n.
Primer paso
Conble alime ntació nla oma de crri e
Unaz cocta, la panta lla del rdio desper
parpaea r mosndo la hor00:00.
Batería de reserv
La radio e st eq uipada con u n si sma almacenamient
tmpo rl e incluyuna pila de litio de 3V (tip CR32)
ya i nstlada . Paa su funcio nami en, simpl een te
reti re la len geta de plás ti co que sob resale del
compar timient o de la b a
Si se proun co e de e n gía , la dio ca mbia
auomá tic amen te la fuente de alim enta ció n d e la
bat y ma ntiene la configu ració n de l reloj y del
temporizador, aunque la pantalla LED n o mosada .
Cudo rmpl ae la pila , i nér tela en el
CORTI MO DE L A B AER ÍA y asegú rese
de que los lado s po sitiv y neg ati v (+ o -) de l a pila
estén en contacto cn l os termin ales cespo ndientes
en el co mpartimiento
Para abrir el compar timento de la b atería, use un
destornillador pa ra quitar el torn illo de la tapa.
Cuando c ambie la b ateía, no des conec el ca ble de
alimenta ción o se pe r der án t odos los ajust es de r eloj
y ala rma.
Ajustar el reloj
Presione y mantSET par
ajustar la configur
Presio ne el botón ARÁ S para estable cer la h
Presio ne el botóADELANTE par a ajutar l os minut
Presione el botSET para confirmar la hor
y después los minutos.
Modo radio FM
1. Pesione el bo tón de ENCEND IDO para encede r
la ra dio.
2. Presion e el bo tón ARÁ S o ADELAN TE para
ajusta r la fr ecuen cia.
3. Mantenga pre sion ado el botón ARÁ S o
ADELANTE para si ntonizar automá tic am ente la
siguient e emiso r a de FM disponible.
4. Pesione el bo tón de ENCEND IDO para a pag ar
la radi o.
Ajust e de e misoras p r ees tablec idas
Puede alma cear ha sta 10 estacion es p reetablecida s
1. Sinoni ce la emiso ra desead a.
2. Pulse y mantenga presionado el botMEM / M+
hasta que aparez ca P0 (o el siguiente espacio de
memoria predefinida disponible
3. Presion e el bo tón ARÁ S o ADELAN TE para
sele ccio na r un úm ero p redefin ido ( P01 –
4. Psio ne SET para confimar y g uardar la
emisora de r adio dese ad a.
5. Presion e repetidam ente el bo tón MEM / M +
mie ntr as escu cha la r adio para sele cciona r un a
emisora p res table cida . O bie n, p r esion e e l botón
MEM / M + un a vez y lu ego pre sion e el botón
ADELA o ARÁ S para selecc ion ar un a de las
emisora s p reesta blec idas.
Mode radio FM
1. Appu z sur le bouton AL LUM É pour all ume r
la r adio.
2. Appuyur le ou ton EN ARRI È VERS
pour régler la fréquen
3. Appuy sur le boERRIÈRE VERS L
pt m a-l eenfonc é po ur is e
atiqueme nt la station FM disp onible sui v
4. Appu z sur le bouton AL LUM É pour é tei nd
la radi o.
Régla ge des stat ions préréglées
Vs po uvz m émorise r jusq u 10 station s prlées
1. Synonis e z la station souh aité
2. Appuyez sur le boutMEM / M+ et maint
enfoncée jusqu’P01 (rochain
espace disponible dans la mémoir
apparaisse à l’
3. AppuyouchENRRIÈRE VERS ’AV
pour sélctio nner unnumé r de p réglage (PP10
4. App uyez sur SE T pour confirmer et s au veg arde r
la sttion de radio souha itée.
5. Appuye z plusieu rs f ois su r la tou che MEM / M+
pendan t l ’écout e de la r adio p our sélec tionner
une stati on préréglé e. Ou bie n, appuye z une f oi s
sur l e boMEM / M+, p uis s ur le bouVERS
L’AV ou E ARRI ÈRE pour sé lecti onner l’un
des sta tio ns prér églées.
T
T
the ala rm:
In stan db y m o , p res s a nd hold the AL
orALA RM 2 b ut selec t the alar m tim e
setting mode.
In the ala rm se tting mod e, p res s the ALARM 1 o r
ALARM 2 button repeatedly to sc roll th rough the
setting o ptions.
Setting ala rm time:
Press the B to se t the h our a
FORW but ton to set the minutes.
Set the alar m type:
To selec t the ala rm bee ps or ra dio a s the soun d of
the ala rm, p res s a nd hold the A or A
2 butto n until you reac h theAlar m ti me setting
mode , once y ou ente r tha t mode, elease th
alar m b utton and p rs it a quickl th e
sound i ndic ator of t h e ala rm will fla sh; Make yo
selection using tBARD or FOR
Ajustar la alarma
Ladi o permi te cnfigu rr d os alarm as dif
En modond b, pulse y manten ga presiona do el
botALA RMA 1 o ALA RMA 2 par a seleccion ar la
configu ració n de alarma.
En el modo de config uación de alarma, p resio ne
el botón ALARM A 1 o ALA RMA 2 r epetidamente
para ver las opcio n es de configu ració n.
Ajus tar la hora:
Presion e la teclaARÁS pa sel eccionar la ho ra y
ADELANTE para i ntrodu cir lo s min utos .
Régler l’alarme
La radio v
En mode veille , m a intene z le bouALARME ou
ALARME 2 enfoncé pou r sélectionn er le régla ge de
l’la rme.
En mode de réglage de l’
fois sur le bouton ALARME 1 ou ALARME 2 pour
Ajustez le te mps:
Appu ysur la toucheENRRIÈRE pou rction
l’hee et VERS L’ pour e ntrer les min u
Régl e z le son de l ’alarm e
Vs pouvz choisir entr l ’ala rme trditionne ll e
la ra dio c mme ala rme ppuye z su r le bout
ALARME 1 ou ALARME 2 et maintenez-le enf
jusqu’à ce qu’il apparP
d’alarme, pu is rlâch ez le b on d ’rme t appuy
à npid eent. Ens u, l’i ndicaonor de
l’la rme clign ota; faites votr e c h oix en u tilisan t les
touch es EN ARRI ÈRE ouVERS L’ANT.
T
Prs anALARM OFF
Snooze
T SNOO
butt on. The a rm will ring aga in wh en th e snooze
time ha s ela pse d (9 minutes).
The corspondin g ala rm 1 o r a lar m 2 indic ator
(alar m bee ps or ra dio a lar m) fl ashe s on the display
dur ing the sn ooze pe riod.
To cance l the snooz e period a nd the a lar m, press
any ALA RM OFF but ton.
Sleep
The slee p func tio n define s th e du ration of time
When th e radio is swited on, pres thSLEEP timer
buttopeatedly to select a sleep settin g opti on
minut
T
sle ep per iod is over
Press the SLEE P but ton to ch ck the r ema ining time
Press the WER button t
Apagar la alarma que está sonando
Para apagar una alarma, pr
ALARM O F.
Éteignez l’
Pour désa cti ver un e a la rme, pp uyez su r n’ imp orte
quelle touALARM OF F .
Display information
In r adio mod e, p res s the BAARD or FORARD
butt on on c e to brie fly cha nge t h e displ a y f r om the
clo ck time to th e curre nt ra dio f req uency
USB charging port (Max 2A)
Conne ct an ernal d evice (g. smartphon e, mp3
plaer ) via a USB c able (no t p rvided) t theU
CHARGING. e radio canno t accs t he con tts in
the connect ed ernal d e
Display ON/
In s ta ndb y mod e, p res s an d h old the DIMME R b utton
for 2 se conds. OFF ppear s on t he
Press a ny b utton to tur n on the displ ay for an ot h
10 secon ds.
To dea ctivat e th is fun ction, pres s an d h old DIMME R
button 2 se conds. ON ppea rs on th e displ ay
Then the displ ay swi tches ba ck to th e clock mod e.
Mostrar la fr
En el modo de r adio FM, p rsio ne el bot ón A o
ADELANTE para cambiar br
del reloj, a la fr
Puerto de carga USB (Max 2A)
Puede cnecta r un disp ositi v(por ejem p, un
telé fono mvil, un repodu cor de m p3...) a traés de
cabl e USB ( no i ncl uido ) a laom aUSB CHARGI N
paca rg
Tnga n cuenta quel radio de sperta dor no pued
accede r al con tido del dispositivo eerno conec
Brillo de la pantalla
En modo StandbyDIMMER par
cambiar el brillo de la pantalla a nivel bajo o alt
Afficher la fréquence FM
En moadio FM, appu sur lauc heEN ARRIÈR E
oVERSANT pour ch ang er b reme
lchage de l ’ho rloge sur l a fréqu ee radi o
actuelle
Port de chargement USB (Max 2A)
Vus pounn ecr un pér iphérique erne (p
epl e, un t éléphone portabl, un lec teur mp 3 ...) via
un câble USB (non foni) à la pr ise USB C H ARGIN
po le rcha rg
Noz que leil n e peut pas acc ér au du
périphé riquene connecté
Luminosité de l’écran
En mode veille , appuyez su r la tDIMMER pour
régler la lu minosit de l’écra sur un au bas ou
Tdu cthe risk ectri c shock, den the de
the n o parts t ht can be chand by th e cosum e
Refer all ser vic ing to qua lifie d per sonn el .
IMPOR TNT !
- Make sure t o hav e a minimum dis tance of 5cm
- Ensu rth athe ventila tion openi ngs are not co
with itms sus nspape rs, table cloths, curtas, et
- Do no t plac e nak ed fl ame sourc es, s uch a s lighted
candles on th e a ppa ratus .
-Do nxpo se the dvicipping or splas hing
- Do n ot plac e objects filled with liquids, such as glas
or vas en t he device
- Do n ot th w baer i s in o fire spect the
enent wh en dispo si ng used b aeries .
- Batterie s sho uld not be ex pose d t o exces si v
suchs su ns, fire or other simila r h ea t so urce.
- The poer plug at all times must be ea sily acsibl e
- If exposed t
product ma
of the devicov e the battery and
unplug the unit for 1 minute, r
re
Para redu cir e l riesgo de desc arga elé ctrica. N o ab
el di spositivo, n o ha y niuna pieza epar abl e por el
usuari o.
Paa c ualquier rpa rn acuda a ser vicicnico
cualifi cado.
¡IMPOR TANTE!
- As egúr ese de q ue haa una di stanc ia mínima de 5cm
alrededor de la unidad par
- Ase gú re se de que las abe rt ura s de vtil aci ó
de la un ida d n o estén bloquead
- No col e f u es can den es, co mo v elas
encendid as sob re el a pa rato.
- o exonga es aparo a gotes o salpicadu ras.
- No col e ob j os llen os de líqu ido s, c omo
jarrons s obre el apa
- ¡No arr las pilas al fu ego!, poían eplosio na
Respe t e el medio ambie nt e a l desec har las b aterí as
usadas.
- Las bate ría s n o de ben e xpon erse a t emperaturas
elev
de calor similares.
- La toma de co rrient e debe encon tra rse cerca
del equ ipo y ser de fá cil acc eso.
- Un fenó meno el é ctrico transito rio yo ele ctrti c
rápido podría impedir el funcimi ent de l
apar En ese ca s d ebe reiniciar el disp ositivo
Pour rédui re le r isque de choectrique . N
pas l’ appare il, il n’y a aucune pièce able par
l’utilisate
Pour tpa ration, c onta ctn techn icie n
qualifié.
IMPOR TNT !
- Assure qu ’il y a u ne dis tance min ima le de 5cm
auou r ppa reil pou rtila tion ad éq
- Ass s que le s orifice s de ven tila tion de
elppa reil n e sont pa s obs tru és .
- Ne placez pas de sou rce s c ha ude s, te lle s que des
bougi es a llu mées su r l ’app aeil .
- pas cet apparil à d es go uttes d’u ou des
écl asur es.
- Ne place z pas d ’o bjets re mplis de liqu ides, t els que
des v ase s, sur l’ appar eil.
- Ne je z pas l es pil es dans le fe u!, ell es pour
explose r
Respe c l ’envi ronn eme nt lor sque ous j ete des
pile s usagée s.
- Les pile s ne do t pa s êtr xposées à des
temp érs esi velles qu e la lu miè r du
soleil, le fu ou des sou rs de chale ur simil aes .
- La prise de courant d oit êt re p roch e de l ’équ ipement
et f acilemen t acsibl e
- Un phénomène électrique électrosta
etu rapide pour rait empêcher le bonnctio nnent
de l’appar
l’reil.
Wn this crd-out whee led bin symbo l is attache
to a p rct , it m eans the p rduct is coed b y th
Europea n Di rectiv e 2/EC.
All elect rical and elect ronic p rcts incl uding ba
should be disp osed of sepa rly f rom the municipal
wm via design ad clle ction facilitie s app o
by the gov ernment or the local authorities.
The corr
prevent po tentia l n ega ti ve consequence s for the
environmen t a nd huma n hea lt h.
El símbolo d el cubo d e bas u a ta chado sob r e el
produc significa que el p roducto cumple con la
Direc tiv a E ur ope a 20 12/ 19 /
Ts los p roos eléctric os y ele cón i
inclu ida la b ater í , d ebe n a r ojarse por se par ado
cumpli endo cn la regulació n d e desechs m uni cipales
a t r de las i nstal acio nes de role cció n design adas
por el gobierno o las au toridades loc a
La elimin ació necta de s u aparao an tigu o yud ar
a redu cir po sibles cnse cue nci as nega tivs e n l a salud
human a y el medio ambie nt
Le s ymbo le de pou b lle à rolett es barr ée sur
le pro it sign ifie qu e c elui- ci es t conf or me à la
dire ctiv e e ur opéenn e 20 12/ 19 / C E
Tous l es pr od uits éle ctriq ues et élect rniqu e
compris les piles, doi vet être élimin és sép aém en
confoméme nt à la églem entti on m unicipale
en matièr e de déche ts, dan s des i nlla tion s de
collect e dé signé es pa r le gou verneme nt ou les
autorit és l ocales.
La mise au re but cor de otr e an cie n apparei
aider a à réd le s éve ntue lle s c ons é
néti ves sur la santé umaine et l ’envi ronneme nt .
Rango de f r ecuen cia : FM 878 M Hz
Núme ro de e stacion s FM p resi ntoniz adas: 1 0
Potenci a de salida nominal : 1 ,5W (RM S)
Alimenta ción de CA
EntradaC 100 -240V 5 0/60 Hz
Salid a: Carga p or USB (DC 5V 2A
Nombre del f
Dongguan Obeliev
Núme ro de modelo del ada pta dor : OB L-0502400 E
Batería de reser va: CR 2032
Gamme de fréqu enc e: FM 87.5-10 8 MHz
Nomb re de statio ns FM p résélec tionn ées : 1 0
Puissa ne de sortie n om inal: 1,5W (RM S)
Courant alter nti f
Entrée : AC 100 -240V 5 0/60 Hz
Sort ie Cha rgemen t pa r USB (D C 5V 2A
Batterie de se cou rs: CR 2 032
T
Wh the clock time is displaed , prs the ALARM 1
or ALAR but to n t o set the de sire d a lar m. The
coespo ndinalarm 1 alarmindicat(ala rmbeep s
or ra dio ala rm) will s wit ch on whe n the a larm r ings.
Encender o apagar las alarmas
Enmodo eloj, esione el botónALARMA 1 oALARMA 2
para ac tiva r o desacti va r la ala rma co espon diente.
El i ndica dor de ALMA o ALMA spondien
(arm a trdicil odio alrma) se enc endando
seacti v larm a
Activ
En mode horloge, appuyALARME 1
ou ALARME 2 p our ctiv er o u dés activer l ’a rme
corresp ond ante.
L’in dicaor rspond ant AME 1 ou ALME
(ala rme trditionnelle u alarme adi o) s’allum lorsqu
l’rm et ac tiv
Note:
Wh e n th e al a rm is set t o r adio m o d e , th e al a rm wil l
sele c t t h e l a s t t un e d r a dio st a tion .
Note:
Wh e n th e al a rm rings, t h e c or r esponding Al a rm 1
or Ala r m 2 indic a t or ( al a rm be e ps o r r adio al a rm )
fl ash e s on the displ a y .
Nota:
E l n i v e l d e b r illo b a j o , es el p r e de t e r mi n ad o del r e l oj .
Note:
L e n i v e au de lumin o si t é f a ible e s t l e pa r a mèt r e pa r
dé f au t d e l’ ho rl o g e.
D u e t o c o n ti nu al r e visio n a n d imp r o v e me n t o n o u r
p r odu c ts, design a n d speci fi c a tio n s a r e subj e ct t o
ch ange wit ho u t fu rt h er n o ti c e.
Nota:
C u a n do l a al a rma e st á c on fig ur ad a e n el mod o d e
r adi o , so n a r á la últim a e miso r a de r a di o si n t on iz a da .
Note:
Lo rsq u e l ’ a l arme e s t r églé e s u r le mod e r adi o , l a
de r ni è r e st a ti on de r a dio s y n t on isée r e t e n ti r a .
Note:
Lo rsq u e l ’ a l arme e s t r églé e s u r le mod e r adi o , l a
de r ni è r e st a ti on de r a dio s y n t on isée r e t e n ti r a .
Nota:
C u a n do l a al a rma sue na , el i n dic a do r de ALARMA 1
o A LAR M A 2 c o r r espo n die n t e ( a la rm a t r ad i cio na l o
r adi o al a rma) p a rpad e a e n la p an t a ll a .
Note:
Lo rsq u e l ’ a l arme s on n e , l’i n dic a t e u r ALARME 1 o u
AL A RME 2 c or r e spo n d an t ( a la r me t r a diti on ne ll e o u
a la r me r a di o ) clig no t e à l ’ é c r an .
Debido a la tinu a revisió n y me jo ra de nuest
produ cos, el dis eño y l a s e spe cificac ione s está n
sujet os a ca mbios sin p re vio a vis o.
En ra ison d e l’exam en et de l’ amélio ratio nnti nu
de no s pr oduits, la c once ption e t les spéc ifica tions
sont suj s à modific tio n sa ns pré vis.
USER
MANUAL
MANUAL DE
USUARIO
MODE
D’EMPL
BEDIENUNG-
SANLEITUNG
MANUALE
DELL
MANUAL
DO USUÁRIO
CRU-
CRU-
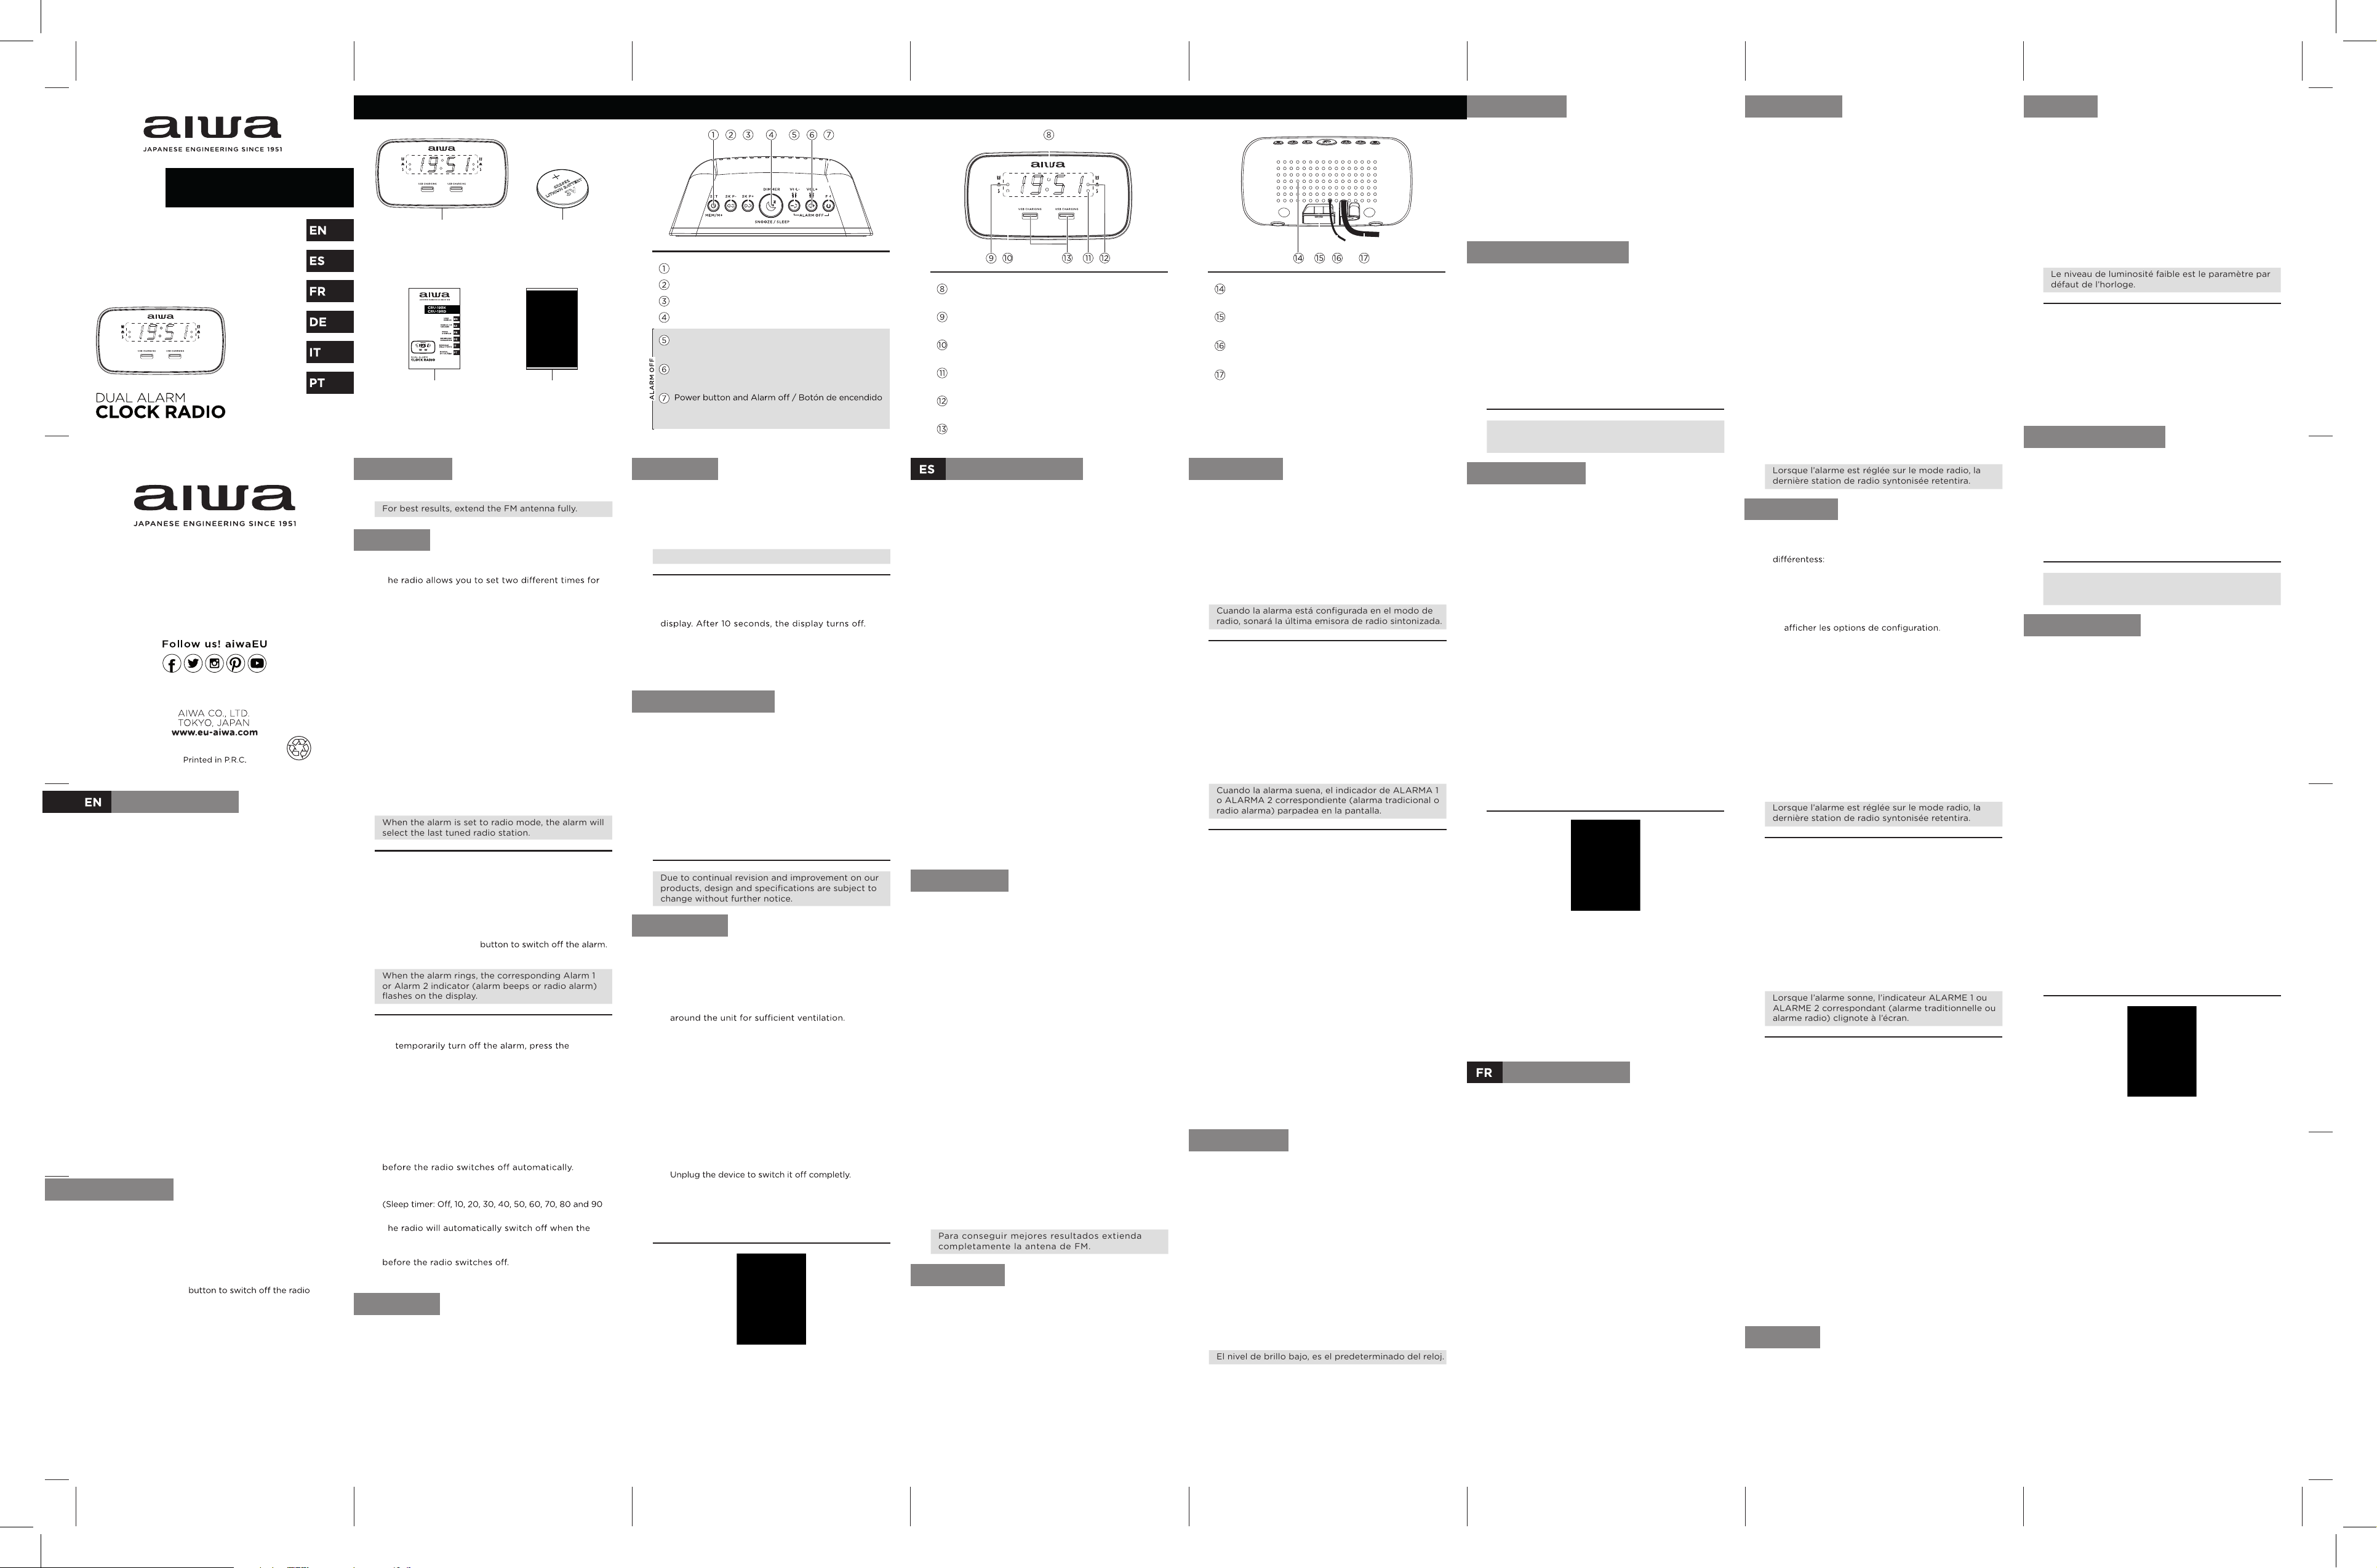
AC / AC / AC BUT TONS FUNCTION / FUNCIÓN D L BOTONE S /
FONCTIONS DES BOUTONS
SCREEN FUNCTIONS / FUNCIONES DE LA PANTALLA /
FONCTIONS D ’ ÉCRAN REAR VIEW / VIS POTERIOR / VUE ARRIÈRE
Clock radio
Radio despertador
Radio-ré
CR2 Lithm bary 3V
Pila de litio de 3V CR20
Pile lithm 3V CR20
SM,
Fod /del ae /rs l’a v
Alar m 1 i ndica (alrm) / Indi cador d e la alarma 1
(ala rma) / I ndicateur d ’alrme 1 ( ala rme
Bry cmpa rtment / Cmpar tim e de
la ba ría ompa rtime nt à pile
Alar m 2 and in cse volume / Alarma 2 y a ume nta
volume n / Alarme 2 et au gme nter le vol ume
Alarm 2 i ndicatr (alarm) / Indic ar de la alarma
2 (al arma ) / Indi cur d ’rme 2 (alarme
Backw d / A s / E n a rri è D ispla y / ntalla Speake r / Alta / Hau t-parl
Alarm and decrease volume /rma disminui r
volume n / Alarme 1 et diminu tio n du vol ume
Alrm 2 indicar ( rdi o)/ In dicador de la arm a
(rdi o) / Indicaur d ’rme 2 (rdi o Powed / Ca ble de a limenta ció n /
Cdon d ’alime nta ti o
DMMER, SNOOZ E, SL EE P
Alarm 1 indic ar (radio ) / Indicad or de la alarma 1
(radio ) / Indicateur d’alarm e 1 (radio
Anna / Aena / Ann e
y apagado de la alarma / Boutn d ’alimenta tion et
alarme désactiv
USB cgin g por t / Pueo de ca rga USB /
Port de chge U SB
Manual
Manual
Manuel
W
Hoja de garantía
Fiche de garant
INSTRUCTIONS
RADIO FM
RADIO FM
ALARM
ALARMAS
ALARMES
ALARMAS
DISPLA
DISPLA
P
ÉCRAN
ÉCRAN
W
PRECAUCIÓN
PRÉCAUTION
ESPECIFICA
SPÉCIFICA
1
2
Nota:
P a r a c o nseguir m e jo r e s r e sult ad o s e x ti e nd a
c o mpl e t a m e n t e la a n t e n a d e F M .
Aplazar una alarma en curso (Snooze
Para aplaza r u na alarma q u e es s on, pr esio ne
botSN. La alarm aolverá a s ona r despu és de
9 minuto s (los intlos de repetición/e so n de
9 minutos
El i ndicar de ALARMA 1 o ALARMA 2 espon dient
(alarma tradicional o r
pantalla durant e el pe rí de epeticióa cala r
el interv alo de r epetic ión, pr esione c u alq uier botón
ALARM OFF.
Dormir (Sleep)
Es fun ción de dormir pe rmitfigu rr el in talo de
tiempoan tes de que ladio se pag uomáticament
Durante el modo de adio FM, pulse el b otón SLEEP
repetidament
tiempo para que se apague la r
(Opc ion es: Desacti vad o 1 0, 2, 3 0, 4 0, 5 0, 6 0, 70,
80 y 90 minu
La radio se apagar
dicho interv
Presione l b oSLEEP p ara verificar el ti e mpo
reste a ntes de que la radio se apagu e.
Presione el botENCENDIDO para cancelar esta
función.
Reporter une alarme en c(Snooze)
Pour rep orer un e al arme q ui sonne, a ppuyz s ur le
boutoSNOO. Lal a rme son ne àeau au bout
de 9 minutes (les interlles de répétition / r épétition
sont de 9 minut
Ldicatr cespo ndanALARME 1 ou ALARME 2
(arm e trdition nlle o u alar me radio) c ligne à l’
pen dant la pério de de rpétiti o. Pour annl’intlle
dépétition, pp uz su r n’impoe qu el bouton ALARM
OFF.
Dormir (Sleep)
Cnction deill e s per mt d e défiir l’i nll e
demps at qu e la rdio s ’igne tiqu een t
En moddi o FM, appuyz plusieus fois su r la tuche
SLEEP pour séectio nr un i nll e de mps pendant
lequel la radio s’tio ns :
Arr êt, 10, 20, 30, 40, 50, 60 , 70, 80 et 90 minutes).
La radio s’
intervalle
Appuye z sur le bouton SLEEP pou r vér ifie r le t emps
restant avant l ’extin ction de la ra di o.
AppuyeALLUMÉ pour annuler c
fonction.
Listening t
1Press the PWER but ton t o swit ch on the radio.
2 Press the BARD or FORARD button to
adj ust the frequen cy
3 s and hold the BARD or FOR bu
to au toma tically tu n e t th e n et aailable FM stion.
4Pres thP .
Setting preset stations
You can store up to 10 p reset stati on
1 Tune in t o a sta tio
2. Pres and h o ld t he MEM/ but until P01 th e
next aispl a
3. Press th e BARD or FOR button
selec t a pr eset memor y n umber (P0 1-P10).
4. Ps the SE T button to confim. The p res et
station has b een s aved .
5. Press the MEM/M+ button edly while
listenin g to the ra dio t o selec t a pre set sta tion.
Alternati vel y p ress the MEM/M + button onc e and
then pres s the BAARD or FORARD button
selec t a pr ese t sta tion
RADIO FM
RADIO FM
Note:
F or b e s t r e sults, e x t e nd th e F M a nt e nn a full y .
Tge: FM 87.5-10 8 MHz
Number of p re set r adio sta tions: 10
Amplifier rat ed output powe r: 1.5W (RM S)
AC power a dap tor
Input: A C 10 0-240V, 50/60 Hz
Outp utUSB chagin g (DC 5V 2 A)
Adaptor Manuf
Dongguan Obeliev
Adaptor Model nu mber: OBL-050
Battery b aup: CR 2 032
SPECIFICA
INSTRUC
INSTRUCTIONS
Notes:
Cloc k displ ay with dimmer l ow is th e defau lt setting.
1
1
2
2
Configu rar e l sonido de la ala rma
Puede ele gir e ne la ala rma t radiciona l o laad io
como ala rma. Pulse y man ten p resion ado el
botón ALARMA 1 o ALARMA 2 hasta que aparezca
en l a p antll aConfigur ación de la ala rm ,
cotinu aci ó
a pulsar rápidamenton ces e l in dica dor d e
sonido de la alarma parpadeará; haga su selec
mediante las teclas ARÁS o AELAN TE.
Encender / apagar la pantalla
En el modo an dby, mante nga pre siona do el botón
DIMMER durant e 2 segun dos. Apa OFF en la
pan tall a y t ra s 10 se gundos, la pa nta lla se ap agará.
Presione cualq uer bo tó pa ra en cener la p antall a
durant ot r os 10 se gundos.
Para d esa cti var la funció n man ten p resiona do
nuevame nte el bot ón DIMME du ante o s 2
segundo s, has ta qu e en l a pan talla apaez cON .
Allumer / éteindre l’écr
En mode veille , m a intene z le bouDIMMER enfon
pen dan t 2 se cdes . OFF app ara ît à l’t ap
10 second es, l ’éc ran s ’ei nt.
Appuyez sur n’impo rte que l bo uton pour allum
l’éc ran pendant 10 se cos suppléme nt a
Pour désa cti ver la on ction , m aintez la tou che
DIMME enf oncé e pen dan t e e 2 secon des,
jusq u q uO app ase à l ’écran .
Commencer
Brz le codo n d ’alimentatio n s ur l a prise s e
Une fois connec, l ’écran d u réveil cligno tera e t
indiq ue l’heure 00 : .
Batterie de sec
La ra dio es t é quipée d’un de seur s et
compr (type: CR2032) déjà
installée. Pr que la ftio n, rti rimpleent la
band de plas tique visible l’ri e du compa rtime
à piles
E cas de coup ue de cou ran t, la radio basc ule
automa tiqu eme nt su r la sou rce d ’alime ntation de la
batteri e et main tie nt les régla ges de l’h orlo ge e t de
la min uteri e. Néanmoins, l’
Si la batterie doit êtr
dans le COMP et assure
que les côtés positif et négatif (+ ou -) de la ba
sont en contact av
compartiment.
Pour our le compar time nt à piles, u tilisen tournevis
poureti rer la vis du co cle du co mp artime nt.
Lors du r emplacemen t de l a bane d énc hez
pas le cdo n d’alime ntion, car ts les réglage s de
l’ho rloge et de l’ala rme sernt per
Ajuster l’horloge
AppuyeS pour régler le
réglage de l’horloge.
App uur lbo uon EN ARRIÈRE pour rgler l’ h
Appuye z sur le bouton VERS L’AV pour régler les
minut es.
Appuye z sur le bouton SE pour con firmer l’he
puis le s minu tes .
Display brightness
In s tan y mode , p re s theDIMME R button
change t he displa y b right s t o lo w o r high lev el.