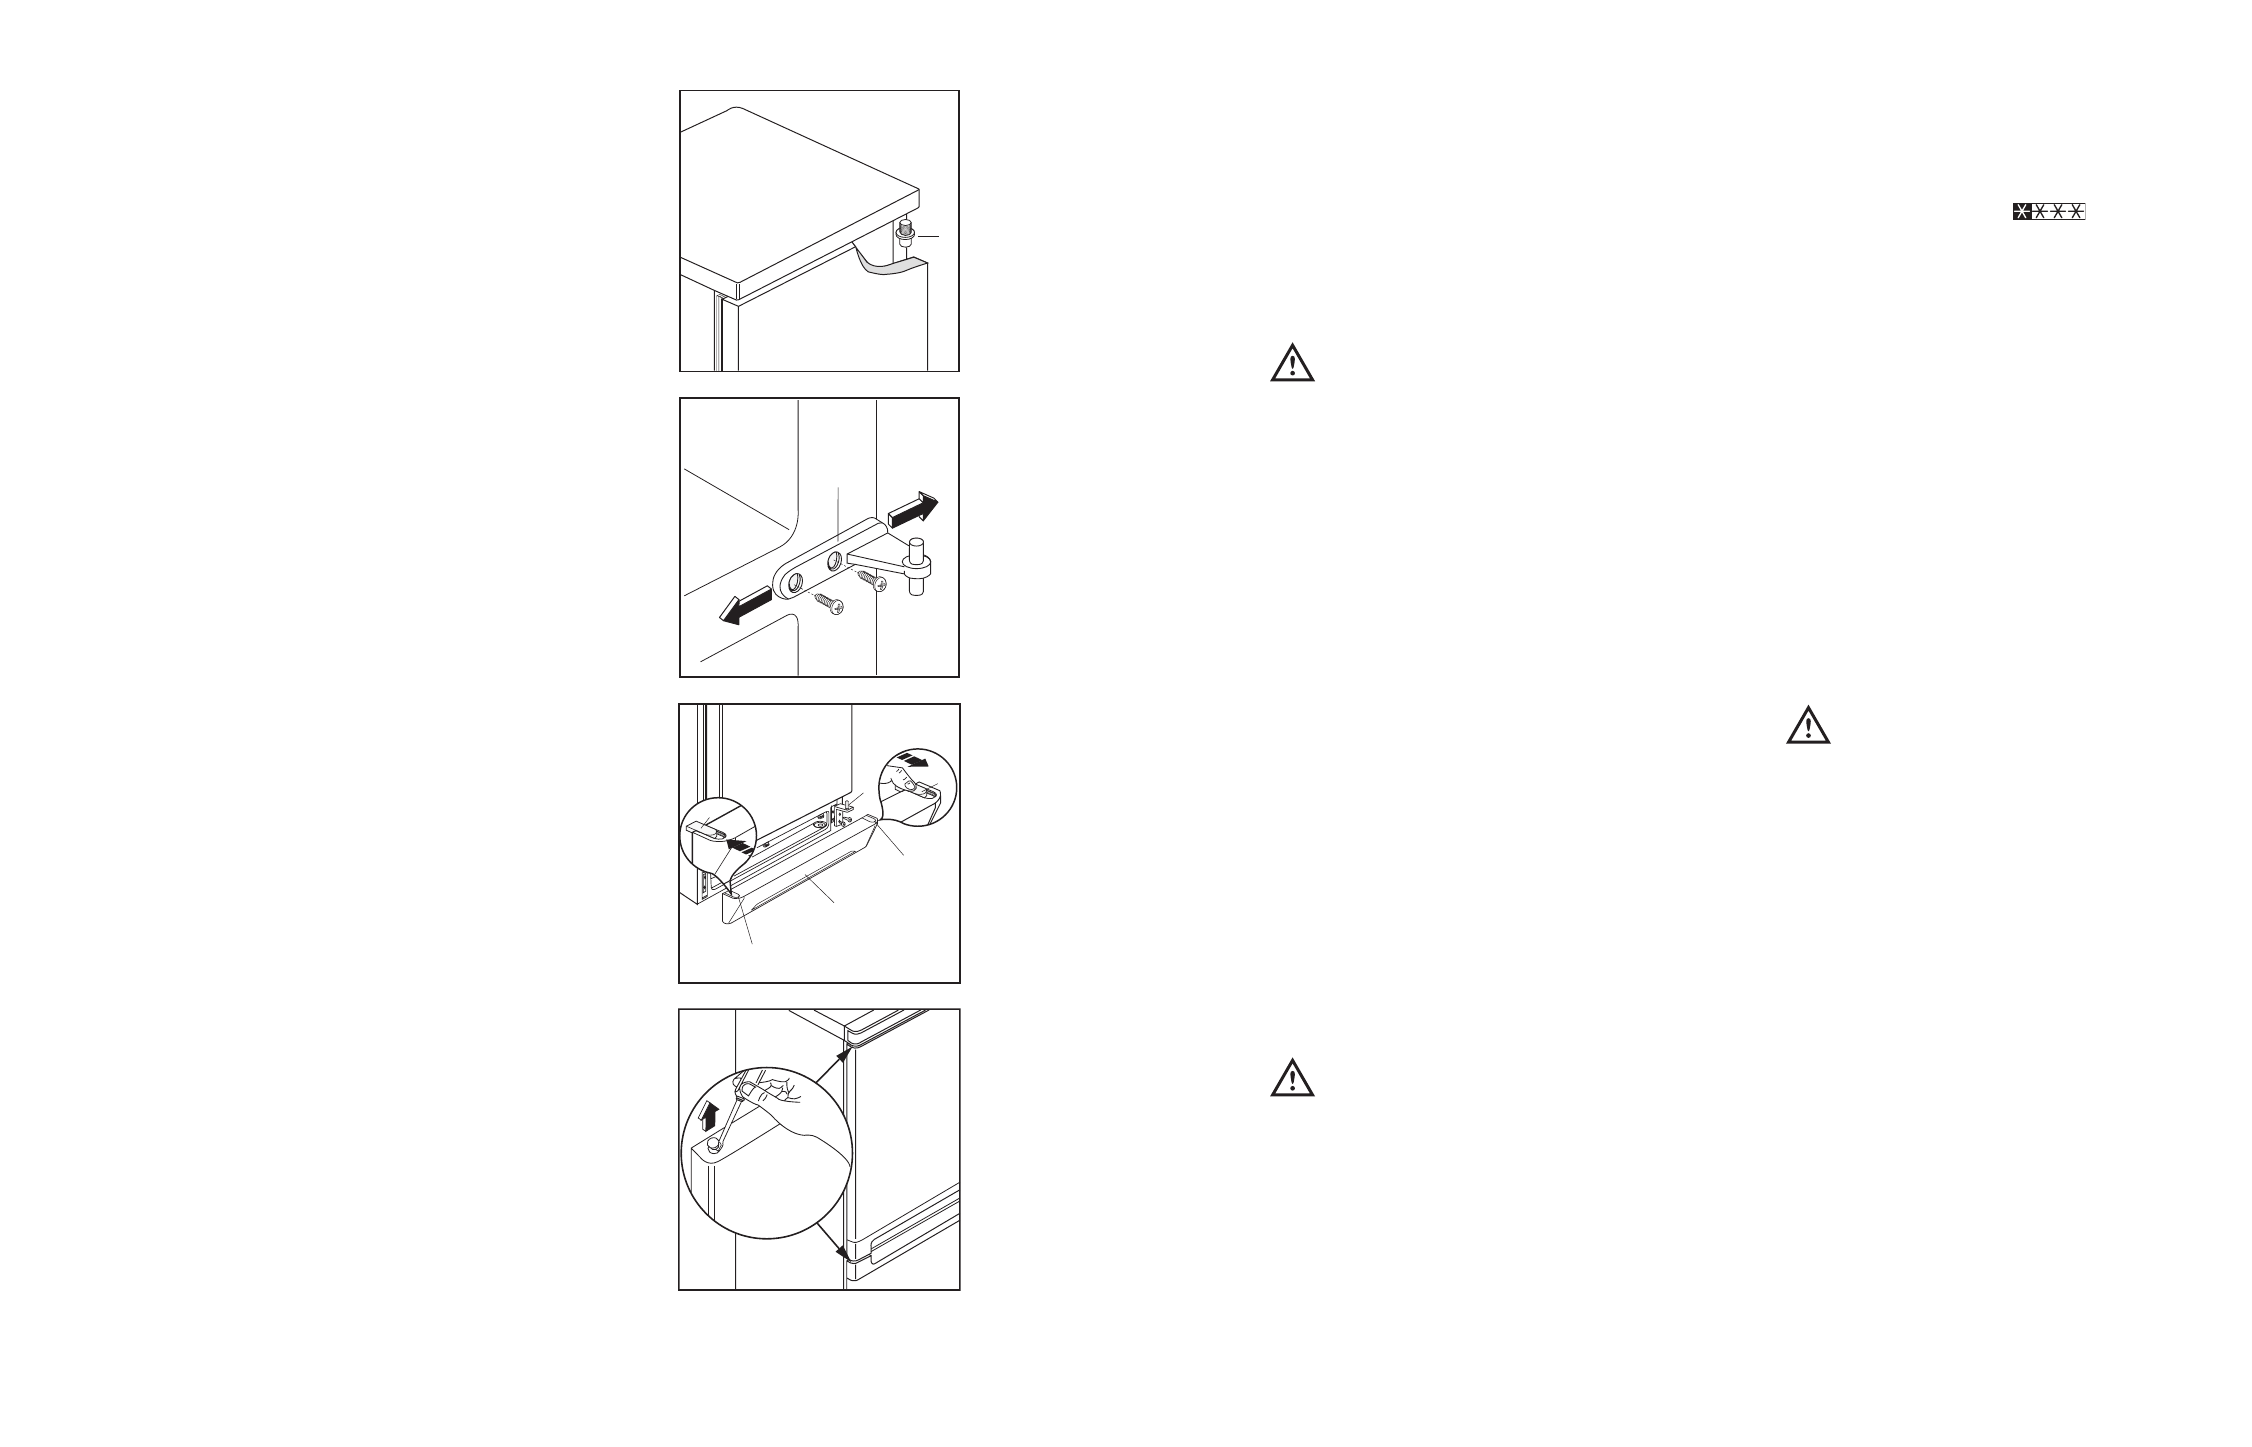
Het wijzigen van de deur-
draairichting
Neem vóór het wijzigen van de deurdraairichting
de stekker uit het stopcontact.
Ga nu verder als volgt te werk:
1. Ventilatierooster (D) verwijderen;
2. Verwijder het onderste scharnier (E).
3. Onderdeur verwijderen van het tussenscharnier
(H).
4. Verwijder het tussenscharnier (H).
5. Bovendeur van bovenscharnierpen (D) trekken.
6. Bovenste scharnierpen verwijderen en aan de
tegenovergestelde kant weer monteren, na de
dopjes verwijderd te hebben. Monteer de dopjes
nu aan de andere kant.
7. Bovendeur herplaatsen.
8. Tussenscharnier op de andere kant aanbrengen.
9. Onderdeur herplaatsen.
10.Plaats het onderste scharnier (E) weer aan de
andere kant.
11.Neem het kapje (F) uit het ventilatierooster (D)
door het in de richting van de pijl te duwen en
breng dit aan de andere kant aan.
12.Onderdeur herplaatsen.
13.Ventilatierooster (D) weer terugplaatsen.
Belangrijk:
Controleer na de richting van de deuren gewijzigd
te hebben, of alle schroeven goed vastgedraaid zit-
ten en of het deurrubber goed op de sponning sluit.
In een koud vertrek (in de winter) kan het gebeuren
dat dat niet het geval is. Na enkele dagen zal het
rubber zich echter aangepast hebben. Wilt u dat
bespoedigen, dan kunt u het rubber warm maken
met een föhn.
15
Cleaning the interior
Before using the appliance for the first time, wash
the interior and all internal accessories with luke-
warm water and some neutral soap so as to remove
the typical smell of a brand-new product, then dry
thoroughly.
Do not use detergents or abrasive pow-
ders, as these will damage the finish.
USE
Operation
Insert the power supply plug into the nearest wall
socket. Open the door and turn the thermostat
knob, clockwise, beyond the “O” (STOP) position.
To turn off the refrigerator, turn the thermostat knob
to the «O» position.
Temperature regulation
The temperature is automatically regulated and can
be increased to achieve a higher temperature
(warmer) by rotating the thermostat knob toward
lower settings or reduced (colder) rotating the knob
towards higher settings.
However, the exact setting should be chosen keep-
ing in mind that the temperature inside the refrigera-
tor depends on:
• room temperature;
• how often the door is opened;
• the quantity of food stored;
• location of appliance.
A medium setting is generally the most suitable.
Important
If the ambient temperature is high or the appli-
ance is fully loaded, and the appliance is set to
the lowest temperatures, it may run continuous-
ly causing frost to form on the rear wall. In this
case the dial must be set to a higher tempera-
ture to allow automatic defrosting and therefore
reduced energy consumption.
Fresh food refrigeration
To obtain the best performance:
• do not store warm food or evaporating liquids in
the refrigerator;
• do cover or wrap the food, particularly if it has a
strong flavour.
• Position food so that air can circulate freely
round it.
Freezing fresh food
The 4-star compartment is suitable for
long term storage of commercially frozen food, and
for freezing fresh food.
To freeze fresh foods it is not necessary to change
the setting of the thermostat knob.
However, for a quicker freezing operation, turn the
thermostat knob to the coldest setting; but remem-
ber tha, in this condition, the refrigertor compart-
ment temperature might drop brlow 0°C. If this
occurs reset thermostat knob to a warmer setting.
Place the food to be frozen on the shelf.
Storage of frozen food
When first starting-up or after a period out of use,
before putting the products in the compartment let
the appliance run at least two hours on the coldest
setting, then turn the thermostat knob to the normal
operating position.
Important
If there is a power failure when food is in the
freezer, do not open the door of the freezer com-
partment. The frozen food will not be affected if
the power cut is of short duration (up to 6-8
hours) and the freezer compartment is full, oth-
erwise, it is recommended that the food should
be used within a short time (a temperature
increase of the frozen food shortens its safe
storage period).
Ice-cube production
This appliance is equipped with one or more trays
for the production of ice-cubes. Fill these trays with
water, then put them in the freezer compartment.
Do not use metallic instruments to remove the
trays from the freezer.
Thawing
Deep-frozen or frozen food, prior to being used, can
be thawed in the refrigerator compartment or at
room temperature, depending on the time available
for this operation.
Small pieces may even be cooked still frozen,
directly from the freezer: in this case, cooking will
take longer.