The Yamaha YHT-298 Home Theater Package includes everything you need to add great sound
to your home theater. By following the steps in this Connection Guide, you’ll have your home
theater set up in no time and be enjoying music and movies like never before. Part A explains how
to connect the speakers and antennas. Part B explains how to connect various AV components.
See the relevant owner’s manuals for full instructions and precautions.
Caution: Disconnect all components from AC outlets before proceeding.
Part A: Speakers and Antennas
1
PHONES
SILENT
CINEMA
TONE
CONTROL
STRAIGHT
VOLUME
TV
BD
DVD
CD
RADIO
INPUT
PROGRAM
SCENE
INFO
MEMORY
PRESET
FMAM
TUNING
YPAO MIC
VIDEO
AUXUSB
VIDEO
iPod/iPhone5V 1A
AUDIO
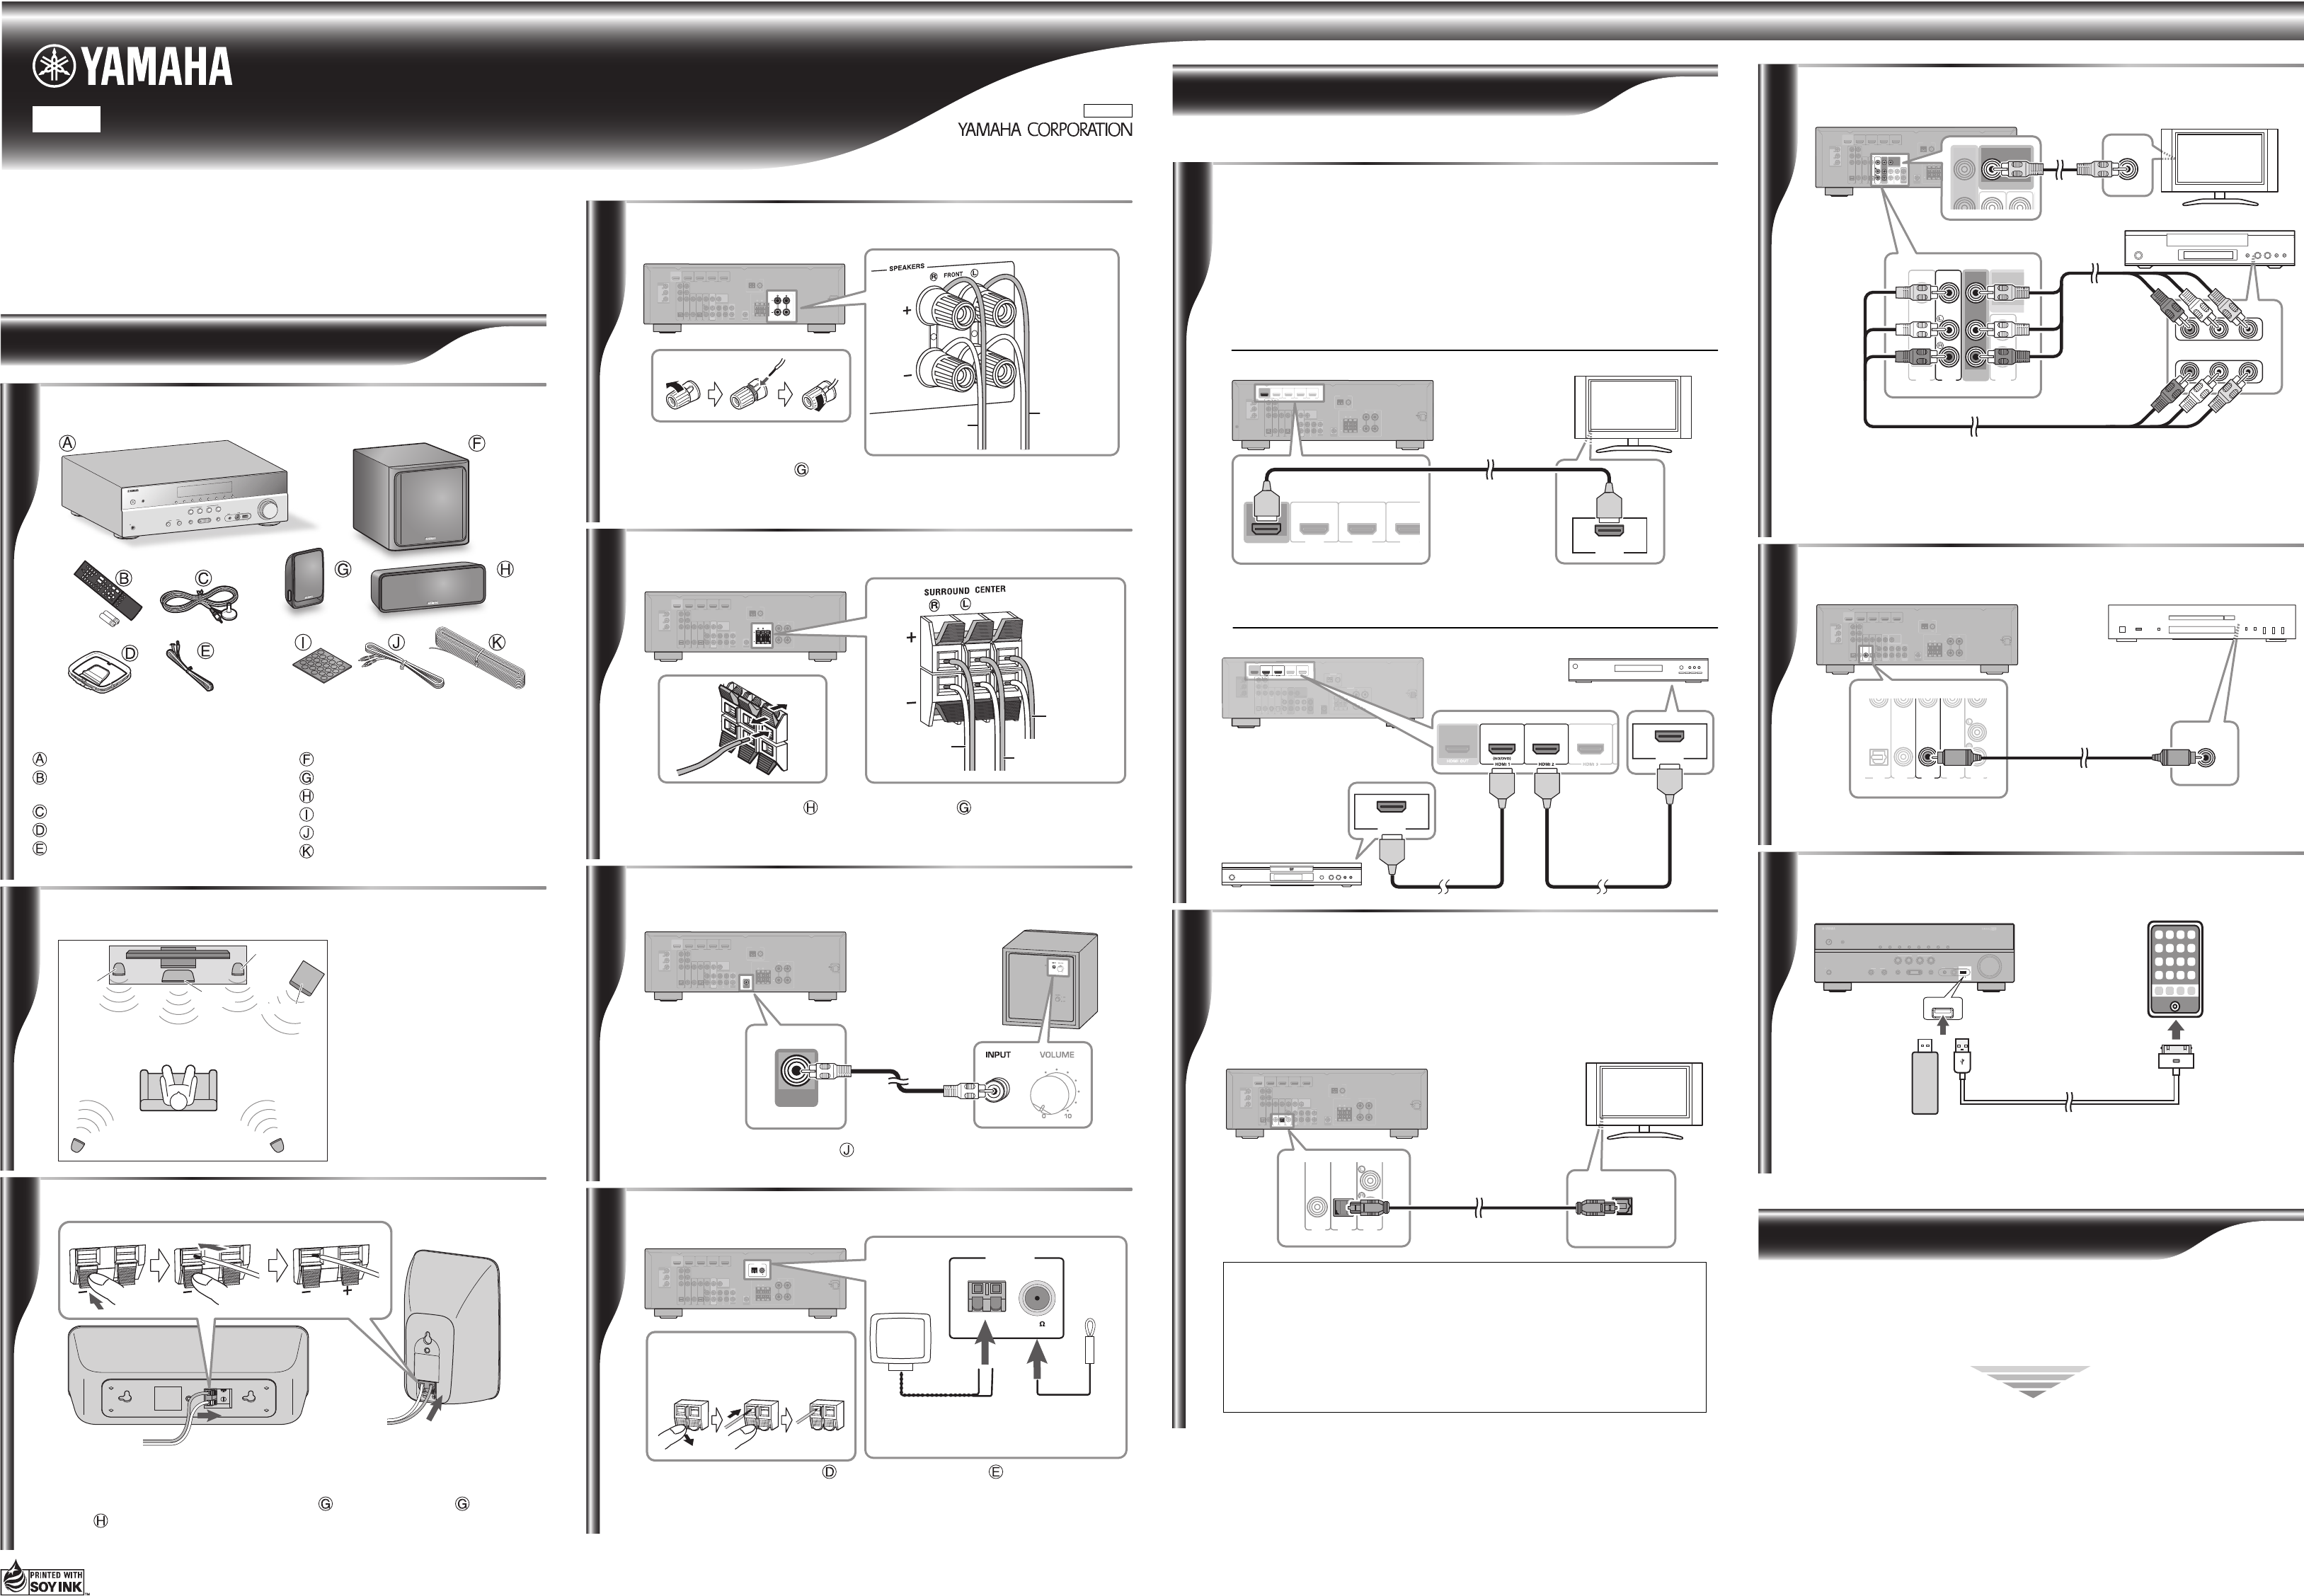
Unpack and check the package contents. The following items are necessary to complete this
Connection Guide. See the owner’s manuals for a complete list of supplied items.
AV Receiver (HTR-3065)
Remote control and two batteries
(AAA, R03, UM-4)
YPAO microphone
AM loop antenna
Indoor FM antenna (FM antenna type
depends on destination country.)
Subwoofer (NS-SW20)
Front/surround speaker (NS-B20)
Center speaker (NS-C20)
Non-skid pad
Subwoofer cable
Speaker cable
Checking the package contents
x 4
2
The four front and surround
speakers are identical, so it
doesn’t matter which one you use
in each position.
Position the speakers as shown.
See the owner’s manuals for more
information on installing the
speakers.
Positioning the speakers
Front
left
Front
right
Subwoofer
Surround
left
Surround
right
Center
3
•Cut the included speaker cable to suitable lengths for the front, center, and surround
speakers. You need to make five cables altogether. Remove about 10 mm (3/8 in.) of
insulation from the end of each cable, and then twist the bare strands tightly.
•Connect the speaker cables to the front speakers (), surround speakers (), and center
speaker (). Make sure you connect the speakers with the correct polarity—positive (+)
terminals to positive (+) terminals, and negative (
–
) terminals to negative (
–
) terminals.
Front, surround
speakers
Preparing the cables and speakers
Center speaker
COMPONENT
VIDEO
P
R
P
B
Y
OPTICAL
(
TV
)
AV 1
AV 2
AV 3
AV 4
AV 5
AUDIO 1
AUDIO 2
COAXIAL
(
CD
)
COAXIAL
OPTICAL
VIDEO
CENTER
SURROUND
HDMI 1
(
BD/DVD
)
HDMI 2HDMI 3
HDMI 4
FRONT
COMPONENT
VIDEO
MONITOR OUT
P
R
P
B
Y
HDMI
OUT
MONITOR OUT
AV
OUT
SUBWOOFER
AUDIO
OUT
SPEAKERS
ANTENNA
FM
AM
ARC
4
AV Receiver
Connect the front speaker () cables to the AV Receiver. Make sure you connect the
speakers with the correct polarity—positive (+) terminals to positive (+) terminals, and
negative (
–
) terminals to negative (
–
) terminals.
To front left
speaker
To front right
speaker
Connecting the front speakers
Connecting the center and surround speakers
COMPONENT
VIDEO
P
R
P
B
Y
OPTICAL
(
TV
)
AV 1
AV 2
AV 3
AV 4
AV 5
AUDIO 1
AUDIO 2
COAXIAL
(
CD
)
COAXIAL
OPTICAL
VIDEO
CENTER
HDMI 1
(
BD/DVD
)
HDMI 2HDMI 3
HDMI 4
FRONT
COMPONENT
VIDEO
MONITOR OUT
P
R
P
B
Y
HDMI
OUT
MONITOR OUT
AV
OUT
SUBWOOFER
AUDIO
OUT
SURROUND
SPEAKERS
ARC
22
33
11
ANTENNA
FM
AM
5
AV Receiver
Connect the center speaker () and surround speaker () cables to the AV Receiver.
Make sure you connect the speakers with the correct polarity—positive (+) terminals
to positive (+) terminals, and negative (–) terminals to negative (–) terminals.
To surround
right speaker
To center
speaker
To surround
left speaker
COMPONENT
VIDEO
P
R
P
B
Y
OPTICAL
(
TV
)
AV 1
AV 2
AV 3
AV 4
AV 5
AUDIO 1
AUDIO 2
COAXIAL
(
CD
)
COAXIAL
OPTICAL
VIDEO
CENTER
SURROUND
HDMI 1
(
BD/DVD
)
HDMI 2HDMI 3
HDMI 4
FRONT
COMPONENT
VIDEO
MONITOR OUT
P
R
P
B
Y
HDMI
OUT
MONITOR OUT
AV
OUT
SUBWOOFER
AUDIO
OUT
SPEAKERS
ANTENNA
FM
AM
ARC
SUBWOOFER
AV Receiver
6
Subwoofer
Use the included subwoofer cable () to connect the Subwoofer’s INPUT jack to the
AV Receiver’s SUBWOOFER jack.
Connecting the subwoofer
Subwoofer
cable
Connecting the antennas
ANTENNA
FM
AM
COMPONENT
VIDEO
P
R
P
B
Y
OPTICAL
(
TV
)
AV 1
AV 2
AV 3
AV 4
AV 5
AUDIO 1
AUDIO 2
COAXIAL
(
CD
)
COAXIAL
OPTICAL
VIDEO
CENTER
SURROUND
HDMI 1
(
BD/DVD
)
HDMI 2HDMI 3
HDMI 4
COMPONENT
VIDEO
MONITOR OUT
P
R
P
B
Y
MONITOR OUT
AV
OUT
SUBWOOFER
AUDIO
OUT
75
SPEAKERS
HDMI
OUT
ARC
FRONT
ANTENNA
FM
AM
75
7
AV Receiver
Connect the AM loop antenna () and indoor FM antenna () to the AV Receiver,
as shown. See the owner’s manuals for more information about connecting antennas.
Indoor FM
antenna
AM loop antena
Press and
holdInsertRelease
Connecting the AM loop antenna
Caution: Disconnect all components from AC outlets before proceeding.
Part B: AV Components
Connecting HDMI-capable components
COMPONENT
VIDEO
P
R
P
B
Y
OPTICAL
(
TV
)
AV 1
AV 2
AV 3
AV 4
AV 5
AUDIO 1
AUDIO 2
COAXIAL
(
CD
)
COAXIAL
OPTICAL
VIDEO
CENTER
SURROUND
HDMI 1
(
BD/DVD
)
HDMI 2HDMI 3
HDMI 4
FRONT
COMPONENT
VIDEO
MONITOR OUT
P
R
P
B
Y
HDMI
OUT
MONITOR OUT
AV
OUT
SUBWOOFER
AUDIO
OUT
SPEAKERS
ANTENNA
FM
AM
ARC
HDMI
IN
HDMI 1
(
BD/DVD
)
HDMI 2HDMI 3
HDMI
OUT
1
AV Receiver
TV
If your TV and BD/DVD players or recorders or satellite/cable set-top box have HDMI
jacks, you can connect them via the AV Receiver. Using HDMI cables (not included),
connect the AV Receiver’s HDMI OUT jack to an HDMI input on your TV, and
connect your BD/DVD players or recorders and satellite/cable set-top box to the AV
Receiver’s HDMI 1(BD/DVD) and HDMI 2 jacks, respectively, as shown.
See the owner’s manuals for more information about HDMI.
● Connecting your TV
● Connecting your BD/DVD players or recorders,
satellite/cable set-top box
COMPONENT
VIDEO
P
R
P
B
Y
OPTICAL
COAXIAL
CENTER
SURROUND
HDMI 4
FRONT
COMPONENT
VIDEO
MONITOR OUT
P
R
P
B
Y
HDMI
OUT
SPEAKERS
ANTENNA
FM
AM
ARC
COMPONENT
VIDEO
P
R
P
B
Y
OPTICAL
COAXIAL
CENTER
SURROUND
FRONT
COMPONENT
VIDEO
MONITOR OUT
P
R
P
B
Y
SPEAKERS
ANTENNA
FM
AM
HDMI
OUT
HDMI
OUT
AV Receiver
Satellite/cable set-top box
BD/DVD players or
recorders
COMPONENT
VIDEO
P
R
P
B
Y
OPTICAL
(
TV
)
AV 1
AV 2
AV 3
AV 4
AV 5
AUDIO 1
AUDIO 2
COAXIAL
(
CD
)
COAXIAL
OPTICAL
VIDEO
CENTER
SURROUND
HDMI 1
HDMI 2HDMI 3
HDMI 4
FRONT
COMPONENT
VIDEO
MONITOR OUT
P
R
P
B
Y
MONITOR OUT
AV
OUT
SUBWOOFER
AUDIO
OUT
(
BD/DVD
)
HDMI
OUT
SPEAKERS
ANTENNA
FM
AM
ARC
AUDIO OUTPUT
(
TV
)
(
CD
)
COAXIAL
OPTICAL
AV 4AV 3AV 5
OPTICAL
2
AV Receiver
TV
You can listen to TV audio through the AV Receiver and speakers by connecting an
audio output on your TV to an audio input on the AV Receiver with, for example, an
optical digital audio cable (not included), as shown.
To listen to TV audio, select the appropriate input source on the AV Receiver.
Connecting your TV for audio output
Your TV supports the Audio Return Channel function and HDMI Control
function
•If your TV supports ARC (Audio Return Channel), this connection is
unnecessary.
•The Audio Return Channel is required the setting of HDMI function of the AV
Receiver before use.
•For the connections and settings, refer to “Connection Method 1 (HDMI
Control/ARC-compatible TV)” (See HTR-3065 Owner's Manual).
•Connect the AV Receiver, Subwoofer, and your other AV components to suitable AC outlets.
•Turn on the AV Receiver first, then the Subwoofer and your other AV components.
•Install the batteries in the AV Receiver’s remote control.
•The optimum crossover frequency setting on the AV receiver is 150–160 Hz.
•See the relevant owner’s manuals for full operating instructions.
Time to enjoy your Yamaha Home Theater Package!
Now, relax and enjoy the great sound of your Yamaha Home Theater Package.
MONITOR OUT
COMPONENT
VIDEO
P
R
P
B
Y
OPTICAL
(
TV
)
AV 1
AV 2
AV 3
AV 4
AV 5
AUDIO 1
AUDIO 2
COAXIAL
(
CD
)
COAXIAL
OPTICAL
VIDEO
CENTER
SURROUND
HDMI 1
HDMI 2HDMI 3
HDMI 4
FRONT
COMPONENT
VIDEO
MONITOR OUT
P
R
P
B
Y
AV
OUT
SUBWOOFER
AUDIO
OUT
(
BD/DVD
)
HDMI
OUT
SPEAKERS
ANTENNA
FM
AM
ARC
VIDEO
AUDIO
R
R
L
L
VIDEO
IN
OUT
(
TV
)
AV 4
AV 5
AUDIO 1
OPTICAL
MONITOR O
AV
OUT
MONITOR OUT
3
AV Receiver
TV
Use a video pin cable (not included) to connect the AV Receiver’s MONITOR OUT
jack to a composite video input on your TV, as shown.
Use AV pin cables (not included) to connect your DVR (digital video recorder) or
VCR to the AV Receiver’s AV 5 and AV OUT jacks, as shown.
Connecting your DVR/VCR
DVR/VCR
Connecting your CD player
COMPONENT
VIDEO
P
R
P
B
Y
OPTICAL
(
TV
)
AV 1
AV 2
AV 3
AV 4
AV 5
AUDIO 1
AUDIO 2
COAXIAL
(
CD
)
COAXIAL
OPTICAL
VIDEO
CENTER
SURROUND
HDMI 1
HDMI 2HDMI 3
HDMI 4
FRONT
COMPONENT
VIDEO
MONITOR OUT
P
R
P
B
Y
MONITOR OUT
AV
OUT
SUBWOOFER
AUDIO
OUT
(
BD/DVD
)
HDMI
OUT
SPEAKERS
ANTENNA
FM
AM
ARC
(
TV
)
AV 4
OPTICAL
COMPONENT
VIDEO
Y
OPTICAL
AV 1
AV 2
AV 3
AV 5
COAXIAL
(
CD
)
COAXIAL
VIDEO
COAXIAL
4
AV ReceiverCD player
Use a digital coaxial cable (not included) to connect your CD player to the AV
Receiver’s AV 3 COAXIAL(CD) jack, as shown.
Connecting your USB storage device or iPod
5
AV Receiver
iPod
Connect a USB storage device or a USB cable supplied with the iPod to the AV Receiver's
USB jack (on the front panel), as shown.
YPAO MIC
INFO
MEMORY
PRESET
FMAM
TUNING
PHONES
SILENT
CINEMA
VIDEO
VOLUME
AUXUSB
TONE
CONTROL
STRAIGHT
TV
BD
DVD
CD
RADIO
INPUT
PROGRAM
SCENE
VIDEO
iPod/iPhone5V1A
AUDIO
USB
USB storage device
Almost Finished
Need help? Post your question in this forum.
Report abuse
Libble takes abuse of its services very seriously. We're committed to dealing with such abuse according to the laws in your country of residence. When you submit a report, we'll investigate it and take the appropriate action. We'll get back to you only if we require additional details or have more information to share.
Product:
Forumrules
To achieve meaningful questions, we apply the following rules:
First, read the manual;
Check if your question has been asked previously;
Try to ask your question as clearly as possible;
Did you already try to solve the problem? Please mention this;
Is your problem solved by a visitor then let him/her know in this forum;
To give a response to a question or answer, do not use this form but click on the button 'reply to this question';
Your question will be posted here and emailed to our subscribers. Therefore, avoid filling in personal details.
Register
Register getting emails for Yamaha YHT-298 at:
new questions and answers
new manuals
You will receive an email to register for one or both of the options.
Get your user manual by e-mail
Enter your email address to receive the manual of Yamaha YHT-298 in the language / languages: English as an attachment in your email.
The manual is 0,6 mb in size.
You will receive the manual in your email within minutes. If you have not received an email, then probably have entered the wrong email address or your mailbox is too full. In addition, it may be that your ISP may have a maximum size for emails to receive.
If you have not received an email with the manual within fifteen minutes, it may be that you have a entered a wrong email address or that your ISP has set a maximum size to receive email that is smaller than the size of the manual.
The email address you have provided is not correct.
Please check the email address and correct it.
Your question is posted on this page
Would you like to receive an email when new answers and questions are posted? Please enter your email address.