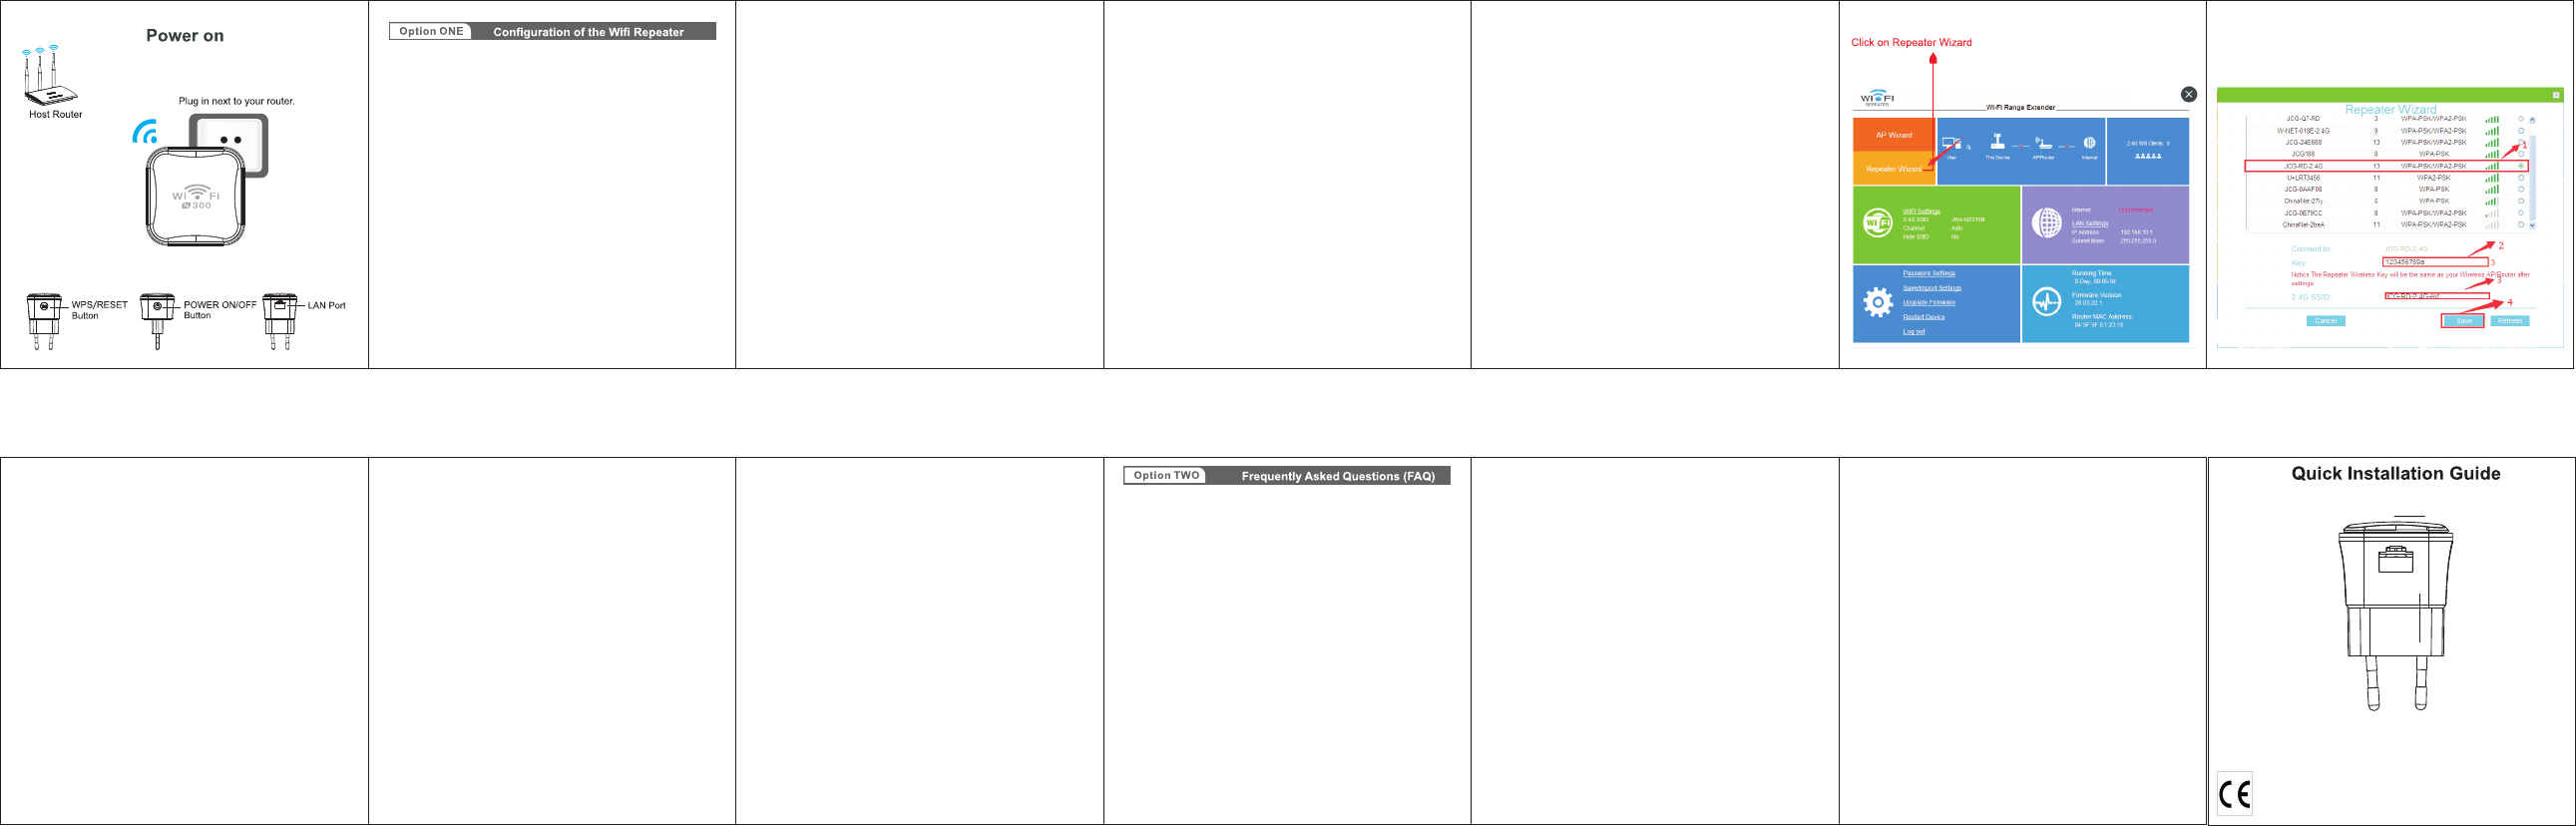
g. Select your network by clicking on the circle in
the column „Choose“ and enter your password
details
h. Click the “Save button(at the botton). The
settings are now being saved, that is why the
repeater will ask you to wait for 90 seconds.
Afterwards you can remove the internet cable,
and install the Wifi repeater at the selected
location.
Remarks: The default Wifi SSID for the repeater
after setup is existing wifi router SSID + -ext. For
example if existing wifi router has the SSID ABC,
the repeater will have the SSID ABC-ext after
setup. But you can also change the repeater
SSID before clicking Save.
3. Connect your laptop, mobile phone or tablet to
the Wifi repeater
a. You can now insert the Wifi repeater in the
selected power outlet. Once again, this will take
some time. Wait at least 2 minutes after
insertion.
b. Search for new Wifi connections from your
mobile device, e.g. laptop, phone or tablet.
Select the SSID with –ext at the end (example if
you existing router has the SSID ABC, select
ABC-ext).
c.The password will be same as your existing
router.
4. Connect an end device to the Wifi repeater
using WPS
a. End devices are e.g. PC, mobile phone, tablet
or IP camera. Activate WPS on the end device
according to the manual of the device.
b. Press the WPS button on the Wifi repeater for
less than 1 seconds.
c.The devices will now connect. After about 2
minutes, the connection works.
Q1: What should I do if my router does not have a
WPS buttons?
A: Please follow instructions on option two – to
set up using the browser.
Q2: How to Reset to defaults?
A: While the power is still on, keep pressing the
reset button on the behind side of the product
for 5 to 10 seconds, and it will restore to
factory settings.
Q3: Why cannot I see the login page after
entering http://192.168.10.1 in the browser?
A: Make sure your PC or phone is connected to
the extender network and has disconnected
from any other network. Also please make
sure your PC or phone is set to obtain an
IP address automatically.
Q4: My signal from the HWR 300 is weak
and keeps dropping off.
A: Please place the extender in a proper
location,i.e. where a minimum of 3 router
signal strength bar is shown (please check
the signal strength of that specific location
with your phone or PC)
Warranty
I
n case the products delivered are not free from
defects in material or workmanship, MAS Elektronik AG
has the right to either repair or replace the defective
product at its choice. MAS Elektronik AG manufactures
and repairs goods using components which are new or
equivalent to new in accordance with industry standards
and practice.
This limited warranty does not cover finishes,
accessories or batteries, nor does it cover damage
resulting from accident, misuse, abuse, dirt, water, battery
leakage, tampering, servicing performed or attempted by
unauthorized service agencies.
Wifi AP / Repeater
XORO HWR 300
warranty or repairs you need a RMA No. You may
obtain a RMA on the internet at www.xoro.de or
by telephone
Please send the device in its original packing material, all
standard accessories and a copy of the invoice, a
description of defect and the RMA No. to following
address. Please note the RMA number clear and in large
numbers on the outer package
.
MAS Elektronik AG
Weidegrund 3
21614 Buxtehude
Germany
Support
e-mail: support@ersservice.de
Hotline: +49 4161 800 24 24
Fax: +49 4161 800 24 61
2. Connect the Wifi repeater to your existing
router without WPS button
a. Plug the Wifi repeater into a power outlet near
your existing router (not too far away from your
router) and wait about 30 seconds for the
repeater to start up.
b. open the WLAN setting of your mobile devices,
select SSID HWR 300.
c. Enter 12345678 as the password and confirm
with the Connect button. Now you are
connected to the HWR 300 by WLAN.
d. Enter 192.168.10.1 in your web browser ( do
not use Google, enter it in the URL bar).
e. Enter „admin“ in the name and password field.
f. The following screen will appear. Click on
“Repeater Wizard”.
g. See the next steps at the 2nd. page
With the CE mark declares the MAS Elektronik AG that the
XORO HWR 300 meets the guidelines 2014/53/EU.
The full text of the EU Declaration of Conformity is available
under the http://www.xoro.de/downloads/ available
Need help? Post your question in this forum.
Report abuse
Libble takes abuse of its services very seriously. We're committed to dealing with such abuse according to the laws in your country of residence. When you submit a report, we'll investigate it and take the appropriate action. We'll get back to you only if we require additional details or have more information to share.
Product:
Forumrules
To achieve meaningful questions, we apply the following rules:
First, read the manual;
Check if your question has been asked previously;
Try to ask your question as clearly as possible;
Did you already try to solve the problem? Please mention this;
Is your problem solved by a visitor then let him/her know in this forum;
To give a response to a question or answer, do not use this form but click on the button 'reply to this question';
Your question will be posted here and emailed to our subscribers. Therefore, avoid filling in personal details.
Register
Register getting emails for Xoro HWR 300 at:
new questions and answers
new manuals
You will receive an email to register for one or both of the options.
Get your user manual by e-mail
Enter your email address to receive the manual of Xoro HWR 300 in the language / languages: English as an attachment in your email.
The manual is 1,22 mb in size.
You will receive the manual in your email within minutes. If you have not received an email, then probably have entered the wrong email address or your mailbox is too full. In addition, it may be that your ISP may have a maximum size for emails to receive.
If you have not received an email with the manual within fifteen minutes, it may be that you have a entered a wrong email address or that your ISP has set a maximum size to receive email that is smaller than the size of the manual.
The email address you have provided is not correct.
Please check the email address and correct it.
Your question is posted on this page
Would you like to receive an email when new answers and questions are posted? Please enter your email address.