75965
11
Zoom out
Zoom in
Previous page
1/13
Next page
14
5.
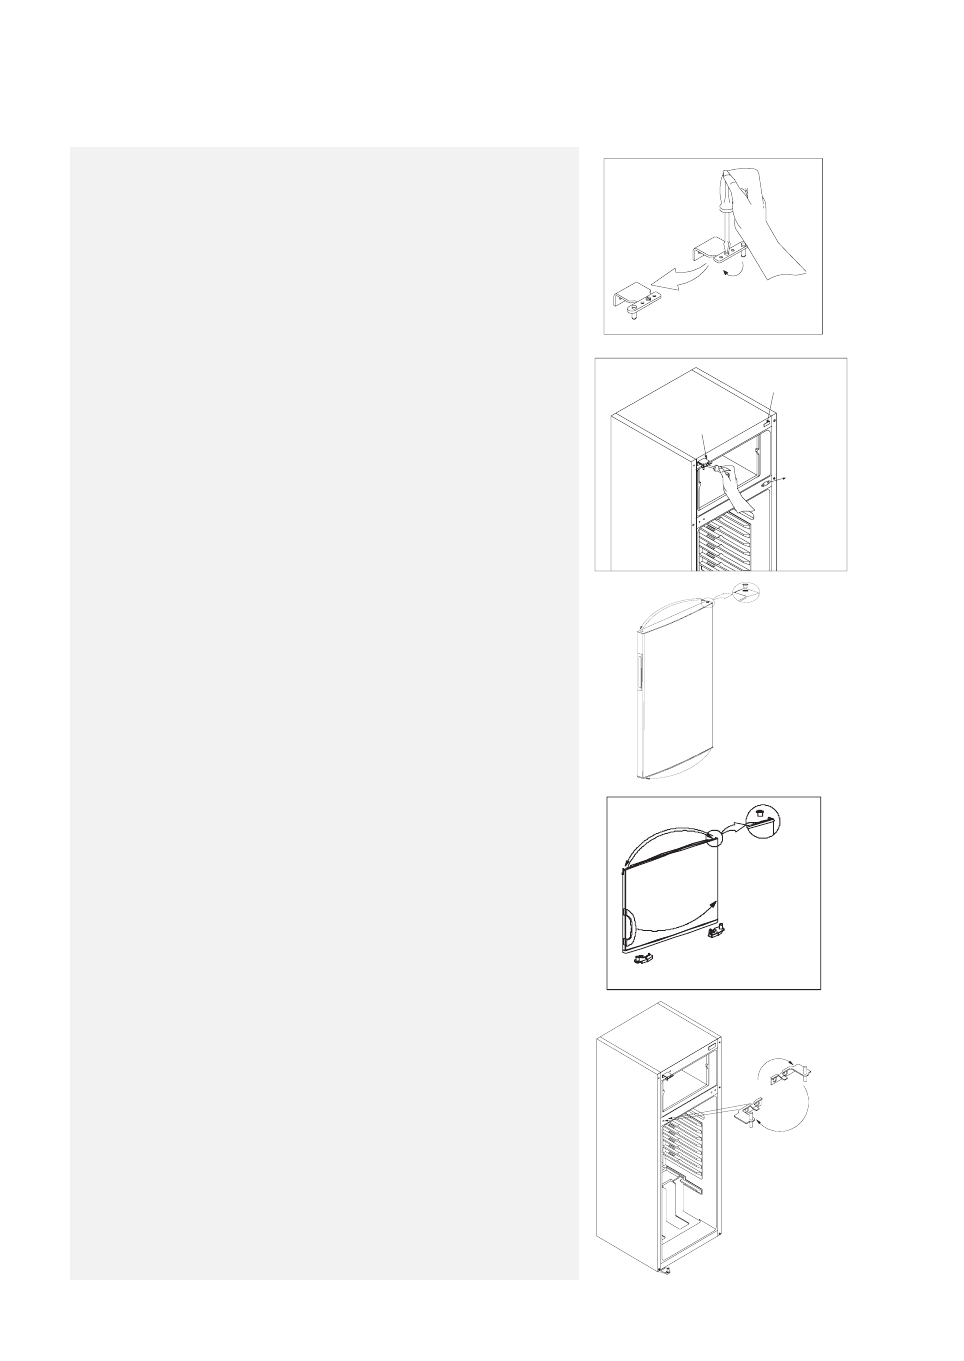
Die Schraube des Zapfens des oberen Scharniers lockern. Den
Zapfen um 180° drehen und die Schraube wieder festziehen
(Abb. 6).
6.
Das obere Scharnier auf der linken Seite montieren (Abb. 7).
Die obere und mittlere Bohrung auf der rechten Seite mit den
Stopfen verschließen. Den Stopfen des Mittelscharniers auf die
linke Seite ummontieren. (Es können die zusammen mit dem
Bedienhandbuch gelieferten Stopfen verwendet werden).
7.
Die obere Hülse samt Stopfen wieder einsetzen (Abb. 8) (Es
kann der zusammen mit dem Bedienhandbuch gelieferte neue
Stopfen für Hülsen verwendet werden). Die untere Hülse
entfernen und auf die linke Seite ummontieren (Abb. 8).
8.
Die obere Hülse entfernen und auf der linken Seite einsetzen
(Abb. 9).Die Schraube der Gefrierraumtürhalterung auf der
rechten Seite und die Halterung entfernen. Die linke Halterung
auf der linken Seite montieren (Abb. 9). (Es kann die zusammen
mit dem Bedienhandbuch gelieferte Halterung für die
Gefrierraumtür (links) verwendet werden).
9.
Das Mittelscharnier um 180° drehen. Die Türen des Kühl- und
Gefrierraums zusammen mit dem Mittelscharnier montieren
(Schritt 2 in umgekehrter Reihenfolge). Das Mittelscharnier in
Position bringen und die Schrauben festziehen (Abb. 10).
Zuletzt die oberen Stopfen der Gefrierraumtür einsetzen.
Abb. 8
Abb. 9
Abb. 10
Abb. 6
Den Zapfen des oberen
Scharniers um 180° drehen
Den Stopfen des
(gren)
Mittelscharniers
einsetzen
Den rechten
Stopfen des
Mittelscharniers
einsetzen
Die zwei
Stopfen des
(gren)
Mittelscharni
ers hier
einsetzen
Abb. 7
Das Mittelscharnier
um 180° drehen
63602013D.fm Page 14 Wednesday, August 2, 2006 5:48 PM
11


Need help? Post your question in this forum.

Forumrules


Report abuse

Libble takes abuse of its services very seriously. We're committed to dealing with such abuse according to the laws in your country of residence. When you submit a report, we'll investigate it and take the appropriate action. We'll get back to you only if we require additional details or have more information to share.

Product:

For example, Anti-Semitic content, racist content, or material that could result in a violent physical act.

For example, a credit card number, a personal identification number, or an unlisted home address. Note that email addresses and full names are not considered private information.

Forumrules

To achieve meaningful questions, we apply the following rules:

Register

Register getting emails for Whirlpool ARC 2283 at:


You will receive an email to register for one or both of the options.


Get your user manual by e-mail

Enter your email address to receive the manual of Whirlpool ARC 2283 in the language / languages: German as an attachment in your email.

The manual is 6 mb in size.


You will receive the manual in your email within minutes. If you have not received an email, then probably have entered the wrong email address or your mailbox is too full. In addition, it may be that your ISP may have a maximum size for emails to receive.

Others manual(s) of Whirlpool ARC 2283

Whirlpool ARC 2283 User Manual - Dutch - 13 pages


The manual is sent by email. Check your email

If you have not received an email with the manual within fifteen minutes, it may be that you have a entered a wrong email address or that your ISP has set a maximum size to receive email that is smaller than the size of the manual.

The email address you have provided is not correct.

Please check the email address and correct it.

Your question is posted on this page

Would you like to receive an email when new answers and questions are posted? Please enter your email address.


Info