Glansspoelmiddelindicator op het bedieningspaneelGlansspoelmiddelindicator op de dispenser
Het controlelampje gaat branden als er
GLANSSPOELMIDDEL MOET WORDEN BIJGEVULD.
donker: OK.helder: MOET WORDEN BIJGEVULD
Gebruik uitsluitend glansspoelmiddel voor afwasmachines. Verwijder gemorst glansspoelmiddel onmiddellijk. Op die manier voorkomt u overmatige schuimvorming, wat een storing kan veroorzaken in het
apparaat.
Als er strepen op het serviesgoed zitten: stel de dosering in op een lagere stand (1-3). Als het serviesgoed niet helemaal droog is: stel de dosering in op een hogere stand (5-6).
Plastic borden drogen moeilijker en een hogere instelling van het glansspoelmiddel lost dit niet op.
Afwasmiddelen met glansspoelmiddel kunnen alleen effect hebben als er langere programma’s worden gebruikt. Bij korte programma’s kunnen er restanten afwasmiddel achterblijven (gebruik eventueel
afwasmiddel in poedervorm). Afwasmiddelen met glansspoelmiddel vormen veel schuim.
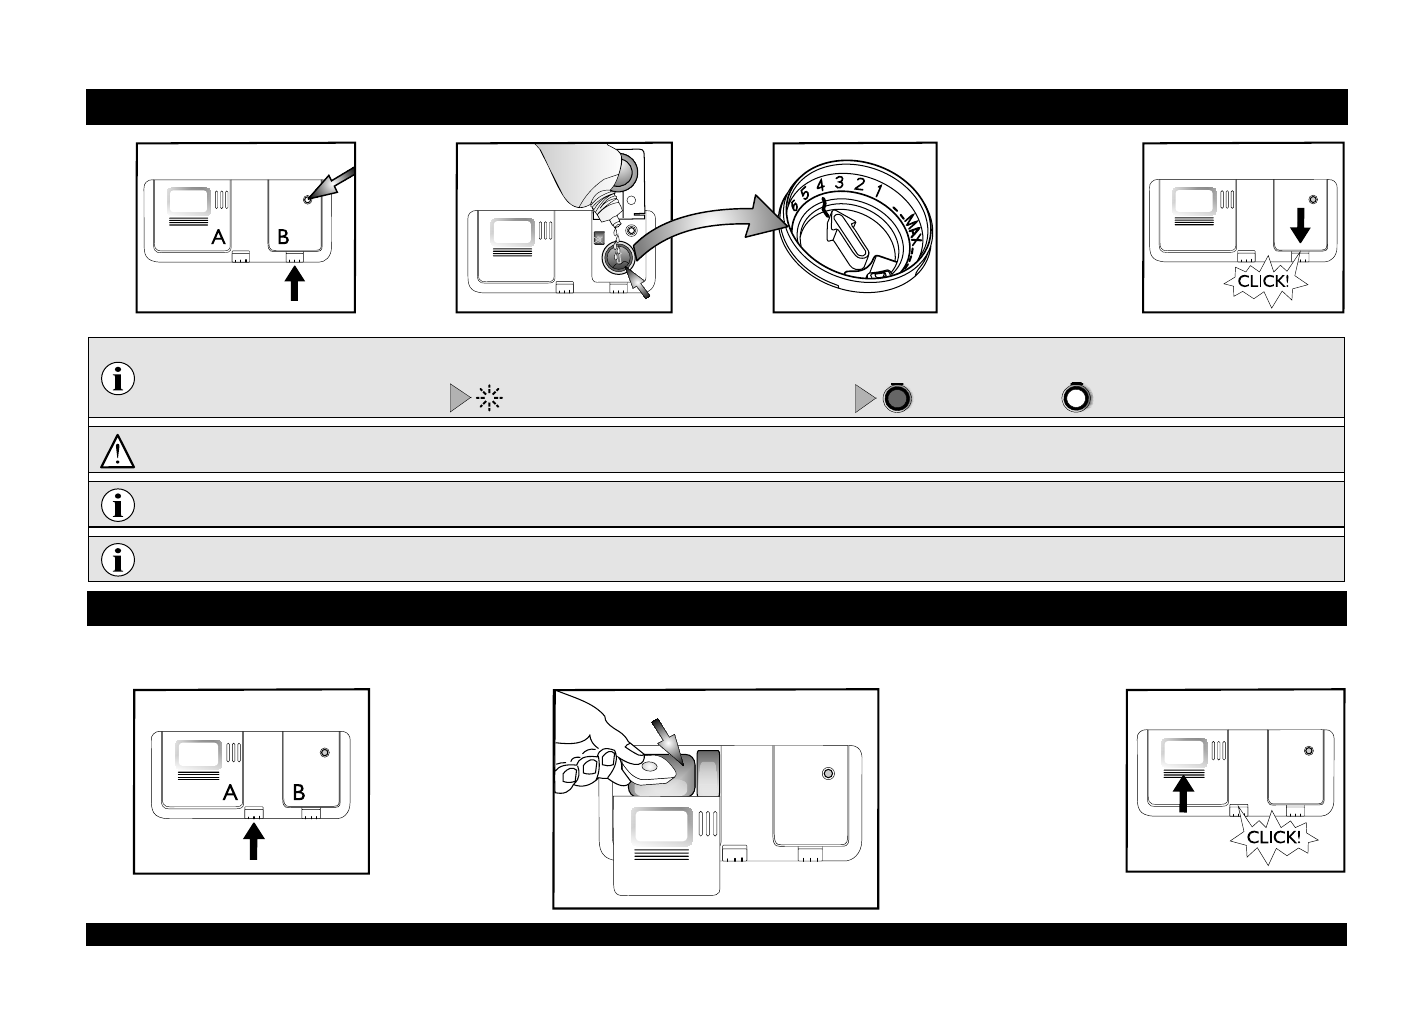
Dagelijks gebruik
Afwasmiddel toevoegen -
Gebruik alleen speciaal afwasmiddel voor afwasmachines in overeenstemming met de aanbevelingen van de fabrikant
Open het deksel A (druk op de
daarvoor bedoelde knop).
Vul het doseerbakje van
het afwasmiddel pas
vlak voordat u een
afwasprogramma start.
Sluit het deksel
door op de ribbels te drukken.
Vullen met afwasmiddel: tablet / poeder / vloeistof
in het grote bakje
Gebruik slechts één tablet voor één
cyclus, in het afwasmiddelbakje.
Alle soorten tabletten kunnen worden
gebruikt, maar bij het type 2 in 1 moet
er zout worden toegevoegd.
Open indien
nodig deksel
B (druk op de
daarvoor
bedoelde
knop).
Voeg
glans-
spoelmiddel
toe tot max.
het streepje
~150 ml
De dosering van het glansspoelmiddel
kan worden aangepast aan het
gebruikte afwasmiddel. Hoe lager de
instelling, hoe minder
glansspoelmiddel er wordt gebruikt
(fabrieksinstelling: stand 4).
Druk op de knop om het deksel B
te openen. Draai de pijl met behulp
van een munt of iets dergelijks op de
gewenste instelling. Sluit het deksel
nadat u de instelling heeft aangepast.
Visuele
indicator
2
Glansspoelmiddel toevoegen
(niet nodig als u tabletten gebruikt). De hoeveelheid glansspoelmiddel instellen
Libble takes abuse of its services very seriously. We're committed to dealing with such abuse according to the laws in your country of residence. When you submit a report, we'll investigate it and take the appropriate action. We'll get back to you only if we require additional details or have more information to share.
Product:
Forumrules
To achieve meaningful questions, we apply the following rules:
First, read the manual;
Check if your question has been asked previously;
Try to ask your question as clearly as possible;
Did you already try to solve the problem? Please mention this;
Is your problem solved by a visitor then let him/her know in this forum;
To give a response to a question or answer, do not use this form but click on the button 'reply to this question';
Your question will be posted here and emailed to our subscribers. Therefore, avoid filling in personal details.
Register
Register getting emails for Whirlpool ADG 9500 at:
new questions and answers
new manuals
You will receive an email to register for one or both of the options.
Get your user manual by e-mail
Enter your email address to receive the manual of Whirlpool ADG 9500 in the language / languages: Dutch as an attachment in your email.
The manual is 4,27 mb in size.
You will receive the manual in your email within minutes. If you have not received an email, then probably have entered the wrong email address or your mailbox is too full. In addition, it may be that your ISP may have a maximum size for emails to receive.
If you have not received an email with the manual within fifteen minutes, it may be that you have a entered a wrong email address or that your ISP has set a maximum size to receive email that is smaller than the size of the manual.
The email address you have provided is not correct.
Please check the email address and correct it.
Your question is posted on this page
Would you like to receive an email when new answers and questions are posted? Please enter your email address.