After unpacking the product, check for any damage during transport. In case of problems, contact the dealer or the After-Sales Service.
PREPARING THE CABINET FOR FITTING
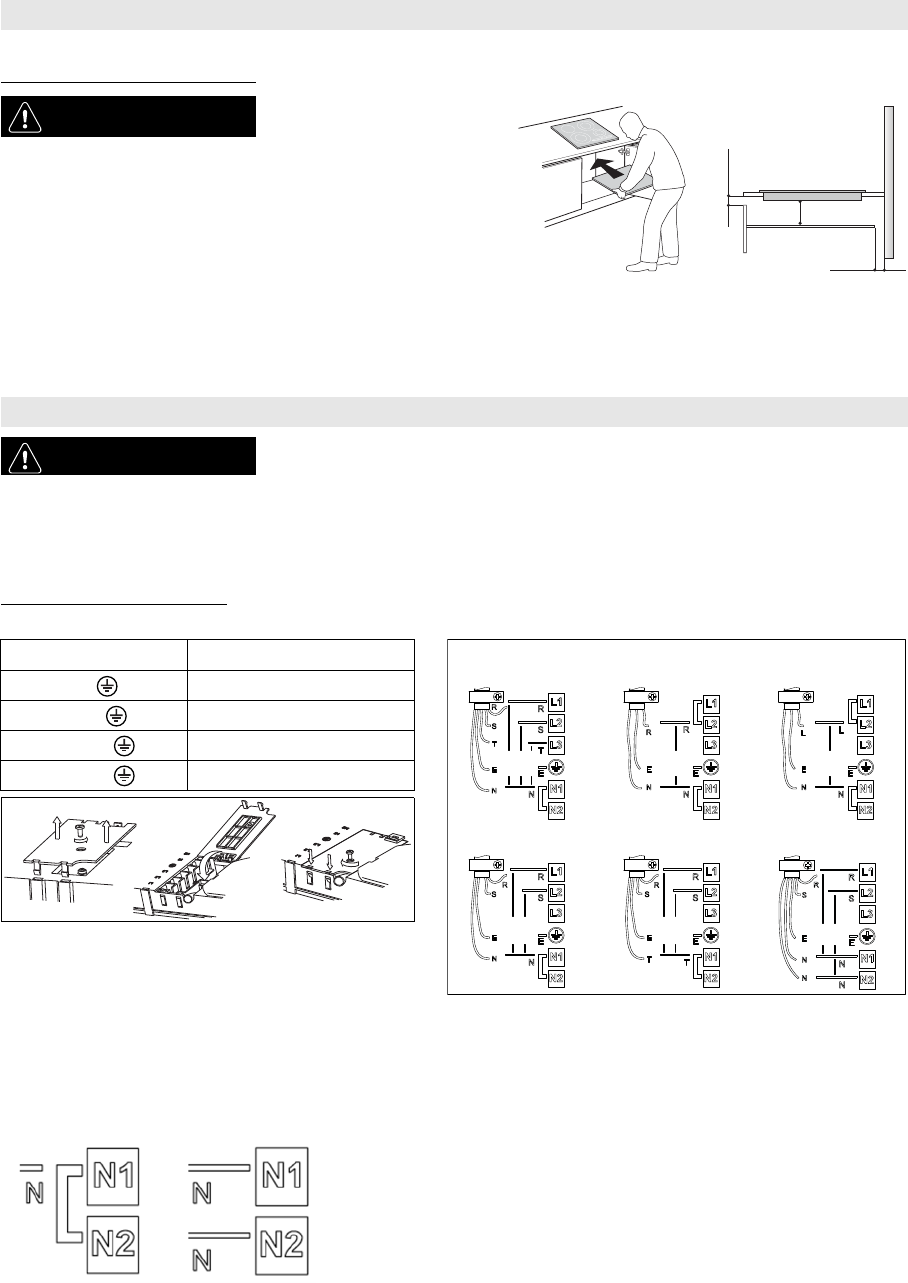
Connection to the terminal block
For the electrical connection, use an H05RR-F cable as specified in the table below.
INSTALLATION
WARNING
-Install a separator panel under
the hob.
-The lower part of the product
must not be accessible after
installation.
-In case of installation of an
undertop oven, do not interpose
the separator panel.
•The distance between the underside of the appliance and the separator panel must respect the dimensions given in the figure.
•In order to ensure the correct operation of the product, do not obstruct the minimum required clearance between the hob and the top of the unit (min. 5 mm).
•If an oven is installed beneath the hob, make sure the oven is equipped with a cooling system.
•Do not install the hob above a dishwasher or washing-machine, so that the electronic circuits do not come into contact with steam or moisture which could damage them.
•To remove the hob from the worktop use a screw driver (not supplied) unlocking the springs from the bottom side of the appliance.
ELECTRICAL CONNECTION
WARNING
-Disconnect the appliance from the power supply.
-Installation must be carried out by qualified personnel who know the current safety and
installation regulations.
-The manufacturer declines all liability for injury to persons or animals and for damage to property resulting from failure to observe the
regulations provided in this chapter.
-The power cable must be long enough to allow the hob to be removed from the worktop.
-Make sure the voltage specified on the dataplate located on the bottom of the appliance is the same as that of the home.
WiresNumber x size
220-240V ~ +
3 x 4 mm
2
220-240V 3 ~ +
4 x 1.5 mm
2
380-415V 3N ~ +
5 x 1.5 mm
2
380-415V 2N ~ +
4 x 1.5 mm
2
Important:
- Based on the wiring diagram (see figure) either keep or remove the metal
jumpers between the screws on the terminal block L1-L2 and N1-N2.
- Make sure all six screws on the terminal block are tightened after connecting the cables.
-Example of jumper present (left) or removed (right). See the wiring diagram
for details (the jumpers can be between L1-L2 and between N1-N2).
min 5 mm
min 20 mm
min 5 mm
230 V
230 V
230 V
230 V
230 V
230 V
230 V
230 V
230 V
230 V
230 V
380-415 V 3N ~220-240 V ~220-240 V ~ (AU and UK)
380-415 V 2N ~
220-240 V 3 ~ (Belgium only)380-415 V 2N ~ (Holland only)
CBA
400010780191.book Page 3 Thursday, March 12, 2015 11:39 AM
Libble takes abuse of its services very seriously. We're committed to dealing with such abuse according to the laws in your country of residence. When you submit a report, we'll investigate it and take the appropriate action. We'll get back to you only if we require additional details or have more information to share.
Product:
Forumrules
To achieve meaningful questions, we apply the following rules:
First, read the manual;
Check if your question has been asked previously;
Try to ask your question as clearly as possible;
Did you already try to solve the problem? Please mention this;
Is your problem solved by a visitor then let him/her know in this forum;
To give a response to a question or answer, do not use this form but click on the button 'reply to this question';
Your question will be posted here and emailed to our subscribers. Therefore, avoid filling in personal details.
Register
Register getting emails for Whirlpool acm 712 ix at:
new questions and answers
new manuals
You will receive an email to register for one or both of the options.
Get your user manual by e-mail
Enter your email address to receive the manual of Whirlpool acm 712 ix in the language / languages: English as an attachment in your email.
The manual is 1,27 mb in size.
You will receive the manual in your email within minutes. If you have not received an email, then probably have entered the wrong email address or your mailbox is too full. In addition, it may be that your ISP may have a maximum size for emails to receive.
If you have not received an email with the manual within fifteen minutes, it may be that you have a entered a wrong email address or that your ISP has set a maximum size to receive email that is smaller than the size of the manual.
The email address you have provided is not correct.
Please check the email address and correct it.
Your question is posted on this page
Would you like to receive an email when new answers and questions are posted? Please enter your email address.