BT-DPRF-02
IMPORTANT!
Before starti work the i shou carefully read this
Installation
contained therein are understood a
-
by
training are only allowed to handle the product under t
supervision of a e fi S to observation of
the
the equipment as provided by l
-
be observed when working with the controller. Any other
application shall not comply with the regulations. T
manufacturer i
the control. Any modi
for safety reasons.
The maintenance may be performed by servi shops
approved by the manufacturer o
- depe model
equipment. This i l is part of the prod a
has to be obtained.
APPLICATION
-
control and ma all type of Electrical heating system or
materials.
- The controllers have been designed for use in residential
rooms and industrial
Verify that the installation complies with existing regulations
before operation to ensure proper
Please find the W
documentation on: http://ww
Table des matières
1 Presentation
1.1 Keyboard
1.2 LED & Display
2 First installation
2.1 Batteries installati
2.2 Time and Date adjustment
2.3 RF installation
2.4 Starting
3 Working mode definiti
3.1 Manual mode Comfort
3.2 Manual mode ECO
3.3 OFF mode
3.4 Automatic mode
3.5 Program mode
3.6 Holiday mode
3.7 Timer mode
3.8 Reversible mode
4 Special functions
4.1 Key lock
4.2 Open window function
4.3 Humidity measurement (*)
4.4 Visualization
5 Parameter's menu
6 Technical characteristi
7 Troubleshooting & Solution
8 Advanced Installer's parameter me
1. Presentation
Electronic
designed to control di
It will
and increase your comfort.
- Modern design with soft touc
- Wireless Bidirectional comm
- “Easy program creation” functi
- Weekly programmabl
- Temporary override functio
- Holiday or Reception functio
- EEPROM nonvolatil
- 2 AAA batteries
- 2 parameter menus (User and I
- Humidity measurement (*)
In option
External sensor with several possibili regulati (Fl
combined…)
1.1. Keyboard
Left Navigation key (◄)
Right navigation key (►)
Escape key ( )
Edition key ( )
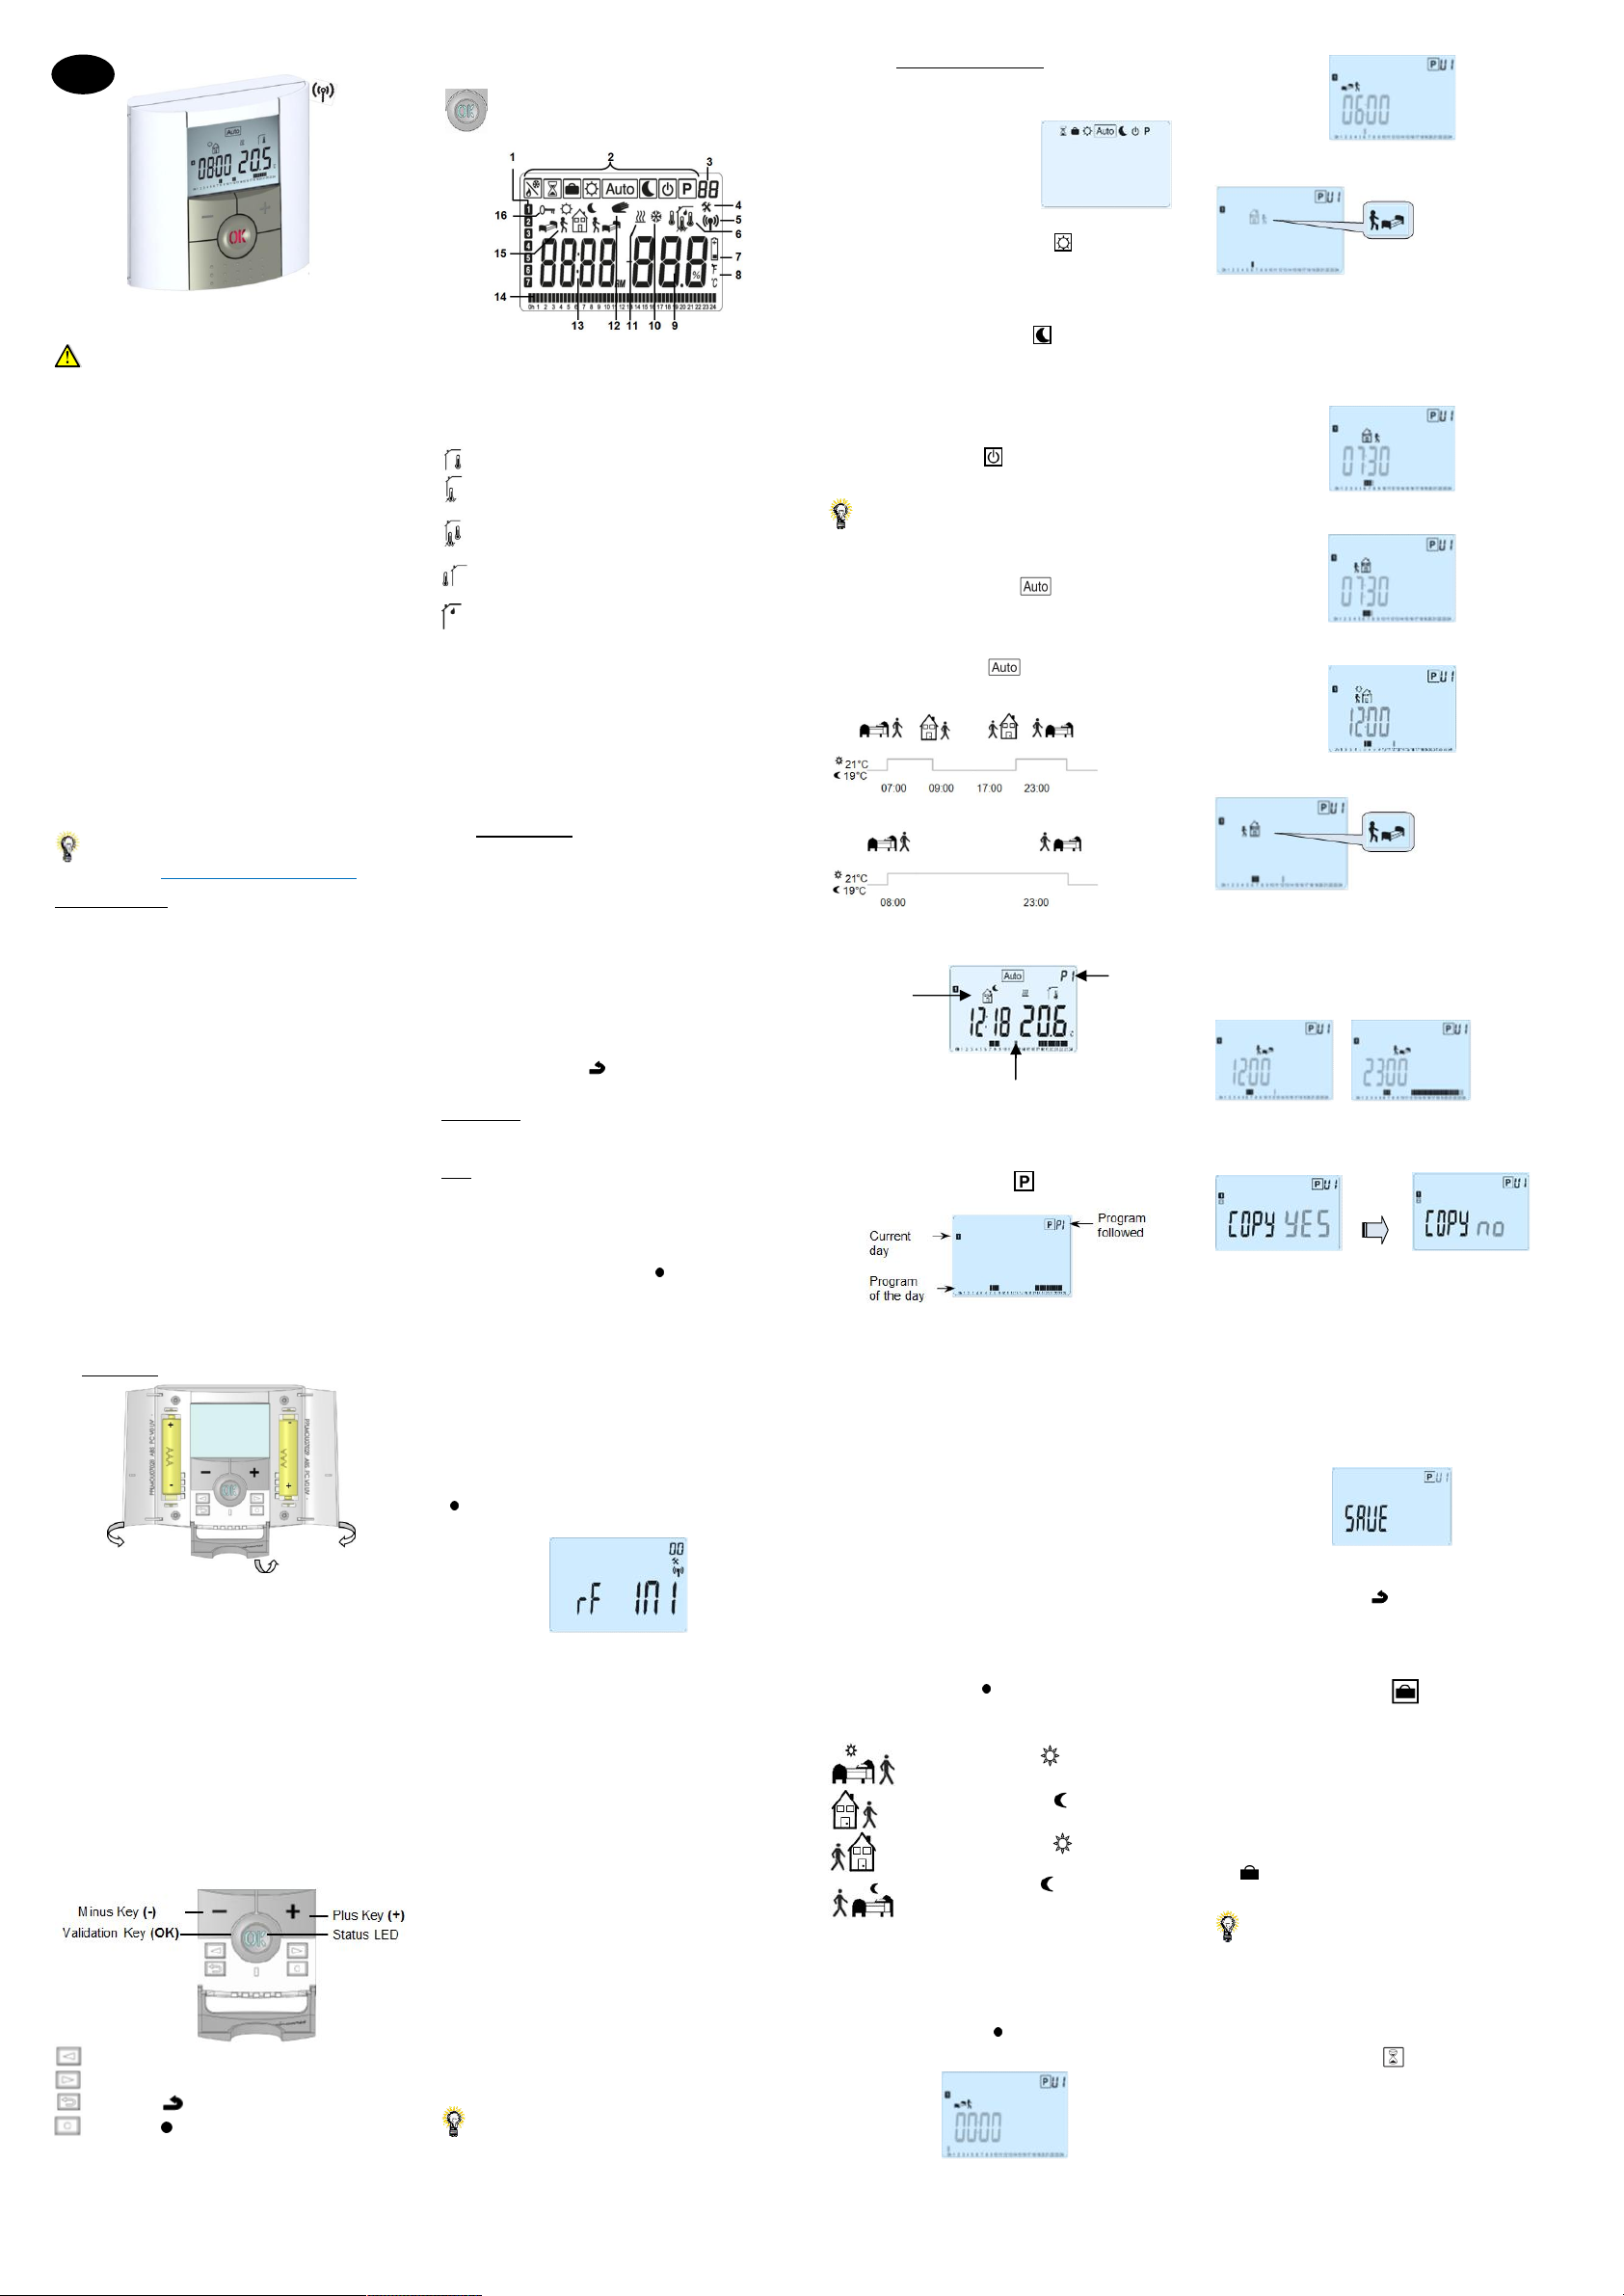
1.2. LED & Display
LED Color when backlight is lit up
Red Fix: Heating demand (**)
Green Fix: Cooling demand (**)
Green flash: validati
Red flash: Error on sensor or batteri
1: Current day of the week (1=Mo
2: Operating mode menu (active mode is framed).
3: Program number or parameter 4” is
displayed.
4: Installation Parameter menu.
5: RF transmission logo.
6: Type of sensor used and temperat
Regulati
Regulation => Fl
(Only available wi
Regulati
limitation.(Only avail
Regulation => outside temperat
sensor (connected on the back of t
Humidity value
7: Low batteries indicator
8: °C or °F unit indicator
9: Setting or measured temperat 6” is displayed.
Parameter value if “4 ” is di
10: Cooli
11: Heati
12: Temporary override function acti
13: Time or parameter titl 4” is displayed
14: Program of the current day (the c
15: Pictogram for program creatio
operating mode.
16: Key lock indicator.
2. First Installation
This section will guide you to set
time.
2.1. Batteries installation
- Open the two side’s covers a
supplied batteries (or remove t
batteries are already i
- Close the two side’s covers
- Now your thermostat will
time and date
2.2. Time and Date adjustment
Each time a value bli(-) and (+)
keys, once the value is chose(OK) key.
The thermostat will
Remark: you can always come back to
pressing the escape key ( ) .
List order of the time and date adj
Time and day:
Adjustment of the hours,
Adjustment of the minutes
Adjustment of the day (1 = Mo
Date:
Adjustment of the day number
Adjustment of the month number (01 to
Adjustment of the year
Then the message “Save ” and blinking green LED appe
press (OK) to validate the adj
You can al reach the ti and d adjustments, by
pressing and ( ) key duri
in normal operating modes.
Remark: w a ce (BT-CT02) is li to your
installation, thermostat will
2.3. RF installation
Please have a look at the list of all receivers compatibl with
this thermostat in Technical
2.3.1. With receivers
-
must put your receiRF » mode (refer
leaflet, only the RF receiver of the same range are
compatibles).
- Now on the t press and maintain t edi key
( ) during 5s, then the paramet « RF ini » must be
display.
The will send radio config to
the receiver.
-
their self the RF init mode, this i the n procedure to
confirm a correct pairi
- Now you can check t dista g to the room which
must be regulated. P
the wall or table...), then p t thermo in Comfort mode
(setting temperat posi Close the and go to
the receiver to check i the new stat o the thermostat has
received.
- return t off i
receiver again if it’s al
If t RF si were recei correctl adj yo setti
temperature as you want.
If t R si weren’t rec correctly, check the
installation RF
rules to be sure.
Remark: To make t install easier, i will be better to
have the thermostat near to t r du the
configuration mode. (A minimal distance of 1 meter must be
respected)
2.3.2. Case of Central (BT-CT02)
Procedure but
(BT-CT02). At this moment, Ce
2.4. Starting
The thermostat is now ready to work. T
mode is Manual Comfort
At ti t i the (OK)
key to lit-up the backli
3. Working mode definition
Your t has several different working modes to allow
you to adjust your unit accordi
To change the working mode,
open the smal center cover to
have access to the navi
keys (◄) or (►) . Move t frame
cursor o the desi worki
mode a press (O to e in
the operating mode y have
chosen.
3.1. Manual mode Confort
Manual worki the setti will
followed all the time.
By pressing (-) or (+) keys, the comfort setti temperat
starts to blink and can be adj
3.2. Manual mode ECO
Manual
followed all the time.
By pressi (-) or (+) keys, the reduced setti temperature
starts to blink and can be adj
Remark: I cool mode, Red mode acts like the OFF
mode (system is stopped)
3.3. OFF mode
Use this mode if you need to swi
Be Careful: In this mode your i
At whe off, (Ok) key
display a few seconds the curre
Remark: To restart your i use the navigati k
(◄) or (►).
3.4. Automatic mode
In this mode t thermostat will follow the chosen program
(Built-in or customi accordi to the actual ti and t
Comfort and Reduced setting temperat
By mode automati
the built-in
program “P1 ”:
Monday to Friday
Saturday and Sunday
Note:
You Working
mode definition” chapter “ Progra ” for more explanation.
You can easily override temporarily the current program by
pressing (-) or (+) . The thermostat jumps to Timer mode in
which
automatically to the Automati
3.5. Program mode
When mode, t i
choose the program number wi(-) or (+) keys.
You caP1 tP9 or
program U1 to U4 .
If you chose a Built-iP1 to P9 ,
You can only see and chose t
P1: Morning, Evening & W
P2: Morning, Midday, Evening & W
P3: Day & Weekend
P4: Evening & Weekend
P5: Morning, Evening (Bathroom)
P6: Morning, afternoon & W
P7: 7H – 19H (Office)
P8: 8H – 19H & Saturday (Shop)
P9: Weekend (Secondary house)
- (◄) (
program.
- (OK)
the main screen (in AUTO mode)
If
it.
Default setting:
U1, U2, U3, U4 = ECO al
- Press on the editi( ) to customise a user program.
Symbols and explanation for progra
First step of the day ( Comfort temp.)
The wakeup hour need to be adj
Middle step of the day ( Reduced temp.)
The leaving hour need to be adj
Middle step of the day (
The comeback hour will
Last step of the day ( Redu
The sleeping hour need to be adj
- The program step is 30 mi
- Each ti a val or i blinks you a invited to make a
choice (-) or pres
(OK) key to jump to the foll
- The program creati will always start with t d 1
(Monday).
Once you have pressed the ( ) key, the following displ
appear:
Now yo are invited to adjust the hour o t step of t
program with (-) or (+) ,
Press (OK) to validate and go to t
Now
program (blinking icons). Two c
- 1
st
choice is to choose the sleep i
- 2
nd
choice is to c
program during the day.
When the choice i(OK) to vali
adjust the step hour with (-) or (+) ,
When step hour is set press (OK) to j
You will be directl(-) or (+) the ho
the comeback step.
Press (OK) to validate and go to t
You are
program (blinking icons), two c
- 1
st
choice is to choose the sleep i
-
nd
to the program during the day.
When the c is made, press (OK) to vali and you can
adjust the hour of this step wi(-) or (+) ,
Press (OK) to validate and fi
Now ca to c program day j to
subsequent days
Change the choice “Yes ” or “no ” with (-) or (+) a val
your choice with (OK) .
- “no ”, you create
Tuesday (repeat the previo
- If you select “Yes ”, yo have t p to copy the
program
to the last day of the week (7=
When press (OK) o l (7 wi be
invited to “SAVE ” your program.
Then the message “Save ” a
Press (OK) key to save your program aAUTO
operating mode foll
Press the escape key ( ) to erase your user program
changes and come back to operati
Remark: li
is done on the Central.
3.6. Holiday mode
The Holiday mode al
for a selected number of days
You ca adj the duration in day “d ” with (-) or (+) , press
(OK) to start (Adjustable 1 to 44 days).
The anti-free setting temperature is fixed and can be
adjusted i the parameter me number 06 ‘ HG’ , refer to
chapter 5.
The
until the end of the period.
If yo
the duration period to “no ” wit(-) key.
Remarks:
- In cooling mode, this mode acts l
- When a central is li
permanent (or set directl
3.7. Timer mode
The Ti mode allows you to adjust, the temperature for a
special After older
mode.
- You ca fi adjust, the duration in hours “H” if below 24H,
then i day “d ” with (-) or (+) , pre (OK) to val
(Adjustable 1 Hour to 44 days)
GB
Current
stage of the
program
Program
followed