3017-1061 · 12/2010
Bezeichnung der T
A
Standard-Schneidsatz
B
Ein-/Ausschalter
C
Gerätebuchse
D
T
E
Detail-Schneidsatz
F
Rasieraufsatz
G
V
H
Kammaufsatz, Schnittlänge 1 mm
I
Kammaufsatz, Schnittlänge 3 mm
J
Kammaufsatz, Schnittlänge 5 mm
K
Kammaufsatz T
L
Kammaufsatz T
M
Kammaufsatz T
N
Schneidsatzöl
O
Reinigungsbürste
P
Steckerschaltnetzteil
Q
Geräteanschluss-Stecker
Wichtige Sicherheitshinweise
Beim Gebrauch von elektrischen Geräten sind zum eigenen Schutz vor V
und Stromschlägen folgende Hinweise unbedingt zu beachten:
V
· Nutzen Sie Haarschneidemaschinen ausschließlich zum Schneiden von mensch-
lichem Haar
· Dieses Gerät ist nicht für den gewerblichen Gebrauch bestimmt.
· Gerät nur an Wechselspannung anschließen. Beachten Sie die angegebene Nenn-
spannung auf dem T
·
stecker ziehen.
·
·
W-
ren Flüssigkeiten vermeiden.
·
ziehen.
·
·
verringerten körperlichen, sensorischen oder geistigen Fähigkeiten oder Mangel an
Erfahrung und Wissen bestimmt, es sei denn, sie werden beaufsichtigt oder erhielten
eine
ihre Sicherheit verantwortlich ist. Kinder sollten beaufsichtigt werden, um sicherzu-
stellen, dass sie nicht mit dem Gerät spielen.
· -
mäßen Zweck verwenden.
verwenden.
· -
falls nicht benutzen, wenn es nicht ordnungsgemäß funktioniert, wenn es beschädigt
ist, oder wenn es ins W
und Reparatur an unser Service Center einsenden. Elektrogeräte dürfen nur durch
elektrotechnisch ausgebildete Fachkräfte repariert werden.
·
verwenden.
· Das Gerät von heißen Oberflächen fernhalten.
· Das Gerät nicht mit verdrehtem oder abgeknicktem Kabel aufladen bzw
· Niemals Gegenstände in die Geräteöffnungen stecken oder fallen lassen.
· Das Gerät nur in trockenen Räumen benutzen und aufbewahren.
· Das Gerät niemals in Umgebungen benutzen, in denen
verwendet werden, oder in denen Sauerstoff freigesetzt wird.
· Zum Schutz vor V
beschädigt ist.
· Keine Einwegbatterien verwenden. -
schen lassen.
· Das Gerät ist schutzisoliert und funkentstört. Es erfüllt die
Richtlinie Elektromagnetische V
richtlinie 2006/95/EG.
V-
brauchte Batterien/Akkus im völlig entladenen Zustand entsprechend den
gesetzlichen Bestimmungen.
Akku laden/Akkubetrieb
· Mit dem Ein-/Ausschalter das Gerät ausschalten (Abb. 2
ⓑ
). Das Gerät lädt nur in
ausgeschaltetem Zustand.
· Geräteanschluss-Stecker an das Gerät anschließen (Abb. 1).
· Bei voll geladenem
· Hinweis: Bei unzureichender Pflege des Schneidsatzes kann sich die Laufzeit erheb-
lich reduzieren. Die Ladezeit bis zum Erreichen der vollen Kapazität beträgt
ca. 60 Minuten.
Kammaufsatz aufsetzen / abnehmen
· Kammaufsatz an der Schneidkante des Schneidsatzes ansetzen und bis zum Einra-
sten in Richtung Gehäuse auf den Schneidsatz drücken (Abb. 3
ⓐ
).
· Der Kammaufsatz lässt sich durch
(Abb. 3
ⓑ
).
V
· Die Mitte des -
zen und den Schneidsatz entlang der Führung bis unter die Rasthaken schieben
(Abb. 4
ⓐ
).
(Abb. 4
ⓑ
).
· Gewünschte Schnittlänge mit dem Schnittlängenregler einstellen (Abb. 5/6)
Stufe 1 = Stoppellänge = 2 mm
Stufe 2 = Kurz = 4 mm
Stufe 3 = Mittelkurz = 6 mm
Stufe 4 = Mittel = 8 mm
Stufe 5 = Mittellang = 10 mm
Stufe 6 = Lang = 12 mm
· Der
ⓒ
) und Schieben entgegen
der Pfeilrichtung entfernen.
Wechsel und
· Mit dem Ein-/Ausschalter das Gerät ausschalten (Abb. 2
ⓑ
).
· Der Schneidsatz bzw
vom Gehäuse weggedrückt wird (Abb. 7
ⓐ
).
· Zum Wiedereinsetzen den Schneidsatz bzw
die
(Abb. 7
ⓑ
).
T
Nachfolgend finden Sie V
Erläuterungen zur Handhabung des Gerätes. Wenn Sie andere V
können Sie diese selbstverständlich ebenfalls anwenden.
1. Kämmen Sie den Bart in Wuchsrichtung, um leichter herauszufinden, ob einige
Haare länger sind als andere.
2. Setzen Sie den V-
zudünnen. Beginnen Sie, indem Sie eine lange Schnittlänge wählen und den T
so halten, dass die Schnittkante in Ihre Richtung zeigt (Abb. 12).
Um ein optimales Ergebnis zu erzielen, beginnen Sie jeweils an den Koteletten und set-
zen den T
überlappenden Streichbewegungen zum Kinn. Gehen Sie dabei in Wuchsrichtung des
Bartes vor-
det der T
ein unregelmäßiges Ergebnis. Stellen Sie die T
kürzere Schnittlänge ein, bis Sie die gewünschte Bartlänge erzielen.
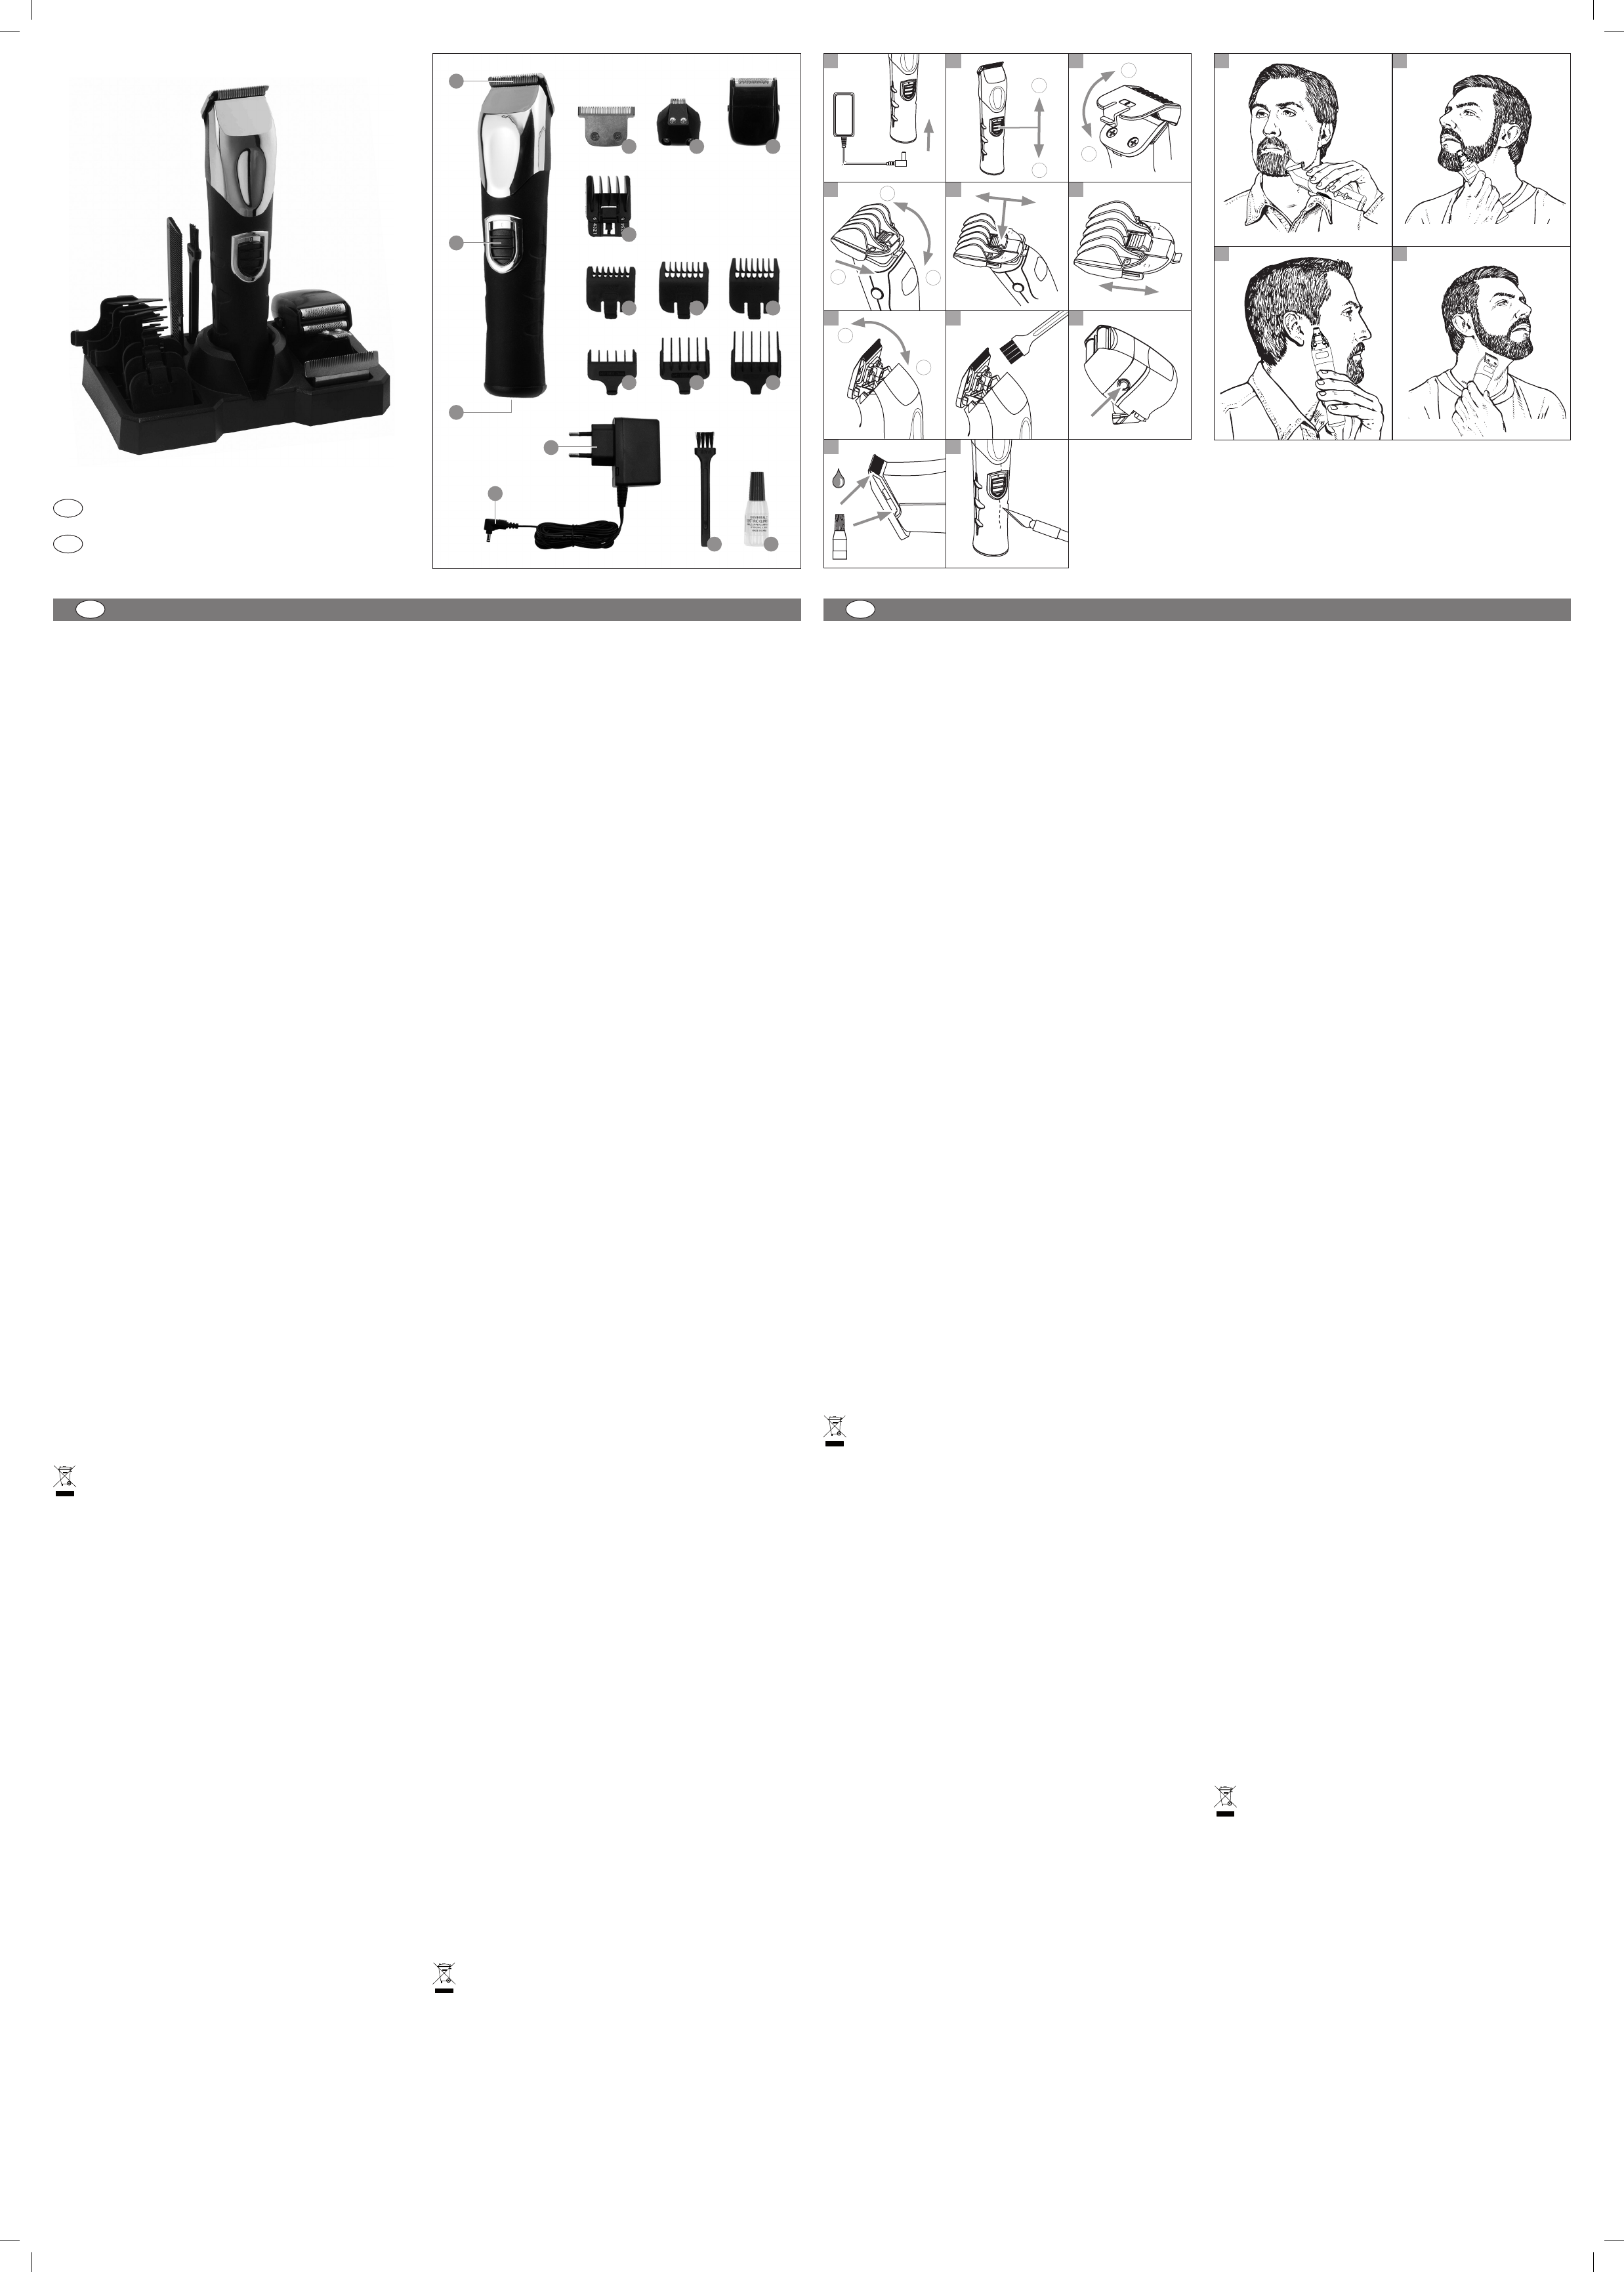
Description of parts
A
Standard blade set
B
On/off switch
C
Appliance socket
D
T
E
Detail blade set
F
Shaving attachment
G
V
2 mm – 12 mm
H
Attachment comb, cutting length 1 mm
I
Attachment comb, cutting length 3 mm
J
Attachment comb, cutting length 5 mm
K
T
L
T
M
T
N
Blade set oil
O
Cleaning brush
P
Plug-in transformer
Q
Appliance plug
Important safety information
For your own protection from injuries and electric shocks, the following information must
be observed when using electrical equipment:
Read all the instructions before using the appliance!
· Only use hair clippers to cut human hair
· This appliance is not intended for commercial use.
· Only connect the equipment to an
plate!
· Never touch electrical equipment that has fallen into water
immediately
· Never use electrical equipment in the bath or shower
· Always position or store electrical equipment where it cannot fall into water (e.g. wash
basin).
· Always disconnect the appliance from the power supply immediately after use except
when charging.
· Disconnect the appliance from the power supply before cleaning.
· -
sory or mental disabilities or who do not have the relevant experience or knowledge of
using such appliance unless under the supervision of or after having received instruction
in the use of the aplliance by an individual who is responsible for their safety
should be supervised to ensure they do not play with the appliance.
· Only use the appliance for the proper purpose as described in the operating instructions.
Only use accessories recommended by the manufacturer
·
appliance if it is not working correctly
these cases, send the appliance to our Service Centre to be inspected and repaired.
Only specialists properly trained in the handling of electrotechnical devices may repair
electrical equipment.
·
handle.
· Keep the appliance away from hot surfaces.
· Make sure that the mains cable is not twisted or kinked during charging or storing.
· Never insert or allow objects to fall into the openings of the appliance.
· Only use and store the appliance in dry rooms.
· Never use the appliance where aerosol (spray) products are being used or where oxy-
gen is released.
· T
· Do not use disposable batteries. Rechargeable battery units can only be obtained from
authorized Service Centres.
· The appliance is safety insulated and radio screened. It meets the requirements of EU
Directive 2004/108/EC regarding electromagnetic compatibility and EC Low V
Directive 2006/95/EC.
Exhausted batteries/rechargeable batteries should not be disposed of in household
waste. Dispose of them in completely discharged state in accordance with legal
regulations.
Charging the battery/battery operation
· Switch off the appliance using the on/of
ⓑ
). The appliance will only
recharge when switched off.
· Connect the appliance plug to the appliance (Fig 1).
· The appliance may be operated for max. 180 minutes with the battery fully charged.
· Note: The operating time may be reduced considerably if the blade set is not properly
maintained. It should take around 60 minutes for the appliance to charge to full capacity
Attaching/removing the attachment comb
· Place the attachment comb onto the cutting edge of the blade set and press it down
onto the blade set in the direction of the housing until it clicks into position (Fig. 3
ⓐ
).
· The attachment comb may be removed by lifting the snap-fit hook in the direction of the
arrow (Fig. 3
ⓑ
).
Adjustable variable attachment comb with 6 settings
· Place the centre of the attachment comb on the cutting edge of the blade set and slide
it along the guide until it is positioned underneath the snap-fit hook (Fig. 4
ⓐ
). Push the
attachment comb onto the blade set until it clicks into position (Fig. 4
ⓑ
).
· Use the cutting-length control switch to adjust the cutting length (Fig. 5/6)
Level 1 stubble length 2 mm
Level 2 short = 4 mm
Level 3 medium short = 6 mm
Level 4 medium = 8 mm
Level 5 medium long = 10 mm
Level 6 long = 12 mm
· Remove the attachment comb by pressing (Fig. 4
ⓒ
) and sliding it in the opposite direc-
tion to the arrow
Changing and replacing the blade sets and the shaving attachment
· Switch off the appliance using the on/of
ⓑ
).
· The blade set or shaving attachment may be removed by sliding it away from the hous-
ing in the direction of the arrow (Fig. 7
ⓐ
).
· Replace the blade set or shaving attachment by hooking it into the recess on the hous-
ing and pressing it down until it clicks into position (Fig. 7
ⓑ
).
T
The following section provides suggestions for how to trim the beard and explanations on
handling the appliance. Naturally
1. Comb the beard in the direction of growth to see whether some hairs are longer than
others.
2.
using a long cutting length and hold the trimmer so that the cutting edge faces towards
you (Fig. 12).
T
towards the neck. Guide the trimmer towards the chin with gentle, overlapping stroking
movements. Work in the beard's direction of growth. If you trim against the beard's direc-
tion of growth, the trimmer will cut the hair of the beard considerably shorter and the result
obtained may be uneven. Gradually set the trimmer guide to a shorter cutting length until
you have achieved the length of beard desired.
Y
to the ears and underneath the chin and then select a longer setting for the front of the
face and point of the chin. The setting last selected is retained when the variable attach-
ment comb is removed until a further adjustment is made.
attachment comb clicks firmly into the desired position before starting to trim.
3. Remove the variable attachment comb and cut the outline of the beard. T-
mer so that the blades point towards you. Start under the chin and continue trimming
towards the jawbone and ears. Define the outer edge of the beard under the jawbone.
Continue the process up to the ears and the hairline (Fig. 15).
Gebrauchsanweisung
Akku-Bartschneider
de
User Instructions
Rechargeable Beard T
en
DEUTSCH
de
ENGLISH
en
T
1 2 3
4 5
12 13
7
6
8
9
14 15
Falls gewünscht, können Sie den V
der Ohren und unterhalb des Kinns einen kürzeren Schnitt erzielen und anschließend eine
längere Einstellung für die V
den V-
ten, bis Sie diese ändern.
der gewünschten Position einrastet, bevor Sie mit dem T
3. Entfernen Sie den V-
hen Sie den T-
halb des Kinns und setzen Sie den T
fort. Definieren Sie den äußeren Rand des Bartes unterhalb des Kieferknochens. Setzen
Sie den V
4. Heben Sie die Bartlinie hervor
Sie von der Linie aus, die Sie geschaffen haben, und arbeiten Sie sich vom Kinn aus in
Richtung der Ohren vor
5. Definieren Sie den oberen T
6. V
können Sie Koteletten, Spitzbärte etc. fein bearbeiten (Abb. 13/14).
Nackenhaar
mit dem Standard-Schneidsatz
konturieren.
Mit langsamen
in die gewünschte Form bringen.
Arm- & Beinbehaarung mit dem Standard-Schneidsatz schneiden.
Mit dem T
schneiden. Beginnen Sie mit einer längeren V
diese dann sukzessive, bis die gewünschte Haarlänge erreicht ist.
Brust- & Bauchbehaarung
mit dem Standard-Schneidsatz schneiden.
Mit
gewünschte Länge schneiden. Beginnen Sie mit einer längeren V-
stellung und verkürzen diese dann sukzessive, bis die gewünschte Haarlänge erreicht ist.
Für die V
verwenden Sie einfach den Rasieraufsatz.
Der Rasieraufsatz eignet sich für die Ganzkörperrasur-
nik können Sie störende Behaarung überall am Körper problemlos beseitigen. Halten
Sie an der zu rasierenden Körperpartie die Haut straff und rasieren das Haar gegen die
Wuchsrichtung.
Intimrasur
mit dem Standard- & Detail-Schneidsatz.
1. Stecken Sie den V-
ten Sie sich von oben nach unten vor-
kammeinstellung auf die gewünschte Länge.
2. V-
satz. Halten Sie die Haut immer straff. Bearbeiten Sie die Körperpartie mit langsamen
T
3. V
Nasenbehaarung
mit dem Detail-Schneidsatz schneiden.
Die Nasenöffnungen müssen frei sein. Führen Sie den Detail-Schneidsatz langsam maxi-
mal 6 mm tief in jede Nasenöffnung ein.
Ohrbehaarung
mit dem Detail-Schneidsatz schneiden.
Die
mit einer Hand flach, und führen mit der anderen Hand den Detail-Schneidsatz maximal 6
mm tief in das
VORSICHT
führen.
Zum Entfernen von Haarwuchs an der Ohrmuschel den Detail-Schneidsatz langsam an
den Rändern des Ohrs entlang führen.
Augenbrauen
mit dem Detail-Schneidsatz schneiden.
Ziehen Sie zum Kürzen überstehender Haare den Detail-Schneidsatz langsam über die
Brauen. Ziehen Sie zum Erzielen der gewünschten gleichmäßigen Brauenlänge den
Detail-Schneidsatz im kürzeren oder weiteren
Detail-Schneidsatz nicht gegen die Braue, damit nicht zu viele Haare entfernt werden.
T
Als Zubehör werden drei Kammaufsätze und drei T
und lang – mitgeliefert. Folgende Kammaufsätze sind im Lieferumfang enthalten:
· Kammaufsatz 1 mm, 3 mm und 5 mm Schnittlänge.
· Kammaufsatz T
Diese Kammaufsätze eignen sich für den Fein- und Konturschnitt von Bärten, sowie zur
Pflege eines 3-T-
wuchsrichtung. Schneiden Sie zur Erzielung eines kürzeren Schnitts gegen die Haar-
wuchsrichtung.
Anwendung ohne Kammaufsatz
· Zum Formen des Bartes, zum Korrigieren der Bartkontur und zum T
Schnurrbartes den Kammaufsatz abnehmen.
· Zum Begradigen der Kontur das Gerät umdrehen, das Schermesser gerade ansetzen
(Abb. 15) und in kurzen Bewegungen vom Bart wegführen.
Reinigung und Pflege
· Das Gerät nicht in W
· Nach jedem Gebrauch den Kammaufsatz abnehmen und mit der Reinigungsbürste die
Haarreste aus der Gehäuseöffnung und vom Schneidsatz entfernen (Abb. 8). Dazu den
Schneidsatz abnehmen (Abb. 7
ⓐ
).
· Den Rasieraufsatz nach jedem Gebrauch reinigen. Nehmen Sie dazu durch Drücken
der seitlichen Entriegelungsknöpfe den Rasierkopf ab (Abb. 9) und reinigen ihn mit der
mitgelieferten Reinigungsbürste.
· Das Gerät nur mit einem weichen, eventuell leicht feuchten T
Keine Lösungs- und Scheuermittel verwenden!
·
Für eine gute und lang anhaltende Schneidleistung ist es wichtig den Schneidsatz
regelmäßig, nach jedem Gebrauch, zu ölen (Abb. 10)
. Benutzen Sie hierzu aus-
schließlich Schneidsatzöl Best. Nr
· Schneidsatzöl können Sie über Ihren Händler oder unser Service Center beziehen.
· Wenn nach längerer Gebrauchsdauer trotz regelmäßigem Reinigen (Abb. 8) und Ölen
(Abb. 10) die Schneidleistung nachlässt, sollte der Schneidsatz ausgetauscht werden
(Abb. 7).
· Ersatzschneidsätze und Rasieraufsätze können Sie über Ihren Händler oder unser Ser-
vice Center beziehen.
· Ein Kammaufsatz dient nach Gebrauch und Reinigung des Gerätes auch als Messer-
schutz.
Entsorgung EU-Länder
Das Gerät darf nicht mit dem Hausmüll entsorgt werden. Im Rahmen der EU-
Richtlinie über die Entsorgung von Elektro- und Elektronikgeräten wird das Gerät
bei den kommunalen Sammelstellen bzw-
nommen.
dient dem Umweltschutz und verhindert mögliche schädliche
Mensch und Umwelt.
Entsorgung Nicht-EU-Länder
· Das Gerät am Ende seiner Lebensdauer bitte umweltgerecht entsorgen.
· Steckertrafo aus der Steckdose ziehen und Gerät einschalten damit der -
laden wird.
· Schneidsatz bzw
ⓐ
) .
· Mit einem Messer den Gummigriff längs aufschneiden (Abb. 1
· Gehäusehälften trennen.
· Den
· Akku einer geeigneten Sammelstelle zuführen.
· Das Gerät darf nach Entnahme des
11
10
4. Emphasise the line of the beard by moving the trimmer downwards. Start from the
line you have created and work your way slowly from the chin towards the ears. T
the area under the line of the beard (Fig. 15).
5. Use the same technique to define the upper part of the beard.
6. Use the detail blade set for precision cutting. This blade set may be used for preci-
sion cutting of sideburns, goatee beards, etc. (Figs. 13/14).
Use the standard blade set to
outline neck hair
beards
.
Obtain the desired shape of the hair and beard sections using the trimmer in slow
downward strokes.
Use the standard blade set to cut
arm and leg hair
.
The trimmer may be used to cut arm and leg hair to the desired length. Start with a
longer setting of the variable attachment comb and gradually shorten it until the desired
hair length is achieved.
Use the standard blade set to cut
chest and stomach hair
.
The trimmer may be used with upward strokes to cut torso hair to the desired length.
Start with a longer setting of the variable attachment comb and gradually shorten it until
the desired hair length is achieved.
Simply use the shaving attachment for a
full clean shave
.
The shaving attachment is suitable for shaving the whole body
on the body may be removed easily using the technique described above. Keep the
skin on the part of the body to be shaved taut and shave the hair against the direction
of growth.
Use the standard and detail blade sets for
intimate shaving
.
1.
top to bottom. Gradually shorten the setting of the variable attachment comb to the
desired length.
2. Use the detail blade set for difficult to reach narrow areas of the body
the skin taut. Work on the body area using slow strokes of the trimmer until the
desired result has been achieved.
3. Use the shaving attachment for gentle intimate shaving.
Use the detail blade set for cutting
nose hair
.
The nostrils must be clear
each nostril.
Use the detail blade set to cut
ear hair
.
The outer areas of the ears must be free from earwax. Press the ear flat with one hand
and guide the detail blade set no more than 6 mm into the outer ear with the other
hand.
CAUTION: Do not guide the detail blade set or other foreign objects into the inner ear
Guide the detail blade set slowly around the margins of the ear pinna to remove hair
growth.
Use the detail blade set to cut the
eyebrows
.
Draw the detail blade set slowly over the eyebrows to shorten overhanging hairs.
Draw the detail blade set over the brows adjusting the gap between blades and brow
to achieve the even brow length desired. Do not press the detail blade set against the
brow to avoid removing too much hair
T
Three attachment combs and three T-
sories - one of each in short, medium and long. The following attachment combs are
included as standard:
· Attachment comb 1 mm, 3 mm and 5 mm cutting length.
· T
These attachment combs are suitable for precision cutting and outlining of beards in
addition to caring for 'designer stubble'. Use the attachment combs for cutting in the
direction of hair growth. Cut against the direction of hair growth to achieve a shorter cut.
Use without attachment comb
· Remove the attachment comb to shape your beard, to correct the outline of your
beard and to trim your moustache.
· T
(Fig. 15) in short strokes away from your beard.
Cleaning and Care
· Do not immerse the appliance in water!
· After each use, remove the attachment comb and use the cleaning brush to remove
any hairs from the housing opening and from the blade set (Fig. 8). Remove the
blade set to do this (Fig. 7
ⓐ
).
· Clean the shaving attachment after each use. T
by depressing the buttons on both sides to release it (Fig. 9) and clean it using the
cleaning brush provided.
· Use only a soft cloth, which may be dampened slightly
Do not use solvents or abrasives!
·
The blade set should be oiled regularly after each use to maintain good cutting
performance and long service life (Fig. 10)
. Use only blade set oil for this purpose,
order no. 1854-7935 (200 ml).
· Blade set oil may be ordered through your dealer or our Service Centre.
· After prolonged use, the cutting performance will deteriorate despite regular cleaning
(Fig. 8) and oiling (Fig. 10) and the blade set should then be replaced (Fig. 7).
· Replacement blade sets and shaving attachments may be ordered through your
dealer or our Service Centre.
· Push on a attachment comb to protect the blade set after cleaning.
Disposal in EU countries
Do not dispose of the appliance with domestic refuse. -
tive governing the disposal of electrical and electronic equipment, the appliance
is accepted free of charge by local waste collection points or recycling centres.
Discharge batteries prior to disposal! Correct disposal will ensure environmental
protection and prevent any potentially harmful impacts on people and the envi-
ronment.
Disposal in non-EU countries
· Please dispose of the appliance at the end of its service life in an environmentally
compatible manner
· Disconnect the plug-in transformer from the mains power supply and switch on the
appliance to discharge the battery completely
· Remove the blade set or shaving attachment (Fig. 7
ⓐ
).
· Cut open the rubber handle lengthwise using a knife (fig. 1
· Pull housing sections apart.
· Detach the rechargeable battery from the circuit board.
· T
· Do not connect the appliance to the mains once the rechargeable battery has been
removed!
Model 9854L
c
b
a
A
B
C
D E F
G
H I J
K L M
N
P
Q
a
b
a
b
a
b