809760
1
Zoom out
Zoom in
Previous page
1/2
Next page
Note
This baby monitor is intended as an aid. It is not a substitute for proper adult supervision, and should
not be used as such.
Test your baby monitor
You may test the baby monitor before initial use, and at regular times thereafter.
Caution
For hearing protection, make sure the parent
unit is more than 3 feet (1 meter) away from both
baby units. If you hear any high-pitched noise,
move the parent unit further until the noise stops. You
can also press VOL- on the parent unit to lower or reduce
the noise.
1. Make sure your baby unit and parent unit are on.
2. The parent unit displays images from the baby unit.
Speak towards the microphone of the baby unit.
You will hear the sound at the parent unit.
3. If you have two baby units, view the image from one of them by pressing . Then,
repeat step 2.
Power on or off the baby unit
Slide the ON/OFF switch to ON to turn on the baby unit. The POWER LED light turns on.
Slide the ON/OFF switch to OFF to turn off the baby unit. The POWER LED light turns off.
Power on or off the parent unit
Press and hold to turn on the parent unit. The screen turns on.
Press and hold again to turn off the parent unit. The screen turns off.
Turn on or off the parent unit screen
You can turn on or off the parent unit screen without powering off the parent unit. You can
still hear sound from the baby units.
Press and hold LCD ON/OFF on the parent unit to turn off the screen.
Press any key on the parent unit to turn on the screen again.
Adjust speaker volume
For parent unit:
Press VOL-/VOL+ on the parent unit to adjust the speaker volume.
Note
Users cannot set the parent unit speaker volume to zero. The parent unit will be muted automatically when the
parent unit is talking to the baby unit. When it is muted, appears on the screen and the light turns on.
For baby unit:
The baby unit speaker volume determines the lullaby volume and talkback volume
transmitted from parent unit. The volume can be adjusted in the parent unit.
1. Press MENU when the parent unit is idle.
2. Press or to choose , then press SELECT or .
3. Press to choose .
4. Press or to choose the volume level of the baby unit.
5. Press SELECT to confirm your selection.
Adjust LCD brightness
You can change the brightness of the parent unit screen from Level 1 to Level 5. The LCD
brightness is preset to Level 3.
1. Press MENU when the parent unit is idle.
2. Press or to choose , then press SELECT or .
3. Press or to choose the desired level of brightness, then press SELECT.
User’s manual
VM3261
Video Monitor
Go to www.vtechphones.com
to register your product for
enhanced warranty support and
the latest VTech product news.
Congratulations
on purchasing your new VTech product. Before using this product, please read Important safety
instructions.
This manual has all the feature operations and troubleshooting necessary to install and operate
your new VTech product. Please review this manual thoroughly to ensure proper installation and
operation of this innovative and feature-rich VTech product.
For support, shopping, and everything new at VTech, visit our website at www.vtechphones.com.
1 set for VM3261
2 sets for VM3261-2
To enter Patrol mode:
1. Press MENU when the parent unit is idle.
2. Press or to choose , then press SELECT or .
3. Press or to switch , then press SELECT to confirm your selection.
Adjust the sound sensitivity of the baby unit
You can choose to hear sounds from the baby unit all the time, or to hear sounds that exceed
a certain level. You can use the parent unit to adjust the microphone sensitivity of your baby
unit. The higher the sensitivity level, the more sensitive the baby unit is in detecting sounds
for transmitting to the parent unit. The VOX sensitivity level is preset to the highest level.
VOX
Sensitivity
level Highest High Medium Low Lowest
Description The parent
unit speaker
is constantly
on, and you
will hear
all sounds
(including
background
noises) from
your baby’s
room.
The parent
unit speaker
turns on
for soft
babbling
and louder
sounds from
your baby.
It remains
quiet when
your baby
sleeps
soundly.
The parent
unit speaker
turns on
for loud
babbling
and louder
sounds from
your baby.
It remains
quiet when
your baby
makes soft
sounds.
The parent
unit speaker
turns on
for crying
and louder
sounds from
your baby.
It remains
quiet when
your baby
makes soft
sounds.
The parent
unit speaker
turns on
for loud
crying or
screeching
sounds from
your baby.
It remains
quiet when
your baby
makes soft
sounds.
1. Press MENU when the parent unit is idle.
2. Press or to choose , then press SELECT or .
3. Press or to choose the desired sensitivity level, then press SELECT to confirm your
selection.
NOTESNOTE
Note
If the screen is off, and the setting of sound-activated screen is ON, then LCD screen will be turned
on automatically when VOX sensitivity is triggered.
Tip
If you want to use a sound machine or white noise machine for natural white noise while using this
baby monitor to check on your baby, you can:
- Lower the volume of your sound machine or white noise machine; or
- Lower the sensitivity level of your baby monitor to medium (level 3) or below. Default level is the
highest level.
Turn on or off the sound activation
When sound activation is on, as long as no sound is detected within 50 seconds, the parent
unit screen will turn off automatically to save power.
When your baby unit detects a sound, which exceeds the selected sensitivity level, the sound
activation triggers the parent unit screen to turn on automatically. When no sound is detected
within 50 seconds, the screen will be off again.
1. Press MENU when the parent unit is idle.
2. Press or to choose , then press SELECT or .
3. Press or to choose or , then press SELECT to confirm your selection.
Note
If the sound sensitivity is set to the highest level, the parent unit screen may remain on continuously
even though sound activation is on. This depends on whether the baby unit detects any sounds.
Pan, tilt, zoom
You can pan and tilt the images or zoom in while viewing images from the baby unit.
Press and hold , , or to pan or tilt the image upward, downward, leftward or
rightward.
Press to zoom in.
Press and hold , , or to pan or tilt the zoomed image upward, downward, leftward
or rightward.
Press again to zoom out.
Talk
You can use the TALK function of the parent unit to comfort your baby.
1. Press and hold TALK on the parent unit. The TALK light turns on.
2. Speak towards the microphone on the parent unit. Your voice is broadcast to the baby unit.
3. Release the TALK key to stop the broadcast.
Note
The parent unit speaker is muted during voice broadcast. Sound transmission from the baby unit
resumes after TALK is released.
What’s in the box
1
Connect and charge the battery
2
Before use
3 Using the baby monitor (Con’t)
Specifications are subject to change without notice.
© 2018 VTech Communications, Inc.
All rights reserved. 10/18. VM3261-X_CIB_V4
Document order number: 91-010873-030-100
Note
When the parent unit displays , and the LINK LED light flashes, move the parent unit closer to
the baby units (observe the minimum distance of 3 feet / 1 meter). You can also check if the baby
unit is connected to a live power socket and switched on.
Tip
Increase the speaker volume of the parent unit if you cannot hear the sounds transmitted from the
baby units.
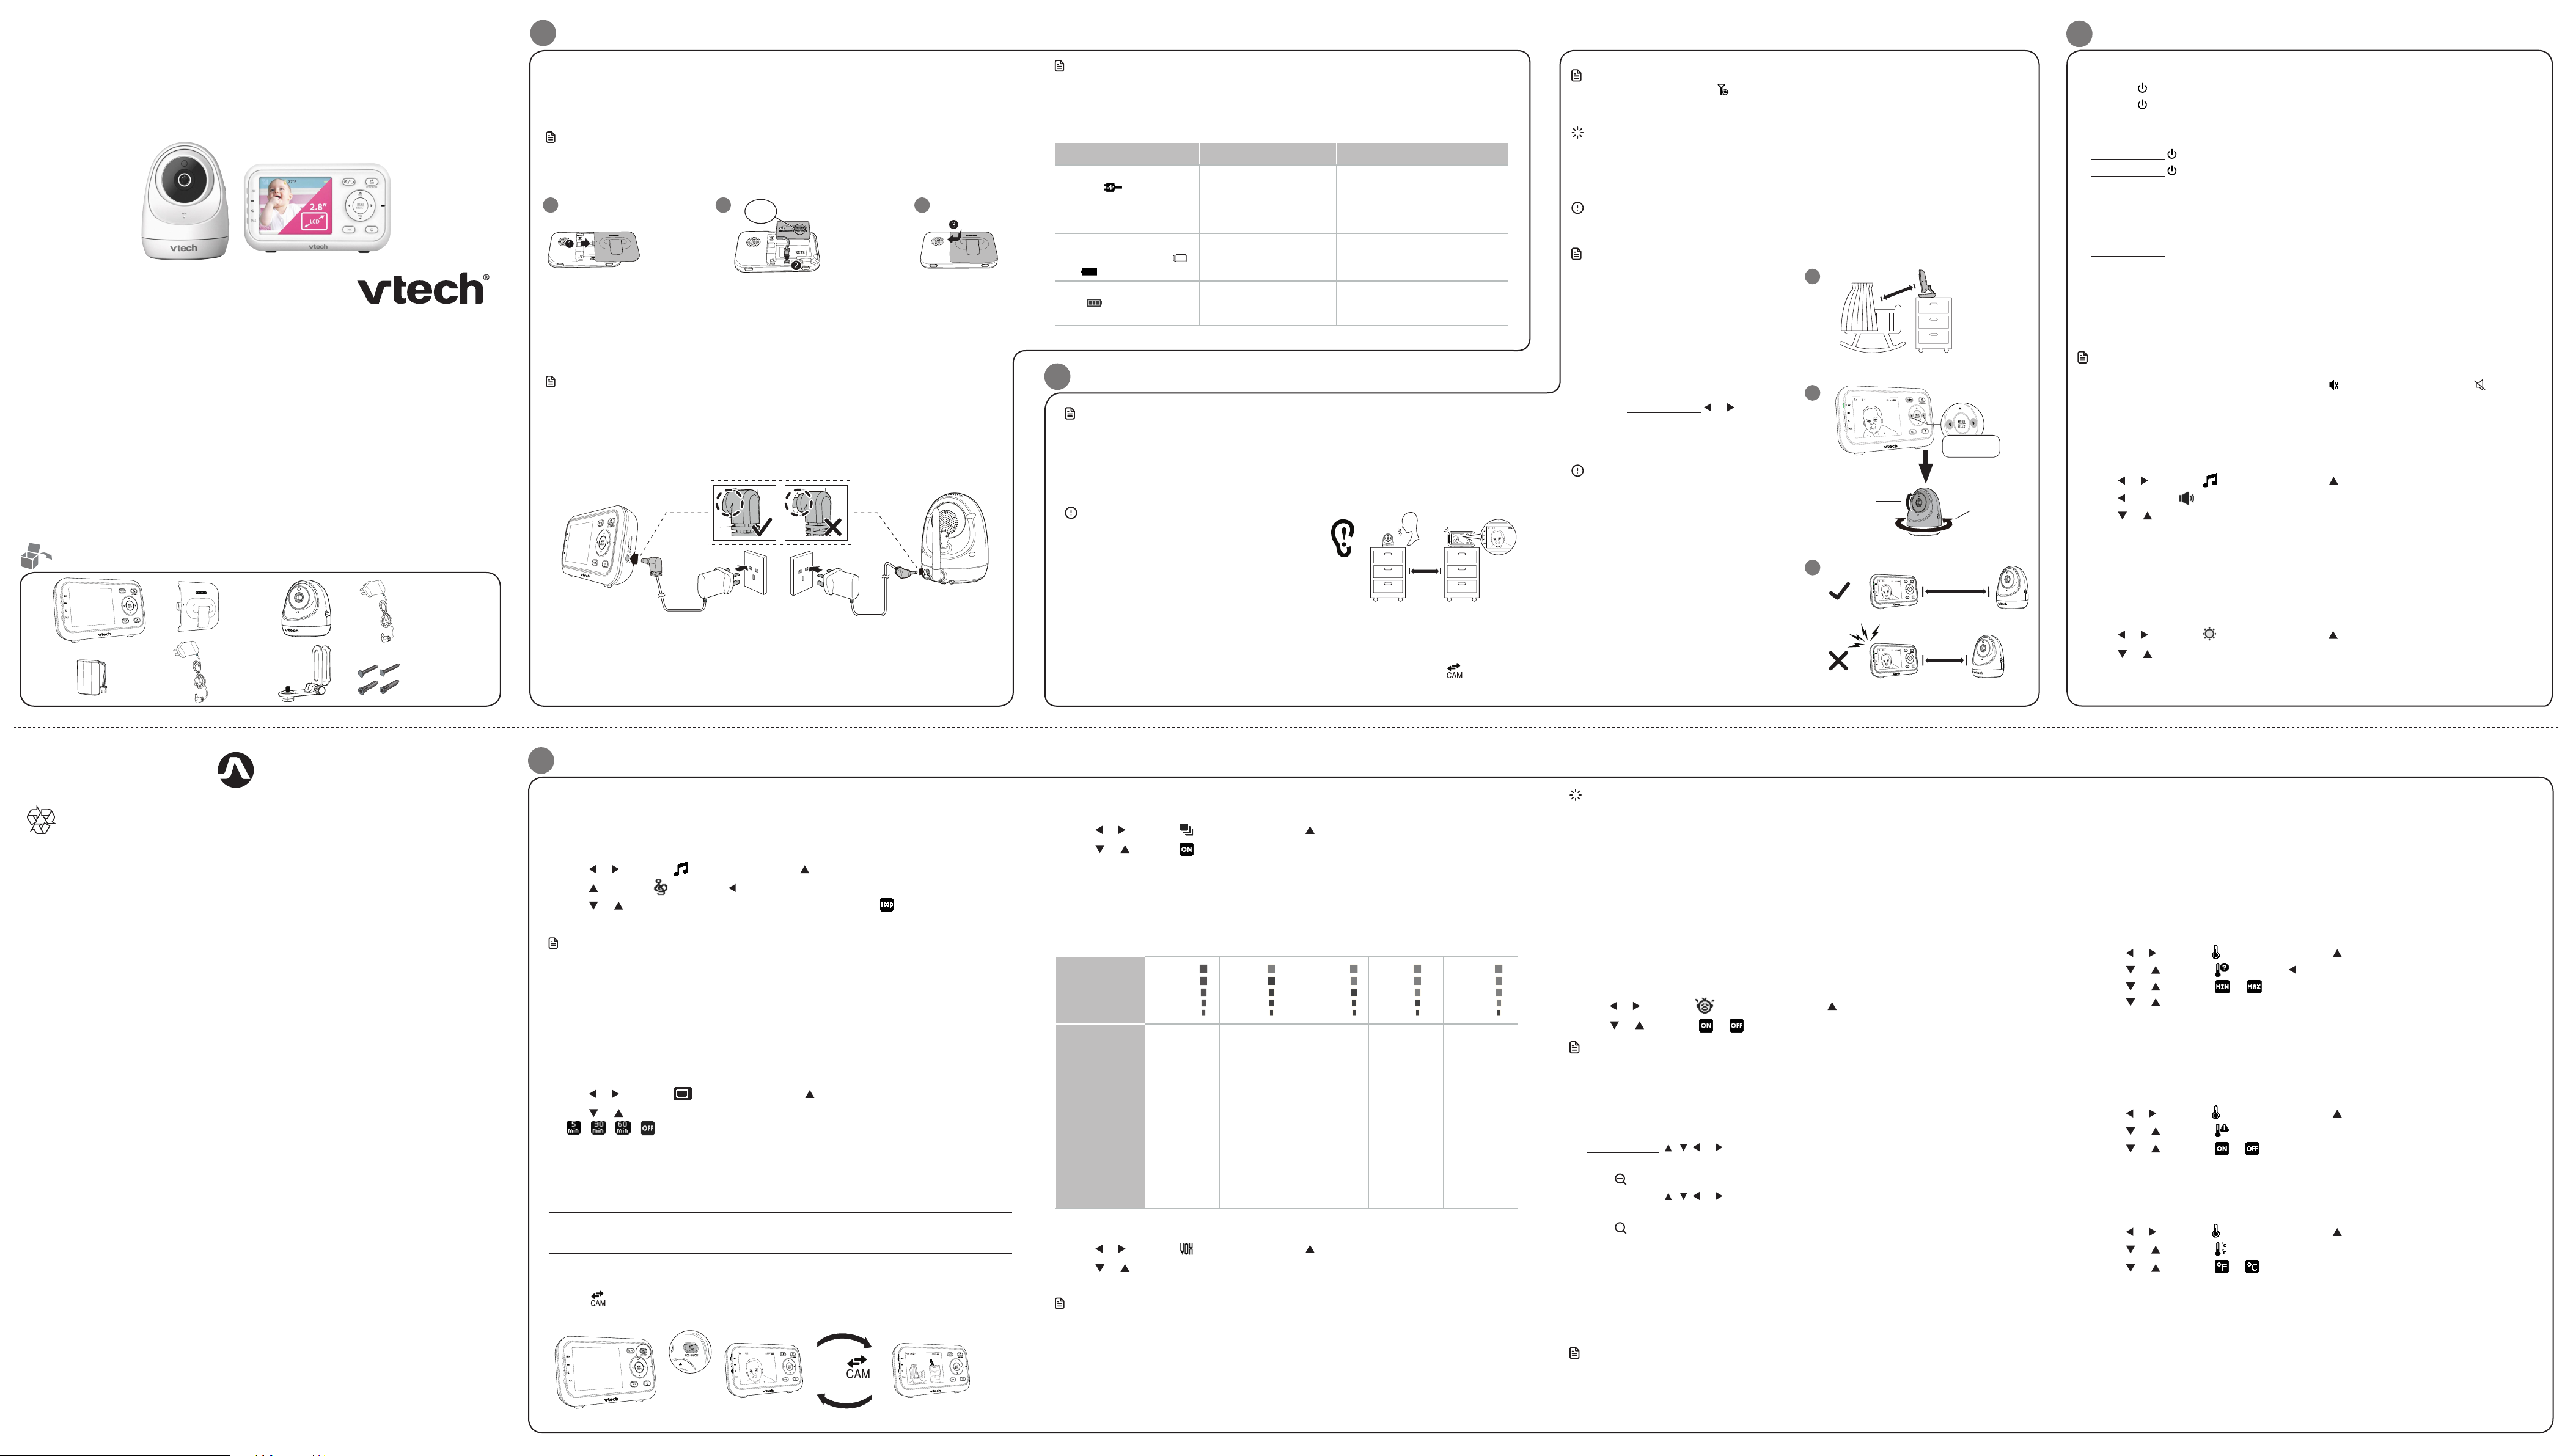
Positioning the baby monitor
Caution
Keep the baby unit out of the reach of your baby. Never place or mount the baby unit inside the
baby’s crib or playpen.
Note
To avoid interference from other electronic
devices, place your baby monitor far away
from devices such as wireless routers,
microwaves, cell phones and computers.
1. Place the baby units more than 3 feet
(1 meter) away from your baby.
2. Adjust the angle of the baby unit
camera to aim at your baby.
Tilt - adjust camera angle manually.
Pan - press and hold or on the
parent unit remotely.
3. Place the parent unit more than 3 feet
(1 meter) away from the baby units.
Caution
The default volume of your parent unit is level 3,
and the maximum volume is level 5. If you
experience high-pitched screeching noise from
your baby monitor while positioning:
- Make sure your baby units and parent unit
are more than 3 feet (1 meter) apart, OR
- Lower the volume of your parent unit.
Operating range
The operating range of the baby monitor
is up to 1000 feet (300 meters) outdoors
or 160 feet (50 meters) indoors. The actual
operating range may vary depending on
the environmental conditions and other
interferences such as walls, doors and other
obstructions.
Lullaby
The baby monitor has five lullabies and four soothing sounds for you to comfort your baby.
You can play the lullabies or soothing sounds on the baby unit using the parent unit.
1. Press MENU when the parent unit is idle.
2. Press or to choose , then press SELECT or .
3. Press to choose , then press .
4. Press or to choose a lullaby or a soothing sound, or choose to stop playing.
5. Press SELECT to confirm your selection.
NOTESNOTE
Notes
The selected lullaby plays for 30 minutes and stops automatically.
The lullaby playback on the baby unit will be paused when receiving talkback from the parent unit.
Screen off timer
You can set the screen off time for the parent unit when there is no key press for a specific
time interval.
When the screen is turned off, you can still hear sound from the baby unit.
1. Press MENU when the parent unit is idle.
2. Press or to choose , then press SELECT or .
3. Press or to choose the desired time period to automatically turn off screen
( / / / ), then press SELECT to confirm your selection.
Monitoring mode * for VM3261-2 only
Every time the parent unit is turned on, it displays a baby unit in Single CAM mode. If there
are two baby units in your system, you can also monitor your baby in Patrol mode.
Single CAM The screen displays image of a single baby unit in full screen.
Patrol A single cam view that transitions to a different baby unit every 10 seconds.
To switch to another camera:
Press to view the next baby unit.
Monitor the temperature
Your baby unit monitors the temperature of your baby’s room with its built-in temperature
sensor. If the detected temperature is out of the preset temperature range, the parent unit
will display an alert message.
Set temperature range
You can set the desired room temperature alert range. The minimum temperature can be
set between 50 oF (10 oC) and 76 oF (24oC). The maximum temperature can be set between
77 oF (25 oC) and 102 oF (39 oC).
1. Press MENU when the parent unit is idle.
2. Press or to choose , then press SELECT or .
3. Press or to choose , then press .
4. Press or to choose or , then press SELECT.
5. Press or to choose the desired minimum or maximum temperature, then press
SELECT to confirm your selection.
Temperature alert tone
You can turn on the temperature alert tone so that the parent unit will emit an alert tone if
the detected temperature is out of range.
1. Press MENU when the parent unit is idle.
2. Press or to choose , then press SELECT or .
3. Press or to choose , then press SELECT.
4. Press or to choose or , then press SELECT to confirm your selection.
Temperature format
You can choose to display the temperature in Fahrenheit (oF) or Celsius (oC).
1. Press MENU when the parent unit is idle.
2. Press or to choose , then press SELECT or .
3. Press or to choose , then press SELECT.
4. Press or to choose or , then press SELECT to confirm your selection.
Install the battery
The parent unit runs on rechargeable battery or AC power. To continuously monitor your
baby, make sure you use both battery and AC power at the same time. With the battery
alone, the parent unit can cordlessly run for a short time only.
NOTESNOTE
Notes
Use only the battery supplied with this product.
If the parent unit will not be used for a long time, disconnect and remove the battery to prevent
possible leakage
Replace the battery
To replace the battery, press down on the battery compartment cover and pull it out, then
follow the steps above to install the battery.
Connect the baby monitor
NOTESNOTE
Notes
Use only the power adapters supplied with this product.
Make sure the baby monitor is not connected to the switch controlled electric outlet.
Connect the power adapters in a vertical or floor mount position only. The adapters’ prongs are not
designed to hold the weight of baby monitor, so do not connect them to any ceiling, under-the-
table, or cabinet outlets. Otherwise, the adapters may not properly connect to the outlets.
Make sure the parent unit, the baby unit and the power adapter cords are out of reach of children.
Charge the parent unit battery
When you have connected and turned on the parent unit, the battery will be charged
automatically. The battery icon indicates the battery status (see the following table).
NOTESNOTE
Notes
The parent unit battery is fully charged after 11 hours of continuous charging.
It takes longer to charge the battery when the parent unit is turned on. To shorten the charging
time, turn the parent unit off while charging.
The standby time varies depending on the volume level you set and your actual use.
Battery indicators Battery status Action
The battery icon is off and
displays .
No battery is installed
but operates using AC
power, or the battery
has been installed
incorrectly.
Install the parent unit battery.
Charge without interruption (at
least 30 minutes).
The screen displays Battery
low at Parent Unit and .
The light flashes.
The battery has very little
charge and may be used
for only a short time.
Charge
without interruption
(about 30 minutes).
The battery icon becomes
solid .
The battery is fully
charged.
To keep the battery charged,
connect it to AC power when
not in use.
THIS SIDE UP
THIS SIDE UP
THIS SIDE UP
1
2
Press down
on the battery
compartment
cover to pull
it out.
Make sure the
label THIS SIDE
UP is facing up
while inserting
the battery.
3
Using the baby monitor
Press .
> 3ft (1m)
1m (3ft)
1m (3ft)
> 3ft (1m)
1
2
3
3ft (1m)
3ft (1m)
Press and hold
Tilt
(Manual
control)
Pan
(Parent unit
remote control)
1


Need help? Post your question in this forum.

Forumrules


Report abuse

Libble takes abuse of its services very seriously. We're committed to dealing with such abuse according to the laws in your country of residence. When you submit a report, we'll investigate it and take the appropriate action. We'll get back to you only if we require additional details or have more information to share.

Product:

For example, Anti-Semitic content, racist content, or material that could result in a violent physical act.

For example, a credit card number, a personal identification number, or an unlisted home address. Note that email addresses and full names are not considered private information.

Forumrules

To achieve meaningful questions, we apply the following rules:

Register

Register getting emails for VTech VM3261 at:


You will receive an email to register for one or both of the options.


Get your user manual by e-mail

Enter your email address to receive the manual of VTech VM3261 in the language / languages: English as an attachment in your email.

The manual is 4.22 mb in size.


You will receive the manual in your email within minutes. If you have not received an email, then probably have entered the wrong email address or your mailbox is too full. In addition, it may be that your ISP may have a maximum size for emails to receive.

The manual is sent by email. Check your email

If you have not received an email with the manual within fifteen minutes, it may be that you have a entered a wrong email address or that your ISP has set a maximum size to receive email that is smaller than the size of the manual.

The email address you have provided is not correct.

Please check the email address and correct it.

Your question is posted on this page

Would you like to receive an email when new answers and questions are posted? Please enter your email address.


Info