T
You may test the baby monitor before initial use, and at
regular times thereafter.
1
2. The p
• Speak to
Y
Caution
• For hearing protection, make sure the par unit is more than 1 metre away from the ba
unit. If you hefeedbac stops. You can
also press on the parent unit to reduce the noise.
Notes
• This baby monitor is intended as an aid. It is not a substitute for proper adult supervision, and should
not be used as such.
• Whe and t No L
nu, aLIN LED light fl
min
and s
Tip
• Increase the speaker volume of the parent unit if you are un
Positioning the baby monitor
1
2. Adju
3. Carefu
deviat
4.
Power on or off the baby unit
• SlidO switcON to turn on the baby unit. The ON/OFF LED light turns on.
• SlO swiOFF to turn off the baby unit. The ON/OFF LED light turns off.
Power on or off the parent unit
• Pres POWER to turn on the parent unit. The scr
• Pres POWER again to turn off the parent unit. The scr
T
Y
can s
• Pr LC on the p
• Press any keys on the pa
Adjust speaker
For parent unit:
• Press or on the parent unit at any time when viewing images. A
adju indi
vol
For baby unit:
The bab
trans
1 when the parent unit is idle.
2. Press or to c , the .
3. Press or to c
loud to confirm you
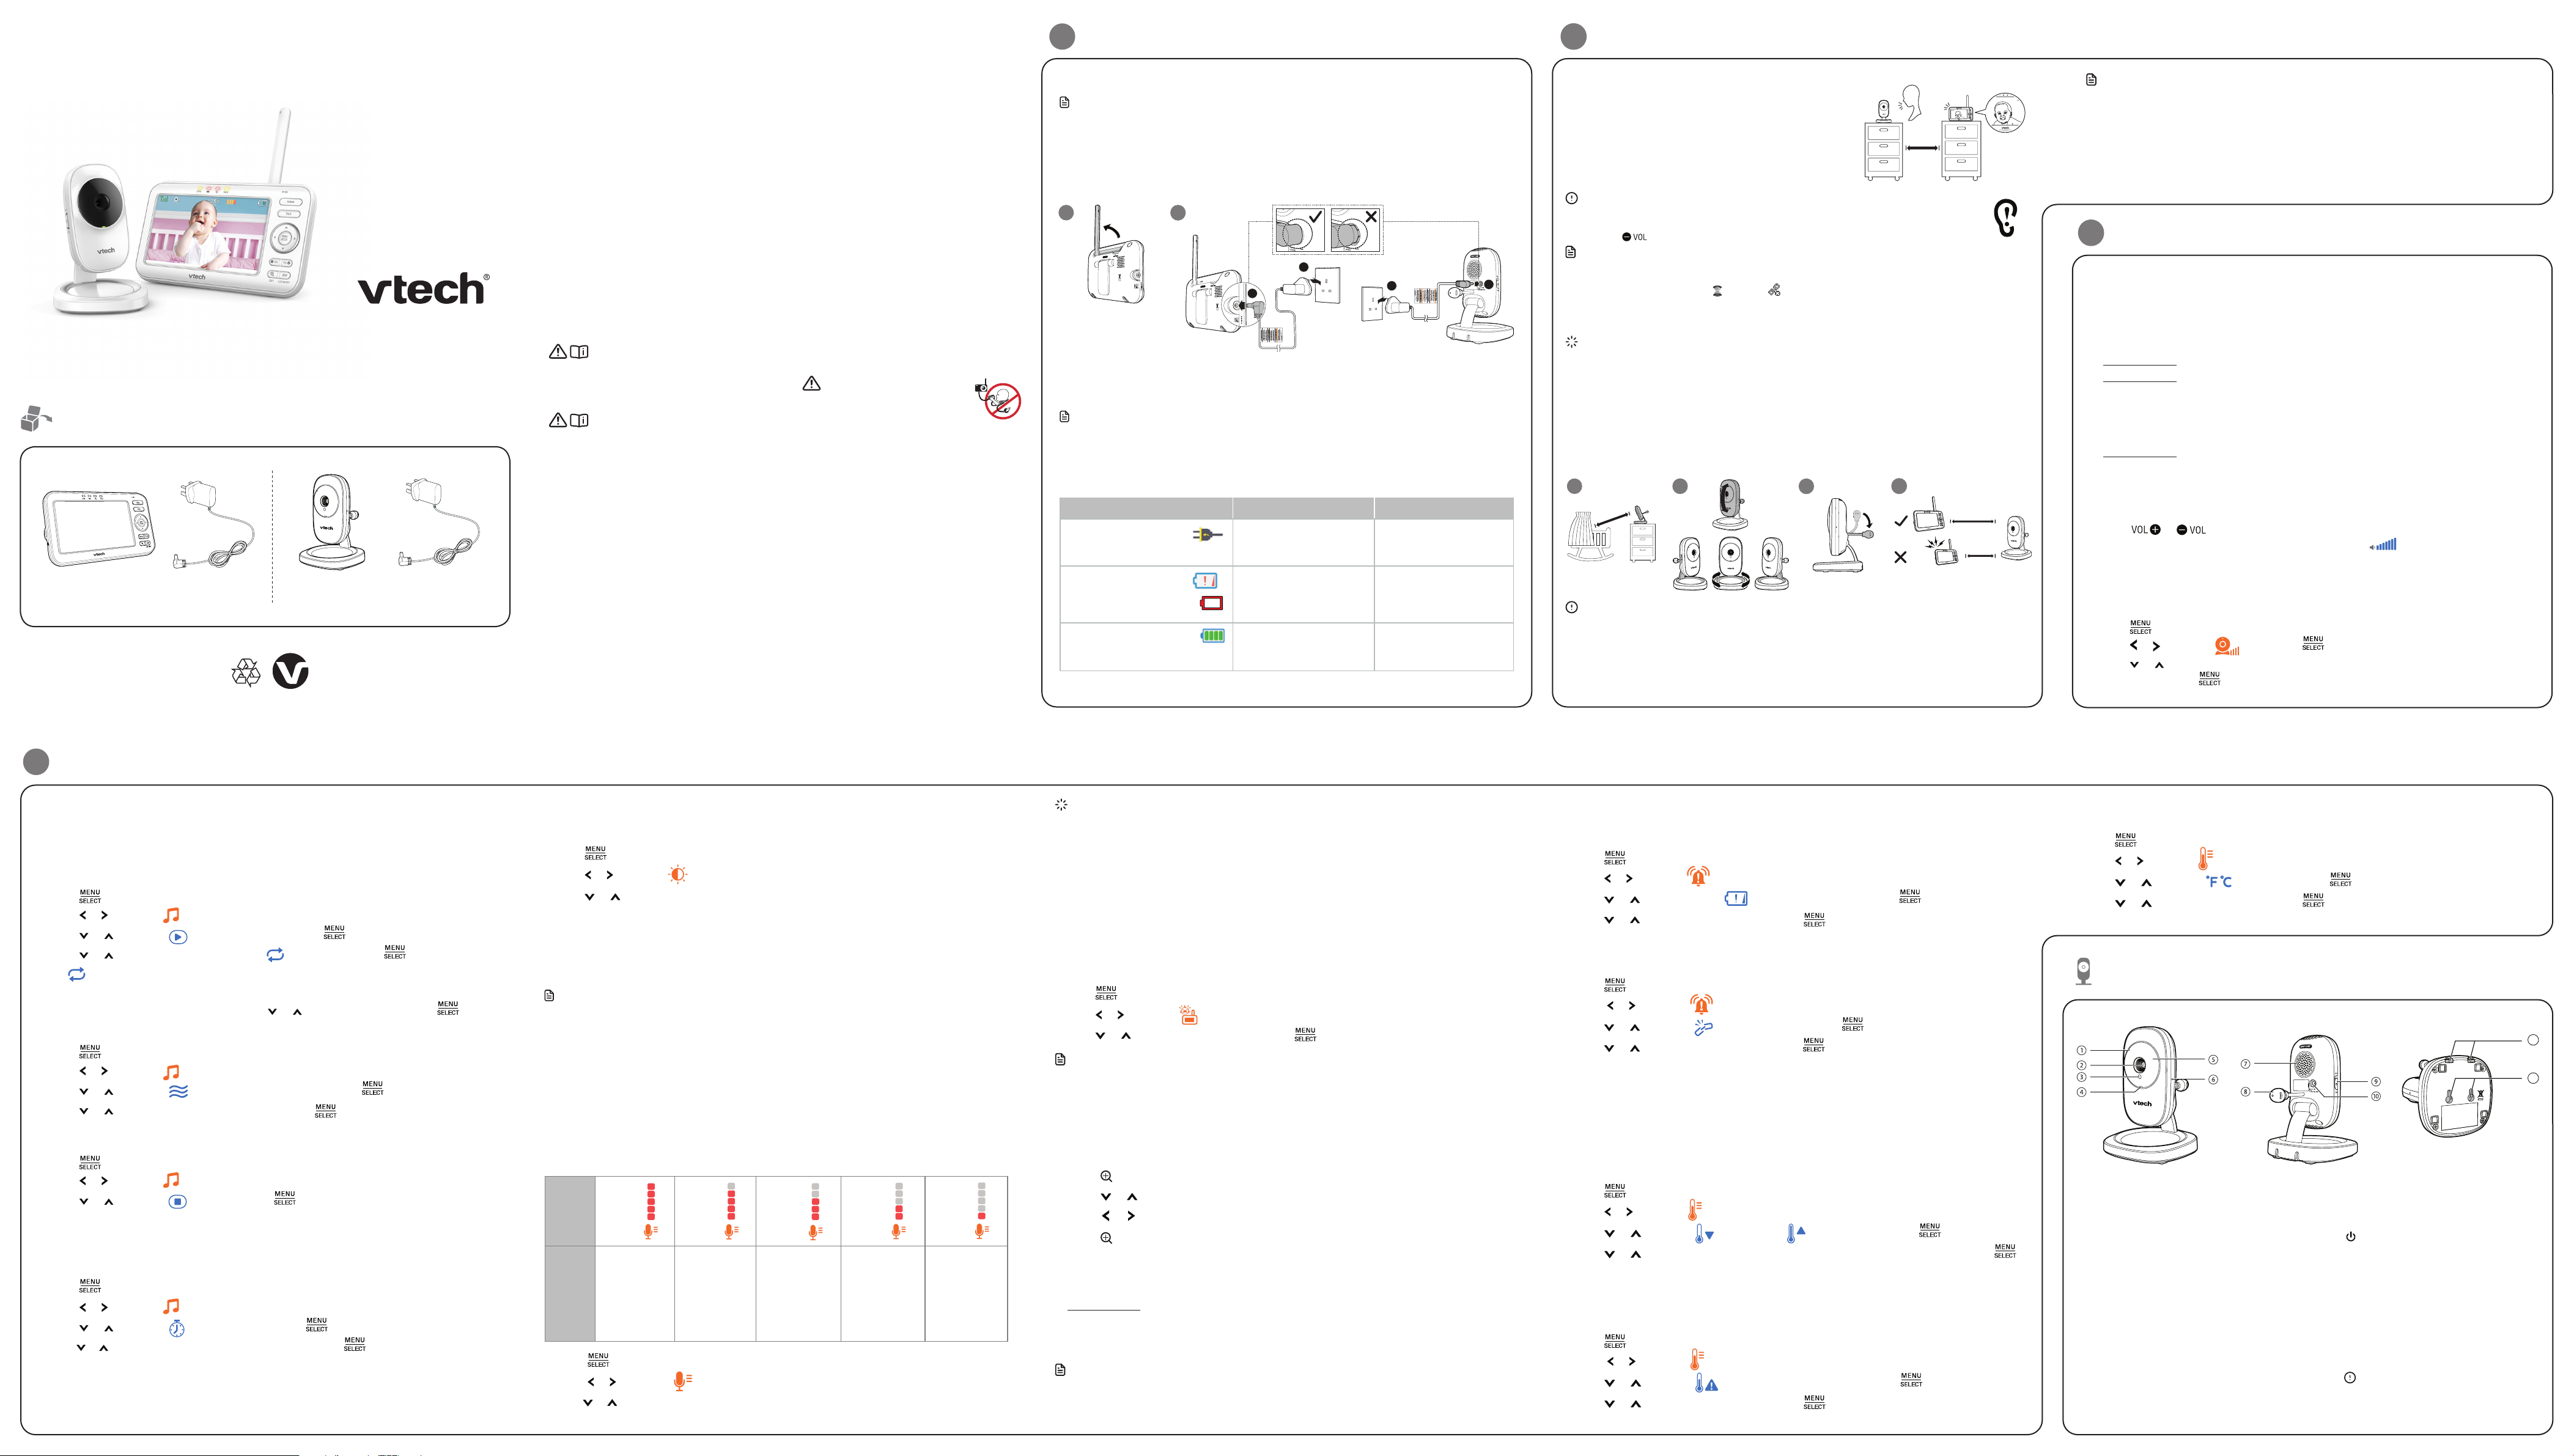
User’s manual
LM808-
LM808-
Full Colour Video Monitor
Tips
• Y
• If you want t
to ch
- Lower t
- Lower t
highest lev
T
WheSound activation is on, t
unit d
Onc
the p
agai
1 when the parent unit is idle.
2. Press or to choose Sound-act.
3. Press or to choOn or Off, then p to confir
Notes
• If you have mu
dete
• Whe
and b
Zoom
Y
• Press to zoom in.
• Press or to mo
• Press or
• Press again to zoom out.
T
You can use thTA func
1TALK on the pTA light turns on.
2. Speak towards the microphone on the parent unit. Your voice is broadcast to the baby unit.
3. Release the TALK key to stop the broadcast.
Notes
• The p
resumesTA is
• The b
Set alert tone
Low batte
Y
1 when the parent unit is idle.
2. Press or to choose Alert settings .
3. Press or agai Low Bt .
4. Press or to choose On or Off, the
No link alert
Y
lo
1 when the parent unit is idle.
2. Press or to c Alert settings .
3. Press or to cho No Lin , then pres .
4. Press or to choose On or Off, the to confi
Monitor the temperature
Y
sens
will di
Se
Y
bet1o C and 20 o C . The ma 21 o C and 30 o C .
1 when the parent unit is idle.
2. Press or to cho T.
3. Press o to choose M or Maximum , then press .
4. Press o to choose th
to confir
Temperature alert tone
You can turn o
the de
1 when the parent unit is idle.
2. Press or to choose T.
3. Press o to choose T Aler, then press .
4. Press o to choose On or Off, then press to confirm your selection.
1 Conne 2 Before use
3 Using
3 Using Continued )
Specifications ar
© 2021 VTech Communications, Inc.
All rights reserved. 09/21
Lullab
The b
Y
pare
T
1 when the parent unit is idle.
2. Press or to cho Pla.
3. Press or to cho P, then p .
4. or to cho Pl , th .
• If Pl i
the
5. or to chPl, then pre .
T
1 when the parent unit is idle.
2. Press or to cho Pla.
3. Press or to cho Pla, then pres .
4. or to cho .
T
1 Press when the parent unit is idle.
2. Press or to cho Pla.
3. Press or to cho Stop , then p .
T
Whil
stops t
time
1 when the parent unit is idle.
2. Press or to cho Pla.
3. Press or to cho Auto Timer, t .
4. Press or to cho to confir
Af
Adjust LCD brightness
You can change the brightness of the parent unit screen from Level 1 to Level 5 . The LCD
brightLeve .
1 Press when the parent unit is idle.
2. Press or to choose B .
3. Press or to cho
T
DIm mo
will di
press
Note
• Whi
pre
Adjust the sound sensi
YSound activation and adjust the V to detec
on the p
Whe
scre
you can se
If you turn ofSound activation , you wil
when t
> 1m
1m
1
3
> 1m
< 1m
Connect the baby
Notes
• The re
• Use only the power ad supplied with this product.
• Make s
• Co
des
or ca
• Make sure the parent unit, the baby unit and the power ad cords are out of reach of children.
Charge the parent unit battery
Whe
indi
Notes
• Befo
• It takes longer to charge the battery when the parent unit is turned on. To shorten the charging time,
turn the parent unit off while charging.
• The b
age of t
Ba Ba Action
Parent u Parent u
cha
run
Keep th
AC power unti
fully charged.
Parent u
Status b
The b
lef
for a sh
Cha
(about 3
Status b The b T
cha
power wh
1
2
1
2
Import
EXIT
VOX
Sensitivity
level Lev
(Highest)
Level 4
(High)
Level 3
(Medium)
Level 2
(Low)
Level 1
(Lowest)
Description (Default setting
The parent unit
screen and
speaker
for
sounds, including
background noise
from your
room.
The parent unit
screen and speaker
turn on for so
babbling and
louder sounds
from your
The parent unit
remains quiet when
your
soundly
The parent unit
screen and speaker
turns on for loud
babbling and louder
sounds from your
baby
remains quiet when
your
sounds.
The parent unit
screen and speaker
turn on for crying
and louder sounds
from your
parent unit
quiet when your
baby
sounds.
The parent unit
screen and speaker
turn on for loud
crying or scr
sounds from your
baby
unit remains quiet
when your
makes soft sounds.
1 set for LM808-
2 sets for LM808-
Bab
11
12
Temperature format
You can choo F) or Ceo C).
1 when the parent unit is idle.
2. Press or to choose T.
3. Press o to choose Format , then press .
4. Press o to choose o F or o C , then press to confirm your selection.
1Microphone
2Camera
3Light se
4ON/
• On wh
and is p
• Flash
bei
or whe
lo
5Infrared L
6Pair
• Y
provide
7Speaker
8T
9 ON/
• Slid
10 Power
11 Wall mou
mounting
12 Wall mou
• Whil
the m
Caution: Do n
a heig
Caution
• Keep the baby unit out of the reach of your baby. Never place or mount the baby unit inside the
baby’s cot or playpen.
• The default volume of your parent unit is level 4 , and the maximum volume is level 7. If you experience
feedbafrom your baby monitor while positioning:
Make sure
Lower
Note
• To av
away
Operating range
The operating range of the baby monitor is up to 30
operating range may vary depending on the environmental conditions and other
obstructions such as walls, doors...
1 when the parent unit is id
2. Press or to cho VOX Sensitivit.
3. Press or to choose the desired sensit
Th
unit
Wh
sh
shock and
1 Follow all warnings and instructions marked on the
product.
2 Adult setup is required.
3. C D
2 metr
4. Th
infant
pa
th
pro
me
is in
5. Do not u
bath, sink, swimming
6. CAUTION: Use only the battery pr
of explosion if a wrong type of battery is used for the parent
unit. The batt
temperatur
storage or
oven, or
result in an e
high tempera
explosion or
subjected to e
explosion or
used battery
7. Use only the pow
Incorrect powe
damage the product.
Power adap
Par
VT
Model: VT05EEU05100 (EU), VT05EUK05100
Baby
VT
Model: VT05EEU05100 (EU), VT05EUK05100
Rechargeable battery
Corun - Ni-MH
Ni-MH AAA900mAh 3.6V
8. The power ad
oriented in a vertical or floor mount position. The prongs
are not designed to hold the plug in place if it is plugged
into a ceiling, under-the-table or cabinet outlet.
9. For pluggable equipment, the socket-outlet sho
be installed near the equipment and sho
accessible.
10. Unplug this product from the wall outlet before cleaning.
Do not use liquid or aerosol cleaners. Use a damp cloth for
cleaning.
11 Do not cut off the power a
other plugs, as this causes a hazardous situation.
12 Do not allow anything to rest on the power cords. Do not
install this product where the cords may be walked on or
crimped.
13. This product should be operated only from the type
of power source indicated on the marking label. If you
are not sure of the type of power supply in your home,
consult your dealer or local power company.
14 Do not overload wall outlets or use an extension cord.
15 Do not place this product on an unstable table, shelf, stand
or other unstable surfaces.
16 This product should not be placed in any area where
proper ventilation is not provided. Slots and openings
in the back or bottom of this product are provided for
ventilation. To protect them from overheating, these
openings must not be blocked by placing the product on
a soft surface such as a bed, sofa or rug.
This product should never be placed near or over a
radiator or heat sou
1 Never push objects of any kind into this product through
the slots because they may touch dangerous voltage
points or create a short circuit. Never spill liquid of any
kind on the product.
18 To reduce the risk of electric shock, do not disassemble
this product, but take it to an authorized service facility.
Opening or removing parts of the product other than
specified access doors may expose you to dangerous
voltages or other risks. Incorrect reassembling can
cause electric shock when the product is subsequently
used.
19. You should test the sound reception every time you turn
on the units or move one of the components.
20. Periodically examine all components for damage.
21 T
electronic devices,
telephones, etc. T
pro
the b
powe
if you w
22 Children should be supervised to ensure that they do not
play with the product.
23 The product is not intended for use by persons (including
children) with reduced physical, sensory or mental
capabilities, or lack of experience and knowledge, unless
they have been given supervision or instruction concerning
use of the appliance by a person responsible for their
safety.
SAVE THESE INSTRUCTIONS
Cautions
1 Use and store the product at a temperature between 0o C
and 40o C.
2 Do not expose the product to extreme cold, heat or direct
sunlight. Do not put the product close to a heating source.
3. Batteries should not be exposed to excessive heat such as
bright sunshine or fire.
4. W
Chi
thi
th
5. Never place the baby unit(s) inside the
baby’s crib or playpen. Never cover the baby unit(s) or
parent unit with anything such as a towel or a blanket.
6. Other electronic products may cause interference
with your baby monitor. Try installing your baby
monitor as far away from these electronic devices
as possible: wireless routers, radios, cellular
telephones, intercoms, room monitors, televisions,
personal computers, kitchen appliances and cordless
telephones.
Precautions
Cardiac pacemakers (applies only to digital cordless devices):
Wireless Technology Research, LLC (WTR), an independent
research entity, led a multidisciplinary evaluation of the
interference between portable wireless devices and
implanted cardiac pacemakers. Supported by the U.S. Food
and Drug Administration, WTR recommends to physicians that:
Pacemaker patients
• Should keep wireless devices at least six inches from the
pacemaker.
• Should NOT place wireless devices directly over the
pacemaker, such as in a breast pocket, when it is turned ON.
WTR’s evaluation did not identify any risk to bystanders with
pacemakers from other persons using wireless devices.
Electromagnetic fields
This VTech product complies with all standards regarding
electromagnetic fields (EMF). If handled properly and
according to the instructions in this user’s manual, the product
is safe to be used based on scientific evidence available today.