Opera
Preliminar S tePS
In a ch o as d
scribedpreviously
Sc th su a o ja Ne
att to op th tran ante con-
nected.
Ifyou
be familiar with
ofthe
VX-230
.
OPera Q uick S t
T
VOL/PWR
clockwisetoturnontheradioon.
T
CH
to choose operating chan-
nel.
Rotate
VOL/PWR
volu level. If no si is pres
pressandholdinthe
Programmable
keyassigned“SQL”
t o se b n
wil be hear and you ma
thisto
VOL/PWR
knob
desiredaudiolevel.
BefOre YOu Begin
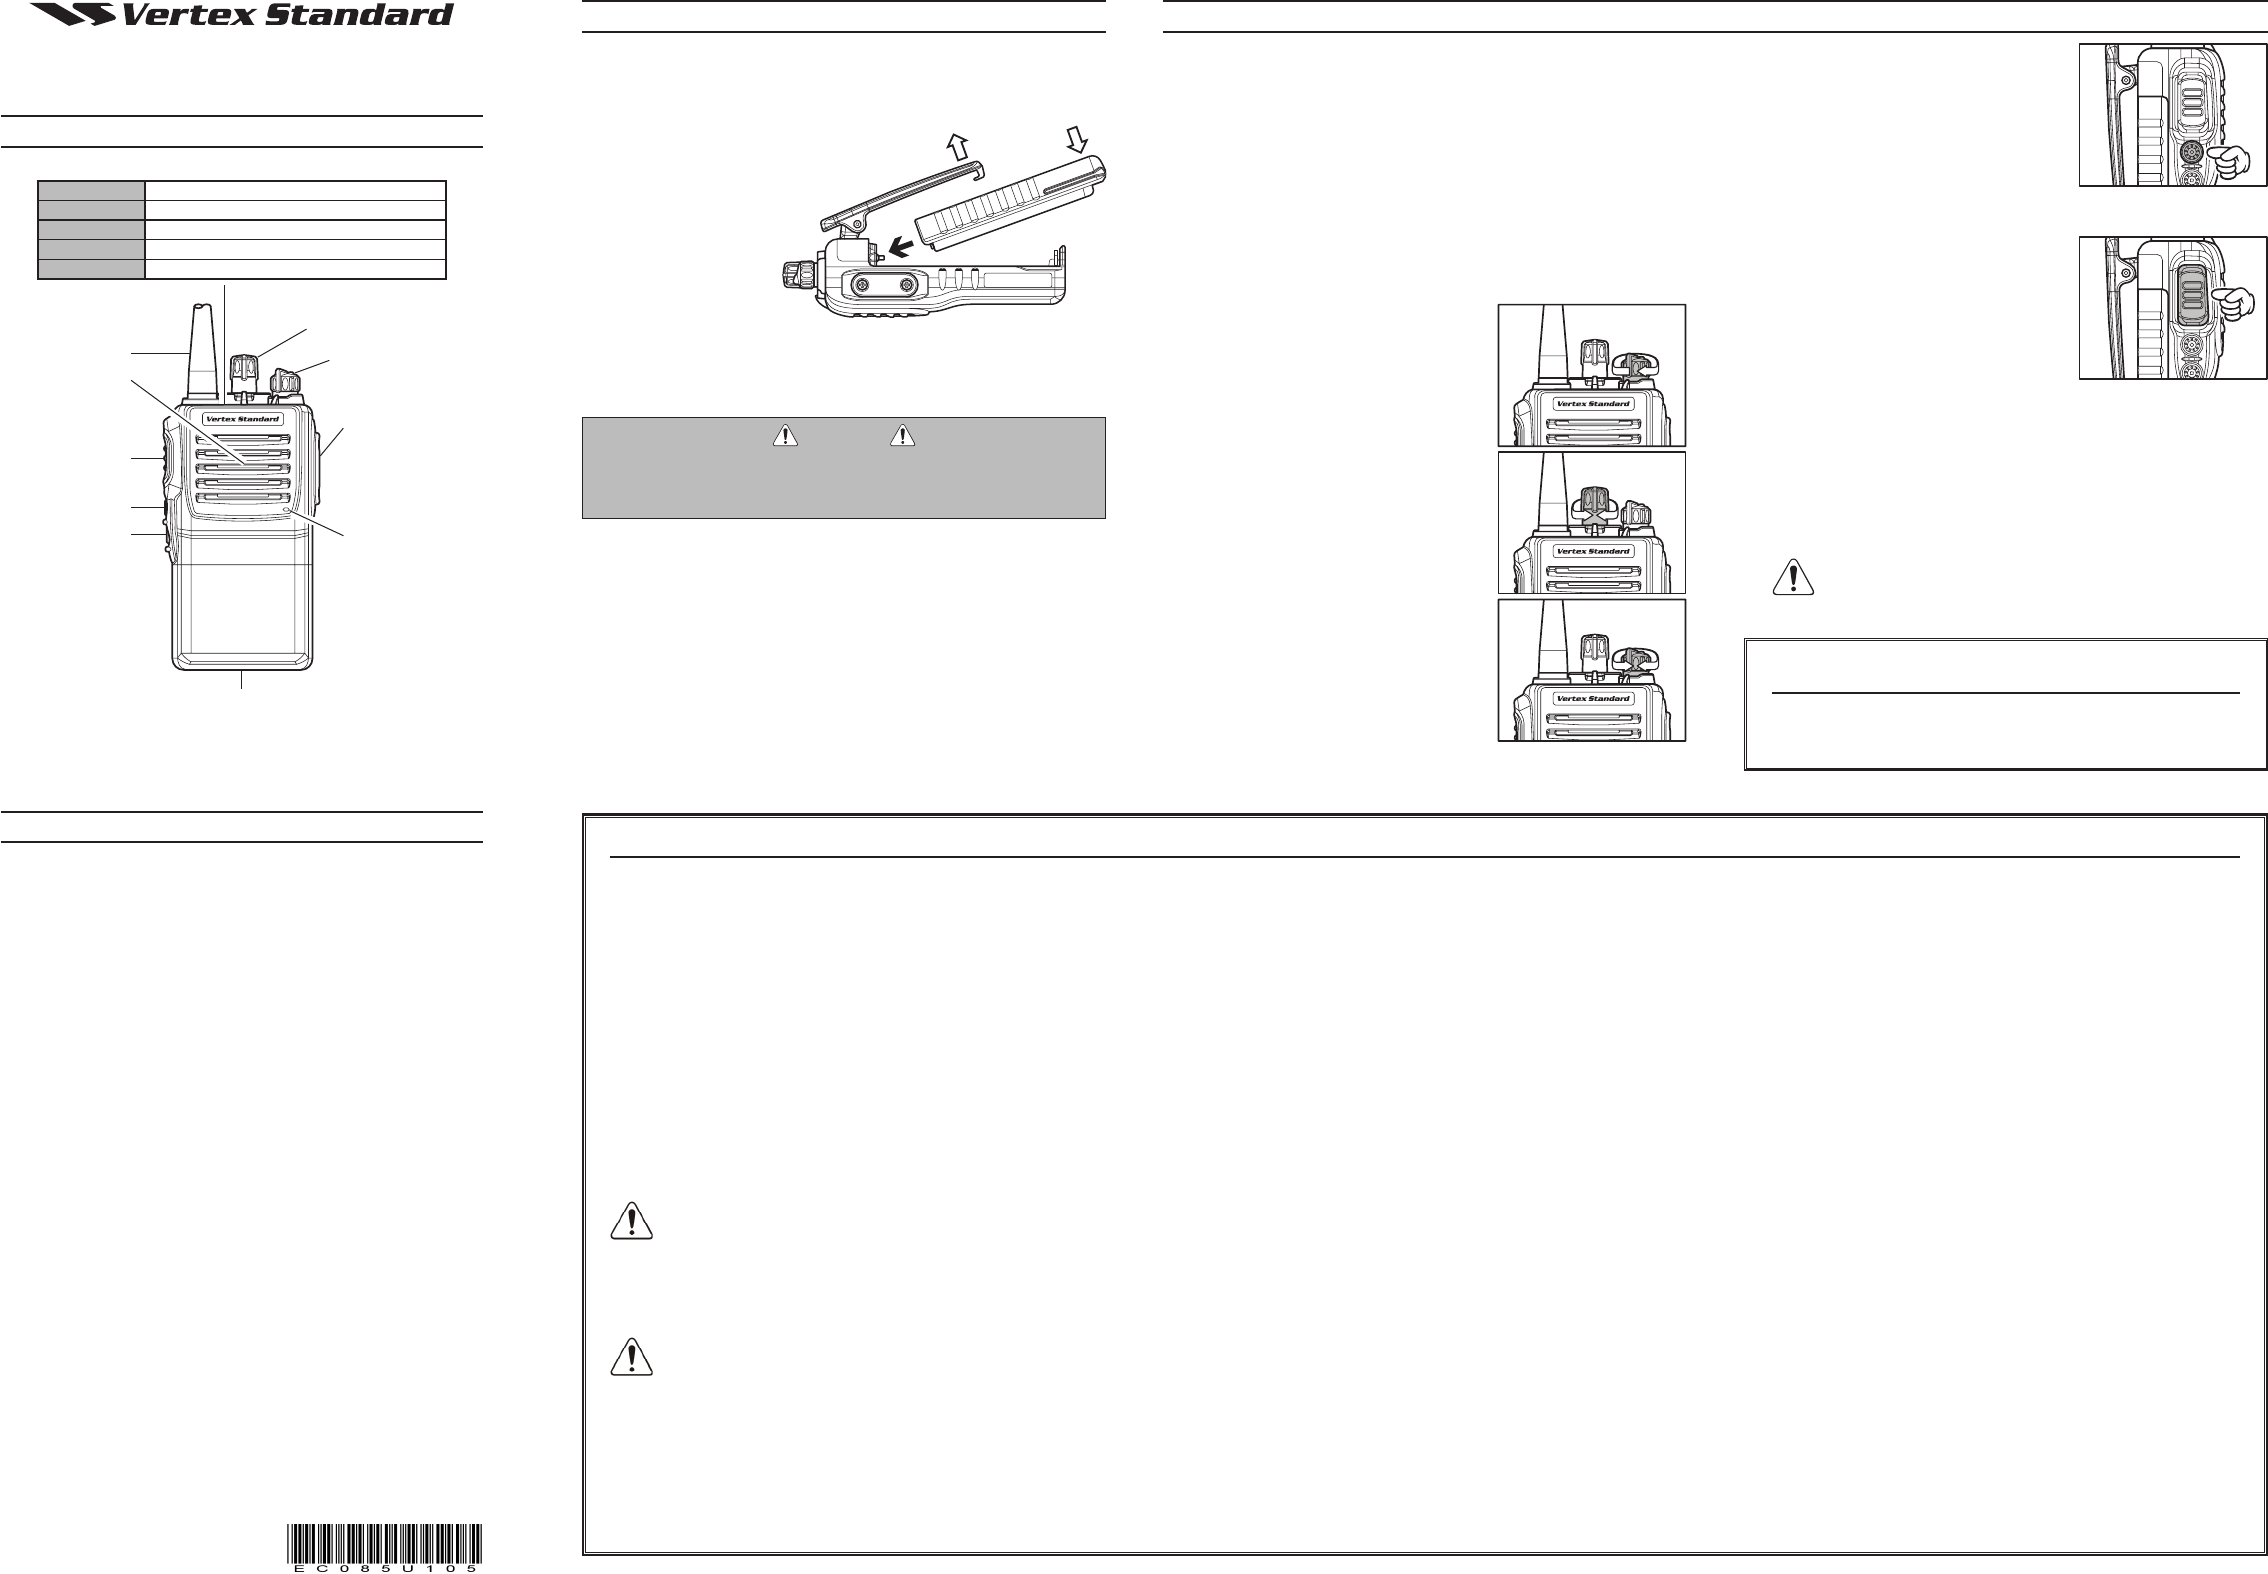
Ba P ack i nSt and r emOv
T install the batt hold the transceive
so
thumb
t b i b
compartmenton
radio whil the Belt
Cli th pus
t b s o t
b p u
t h e b a t t p a c k
l w
teryPackLatch.
T
ti cas Sl th Pa Lat on th of th
radi slide the ba down and out fro
whileholdingtheBeltClip.
Caution
Do
Io pa as t e if ac sh
circuited.
lOw Ba i ndica
As
lower
charged ba and rec deplet the batt
voltage
red.Furthermore,ifyourDealersetsthe“LowBattery
intothetransceiver,analertbeeperwillsoundwhen
ageislow
Pressandhol
Programmable
keyassigned“SQL”
t s p t k
tw to q t noi and re
normal(quiet)monitoring.
T
THIS IS
T
PTT
s i t m
a t f p (
ri in a no v
level. return to the mode,
releasethe
PTT
switch.
Do n tr th wi
an antenna connected.
Ifa
its two mounting screws from transceiv
then
MIC/
S
ja se t p us th s wi t
Speaker/Microphone.
whilereceiving.T
PTT
switchon
er/Microphone,
Not: Save t pla ca its m
screws.Theyshould
Speaker/Microphone.
Microphone
Speaker
MIC/SP Jack
(
ExternalMic/Earphone
)
VOL/PWR Knob
CH
(
Channel
)
Selector
Side 1 Switch
Push T
(
PTT
)
Switch
Antenna
LED Indicator
Battery Pack Latch
Side 2 Switch
SafetY training infOrma
This
nications Comm (FCC) RF exposure limits for Occupati
Use/Controlled
thefollowingStandardsandGuidelines:
FCC 96-32 fo the En
fectsofRadio-FrequencyRadiation.
FCCOETBulletin65Edition97-01(1997)SupplementC,Eval-
uatingCompliance
RadioFrequencyElectromagneticFields.
ANSI/IEEE IEEE Levels
Res to H Ex to Radi El
neticFields,3kHzto300GHz.
ANSI C95. IE Pract for the
Measurement of Potentially Hazardous
RFandMicrowave.
W:Thisradio
during
edasOccupational Use Only ,meaningit
the
thewaystominimizesuch
bytheGeneral Population inanuncontrolledenvironment.
CAUTION:T
ic
use,alwaysadheretothefollowingguidelines:
Please read this manual carefully to become familiar
features of this transceiver
Do not transmit the radio without an antenna connected.
This NOT use the
tion
to work
radio operator must
posure conditions.
When
its microph 1 (2.5 to 5 cm) away from your
mo ke th ant at le awa
from your
T r m be u wi a m du
cycle
gurations. DO NOT transmit for mor than 50 %
rad use ti (50 % du cycl T m than
50 %
quirements to be exceeded.
T
dard
cycle still more.
The radio is
radio cause by
pressing the PTT
When operate the the V CLIP-18
belt-clip,
keep the Body W
Al use t FN FN
UNI or FNB-V132LI-UNI Lithium-Ion Battery
Risk
Dispose of used batteries according to the instructions.
Perf the bat char where the am tem
ture ° F ° F ° C ° C).
of this range could cause damage to the battery pack.
Battery Pack not be excessive as
sunshine, re or
V
Always use V
V Sta be li fo any d ac-
cid su as fire, le o expl o e
caused by the malfunction Standard accesso-
ries.
T g R e e
tran mode. This rad is and clas as
occupational only meaning must used
the co of empl aw
ous,
not
trolled envir
The
needed
assure with FCC exposure of
thisradio.
Electromagnetic Interfer
During tran this radi RF energy that can
po ca wi ot de o sy
avoid interfer radio
are posted to do so.
Do not
tro suc hos he fac
aircraft, and blasting sites.
FCC LICENSE INFORMA
This ra opera on commu frequenc which are
sub to F (Fed Co Co R
and Regulations. FCC Rules require that all operators using Pri-
vate Land Mobile
operating their equipment.
acceSSOrieS & OptiOnS
FNB-V103LI
7.4V
FNB-V104LI
7.4V
FNB-V131LI-UNI
7.4V
FNB-V132LI-UNI
7.4V
V
DesktopRapidCharger(forFNB-V103LI/-V104LI)
V
6-unitMultiCharger(forFNB-V103LI/-V104LI)
CD-58
DesktopCharger(forFNB-V131LI-UNI/-V132LI-UNI)
P
AC
V
6-unitMultiCharger(forFNB-V131LI-UNI/-V132LI-UNI)
MH-37
A4B
Earpiece/Microphone
MH-45
B4B
Speaker/Microphone(NoiseCancelling)
MH-360S
Speaker/Microphone(SmallT
MH-450S
Speaker/Microphone(MiniatureT
VH-1
Lightweightheadsetw/Boommic
VH-215S
Lightweightpaddedheadset,SingleSpeaker
VH-225S
Lightweightpaddedheadset,DualSpeaker
VCM-2
V
DCM-1
DesktopChargerBracket(for
A
Rubber
A
Rubber
A
Rubber
A
Rubber
A
Rubber
A
Rubber
A
Rubber
A
Rubber
A
Rubber
CLIP-18
BeltClip
LCC-230
LeatherCase
CE99
ProgrammingSoftware
FIF-12
USBProgrammingInterface
CT
RadiotoRadioProgrammingCable
CT
PCProgrammingCable(forFIF-12)
Tilt the Belt Clip
Insert the Battery Pack
Push the bottom side
of the Battery Pack
vX-230 SerieS
OPera m anual
cOntrOlS & cOnnect
Green Monitoron(orSide1orSide2switchisactivated)
Blinking Green BusyChannel(orSQL
Glows Red Transmitting
Blinking Red BatteryV
Y ReceivingaSelectiveCall
Opera t empera r ange
(
FOr eurOpean user
)
Operation:–20°Cto+55°C
Battery Charging:+10°Cto+40°C
(T