Vehicle fe Vehicle features
Vehicle features
Longitudinal
Pull handle
handle.
Danger
:
Do not sit nearer than 25 cm f
steering wheel,
airbag deployment.
Seat backrests:
Pull lever, adj
release lever
engage audibl
Do not angle the backrest too far
back. We recommend a maximum
rake of app
o
.
Seat heig
Lever pumping motion.
up = seat higher
down = seat lower
Lumbar su
Adjust using th
suit personal
To move support up and down:
push switch up or down
To increase an
push switch forwar
backwards.
Seat inc
Lever pumping motion:
Up = Front end hig
Down = Front end lower
Adjustable
Pull the lever
support.
Seat position
Sit with buttocks are as far back
against backrest as pos
Adjust distance between seat and
pedals so that
angled when depre
Slide the fron
far back as possib
Head restraint adju
Press butt
engage in positio
of the head restraint should be at
upper head le
To adjust horizontally, pu
head restraint forwards. It e
in several positi
Seat belt height adjus
1 Pull belt out slightly
2. Press but
3. Adjust height a
Adjust heig
the shoulder.
the throat or upper arm. Do not
adjust while d
Fitting seat belts:
Withdraw seat belt from retractor,
guide it untwisd across
and insert latch
Tighten the lap belt regularly whilst
driving by pullin
Loose or bulk
the belt from fitting snugly.
place objects such as han
mobile phones
and your body.
To release b
belt buckle.
Fasten seat belt
Steering whe
Unlock the lever, adjust the
steering wheel,
and ensure
Do not adjust the steering wheel
unless the vehicle i
the steering wheel
released.
Interior mirror:
To reduce dazzle, adjust the lever
on the underside of the mirror
housing.
Dazzle from followi
night is automatically reduced if
the vehicle is eq
automatic anti-dazzle interior
mirror. The leve
on the underside of the mirror
housing.
Power windows:
With the ignition on, power
windows are operated vi
switches in
Push switch = Open win
Pull switch = Close windo
Push or pull s
detent position: Window moves up
or down as long as the switch is
operated.
Push or pull swch to the second
detent position and th
Window opens
automatically.
If the window glass encounters
resistance
window during automatic closing,
it is immediatel
opened agai
Adjustin
Select the relevant exterior mirror
by turning the control to left (L)
or righ
Swivel the control to adjust the
mirror.
In position 0 , no mirror is se
Folding in elect
Turn control to 0 , then push the
control down. Both exterior mirrors
will fold
Push the contro
exterior mirrors return to
original pos
If an electrica
manually ex
control dow
extend the other mirror.
For ped
mirrors will s
normal mountingsition if they
are struck with suf
Reposition
by applying pressure to the
mirror
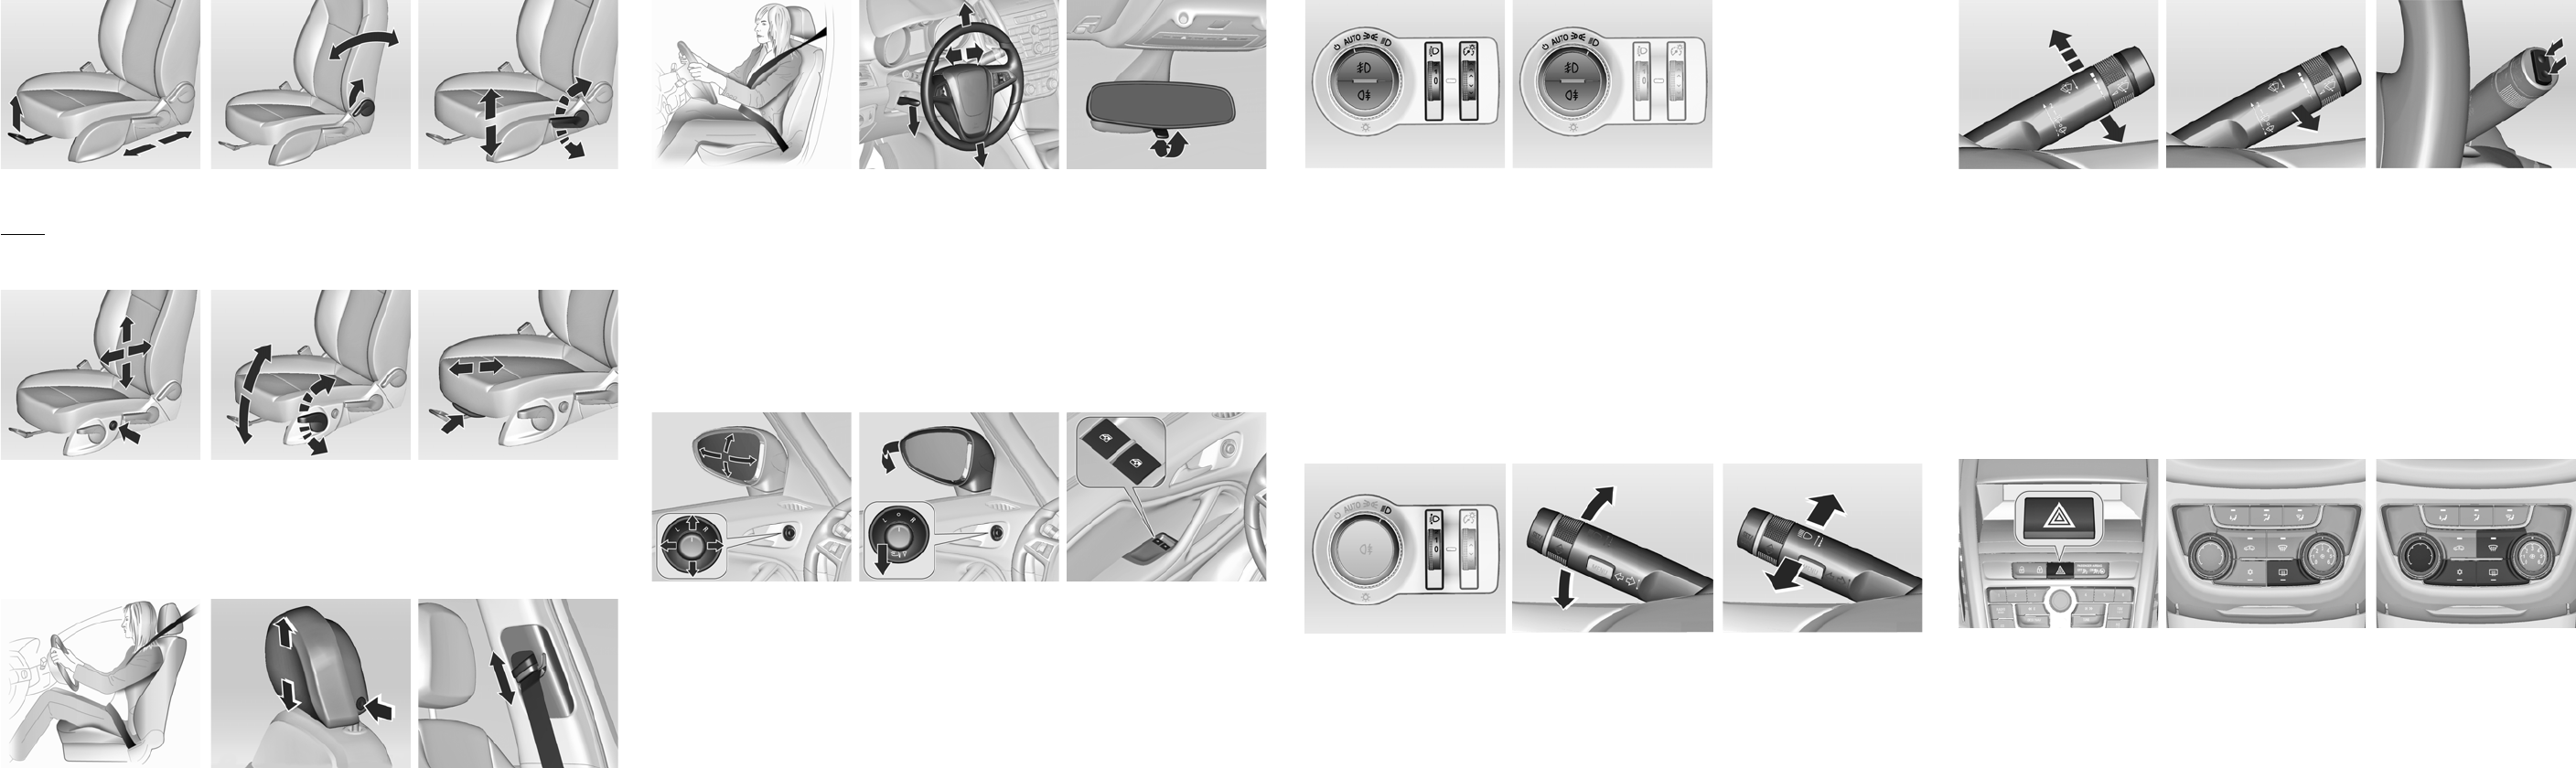
Light switch:
Turn light swit
m = Activation or deactivation
of automatic light control
(switch returns to AUTO )
AUTO = Automatic li
Headlights
on and off automatically
O =O
8 = Sidelights
9 = Low beam or high beam
Press button:
> = Fro
r = Rear fog light
Turn thumb wheel:
q = Headlight range
adjustment
A = Instrument panel
illumination
Front fog lights:
Operated with the
> button.
Light switch in positiAUTO:
Switching on front f
switch headligh
Rear fog li
Operated with the
r button.
Light switch in positiAUTO:
Switching on rear fog light will
switch headligh
Light switch in positi
8:
Rear
on with front fog ligh
Vehicle rear fo
when towing.
Automatic light control
When the function is switche
with the engine running
switches between
lights and headli
on external lighti
information f
Daytime runn
Increases vis of the vehicle
during daylig
Automatic headli
During poor li
headlights are switche
The headlights are al
on automatically if the winds
wipers have been activated for
several swipes.
Tunnel detection:
When a tunnelis entered the
headlights are switche
automatically.
Exit lightin
Remove the key from the ignition:
Interior lights
lights and pudd
for a short period
Lights will switch off automatically
after a short delay.
Headligq:
Adapt headlight range to suit th
vehicle load to preven
other road us
Turn thumb wheel
? to required
position.
Front seats occupie = 0
All seats occupied = 1
All seats occupied an
load compartment laden = 2
Driver’s sea
load compartment laden = 3
Turn and lane
Lever up = Rig
Lever down = Left turn signal
If the lever is moved past the
resistance point, the turn signal i
switched on constantly.
steering whe
turn signal is automatically
deactivated.
For three flas
changing la
resistance is fe
Move the lever to the resistance
point and hold
indication.
Operating he
beam and low beam:
Headlight flash =
towards
steering wheel
High beam =
forwards
Low beam = Push lever
forwards
again or p
towards
steering whee
Windscreen wipe
2 = Fast
1 = Slow
P= Adjustable timed interval
wipe
§ = Off
For a single wipe
off, press the le
Vehicles with adjustable
interval: With wiper lever in
position P ,
turn adjuster wheel
upwards or downwards to make
wiping interval shorter or longer.
Do not use wiper
is frozen.
Switch wiper off in car washes.
Windscreen
washer:
Pull lever toward
Washer fluid is sprayed onto the
windscreen and the wiper swipes
for a few strokes.
If the headlig
fluid is also sprayed onto the
headlights, pr
is pulled fo
period.
The headlight was
then inoperab
or until engi
been switched off and on ag
Rear window wiper/was
Press the rocker switch to activate
the rear window wiper:
upper positio = continuous
operation
lower position = intermittent
operation
middle position = off
Pull lever toward
activate rear window washer.
Washer fluid
rear window and the wip
for a few strokes.
The rear window wiper comes on
automatically when the winds
wiper is switched
gear is engaged.
Hazard warnin
Operated with the
¨ button.
In the event of an accident wher
the airbags
hazard warnin
activated automatically.
Heated rear
heated exterior miÜ:
The heating is op
pressing th
Ü button.
Heating work
running and swit
automatically after a short time.
Depending o
comes on automatically during
driving when
filter is bein
Demisting and defrosti
windows V:
Press button V:
Fan automatically switches to
higher speed and a
towards the windscreen.
Set the temperature co
highest level
Switch cooling
n on.
Switch heated
Ü on.
Open side ai
direct them towards the door
windows.