Vehicle fe
Meriva
Quick Reference Guide
Refer to Owner’s M
Illustrations m
Operation i
Depending o
and access
vehicle may diff
TS 1692-A-13 / KTA May 2012
*KTA-2692-5*
Vehicle features Vehicle features
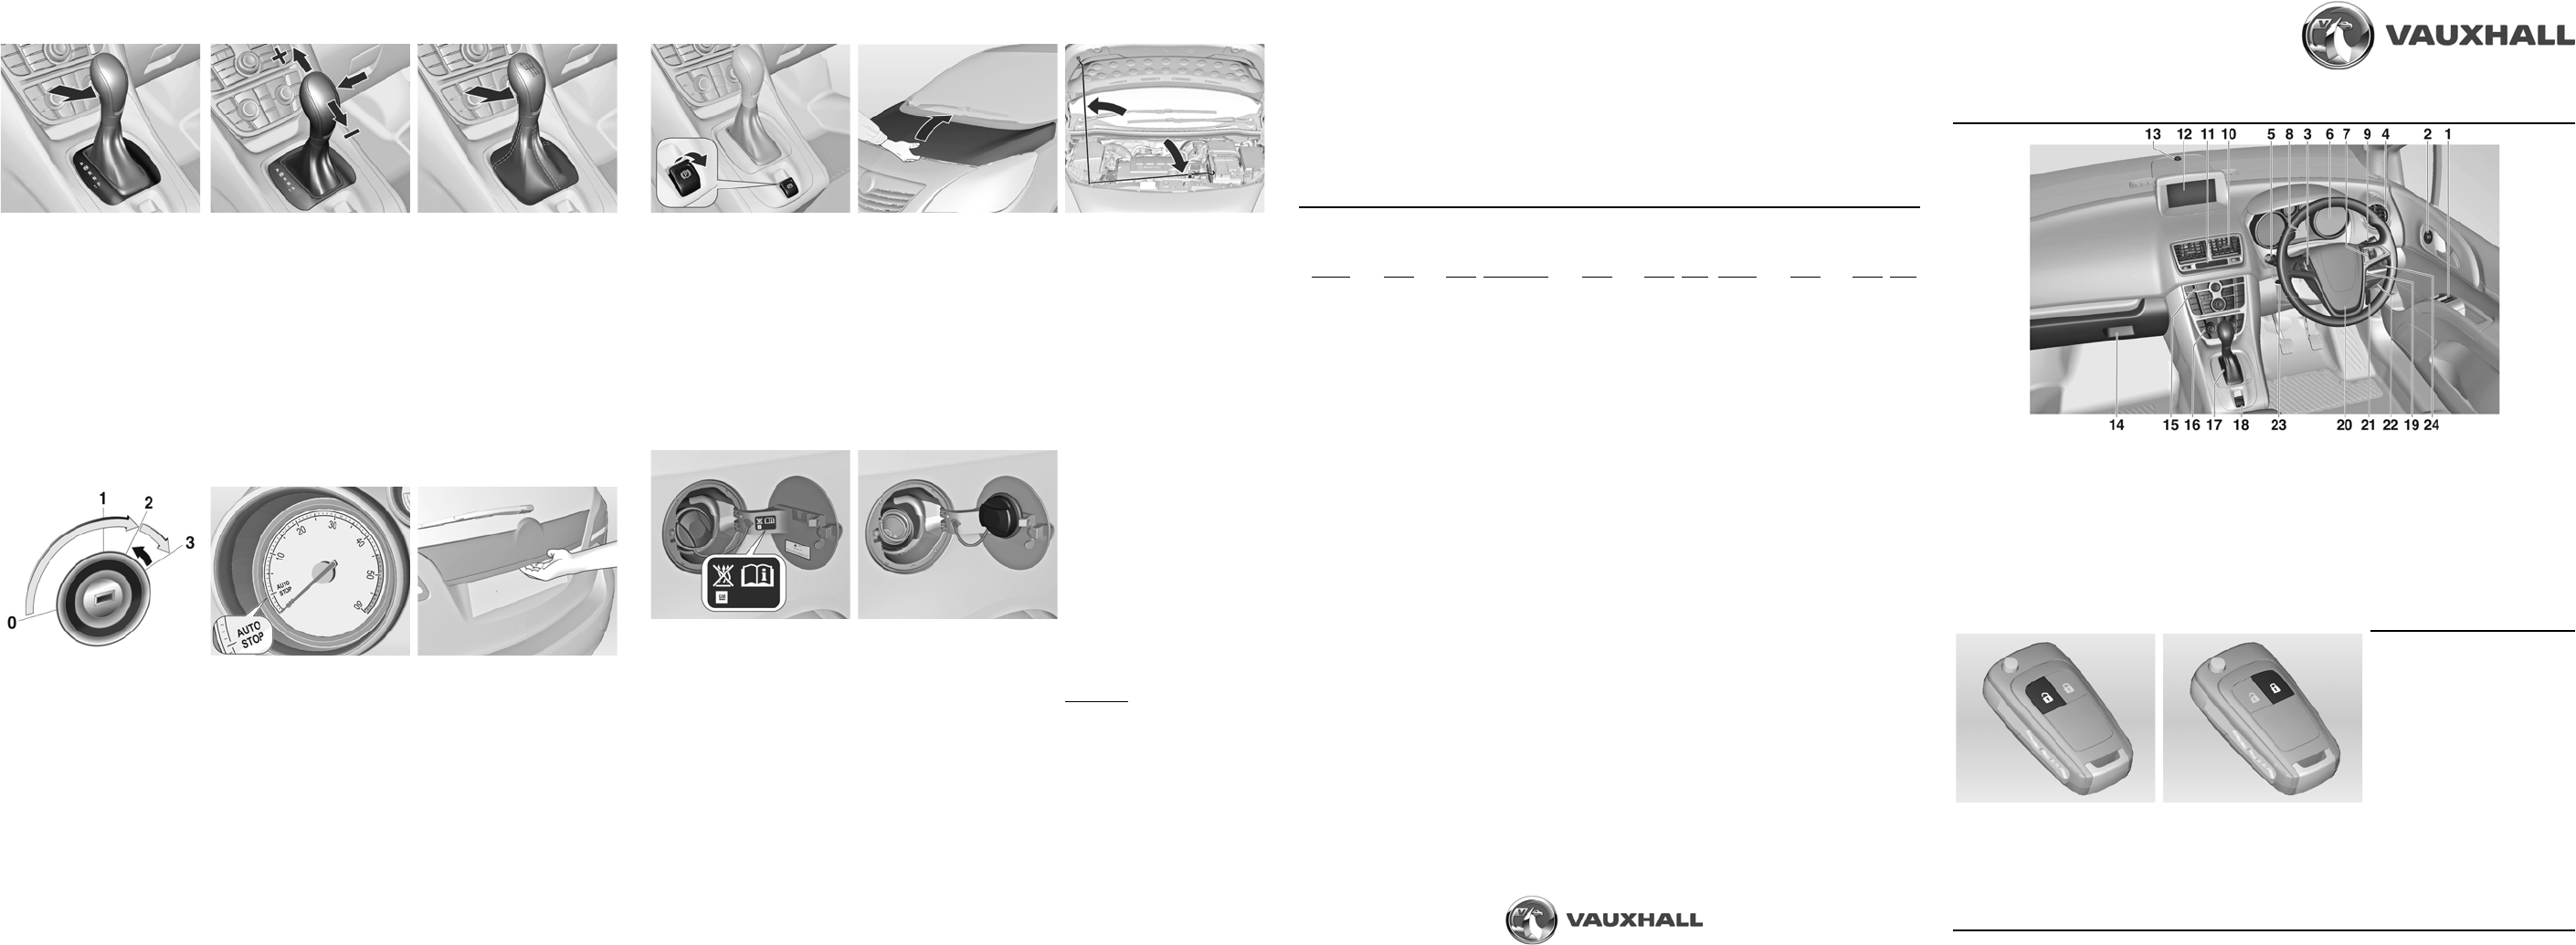
Unlocking the
First press button to extend key
from foldaway s
Press button c on remote control
- or - turn key in driver’s door lock
towards the front of the vehicle to
unlock the d
compartment and f
Locking the veh
Press butte on remote control
- or - turn key in driver
towards the rear to lock the vehicle.
If the driver’s
properly, the cen
will not work.
The vehicle can a
to unlock only the d
when pressing button c once on the
remote control. Pressing button c
twice will unlo
Central locking
To lock or u
the vehicle, press
button ce in the centre console
with the doors clo
the button illuminates.
The LED in the button i
for approx. 2 minutes after
with the remote control.
Electronic imm
Activated automatically when key
is removed fr
1. Power windows
2. Exterior mirrors
3. Cruise
4. Side
5. Turn signals, headlight fl
low beam and high beam,
exit lighting, park
Driver In
6. Instrume
7. Steering wh
8. Driver
9. Wipers
10. Centre air ven
11. Centra
LED for airbag dea
12. Info-Dis
13. Sensor for
Control
14. Glovebox, fu
15. Traction Control, parking assi
Electronic Sta
tyre deflatio
Eco button, fuel selector
16. Climate co
17. Selector lever
18. Electrical parking brake
19. Ignition s
steering wheel l
20. Horn, driv
21. Bonnet rele
22. Storage compartment
23. Steering w
24. Light swi
headlight range adjus
instrument pan
Automatic transmissi
P = park
R = reverse
N =n
D =d
The selector le
moved out of P when
on and the
When the foot br
depressed, thj
illuminates in th
To engage P or R , press the release
button on the selector lever.
When position N is selected
depress foot brake or engage
parking brake befo
Manual mode:
Move selector le
position D towards the left to
engage manu
Move lever forwards or
to change gear:
< = Shift to a high
] = Shift to a lo
If a higher gear is selecte
vehicle sp
gear when vehicle speed is too
high, the shift is
Manual transm
Reverse gear:
With the vehicle sta
3 seconds after depressing the
clutch pedal, then press rele
button on selector lever and
engage gear.
If the gear doesnot engage, set the
lever to neutral,
pedal and depress
repeat gear selection.
When operatin
pedal compl
pedal as a foot rest.
Starting
Turn key to position 1
Move steering wh
release steeri
Manual transmiss
with clutch depressed
Automatic transmission in P or N
with brake pedal depressed
Do not accelerate
Diesel engin
Turn key to position 2 for
preheating and wait! to
extinguish i
Turn key to position 3 and
release when en
Stop-Start syst
When conditions al
switches
and reduce emiss
vehicle is
standstill, e.g. at traffic lights or in a
traffic jam. It starts the engine as
soon as the clutc
To activate an Autostop:
Depress clutch pedal
Shift to neutral
Release the clutch
The needle pointsAUTO STOP in
the tachometer.
To restart engine, depress clutch
again.
Load compart
Unlock the vehicle by
button c on remote control
- or - by turnin
lock towards the front of the
vehicle.
To open the tailgate, push the
touchpunderneath the
tailgate mo
Use one of the
the unders
close.
Do not push the touchpad switch
underneath the tailgate moulding
when closing or the ta
unlock agai
Secure the bonnet support.
If the bonnet is
Autostop, the engine will be
restarted automatically for safety
reasons.
Before closing, pr
support into its h
Lower the bonnet and allow it to
drop into the catch. Check that the
bonnet is engag
Electri
Pull switch J: the electric
brake is applie
For maximum fo
parking on inclJ
t
To release, sw
foot brake depr
switch J .
Drive away
Depressing clutch oD
(automatic
depressing the acc
releases the electri
brake automatica
Opening the bonne
Pull the rele
the instrument panel on the driver’
side and return it to its original
positio
Press the safety catch below the
bonnet and open the bonnet.
Refuelling:
Before refu
and any external heaters
combustion cham
by sticker on fu
Switch off mobi
Fuel filler located at right
rear side of
The fuel fill
opened if the ve
Pull fuel fil
open.
Unscrew the fuel fi
remove.
The fuel fill
the bracket on the
To close, repl
close fu
Wipe off any overflowi
Fuel speci
Petrol engines -
only use unle
c
Diesel engines
only use dies
w
Capacities:
Fuel tank capacity
(All petrol/dies litres.
Engine oil:
Check the engine
on a regular basis to prevent
damage to the engine.
Ensure that the correct
specifica
Check with vehicle on a le
surface. Engine mus
operating temperatu
switched o minu
Pull out dipstick, wipe it clean,
insert to the stop on the handle,
pull out and read en
Insert dipstick to stop on handle
and make half a turn.
Important:
It is the owner’s responsibility to
maintain the correct level of an
appropriate q
engine.
Do not allo
drop below the
Tyre pressure:
Check tyre pressures, iys and prior to any long journey;
checked when cold.cles with tyre pressu re monitor
The tyre pressure data refers to cold tyres. It
Always inflate
The ECO tyre press
Incorrect tyre press
wear.
Consult a wor
Tyre pressure (psi
Comfort setting for load of
upto 3 people
Engine
Tyres Front Rear
A14XER 195/65 R15 33 30
205/55 R16 33 30
225/45 R17 33 30
225/40 R18
1)
33 30
A14NEL 195/65 R15 33 30
205/55 R16 33 30
225/45 R17 33 30
225/40 R18
1)
36 33
B14NEL 195/65 R15 33 30
205/55 R16 33 30
225/45 R17 33 30
225/40 R18
1)
33 30
A14NET 2 33 30
225/45 R17 33 30
225/40 R18
1)
36 33
A13DTC 195/65 R15 33 30
205/55 R16 33 30
225/45 R17 33 30
225/40 R18
1)
33 30
A13DTE 195/65 R15 33 30
205/55 R16 33 30
225/45 R17 33 30
225/40 R18
1)
33 30
A17DT, 195/65 R15
2)
3)
36 33
A17DTC, 205/55 R16 36 33
A17DTS, 225/45 R17 36 33
A17DTI 225/
1)
39 36
All Temporary spare 6 61
1)
With reduced ste
2)
Only permitted in combination
with weight reduction package.
3)
Only permitted with A17DT,
A17DTC and A17DTI.
Tyre pressure (psi)
For full load
Engine
Tyres Front Rear
A14XER 195/65 R15 36 46
205/55 R16 36 46
225/45 R17 36 46
225/40 R18
1)
36 46
A14NEL 195/65 R15 36 46
205/55 R16 36 46
225/45 R17 36 46
225/40 R18
1)
39 46
B14NEL 195/65 R15 36 46
205/55 R16 36 46
225/45 R17 36 46
225/40 R18
1)
36 46
A14NET 20 36 46
225/45 R17 36 46
225/40 R18
1)
39 46
A13DTC 195/65 R15 36 46
205/55 R16 36 46
225/45 R17 36 46
225/40 R18
1)
36 46
A13DTE 195/65 R15 36 46
205/55 R16 36 46
225/45 R17 36 46
225/40 R18
1)
36 46
A17DT, 195/65 R15
2)
3)
39 46
A17DTC, 205/55 R16 39 46
A17DTS, 225/45 R17 39 46
A17DTI 225/40 R
1)
41 46
All Temporary spare 6 61
1)
With reduce
2)
Only permitted i
with weight redu
3)
Only permitted w
A17DTC and A17DTI.
Tyre pressure
ECO settin
upto 3 people
Engine
Tyres Front Rear
A14XER 195/65 41 38
205/55 R16 41 38
225/45 R17 41 38
225/40 R18 -
1)
-
1)
A14NEL 195 41 38
205/55 R16 41 38
225/45 R17 41 38
225/40 R18 -
1)
-
1)
B14NEL 195/65 R15 41 38
205/55 R16 41 38
225/45 R17 41 38
225/40 R18 -
1)
-
1)
A14NET 205 41 38
225/45 R17 41 38
225/40 R18 -
1)
-
1)
A13DTC 195/65 41 38
205/55 R16 41 38
225/45 R17 41 38
225/40 R18 -
1)
-
1)
A13DTE 195/65 R15 41 38
205/55 R16 41 38
225/45 R17 41 38
225/40 R18 -
1)
-
1)
A17DT, 195/65
2)
3)
43 41
A17DTC, 205/55 43 41
A17DTS, 225 43 41
A17DTI 225 -
1)
-
1)
All Tempor -
1)
-
1)
1)
Do not use ECO tyre p
setting for this tyre.
2)
Only permitted in combin
with weight reduction package.
3)
Only permitted with A17DT,
A17DTC and A17DTI