Vehicle fe
Combo
Quick Reference Guide
Refer to Owner’s M
Illustrations
Oper
Depending o
and access
vehicle may diff
TS 1716-A-13 / KTA August 2012
*KTA-2742-1*
Vehicle features Vehicle features
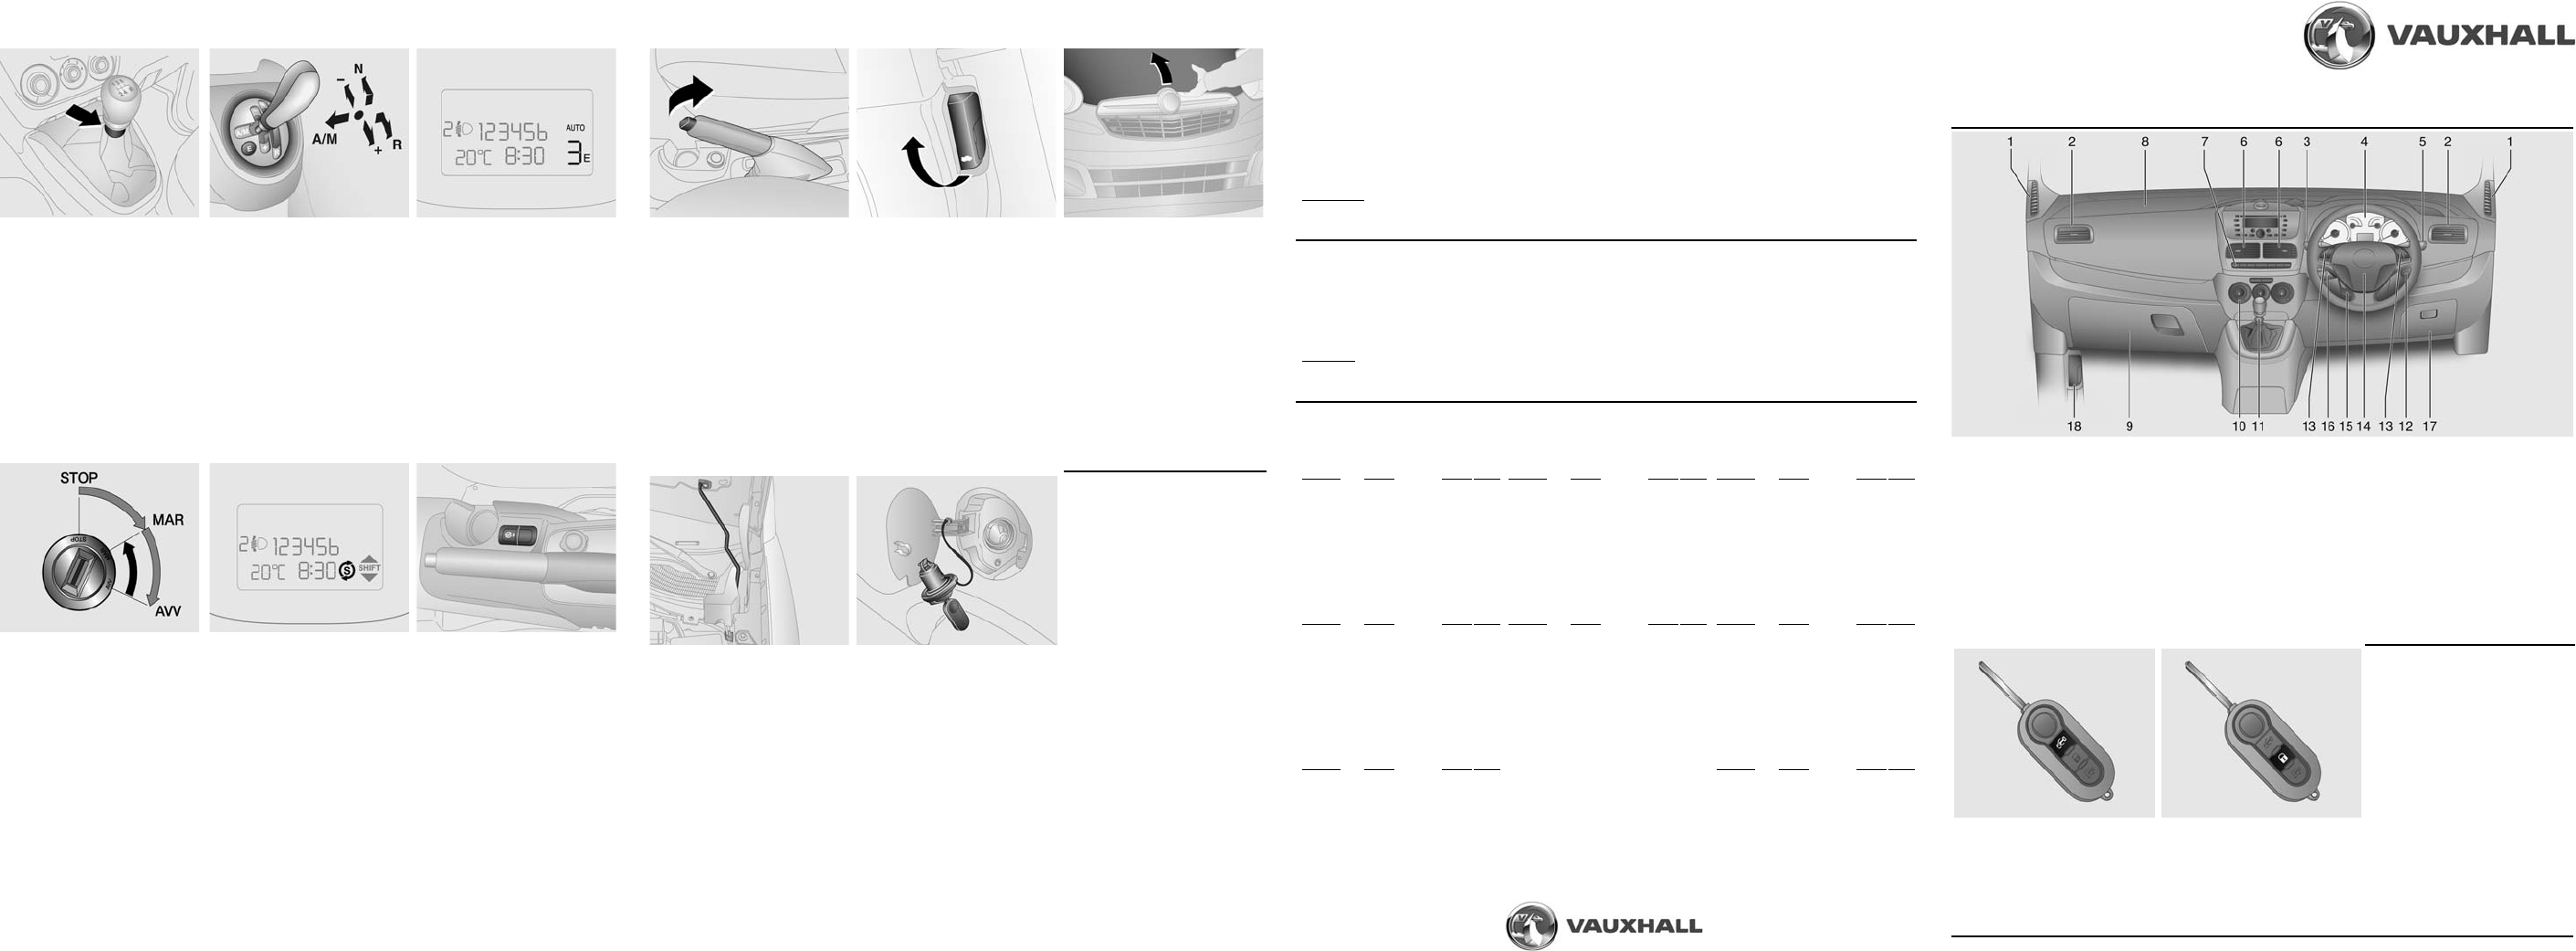
Unlocking the
Press button Ä on remote control
- or - turn key in driver’s door lock
towards the front of the vehicle to
unlock the d
doors / tailg
doors) and load compartment.
Locking the veh
Close door
compartment.
Press button
e on remote control
- or - turn key in driver
towards the rear to lock the vehicle.
Anti-theft locking system:
Press button
e twice on remote
control to deadlock all doors.
Do not use the sy
people in the
cannot be unlocked from the
inside.
Unlocking the load compartment:
Press button Å to unlock the load
compartment (rear doors / tailgate
and sliding si
independently o
Electronic imm
Activated automatically when key
is removed fr
1. Fixed air vents
2. Side air vents
3. Light switch,
turn and lane-change s
low beam, high beam
headlight flash
4. Instruments, incl
speedometer, tacho
fuel gauge, engi
temperature gauge
Driver Inform
including: o
trip odometer
5. Windscre
windscreen wash
rear window wiper,
rear window washer,
trip odometer reset button
6. Centre air ven
7. Headli
Driver Inform
settings menu, trip computer,
instrument illumination,
hazard w
front fog lights, rear fog light,
heated rear window
8. Front passenger airb
9. Glovebox
10. Climate control s
11. Selector lever
12. Ignition s
with steering wheel lock
13. Steering w
14. Driver airbag, hor
15. Steering w
16. Cruise contr
17. Fuse bo
18. Bonnet rele
Manual tran
Reverse gear
With vehicle statio
3 seconds after depressing cl
pedal, pull up the colla
selector lever and engage g
If the gear does not engage, set the
lever to neutral,
pedal and depress
repeat ge
Do not grind the clutch
unnecessa
When operatin
pedal fully. Do
a foot rest.
Manual transmission au
(MTA):
N =n
* = drive position
+ = higher gear
- = lower gear
A/M = switch between automatic
mode and manual mode
R =r
(with selector le
E = Eco mode (
Move selector lever to the
appropriate position an
Selector lever auto
to the centre position.
MTA (continued):
The current g
the tra
Depress foot br
the engine. M
towar+ to eng
gears by moving lever to + or -.
Move selecA/M
to switch to automatic mode:
Transm
automatically.
In automatic mode, press the
E button on the selector lever
housing to activate Eco mode and
help reduce
Starting
Turn key to position MAR
Move steering wh
release steeri
Manual transmiss
with clutch depressed
MTA: depress brake ped
Do not accelerate
Diesel engines
position MAR for preheating
and wait for ! to extinguish
Turn key to AVV and release
During an Autostop, the engi
can be resta
clutch pedal (manual
transmission). Vcles with MTA:
select a gear then depress
pedal.
Stop-Start syst
When conditions al
switches
and reduce exhaust
vehicle is
standstill, e.g. at traffic lights or in a
traffic jam. It restarts the engine as
soon as the clutch is depresse
To activate an Autostop:
Depress clutch peda
Shift selector leve
Release the clutch pe
An Autostop is indicated when ^
flashes in the
Centre (DIC).
To restart engine, select neut
then depr
transmission). Vehicles with MTA:
select a gear then depress clutch
pedal.
Deactivate the Stop-Start system
manually by pressing the
^ button
in the cen
The LED in th
confirm deactivation.
To open completely, push the
safety catch and open the bonnet.
Parking bra
To release
lever slightly
and lower leve
Always apply parking b
without operati
button and apply as firmly as
possible on
slope.
To reduce the ope
the parking brake, dep
brake pedal at the same time.
Opening the bonne
To open the bonnet, p
release le
instrument pa
side.
The bonnet wi
and will partially open. Return
release lever
Pull up bonnet
holder and
the underside o
right-hand sid
Closing the
Replace the bon
its holder.
Lower the bon
drop into the catch.
Check that the bonnet is engaged.
Refuel
Before ref
and any external
combustion chambers (ident
by sticker on
Switch off any
Fuel filler
side of ve
Release the fu
the flap by hand.
Insert key into f
turn anticlockwise t
Turn fuel filler
and remov
The fuel fill
the bracket on the
For refuelling
nozzle and swi
After the automatic cut-off, it can
be topped-up with a maximum two
doses of f
Wipe off any overfl
immediately.
To close, replace fue
turn clockwise.
Insert key into
turn clockwise to lock.
Close the f
Petrol engines -
meeting specificati
D
Diesel engi
meeting specificati
D
Fuel tank capacity
(all petrol/dies litre
Engine oi
Check engine oi
specification o
Check with vehicl
5m
Pull out dipstick, wipe clean,
When the engMIN mark, top up engine oil.
Insert dipstick to stop on handle and mak
Importan
It is the owner’s responsibility to maintain the correct level of an app
Do not allow the
Van
Tyre pressure (psi
Comfort setting for u
2 people and 100 kg of l
Engine
Tyres Front Rear
All 1 36 36
185/65 R15 92T 36 38
195/65 R15 95T 35 35
195/60 R16C 97T 39 39
195/60 R16C 99T 39 39
Tyre pressure (psi
With full lo
Engine
Tyres Front Rear
All 1 42 42
185/65 R15 92T 42 44
195/65 R15 95T 38 39
195/60 R16C 97T 39 48
195/60 R16C 99T 39 48
Tyre pressure (psi
With full load (long wheelbase):
Engine
Tyres Front Rear
All 1 42 42
185/65 R15 92T 42 44
195/65 R15 95T 38 39
195/60 R16C 97T 39 52
195/60 R16C 99T 39 52
Combo Tou
Tyre pressure (psi
Comfort setting for upto
2 people and 100 kg of luggage:
Engine
Tyres Front Rear
All 18 36 36
185/65 R15 92T 36 38
195/65 R15 95T 35 35
195/60 R16C 97T 39 39
195/60 R16C 99T 39 39
Tyre pressure (psi
With full load (5 sea
Engine
Tyres Front Rear
All 18 42 42
185/65 R15 92T 42 44
195/65 R15 95T 38 38
195/60 R16C 97T 39 41
195/60 R16C 99T 39 41
Tyre pressure (psi
With full load (7 sea
Engine
Tyres Front Rear
All 18 42 42
185/65 R15 92T 42 44
195/65 R15 95T 38 38
195/60 R16C 97T 39 52
195/60 R16C 99T 39 52
Combi
Tyre pressure
Comfort setting for upto
2 people and 100 kg of luggag
Engine
Tyres Front Rear
All 185 36 36
185/65 R15 92T 36 38
195/65 R15 95T 35 44
195/60 R16C 97T 39 39
195/60 R16C 99T 39 39
Tyre pressure
With full load:
Engine
Tyres Front Rear
All 185 42 42
185/65 R15 92T 42 44
195/65 R15 95T 38 46
195/60 R16C 97T 39 52
195/60 R16C 99T 39 52
Tyre pressure:
Check tyre pressures
checked when cold. cold tyres. It applito summe
Always inflate
Incorrect tyre press
wear.
Warning:
If the pressure
separation and even to tyreblow-out