ASSEMBLY AND OPERATING
INSTRUCTIONS
Read these instructions thoroughly
INSTALLATION INSTRUCTIONS
Wall holder for hairdryer
Models 037C - 037M - 037R - 037S
Model 037C
Model with digital clock.
Model 037M
Model with magnifying mirror.
Model 037R
Model with universal shaver socket. A safety transformer insulates
the shaver socket from the mains and a protection device inhibits
the operation of appliances with a load higher than 20VA.
Model 037S
Model with standard European socket 2P + earthing 16A.
Installation of wall holder
This hair dryer must only be installed by a qualified electrician in
conformity to applicable safety standards. The hairdryer must be
fixed out of reach of a person using a bath or shower.
The hair dryer may be installed in one of two ways:
A = connection to wall mains wiring
B = connection to surface mains wiring
Attention: before installing the hairdryer always switch off the
general switch of your mains electricity.
For each pole a switch with a minimum break distance between
contacts of 3 mm must be fitted up-line of the appliance.
Each time the appliance is opened, the switch must be used to
disconnect the appliance.
Method A
(connection to wall mains wiring)
The connection wiring from the mains must be at least 3x1,5 mm
2
for wall holder model 037S.
The connection wiring from the mains must be at least 2x1,0 mm
2
for wall holder models 037R, 037C, 037M.
1.To fix the back of the wall unit to the wall, drill three holes for
the fixing screws and insert the relevant wall plugs (fig. 1).
2.Screw in screws (1) and (2) (fig. 2) first, leaving them
protruding at least 10 mm from the wall plugs.
3.Unscrew the screw (4) (fig. 3a) and remove the cover from
the wall unit.
4. Break the plastic membrane (5) at the back of the wall unit (fig. 4).
5.Route the main power cable from the wall (6) through the hole
left by the plastic membrane (5) (fig. 4).
6.Hang the wall unit over the two screws (1) and (2) and fully
tighten them (fig. 5).
7.Fully fix the unit to the wall with the last screw (3) (fig. 6).
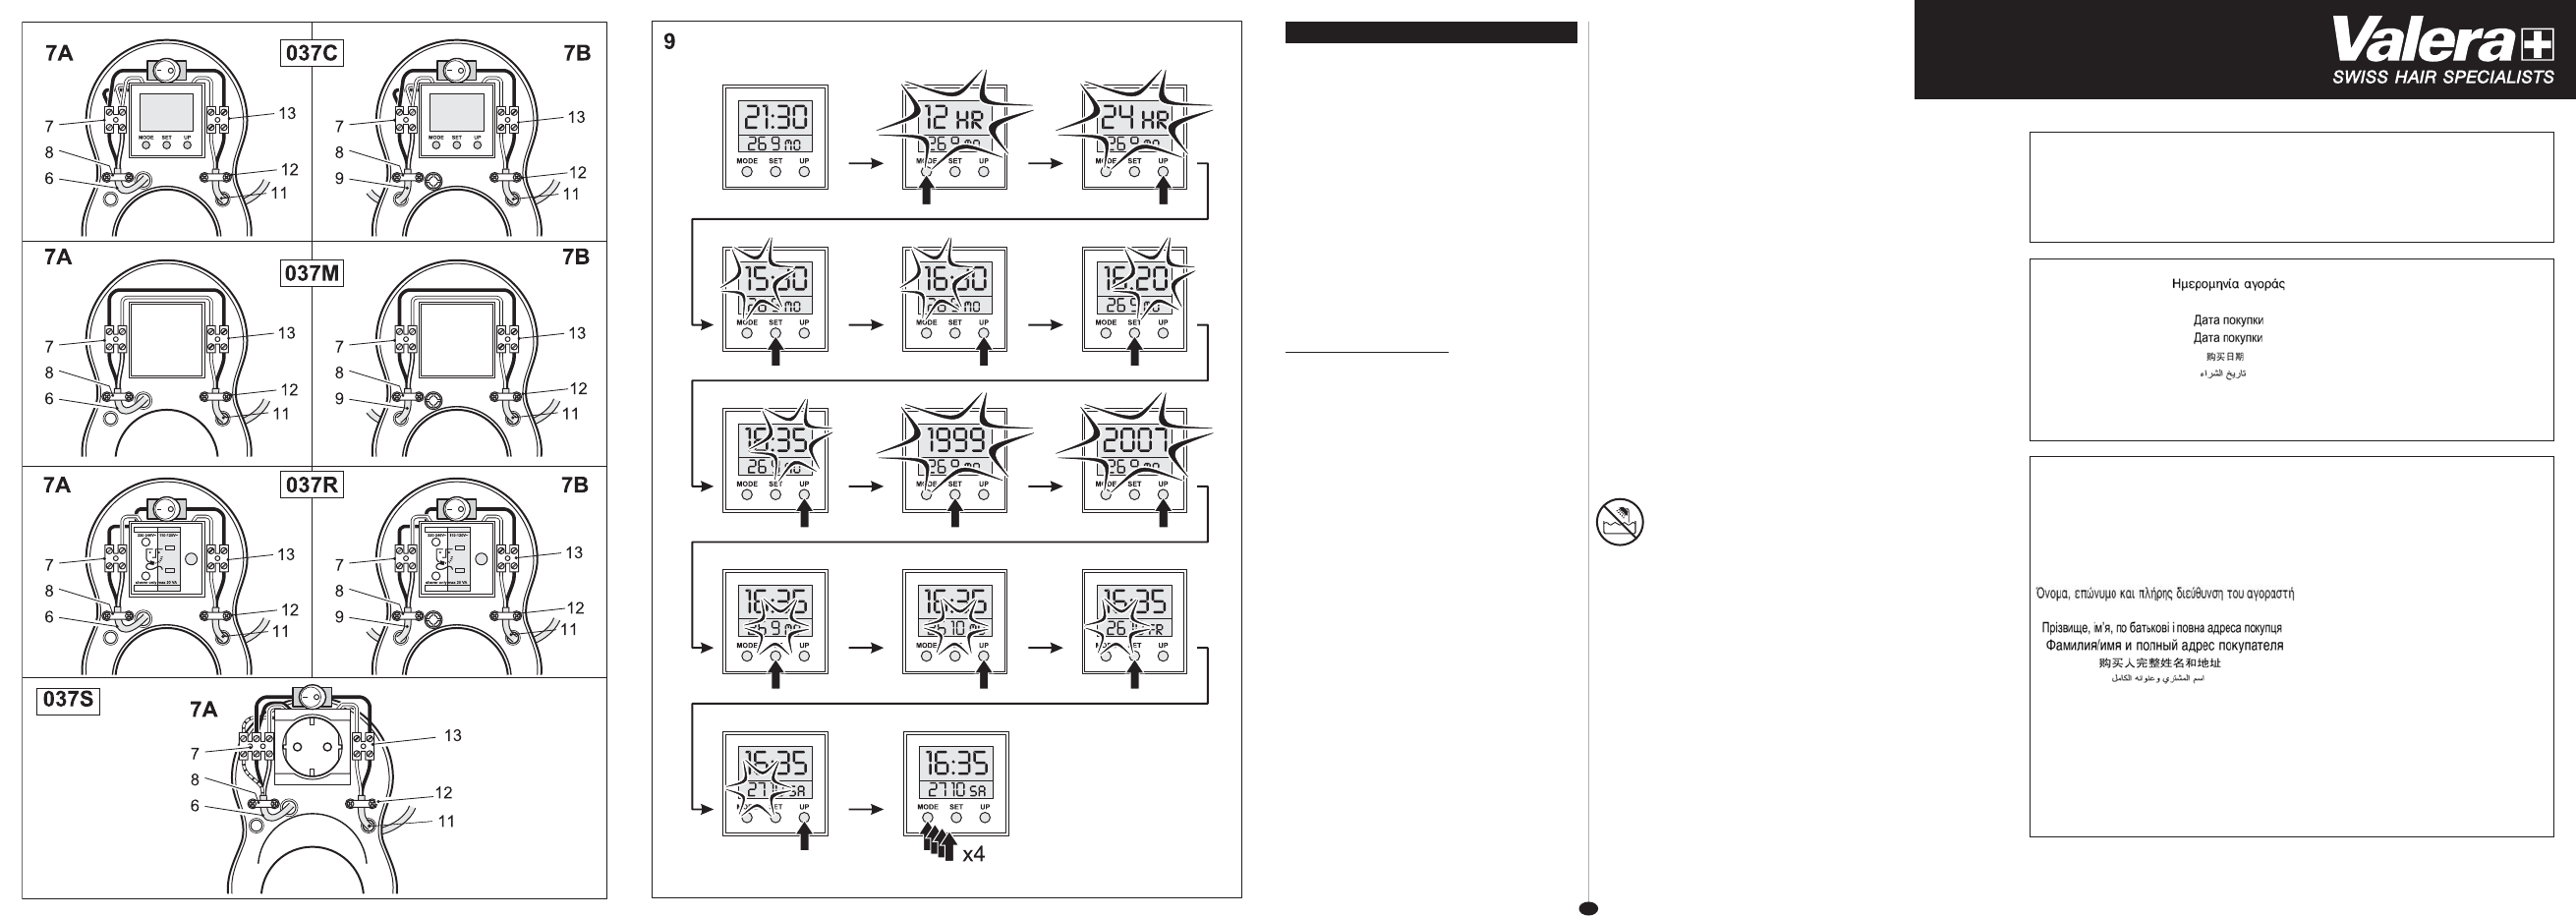
8.Remove the terminal strip (7). Connect up the power cable (6)
and reposition the terminal strip. Tighten the cable clamp (8)
with its own screws. See fig. 7 for the specific model you have
purchased.
9.Models 037R, 037C and 037M are double insulated and do
not require grounding (earthing). Model 037S is fitted with a
European standard plug. The ground (earth) wire of the mains
supply must be connected to terminal (7). On this model it is
also important to check that the mains power supply is
suitable for a 16A load.
10.Remove the terminal strip (13). The power cable (11) of a
hairdryer with max input current of 10A, if not already
English
connected, must be connected to the terminal strip (13);
reposition the terminal strip(13) and tighten the cable clamp
(12) with its own screws.
11.Fit the cover back on the wall unit with (4) (fig. 3).
12.Switch the power on at the mains switch. The hair dryer is
now ready to use.
Method B
(only for models 037C, 037M e 037R)
(connection to surface mains wiring)
The connection wiring must be at least type H05VV-F 2x1,0 mm
2.
1.To fix the back of the wall unit to the wall, drill three holes for
the fixing screws and insert the relevant wall plugs (fig. 1).
2.Screw in screws (1) and (2) (fig. 2) first, leaving them
protruding at least 10 mm from the wall plugs.
3.Unscrew the screw (4) (fig. 3a) and remove the cover from the
wall unit.
4.Route the main power cable (9) through hole (10) (fig. 8).
5.Remove the terminal strip (7). Connect the power cable to the
mains (9) and reposition the terminal strip. Tighten the cable
clamp (8) with its own screws. See fig. 7 for the specific model
you have purchased.
6.Attention: this appliance is double insulated and no earth
connection is provided.
7.Remove the terminal strip (13). The power cable (11) of a
hairdryer with max input current of 10A, if not already
connected, must be connected to the terminal strip (13);
reposition the terminal strip(13) and tighten the cable clamp
(12) with its own screws.
8.Fit the cover back on the wall unit with (4) (fig. 3b).
9.Switch on the general switch of your mains electricity.
The hairdryer is ready for use.
INSTRUCTIONS FOR USE
Hairdryer with wall holder
Caution
• Plug the hairdryer into an alternating current outlet
only, and make sure that the voltage of your
electricity supply is the same as that indicated
on the rating plate of the appliance.
• Do not use your hairdryer in the bath or under the shower, or
near basins or other vessels containing water.
• Do not immerse in water or other liquids.
• Never put the appliance in a place where it could fall into water
or in other liquids.
• Do not try to recover an electric appliance fallen into water, but
unplug it immediately from the mains supply.
• Turn the unit off when you put it down.
• Unplug the appliance when not in use, but never do it by pulling
the cord.
• Remember to check regularly that the air inlet and outlet grills
are clean.
• Allow your appliance to cool before storing away and do not
wrap the supply cord around the hairdryer in storage.
• Do not use the dryer if it does not work properly, if it dropped or
if the supply cord is damaged. And do not try to repair an
electric appliance by yourself, but apply to an authorized
Service Centre.
• This appliance is not intended for use by persons (including
children) with reduced physical, sensory or mental capabilities,
or lack of experience and knowledge, unless they have been
given supervision or instruction concerning use of the appliance
by a person responsible for their safety.
• Let the children know the dangers and rules of electrical safety
and never allow them to use electrical appliances without your
supervision.
• Children should be supervised to ensure that they do not play
with the appliance.
4
Mod. Nr.
Date of purchase
Kaufdatum
Date d’achat
Data d’acquisto
Fecha de adquisición
Datum aankoop
Data cumpãrãrii
Satın alma tarihi
Ligo Electric SA - 6853 Ligornetto - Switzerland
Name and full address of purchaser
Name und vollständige Anschrift des Käufers
Nom et adresse completè de l’acheteur
Nome e indirizzo completo dell’acquirente
Nombre y dirección completa del comprador
Naam en adres van de consument
Numele i adresa completa˘ a compãrãtorului
Alıcının tam ismi ve adresi