2.1
1.0
2.0
3.1 3.2
3.3
3.4
3.0
4.0
5.1
5.0
6.0
MONTH - DATE DATE - MONTH
9.0
A
B
C
2.2 2.3 2.4
5.2
5.3
5.5
5.4
5.6
12 hour 24 hour
R
GOLD
Kat.-Nr
Bedienungsanleitung
Operating Instructions
Mode d’emploi
Istruzioni per l’uso
Instrucciones para el manejo
Gebruiksaanwijzing
Mode d’emploi HiTRAX GOLD Chronomètre
Operation:
1.0 Réglage
1.1 Affichage normal: heure, minute, seconde, jour de la
semaine.
(1=lundi, 2 = mardi, 3=mercredi, 4=jeudi, 5=vendredi,
6=samedi, S=dimanche)
1.2 Maintenir la touche A appuyée: affichage du mois,
de la date et du jour de la semaine
1.3 Maintenir la touche B appuyée: affichage de l’heure
de l’alarme en heures et en minutes
1.4 Appuyer sur la touche C 1 fois: passer de l’affichage
normal en mode chronographe
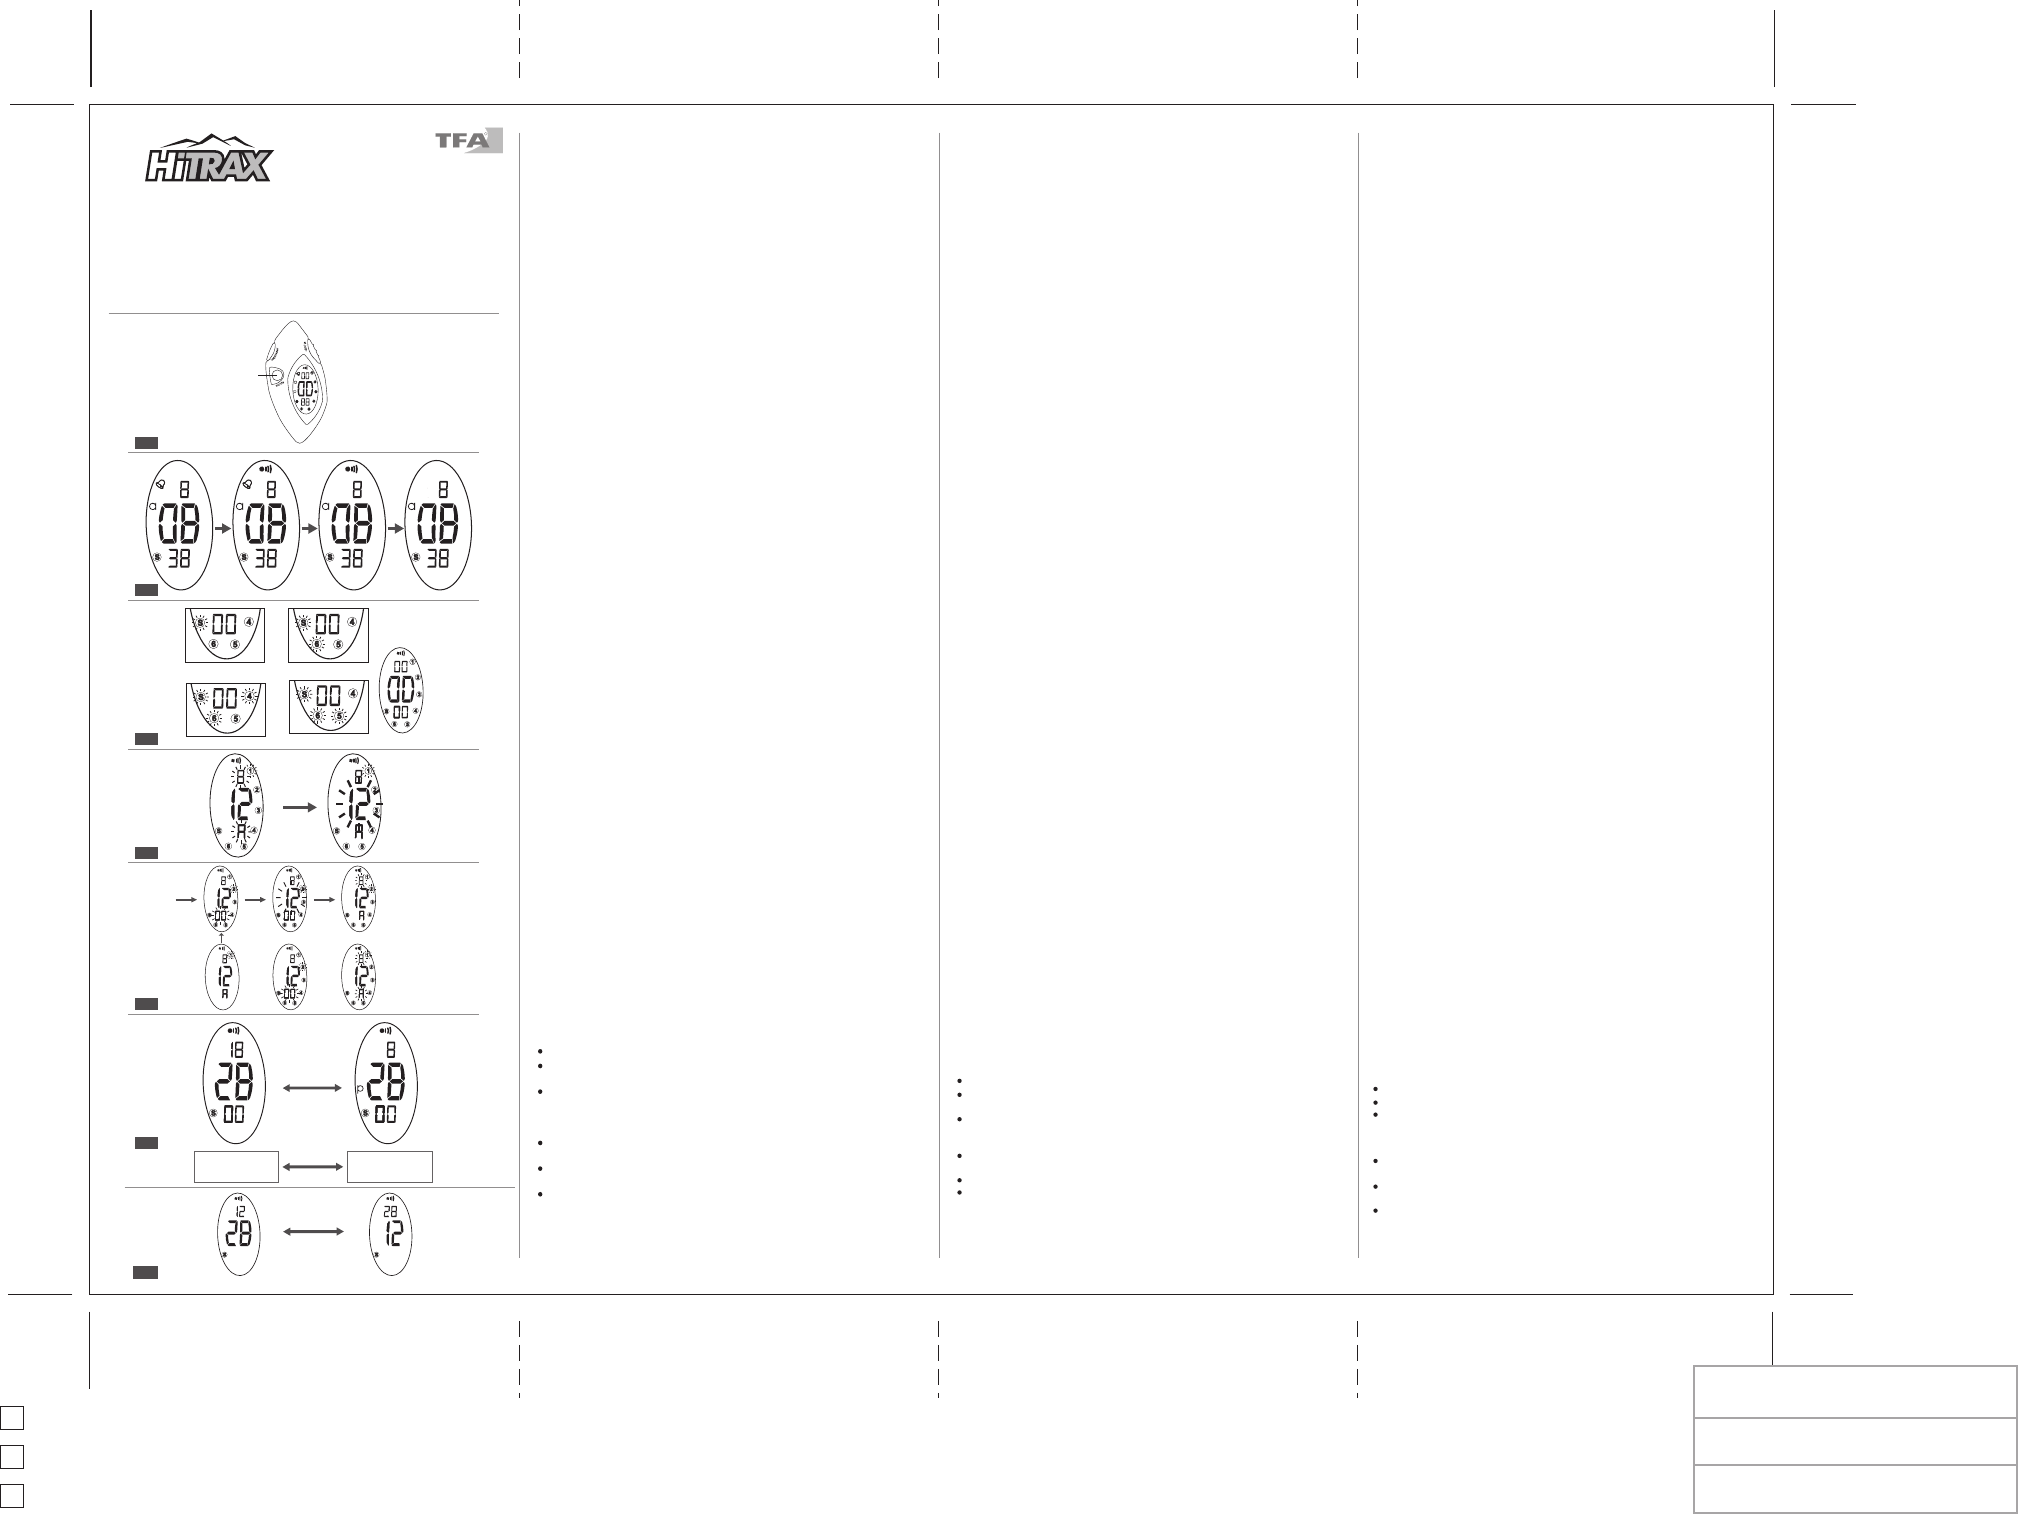
2.0 Alarme et signal des heures marche/arrêt
2.1 Affichage normal: maintenir la touche B appuyée,
appuyer sur la touche A 1 fois: signal des heures
marche
2.2 Appuyer sur la touche A encore 1 fois: alarme marche
2.3 Appuyer sur la touche A encore 1fois: signal des
heures arrêt
2.4 Appuyer sur la touche A encore 1 fois: alarme arrêt
2.5 Relâcher la touche B: revenir en affichage normal
3.0 Mode chronographe
3.1 Affichage normal: appuyer sur la touche C 1 fois,
passer en mode chronographe
3.2 Appuyer sur la touche A: fonction marche/arrêt. Le
comptage s’effectue en 1/100 secondes.
3.3 Appuyer sur la touche B pendant le comptage: prendre
le temps intermédiaire, le chronographe continue de
compter
3.4 Appuyer sur la touche B encore 1 fois: passer en
affichage chronographe
3.5 Appuyer sur la touche A: terminer le comptage,
appuyer sur la touche B: remise à zéro de l’affichage
4.0 Réglage de l’heure de l’alarme
4.1 Affichage normal: maintenir la touche C appuyée
pendant 3 sec., "Lundi" et l’affichage des heures
clignote. Régler avec la touche B l’heure souhaitée.
4.2 Appuyer sur la touche A 1 fois: "Lundi" et l’affichage
des minutes clignote. Avec la touche B, régler les
minutes souhaitées.
4.3 Appuyer sur la touche C: passer en affichage normal
5.0 Réglage de l’heure
5.1 Affichage normal: maintenir la touche C appuyée
d’abord pendant 3 sec., puis appuyer 1 fois. "Mardi"
et l’affichage des secondes clignote. Avec la touche
B, régler sur zéro.
5.2 Appuyer sur la touche A 1 fois: l’affichage des minutes
clignote. Avec la touche B, régler les minutes
souhaitées.
5.3 Appuyer sur la touche A 1fois: l’affichage des heures
clignote. Avec la touche B, régler l’heure souhaitée.
5.4 Appuyer sur la touche A 1 fois: l’affichage du mois
clignote. Avec la touche B, régler le mois souhaité.
5.5 Appuyer sur la touche A 1fois: l’affichage de la date
clignote. Avec la touche B, régler la date souhaitée.
5.6 Appuyer sur la touche A 1fois: l’affichage du jour de
la semaine clignote. Avec la touche B, régler le jour
de la semaine souhaité.
5.7 Appuyer sur la touche C: passer en affichage normal
6.0 Système 12/24 heures
6.1 Affichage normal: maintenir la touche B appuyée,
appuyer sur la touche C 1 fois: A ou P s’affiche ou
disparaît sur l’écran.
6.2 Pour le système 12 heures: sélectionner A ou P
7.0 T
7.1 Affichage normal: maintenir les touches B et A
appuyces en même temps: l’alarme sonne.
8.0 Débrancher l’alarme
8.1 Affichage normal: appuyer sur la touche B: l’alarme
s’arrête.
9.0 Changer l’affichage mois/date
9.1 Affichage normal: maintenir la touche A appuyée,
puis appuyer sur la touche B 1 fois.
Changement de batterie :
Batterie: 1 x CR 2032
V
Ne jetez pas les piles usagées à la poubelle. Déposez-les dans les
lieux de collecte prévus à cet effet.
Entretien:
Evitez d’exposer l’appareil à des températures extrêmes, vibrations
ou chocs.
Pour le nettoyage du display et du boîtier
humide. N’utilisez pas de dissolvants ou d´agents abrasifs
N’effectuez en aucun cas des réparations par vos propres moyens.
Rapportez l’appareil au point de vente. Avant tout réclamation, veuillez
faire échanger la pile. Nous déclinons toute responsabilité en cas de
manipulation incompétente ou d´ouverture de l´appareil.
Bedienungsanleitung HiTRAX GOLD Stoppuhr
Bedienung
1.0 Normalmodus
1.1 Normalanzeige: Stunde, Minute, Sekunde, Wochentag.
(1=Montag, 2 = Dienstag, 3=Mittwoch, 4=Donnerstag,
5=Freitag, 6=Samstag, S=Sonntag)
1.2 T
und Wochentag
1.3 T
Stunden und Minuten
1.4 T
Normalanzeige und Stoppuhrmodus
2.0 Alarm und Stundensignal an/aus
2.1 Normalanzeige: T
x drücken: Stundensignal an
2.2 T
2.3 T
2.4 T
2.5 T
3.0 Stoppuhrmodus
3.1 Normalanzeige: T
Stoppuhrmodus
3.2 T
erfolgt in 1/100 Sekunden.
3.3 T
nehmen, Stoppuhr zählt weiter
3.4 T
Stoppuhranzeige
3.5 T
Zurückstellen der Anzeige auf Null
4.0 Einstellen der Alarmzeit
4.1 Normalanzeige: T
"Montag" und Stundenanzeige blinkt. Mit T
gewünschte Stunde einstellen.
4.2 T
blinkt. Mit T
4.3 T
5.0 Einstellen der Uhrzeit
5.1 Normalanzeige: T
halten, dann 1 x drücken. "Dienstag" und
Sekundenanzeige blinkt. Mit der T
stellen.
5.2 T
T
5.3 T
T
5.4 T
T
5.5 T
T
5.6 T
Mit T
5.7 T
6.0 12/24-Stunden-Zeitsystem
6.1 Normalanzeige: T
x drücken: A bzw
dem Display
6.2 Für das 12-Stunden-System: A bzw
7.0 Alarmtest
7.1 Normalanzeige: T
halten: der Alarm ertönt.
8.0 Alarm ausschalten
8.1 Normalanzeige: T
9.0 Monat/Datum Anzeigewechsel
9.1 Normalanzeige: T
B 1 x drücken.
Batteriewechsel:
Batterie: 1 x CR 2032
Bitte lassen Sie den Batteriewechsel von einem
Fachgeschäft durchführen.
V
bitte bei entsprechenden Sammelstellen oder im Handel ab.
Instandhaltung:
Setzen Sie das Gerät keinen extremen T
und Erschütterungen aus.
Reinigen Sie das Gerät mit einem weichen, leicht feuchten Tuch. Keine
Scheuer- oder Lösungsmittel verwenden!
Bitte unternehmen Sie keine eigenen Reparaturversuche. Bei
Reklamationen wenden Sie sich an Ihren Händler
bitte Batterie austauschen lassen. Bei Öffnung oder unsachgemäßer
Behandlung erlischt die Garantie.
Operating Instructions HiTRAX GOLD Stopwatch
Operation:
1.0 Control of watch
1.1 Normal display shows hour
of week (1=Monday
4=Thursday
1.2 Hold A-Button: Display shows
month, date and day of week
1.3 Hold B-Button: Display shows
alarm time in hour and minute
1.4 Push C-Button once: Change between
Normal Display and Chronograph Mode
2.0 Alarm and Chime On/Off
2.1 In Normal Display hold B-Button, and push A-Button
once: Chime will be on
2.2 Push A-Button once again: Alarm will be on
2.3 Push A-Button once again: Chime will be off
2.4 Push A-Button once again: Alarm will be off
2.5 Release B-Button, the display changes to Normal
Display immediately
3.0 Chronograph Mode
3.1 In Normal Display push C-Button once, chronograph
function will be set.
3.2 Start/Stop: Push A-Button to start/stop counting. It
operates in cumulative counting up to 1/100 second.
3.3 Lap Time: While in counting, push B-Button once, the
Lap Time will be display
counting. Push B-Button once again to return to
counting display
3.4 Reset: Push A-Button to stop counting and then push
B-Button to reset the digits to zero.
4.0 Alarm Time Setting
4.1 In Normal Display
seconds. Monday flag and hour digits will flash. Hour
digits advance through depression of B-Button.
4.2 Push A-Button once: Monday flag and Minute digits
of the alarm time will flash. Minute digits advance as
above.
4.3 If push of C-Button during any changing time, Normal
Display will be appeared.
5.0 Normal Time Setting
5.1 In Normal Display
seconds and then push C-Button once. Tuesday flag
and second digits will flash. Push B-Button once to
reset the second to zero.
5.2 Push of A-Button once:
Minute digits flash and advance by depression of B-
Button.
5.3 Push of A-Button once again: Hour digits flash
and advance as above.
5.4 Push of A-Button once again: Month digits flash
and advance as above.
5.5 Push of A-Button once again: Date digits flash
and advance as above.
5.6 Push of A-Button once again: Flag of weekday
flash and advance as above.
5.7 If push of C-Button during any changing time, Normal
Display will be appeared.
6.0 12/24 Hours Reversal Option
6.1 In Normal Display
Button once. A or P mark will be appeared or
disappeared.
6.2 12 hours mode, A or P will be present on the display
7.0 Alarm T
7.1 In Normal Display
together
8.0 Alarm Sound Off
8.1 For “Beep, Beep” alarm sounded, push B-Button to
stop the “Beep”
9.0 Month/Date Position Interchange
9.1 In Normal Display hold A-Button and then push B-
Button once.
Battery change:
Batterie: 1 x CR 2032
Please contact a specialized dealer for battery change. Thereby the
sealing ring must not be damaged.
Do not dispose of empty batteries in household waste. T
special local collection sites.
Maintenance:
Do not expose the instrument to extreme temperatures, vibration or
shock
Clean it with a soft damp cloth. Do not use solvents or scouring agents.
Please do not try to repair the unit. Contact the original point of
purchase. Please let change the battery before complaining. No
guarantee if the instrument is handled or opened improperly
APN ref. no: A35016
Date: 19-08-03
V
no. of color: 1C+1C
B&W artwork attached:
Presentation
T
Production/Shipment
Prepared by:
V
Approved by: