ECO Solar - Digital solar indoor/outdoor thermometer
1. Before you start using it
• Please make sure to read the instruction manual carefully.
• Following and respecting the instructions in your manual will prevent damage
to your instrument and loss of your statutory rights arising from defects due to
incorrect use.
• We shall not be liable for any damage occurring as a result of not following
these instructions. Likewise, we take no responsibility for any incorrect read-
ings and for any consequences which may result from them.
• Please take particular note of the safety advice!
• Please keep this instruction manual for future reference.
2. Field of operation and all the benefits of your new instrument at a glance
• Indoor and outdoor temperature (via cable) • Maximum and minimum values
• Solar powered
3. For your safety
• This product is exclusively intended for the field of application described above.
It should only be used as described within these instructions.
• Unauthorised repairs, modifications or changes to the product are prohibited.
• This product is not be used for medical purpose or for public information, it is
only intended for home use.
Caution!
Risk of injury:
• Keep this instrument and the battery out of the reach of children.
• Batteries must not be thrown into a fire, short-circuited, taken apart or
recharged. Risk of explosion!
• Batteries can be fatal if swallowed. If a battery has been swallowed, get medical
assistance immediately.
• Batteries contain harmful acids. Low batteries should be changed as soon as
possible to prevent damage caused by leaking.
• Wear chemical-resistant protective gloves and glasses when handling leaking
batteries.
Important information on product safety!
• Attention: The solar panel is fragile. Do not drop the instrument and avoid colli-
sions, vibration or extreme temperatures.
• Protect your instrument from moisture.
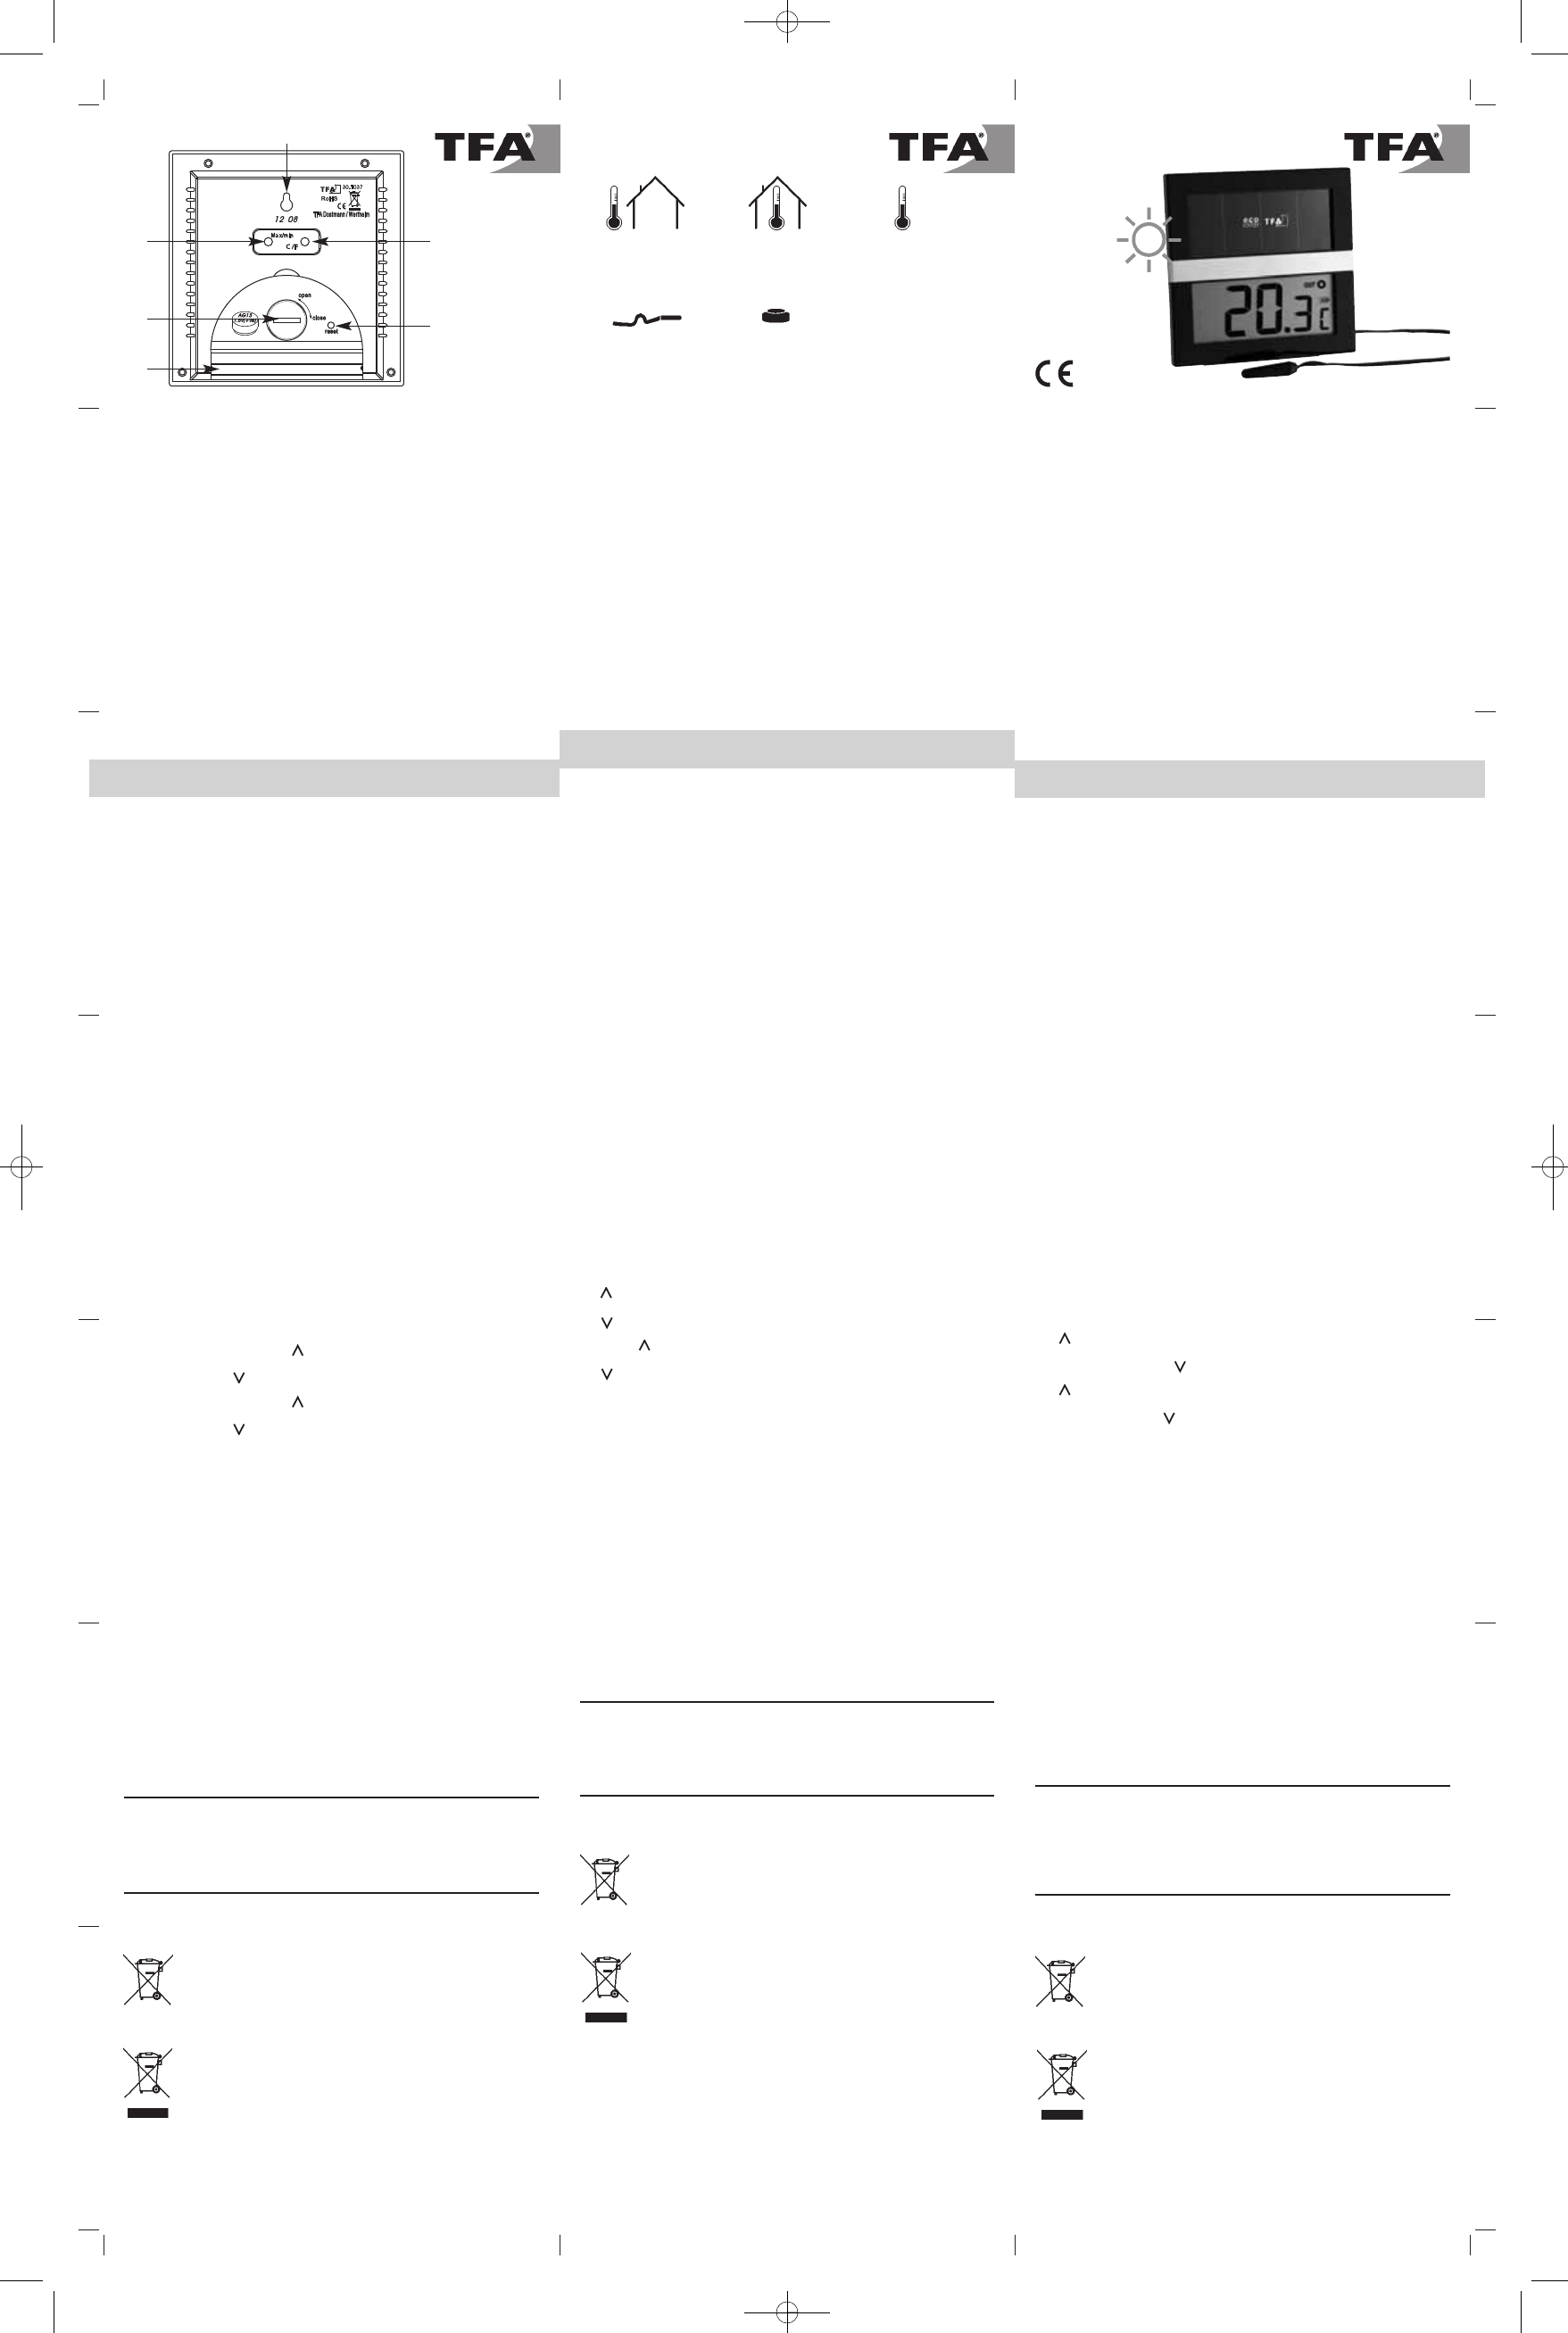
4. Elements
A: “MAX/MIN“ button B: “°C/°F” button
C: “RESET” button D: Wall mount hole
E: Battery compartment F: Stand (fold out)
5. Getting started
• The ECO SOLAR indoor/outdoor thermometer is solar powered. Please consider
when choosing a location that the solar panel needs adequate light. The battery
will operate as a backup power source in case the solar panel has not received
adequate light.
• Fold out the stand.
• Open the battery compartment by turning the lid counterclockwise using a coin
until the marking meets “open”.
• Remove the battery insulation strip.
• Close the battery compartment by turning the lid with a coin until the marking
meets “close”.
• The unit is now ready to use.
• The display toggles between the actually measured indoor and outdoor tempera-
ture every 14 seconds.
• By pressing the “°C/°F” button the temperature unit can be changed from °C to °F.
6. MAX/MIN temperatures
• Press the MAX/MIN button and the highest indoor temperature value is displayed.
“ ” appears on the display.
• Press “MAX/MIN” button again to show the lowest indoor temperature value.
“ “ appears on the display.
• Press the “MAX/MIN” button and the highest outdoor temperature value is dis-
played. “ ” appears on the display.
• Press “MAX/MIN” button again to show the lowest outdoor temperature value.
“ “ appears on the display.
• Press “MAX/MIN” button again. The display shows the current temperature.
• In Max or Min display mode, hold “Max/Min” button for 4 seconds to clear the
recorded temperature values and “---,-“ will be shown and new values will be
recorded.
7. Positioning of the thermometer
• Position the thermometer near a window using the built-in hanging slot with a
nail or a screw or the table stand.
• Lead the cable with the sensing element through the open window to the outside.
The cable adapts to the window sealing shape. (Take care of sharp-edged win-
dow frames – avoid frequent opening and closing the window).
• Avoid radiators and direct sunshine.
8. Care and maintenance
• Keep the thermometer in a dry place.
• For best function keep the solar panel always clean. Clean it with a soft cloth and
maybe a little glass- or display cleaner. Do not use solvents or scouring agents.
• Remove the battery if you do not use the product for a long period of time.
• Replace the battery when the display becomes weak.
• Open the battery compartment and insert the battery with the negative pole
downwards (1 x LR44 button cell).
9. Troubleshooting
Problems Solutions
No display / Incorrect display ➜ Ensure that the battery polarity is correct
(- pole downwards)
➜ Change the battery
➜ Make sure that no objects cover the solar
panel
➜ Use a pin to press the “RESET” button
10. Waste disposal
This product has been manufactured using high-grade materials and components
which can be recycled and reused.
Never dispose of empty batteries and rechargeable batteries in
household waste.
As a consumer, you are legally required to take them to your retail
store or to appropriate collection sites depending on national or
local regulations in order to protect the environment.
The symbols for the heavy metals contained are:
Cd=cadmium, Hg=mercury, Pb=lead
This instrument is labeled in accordance with the EU Waste Electri-
cal and Electronic Equipment Directive (WEEE).
Please do not dispose of this instrument in household waste. The
user is obligated to take end-of-life devices to a designated collec-
tion point for the disposal of electrical and electronic equipment, in
order to ensure environmentally-compatible disposal.
TFA Dostmann GmbH & Co.KG, Zum Ottersberg 12, D-97877 Wertheim.
No part of this manual may be reproduced without written consent of TFA Dost-
mann. The technical data are correct at the time of going to print and may change
without prior notice.
www.tfa-dostmann.de 08/13
Back-Up-Batterie
Back-Up Battery
1 x LR44
inklusive / included
-40°C…+70°C
-40°F...+158°F
°C↔°F
ca. 3,0 m
Arbeitsbereich:
Operating temperature:
-10°C...+50°C
(+14°F...+122°F)
ECO Solar - Digitales Solar-Innen/Außen-Thermometer
1. Bevor Sie mit dem Gerät arbeiten
• Lesen Sie sich bitte die Bedienungsanleitung genau durch.
• Durch die Beachtung der Bedienungsanleitung vermeiden Sie auch Beschädi-
gungen des Gerätes und die Gefährdung Ihrer gesetzlichen Mängelrechte
durch Fehlgebrauch.
• Für Schäden, die aus Nichtbeachtung dieser Bedienungsanleitung verursacht
werden, übernehmen wir keine Haftung. Ebenso haften wir nicht für inkorrekte
Messwerte und Folgen, die sich aus solchen ergeben können.
• Beachten Sie besonders die Sicherheitshinweise!
• Bewahren Sie diese Bedienungsanleitung gut auf!
2. Einsatzbereich und alle Vorteile Ihres neuen Gerätes auf einen Blick
• Innen- und Außentemperatur (über Kabel) • Höchst- und Tiefstwerte
• Solarbetrieben
3. Zu Ihrer Sicherheit
• Das Produkt ist ausschließlich für den oben beschriebenen Einsatzbereich geeig-
net. Verwenden Sie das Produkt nicht anders, als in dieser Anleitung dargestellt
wird.
• Das eigenmächtige Reparieren, Umbauen oder Verändern des Gerätes ist nicht
gestattet.
• Dieses Gerät ist nicht für medizinische Zwecke oder zur öffentlichen Information
geeignet und nur für den privaten Gebrauch bestimmt.
Vorsicht!
Verletzungsgefahr:
• Bewahren Sie das Gerät und die Batterie außerhalb der Reichweite von Kindern
auf.
• Batterien nicht ins Feuer werfen, kurzschließen, auseinander nehmen oder aufla-
den. Explosionsgefahr!
• Batterien können bei Verschlucken lebensgefährlich sein. Wurde eine Batterie
verschluckt, muss sofort medizinische Hilfe in Anspruch genommen werden.
• Batterien enthalten gesundheitsschädliche Säuren. Um ein Auslaufen der Batteri-
en zu vermeiden, sollten schwache Batterien möglichst schnell ausgetauscht
werden. Beim Hantieren mit ausgelaufenen Batterien chemikalienbeständige
Schutzhandschuhe und Schutzbrille tragen!
Wichtige Hinweise zur Produktsicherheit!
• Vorsicht: Das Solarpanel ist empfindlich. Lassen Sie das Gerät nicht fallen und
setzen Sie es keinen heftigen Stößen, Erschütterungen oder extremen Tempera-
turen aus.
• Das Gerät vor Feuchtigkeit schützen.
4. Bestandteile
A: „MAX/MIN“ Taste B: „°C/°F“ Taste
C: „Reset” Taste D: Wandaufhängung
E: Batteriefach F: Ständer (ausklappbar)
5. Inbetriebnahme
• Das ECO SOLAR Innen/Außen-Thermometer ist solarbetrieben. Bitte beachten
Sie bei der Standortwahl, dass das Solar-Panel ausreichend Licht bekommt. Die
Knopfzelle-Batterie fungiert als Backup Batterie, falls die Energieversorgung
durch das Solar-Panel nicht ausreicht.
• Klappen Sie den Ständer aus.
• Öffnen Sie das Batteriefach, indem Sie den Deckel mit Hilfe einer Münze entge-
gen dem Uhrzeigersinn drehen, bis die Markierung auf „open” steht.
• Entfernen Sie den Batterieunterbrechungsstreifen.
• Schließen Sie das Batteriefach wieder (Markierung: „close”).
• Das Gerät ist nun betriebsbereit.
• Das Display zeigt im Wechsel (ca. 14 Sek.) den momentan gemessenen Außen-
bzw. Innentemperaturwert an.
• Mit der „°C/°F” Taste können Sie zwischen °C und °F als Maßeinheit für die Tem-
peratur wählen.
6. Höchst- und Tiefsttemperaturen:
• Drücken Sie die „MAX/MIN” Taste und es erscheint der höchste Innentempera-
turwert. Im Display erscheint „ “.
• Durch nochmaliges Drücken wird der tiefste Innentemperaturwert angezeigt. Im
Display erscheint „ “.
• Drücken Sie die „MAX/MIN” Taste und es erscheint der höchste Außentempera-
turwert. Im Display erscheint „ “.
• Durch nochmaliges Drücken wird der tiefste Außentemperaturwert angezeigt. Im
Display erscheint „ “.
• Drücken Sie noch einmal die „MAX/MIN” Taste. Auf dem Display erscheint die
aktuelle Temperatur.
• Drücken Sie die „MAX/MIN” Taste (4 Sek.) im jeweiligen MAX/MIN-Modus und
der Speicher wird gelöscht. Im Display erscheint „---.-“.
7. Aufstellen des Thermometers
• Mit dem ausklappbaren Ständer auf der Rückseite kann das Thermometer in Fen-
sternähe aufgestellt werden oder mit der Aufhängeöse an der Wand befestigt
werden.
• Das Kabel mit dem Sensor einfach bei geöffnetem Fenster nach außen führen.
Das Kabel passt sich der Form der Fensterdichtung an. (Vorsicht bei scharfkanti-
gen Fensterrahmen – häufiges Öffnen und Schließen des Fensters vermeiden.)
• Vermeiden Sie die Nähe von Heizkörpern und direkte Sonneneinstrahlung.
8. Pflege und Wartung
• Bewahren Sie das Thermometer an einem trockenen Platz auf.
• Um die beste Funktionsfähigkeit zu erhalten, sollte das Solar-Panel immer sau-
ber sein. Reinigen Sie die Solarzellen und das Display mit einem weichen Tuch
und eventuell ein wenig Glas- oder Monitorreiniger. Keine Scheuer- oder
Lösungsmittel verwenden!
• Entfernen Sie die Batterie, wenn Sie das Gerät längere Zeit nicht verwenden.
• Tauschen Sie die Batterie aus, wenn die Anzeige schwächer wird.
• Öffnen Sie den Batteriedeckel und legen Sie die Batterie mit dem Minuspol nach
unten ein (1 x LR44 Knopfzelle).
9. Fehlerbeseitigung
Problem Lösung
Keine Anzeige / ➜ Batterie polrichtig einlegen (- Pol nach unten)
Unkorrekte Anzeige ➜ Batterie wechseln
➜ Achten Sie darauf, dass keine Gegenstände
das Solar-Panel abdecken
➜ „RESET” Knopf mit einem spitzen Gegen-
stand drücken
10. Entsorgung
Dieses Produkt wurde unter Verwendung hochwertiger Materialien und Bestandteile
hergestellt, die recycelt und wiederverwendet werden können.
Batterien und Akkus dürfen keinesfalls in den Hausmüll!
Als Verbraucher sind Sie gesetzlich verpflichtet, gebrauchte Batteri-
en und Akkus zur umweltgerechten Entsorgung beim Handel oder
entsprechenden Sammelstellen gemäß nationaler oder lokaler
Bestimmungen abzugeben.
Die Bezeichnungen für enthaltene Schwermetalle sind:
Cd=Cadmium, Hg=Quecksilber, Pb=Blei
Dieses Gerät ist entsprechend der EU-Richtlinie über die Entsorgung
von Elektro- und Elektronik-Altgeräten (WEEE) gekennzeichnet.
Dieses Produkt darf nicht mit dem Hausmüll entsorgt werden. Der
Nutzer ist verpflichtet, das Altgerät zur umweltgerechten Entsorgung
bei einer ausgewiesenen Annahmestelle für die Entsorgung von
Elektro- und Elektronikgeräten abzugeben.
TFA Dostmann GmbH & Co.KG, Zum Ottersberg 12, D-97877 Wertheim.
Diese Anleitung oder Auszüge daraus dürfen nur mit Zustimmung von TFA Dost-
mann veröffentlicht werden. Die technischen Daten entsprechen dem Stand bei
Drucklegung und können ohne vorherige Benachrichtigung geändert werden.
www.tfa-dostmann.de 08/13
ECO Solar - Thermomètre solaire intérieur/extérieur digital
1. Avant d'utiliser votre appareil
• Lisez attentivement le mode d'emploi.
• En respectant ce mode d'emploi, vous éviterez d'endommager votre appareil
et de perdre vos droits résultant d'un défaut pour cause d'utilisation non
conforme.
• Nous n'assumons aucune responsabilité pour des dommages qui auraient été
causés par le non-respect du présent mode d'emploi. De même, nous n’assu-
mons aucune responsabilité pour des relevés incorrects et les conséquences
qu’ils pourraient engendrer.
• Suivez bien toutes les consignes de sécurité!
• Conservez soigneusement le mode d'emploi!
2. Aperçu du domaine d'utilisation et tous les avantages de votre nouvel appareil
• Température intérieure et extérieure (via câble)
• Valeurs maximales et minimales • Opère par cellules solaires
3. Pour votre sécurité
• L'appareil est uniquement destiné à l'utilisation décrite ci-dessus. Ne l'utilisez
jamais à d'autres fins que celles décrites dans le présent mode d'emploi.
• Vous ne devez en aucun cas réparer, démonter ou modifier l'appareil par vous
même.
• Cet appareil ne convient ni pour une utilisation médicale ni pour l'information
publique, il est destiné uniquement à un usage privé.
Attention!
Danger de blessure:
• Gardez votre appareil et la pile hors de la portée des enfants.
• Ne jetez jamais les piles dans le feu, ne les court-circuitez pas, ne les démontez
pas et ne les rechargez pas. Risques d'explosion!
• L'ingestion d'une pile peut être mortelle. En cas d'ingestion de pile, consultez
immédiatement un service médical.
• Les piles contiennent des acides nocifs pour la santé. La pile faible doit être rem-
placée le plus rapidement possible, afin d'éviter une fuite. Pour manipuler des
piles qui ont coulé, utilisez des gants de protection chimique spécialement adap-
tés et portez des lunettes de protection !
Conseils importants de sécurité du produit!
• Attention: Le panneau solaire est fragile. Ne laissez pas tomber l'appareil et ne
l'exposez pas à chocs, des vibrations excessives ou à des températures extrêmes.
• Protégez-le contre l'humidité.
4. Eléments
A: Touche «MAX/MIN» B: Touche «°C/°F»
C: Touche «RESET» D: Suspension murale
E: Compartiment à pile F: Support (rabattable)
5. Mise en service
• Le ECO SOLAR thermomètre intérieur/extérieur opère par cellules solaires. Lors
du choix de l'emplacement, assurez-vous que le panneau photovoltaïque reçoit
suffisamment de lumière. La pile ronde fonctionne en batterie backup, si l'ali-
mentation en énergie par le panneau solaire n'est pas suffisante.
• Basculer le support.
• Ouvrez le compartiment à batterie en tournant le couvercle dans le sens contraire
des aiguilles d’une montre (aidez-vous d’une pièce de monnaie) jusqu’à ce que le
repère se trouve en face de la mention «open».
• Enlever la bande d´interruption de la pile.
• Refermez le compartiment à batterie (repère en face de la mention «close»).
• L’instrument est maintenant prêt à fonctionner.
• Le display change chaques 14 secondes entre la température intérieure et exté-
rieure actuelle.
• En pressant la touche «°C/°F» l´affichage de la température peut être ajusté en
°C ou en °F.
6. Températures maximales et minimales
• En pressant la touche «MAX/MIN» apparaît la température intérieure maximale.
« » apparaît sur l'affichage.
• En pressant encore une fois la touche «MAX/MIN» on peut obtenir la températu-
re intérieure minimale. « » apparaît sur l'affichage.
• En pressant la touche MAX/MIN apparaît la température extérieur maximale.
« » apparaît sur l'affichage.
• En pressant encor une fois la touche «MAX/MIN» on peut obtenir la température
extérieure minimale. « » apparaît sur l'affichage.
• Appuyer encore une fois sur la touche «MAX/MIN». La température actuelle s’af-
fichent à l’écran.
• Si la touche «MAX/MIN» reste appuyée (4 secondes) en même temps les valeurs
maximales ou minimales sont affichées, les valeurs seront effacées. «---,-»
apparaît sur l'affichage.
7. Mise en place du thermomètre
• Accrocher le thermomètre près d’une fenêtre à l’aide d’une clou ou d’une vis ou
poser le thermomètre en sortant le pied repliable.
• Simplement guider le câble avec le palpeur vers l’extérieur par la fenêtre ouverte.
Le câble s’adapte à la forme du bourrage de fenêtre. (Attention aux châssis à
vives arrêtes – éviter d’ouvrir et de fermer le fenêtre fréquemment).
• Eviter les appareils de chauffage et le rayonnement solaire direct.
8. Entretien et maintenance
• Conserver le thermomètre dans un endroit sec.
• Afin d’assurer un fonctionnement optimal, veillez à ce que le panneau solaire
reste toujours propre. Nettoyez les cellules solaires avec un chiffon doux en
ajoutant éventuellement un peu de produit à vitres ou de produit de nettoyage
pour moteur. N’utilisez aucun dissolvant ou agent abrasif!
• Enlevez la pile, si vous n’utilisez pas votre appareil pendant une durée prolongée.
• Veuillez échanger la batterie si l’affichage devient faible.
• Ouvrir le compartiment de la pile et insérer la pile avec le pôle négatif dirigé vers
le bas (1 x LR44 pile à bouton).
9. Dépannage
Problème Résolution
Affichage manquant / ➜ Contrôlez la bonne polarité de la pile
Indication incorrecte (pôle - vers le bas)
➜ Echangez la pile
➜ Assurez-vous qu'aucun objet ne couvre le
panneau solaire
➜ Appuyez sur la touche «RESET» à l'aide d'un
objet pointu
10. Traitement des déchets
Ce produit a été fabriqué avec des matériaux et des composants de haute qualité
qui peuvent être recyclés et réutilisés.
Les piles et accus usagés ne peuvent en aucun cas être jetés dans
les ordures ménagères ! En tant qu'utilisateur, vous avez l'obligation
légale de rapporter les piles et accus usagés à votre revendeur ou de
les déposer dans une déchetterie proche de votre domicile confor-
mément à la réglementation nationale et locale.
Les métaux lourds sont désignés comme suit:
Cd=cadmium, Hg=mercure, Pb=plomb
Cet appareil est conforme aux normes de l'UE relatives au traitement
des déchets électriques et électroniques (WEEE).
L'appareil usagé ne doit pas être jeté dans les ordures ménagères.
L’utilisateur s’engage, pour le respect de l’environnement, à déposer
l’appareil usagé dans un centre de traitement agréé pour les déchets
électriques et électroniques.
TFA Dostmann GmbH & Co.KG, Zum Ottersberg 12, D-97877 Wertheim.
La reproduction, même partielle de la présente mode d'emploi est strictement inter-
dite avec accord explicite de TFA Dostmann. Les spécifications techniques de ce
produit ont été actualisées au moment de l'impression et peuvent être modifiées,
sans avis préalable.
www.tfa-dostmann.de 08/13
Kat. Nr. 30.1038
Bedienungsanleitung
Instruction Manual
Mode d’emploi
A
E
F
D
B
C
-20°C…+70°C
-4°F...+158°F
°C↔°F
±1°C (1.8°F)
TFA Anl. No. 30.1038_08_13 09.09.2013 14:02 Uhr Seite 1