Außenwetterstation D
Wichtiger Montagehinweis für Ihre Außenwetterstation:
Damit Sie lange Freude an Ihrer Außenwetterstation
haben, können Sie das Gerät mit beiliegendem Befesti-
gungsmaterial wirkungsvoll gegen Diebstahl sichern.
Vorgehensweise:
1. Stellen sie das Barometer gemäß beiliegender Anwei-
sung ein.
2. Suchen Sie sich einen geeigneten Platz zum Aufhängen,
wenn möglich wetter- und sonnengeschützt.
3. Hängen Sie das Gerät ohne Barometer an dem vorgese-
henen Aufhängeloch auf. Für die waagerechte Version
finden Sie zwei Aufhängelöcher vor. Für beiliegende
Schrauben und Dübel verwenden Sie bitte einen 6 mm
Steinbohrer.
4. Verbinden Sie das Gerät zusätzlich mit Schrauben und
Dübel durch das freibleibende Mittelloch im Gehäuse
mit der Wand. (Schraube und Dübel für Steinbohrer
6 mm).
5. Drücken Sie zuerst den beiliegenden Montagering in
die Gehäusefrontseite.
6. Drücken Sie dann vorsichtig das lose beiliegende Baro-
meter in den Montagering. Achten Sie auf einen gera-
den Sitz und eine gleichmäßige Druckverteilung auf
dem Barometerglas beim Montieren.
7. Möchten Sie Ihr Gerät wieder abhängen oder das Baro-
meter nachstellen, ziehen Sie das Werk vorsichtig aus
dem Gehäuse.
Ohne Diebstahlsicherung:
Lassen Sie Punkt 4. der Montageanweisung aus.
Outdoor weather station
Important installation note for your outdoor weather station:
You can protect your outdoor weather station against
theft with the enclosed installation material, so that it will
give you long and reliable service.
Procedure:
1. Adjust the barometer according to the instructions pro-
vided.
2. Choose a suitable mounting location, as far as possible
protected against direct weather influence and solar
radiation.
3. Hang the unit on the provided mounting hole without
the barometer. There are two mounting holes for the
horizontal version. Use a 6 mm stone drill for the provi-
ded screws and dowels.
4. Fix the unit additionally to the wall with a screw and
dowel through the free centre hole in the case (screw
and dowel for 6 mm stone drill).
5. First of all press the provided mounting ring into the
front side of the case.
6. Then cautiously press the barometer, provided loose as
a separate item, into the mounting ring. Make sure that
it is seated straight and that the pressure exerted when
mounting is distributed evenly over the barometer
glass.
7. When you wish to take down the unit again or readjust
the barometer, cautiously pull the mechanism out of
the case.
Without protection against theft:
Omit step 4 of the mounting instructions.
➀ ➁ ➂ ➃
➄
W1.100049
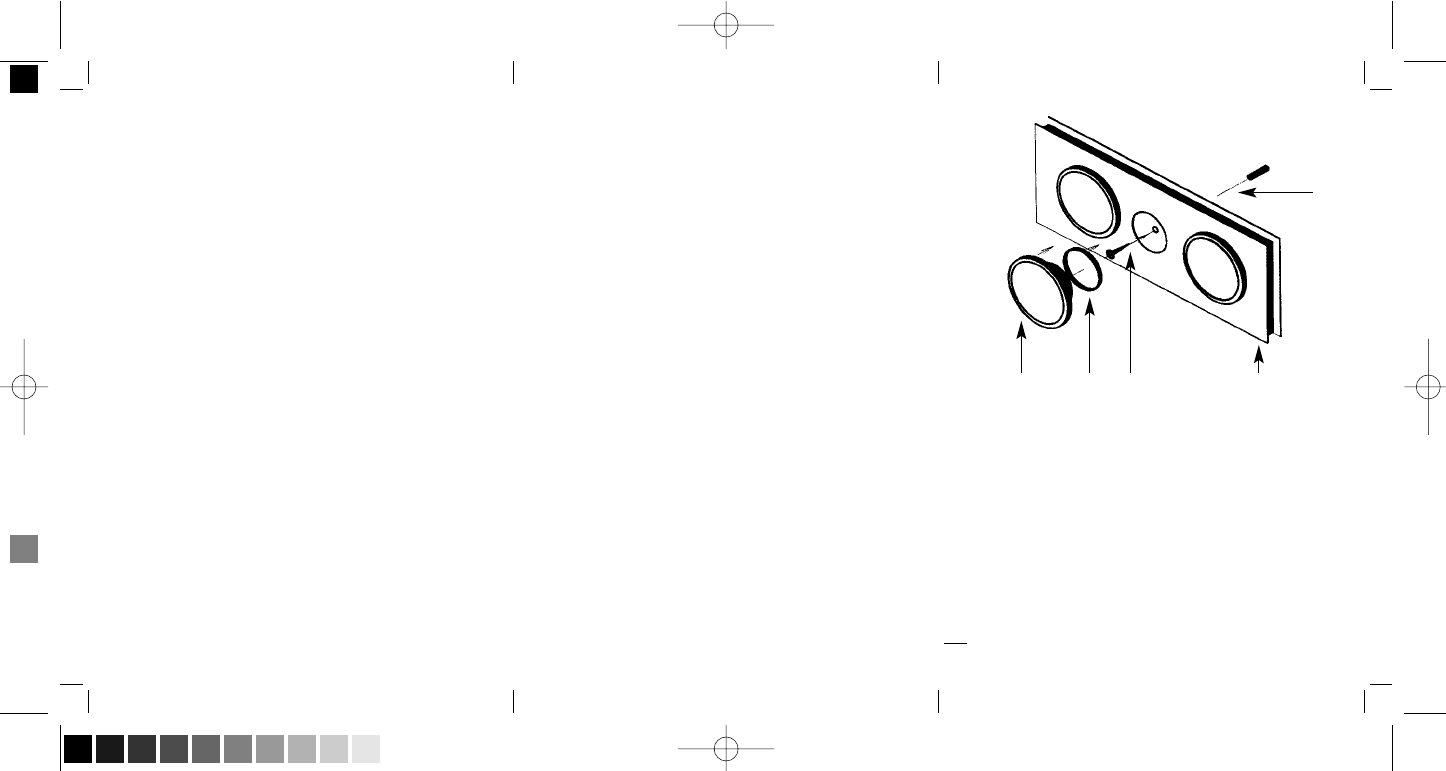
➀
Barometer
➁
Montagering
➂
Schraube
➃
Gehäusefrontseite
➄
Dübel
➀
Barometer
➁
Mounting ring
➂
Screw
➃
Front side of housing
➄
Dowel
➀
Baromètre
➁
Anneau de montage
➂
Vis
➃
Front du boîtier
➄
Cheville
➀
Barometro
➁
Anello di montaggio
➂
Vite
➃
Lato frontale
➄
Tassello
TFA No. 20.2015_Anleitung 11.06.2008 11:02 Uhr Seite 1 (Schwarz/Process Black Auszug)