E
PRESTACIONES Y FUNCIONES
PREPARACIONES ANTES DEL USO
Báscula
1. Pantalla de visualización
2. Botón de Configurar
3. Botones de flecha (Seleccionar)
4. Electrodos para la planta del pie
5. Electrodos para el talón
6. Tecla de peso solamente
Consulte las características técnicas para
saber si su modelo dispone de esta prestación
Accesorios
7. Pilas tamaño AA (4)
7.
Instalación de las pilas
Abrir la tapa de las pilas situada en la parte posterior de la báscula. Insertar
como se indica las baterías AA suministradas.
Nota: Asegúrese de situar correctamente la polaridad de las pilas. Si coloca las pilas de
manera incorrecta, el líquido puede derramarse y dañar el suelo. Si no tiene
intención de utilizar esta unidad durante un período de tiempo prolongado, se
recomienda sacar las pilas antes de guardarla.
Por favor, tenga en cuenta que desde que las pilas fueron colocadas en
fábrica puede haber disminuido su nivel de energía.
Colocación del monitor
Coloque la báscula en una superficie dura y lisa con una vibración mínima
para asegurar una medición segura y precisa.
Nota: Para evitar posibles lesiones, no pise el borde de la plataforma.
Recomendaciones de manejo
Este monitor es un instrumento de precisión que utiliza tecnología de
vanguardia. Para mantener la unidad en condición óptima, siga estas
instrucciones cuidadosamente:
• No intente desmontar la báscula.
• Guarde el aparato horizontalmente y colóquelo de manera que las teclas
no resulten presionadas accidentalmente.
• Evite que la unidad reciba golpes o vibraciones excesivas.
• Sitúe la unidad fuera del alcance de la luz directa del sol, calefacciones
y radiadores, humedad elevada o cambios extremos de temperatura.
•
No lo sumerja nunca en agua. Utilice alcohol para limpiar los electrodos y limpiacristales
(aplicado mediante un trapo) para mantenerlos brillantes; evite utilizar jabones.
• Evite la humedad al subirse a la plataforma.
• Evite que caiga cualquier objeto sobre el aparato.
38
Abrir como se muestra.
Sentido de las pilas.
()
1.
2.
3.
4.
3.
4.
5.
6.
GB
5
HOW TO DETERMINE BODY FAT PERCENTAGE
GETTING ACCURATE READINGS
Setting and Storing Data in Memory
The unit can be operated only if data has been programmed into one of the personal data memories or the Guest mode.
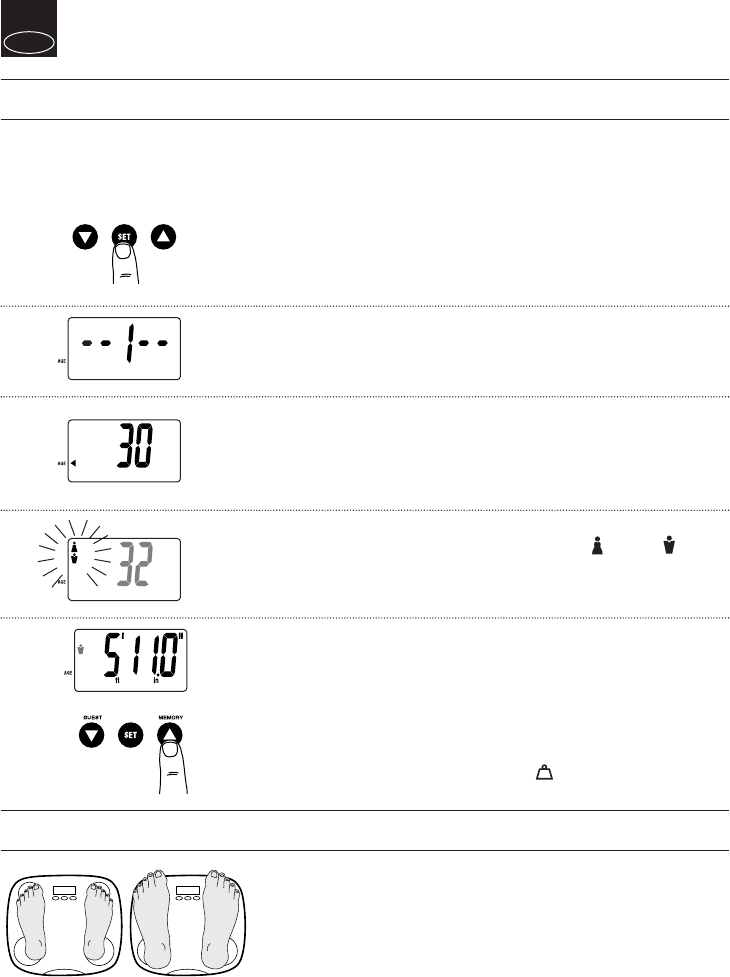
1. Turn on the Power
Press the Set button to turn on the unit. The unit will beep to confirm
activation, the Personal data number will be displayed, and the display will
flash.
Note: If you don’t operate the unit for sixty seconds after the unit has been turned on, the
unit will turn off automatically.
2. Select a Personal data Number
Press the Up/Down buttons to select a Personal data number. Once you
reach the Personal data number you wish to use, press the Set button. The
unit will beep once to confirm.
3. Set Age
The display defaults to Age 30 (range of user age is between 7-99). An
arrow icon appears on the lower left side to indicate Age setting. Use the
Up/Down buttons to scroll through numbers. When you reach your age,
press the Set button. The unit will beep once to confirm.
4. Select Female or Male
Use the Up/Down buttons to scroll through Female ( ), Male ( )
settings, then press the Set button. The unit will beep once to confirm.
5. Specify the Height
The display defaults to 5’ 7.0” (170cm) (range of user is from 3’ 4.0” – 7’ 3.0” or 100cm –
220cm). Use the Up/Down buttons to specify Height and then press the Set button. The unit
will beep once to confirm.
The unit will beep twice and the display will flash all data (Male/Female, Age, Height.) three
times to confirm the programming. The power will then shut down automatically.
Note: If you make a mistake or want to turn the unit off before you have finished
programming it, press the Weight-Only Key ( ) to force quit. (for models with
the Weight- Only Key.)
To ensure accuracy, readings should be taken without clothing and under consistent
conditions of hydration. If you do not undress, always remove your socks or stockings,
and be sure the soles of your feet are clean before stepping on the measuring platform.
Be sure that your heels are correctly aligned with the electrodes on the
measuring platform. Don’t worry if your feet appear too large for the unit -
accurate readings can still be obtained if your toes overhang the platform.
It is best to take readings at the same time of day. Try to wait about three
hours after rising, eating, or hard exercise before taking measurements.
While readings taken under other conditions may not have the same
absolute values, they are accurate for determining the percentage of change
as long as the readings are taken in a consistent manner. To monitor
progress, compare weight and body fat percentage taken under the same
conditions over a period of time.
Heels centered on
electrodes
Toes may overhang
measuring platform
Note: An accurate reading will not be possible if
the soles of your feet are not clean, or if your
knees are bent or you are in a sitting position.