You will receive readings only if data has been programmed into the Tanita Remote Display.
2010TANITA CorporationAll Rights Reserved.
For questions or help with product: Call Customer Service (847) 640 - 9241 (US & Canada Only)
Do not use the body fat reading feature of this product if you have a pacemaker or other electronic
implanted medical device. The body fat monitor function is not intended for pregnant women,
professional athlete or bodybuilders.
WARNING
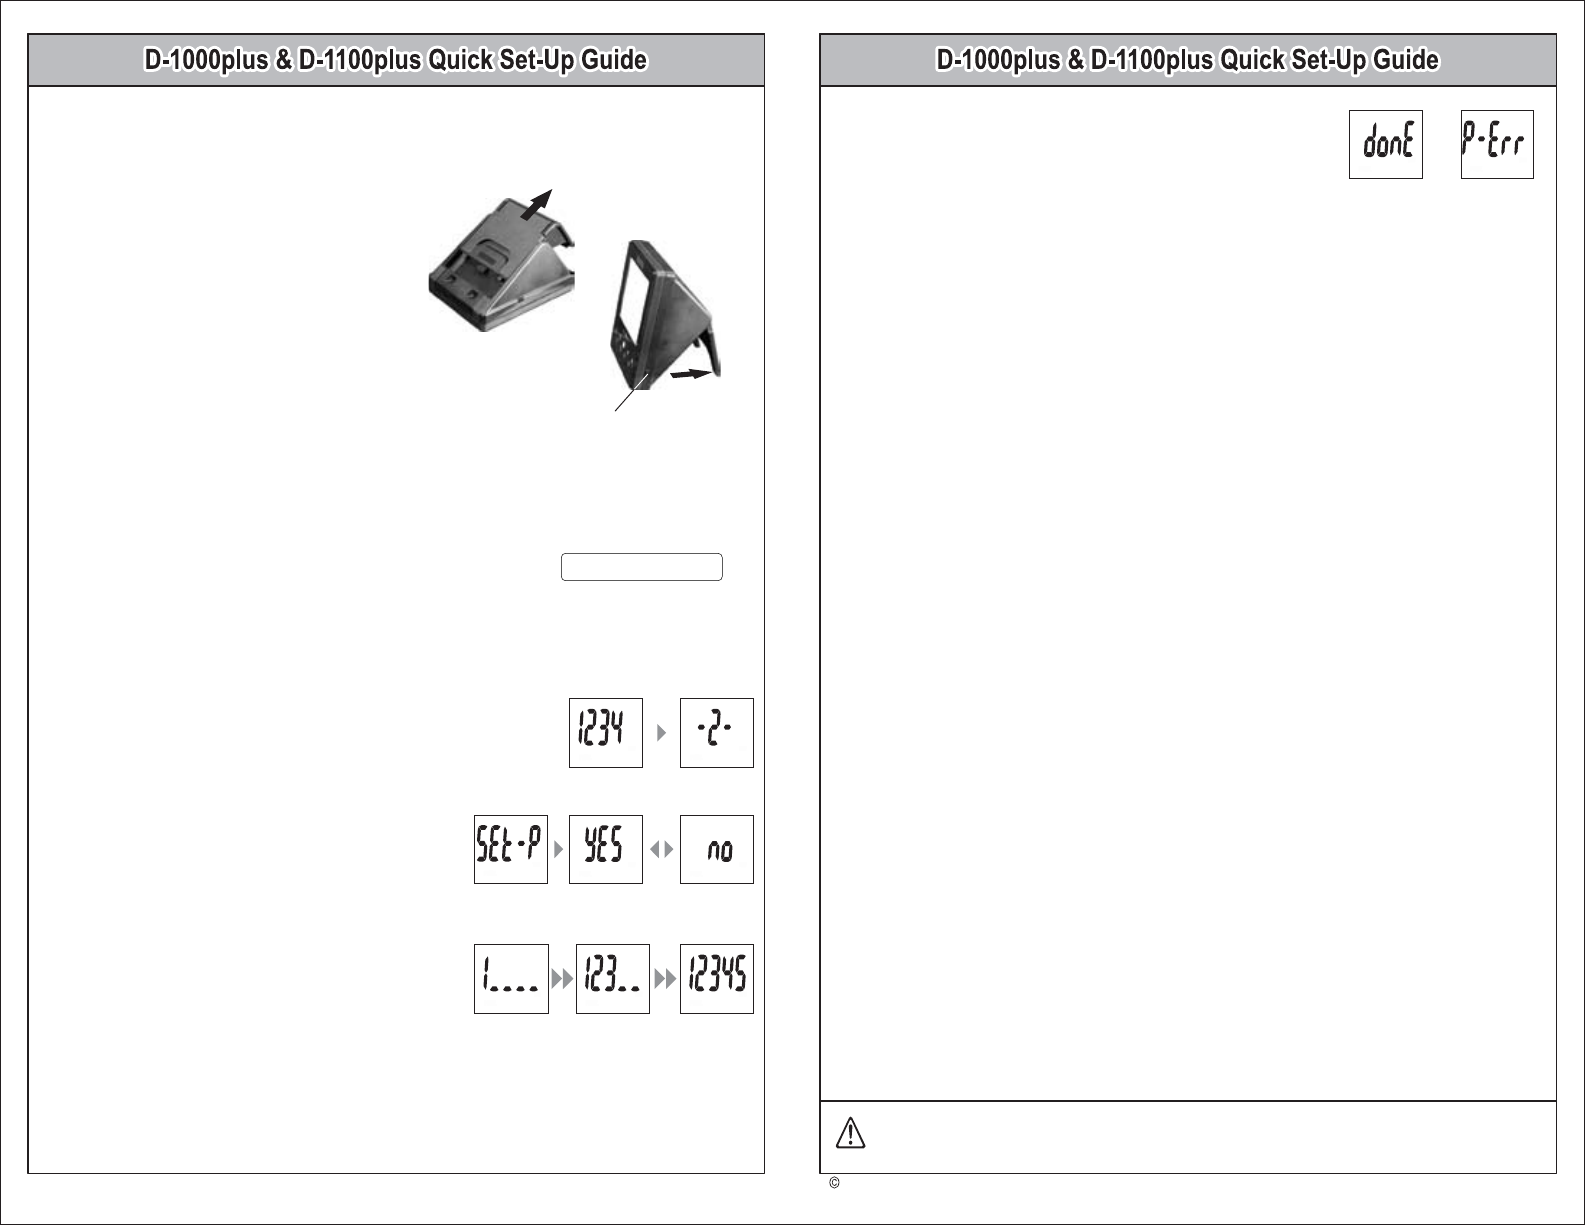
1) Before proceeding, a) Install the batteries in the platform.
b) Install the batteries and set the clock in the remote display.
c) The platform and the remote display are within 17 feet (5 m) of each other.
2. Pairing the remote display and Tanita wireless platform (”platform”)
The platform needs to pair with the applicable remote display before measurements are attempted.
2) Press and hold the OFF button for 2 seconds on the remote display.
The remote display will show “ 1234 ” for selecting a personal number.
Select the preferred personal number which will be paired with the platform
using ▲/▼buttons and press the SET button to confirm.
3) The remote display will show “ SEt-P ”. Select “ YES ” or “ no ”
using ▲/▼ buttons, and press the SET button to confirm,
4) Input the 5 digit serial number found on the bottom of the
platform using ▲/▼buttons and press the SET button to
confirm.
Note: ・ “ 00000 ”, “ 000001 ” and more than “ 65535 ”.
These serial numbers are not allowed. Please input the correct serial number.
・ The serial number is located on the bottom of the platform.
Cancellation-1: Press the OFF button to cancel during the pairing process and then the clock will be displayed.
Cancellation-2: The pairing process will be cancelled if inactive for 1 minute and then the clock will be displayed.
1) Set Hour
Press ▲/▼buttons to set hour and then press SET.
The unit will beep once to confirm.
2) Set Minute
Press ▲/▼buttons to set minute and then press SET.
The unit will beep twice to confirm the programming.
• Resetting Clock
Press the clock button on the bottom of the remote display.
Then follow the clock setting procedure 1) and 2).
1. Initial Setting (Clock Setting)
Insert batteries into the remote display and then press
any front panel button to set the clock.
a) “ YES ”: The pairing process will continue to the next step.
b) “ no ”: The pairing process will be cancelled and then
the clock will be displayed.
Note:
To confirm the paired serial number on each personal number after completion the
pairing process:
Press and hold the SET button for 2 seconds on the remote display. The remote display will show “ -1- ”.
Select the personal number using ▲/▼buttons, and press the SET button to confirm. The display shows
the paired serial number for 3 seconds.
“- - - - -” is shown if there is no serial number stored for the selected personal number.
5) Once the pairing process is completed with the platform, the remote
display shows “ donE ” and then the clock will be displayed. If the remote
display shows “ P-Err ”, please try the pairing process again.
1) Selal Data Number
Use the SET button to activate the unit. Use ▲/▼buttons to select a personal data number.
Press the SET button.
You will receive readings only if data has been programmed into the Tanita remote display.
2) Set Age (Applicable Age: Refer to the platform manual)
Use ▲/▼buttons to select age. Press the SET button.
3) Select Female or Male (Athlete mode: Refer to the platform manual)
Use ▲/▼buttons to select Female / Male / Athlete Female / Athlete Male. Press the SET button.
4) Specify Height
Use ▲/▼buttons to select height. Press the SET button to confirm.
3. Setting and storing personal data in the remote display
The remote display will beep twice and the display will flash all data three times to confirm the programming.
The power will then shut down automatically.
To use the DCI (Daily Calorie Intake) feature properly, you need to set the Activity Level.
Level 1 = Inactive lifestyles (little or no exercise)
Level 2 = Moderately active lifestyles (occasional, low intensity exercise)
Level 3 = Adult involved in intense physical activity
Note: If you select the Athlete Mode, it will automatically set the Activity Level to Level 3.
Use the ▲/▼ buttons to specify Activity Level. Press the SET button to confirm.
5) Select Activity Level
Please review the Tanita wireless platform instruction manual for remote display operations, warnings, and other
important information. The instruction manual of each platform also includes the following procedures.
- Taking body composition readings
- Programming The Guest Mode- Taking Weight Measurement Only
- Recall Function
Battery Cover
Backlight Button
Upright Position
Note: If there is no serial number on the bottom of the
platform, the pairing process is not required and
you can skip to the section 3, settting and storing
personal data in the remote display.
Note: D-1000plus only, but it also depends on the platform specification, refer to platform manual.
Serial Number Sticker
Serial No.
X X X X X
Need help? Post your question in this forum.
Report abuse
Libble takes abuse of its services very seriously. We're committed to dealing with such abuse according to the laws in your country of residence. When you submit a report, we'll investigate it and take the appropriate action. We'll get back to you only if we require additional details or have more information to share.
Product:
Forumrules
To achieve meaningful questions, we apply the following rules:
First, read the manual;
Check if your question has been asked previously;
Try to ask your question as clearly as possible;
Did you already try to solve the problem? Please mention this;
Is your problem solved by a visitor then let him/her know in this forum;
To give a response to a question or answer, do not use this form but click on the button 'reply to this question';
Your question will be posted here and emailed to our subscribers. Therefore, avoid filling in personal details.
Register
Register getting emails for Tanita D-1100Plus at:
new questions and answers
new manuals
You will receive an email to register for one or both of the options.
Get your user manual by e-mail
Enter your email address to receive the manual of Tanita D-1100Plus in the language / languages: English as an attachment in your email.
The manual is 0,3 mb in size.
You will receive the manual in your email within minutes. If you have not received an email, then probably have entered the wrong email address or your mailbox is too full. In addition, it may be that your ISP may have a maximum size for emails to receive.
The manual is sent by email. Check your email
If you have not received an email with the manual within fifteen minutes, it may be that you have a entered a wrong email address or that your ISP has set a maximum size to receive email that is smaller than the size of the manual.
The email address you have provided is not correct.
Please check the email address and correct it.
Your question is posted on this page
Would you like to receive an email when new answers and questions are posted? Please enter your email address.