ENGLISH
Operating Manual
Please read and observe the following
information and keep the operating
manual nearby for future reference!
Safety information
WARNING!
• Risk of explosion!
Æ Only use the power adapter plug supplied!
Æ Only use the batteries supplied or ones of the same type!
Æ Always treat batteries with due care and attention and only
use them as described.
• Risk of fatal injury with heart pacemakers!
Æ Always keep the phone a minimum safety distance of at
least 15 cm to heart pacemakers.
Æ Risk of suffocation through small objects, packaging and
protective foil!
Æ Keep children away from the product and its packaging!
• Batteries represent a hazard to health and the environment!
Æ Never open, damage or swallow batteries or allow them to
pollute the environment. They could contain toxic and
ecologically harmful heavy metals.
CAUTION!
• Risk of hearing damage!
Æ Avoid listening at full amplified volume.
ATTENTION!
• Risk of property damage.
Æ Prevent exposure to environmental influences, e.g. smoke,
dust, vibration, chemicals, moisture, heat and direct sunlight.
Æ Only allow repairs to be completed by qualified personnel.
Package contents
- 1 handset - 1 base station
- 3 rechargeable batteries - 1 power adapter plug
- 1 instruction manual
Operating elements
1 Indicator lamp
2 Earpiece
3
and One-touch dialling keys
4
Change handset volume during a call
5
Switch handset volume amplification on/off during a call
6 Display
7
Standby mode: redialling
When dialling a number: enter a dialling pause
8
Standby mode: press and hold to switch phone on/off
Phone is ringing: reject call
During call: end call
9
/ In menu: navigate / select menu option
Standby mode:
open call list, open phone book
10
Standby mode: Press and hold to switch the signal lamp
on/off
11 Microphone
12
When entering digits: enter a 0
When entering text: enter a space and punctuation marks
Standby mode: switch vibration on/off
13
Standby mode: press and hold to switch key lock on/off
14 Digit keys 1-9
15
Dial phone number / take incoming call
During call: activate handsfree function
16 Connection socket for headset
17
Call another handset
18 Softkeys (function is indicated in the display above the respect
ive key)
19 Change ringing volume of the handset
20 Press to issue an emergency call (SOS)
21 Telephone line socket
22 Power adapter plug connection socket
23 Paging key
Intended use
The telephone is suitable for telephoning within a public telephone
network system. Any other use is considered unintended use.
Unauthorised modification or reconstruction is not permitted. Under
no circumstances open the device or complete any repair work
yourself.
Starting up
Connecting the telephone line
Æ Connect the telephone cable to the telephone line socket .
Æ Connect the telephone cable to the telephone line wall socket.
Connecting the power adapter plug
Æ Connect the cable of the power adapter plug to the base station.
Æ Connect the power adapter plug to the mains power outlet.
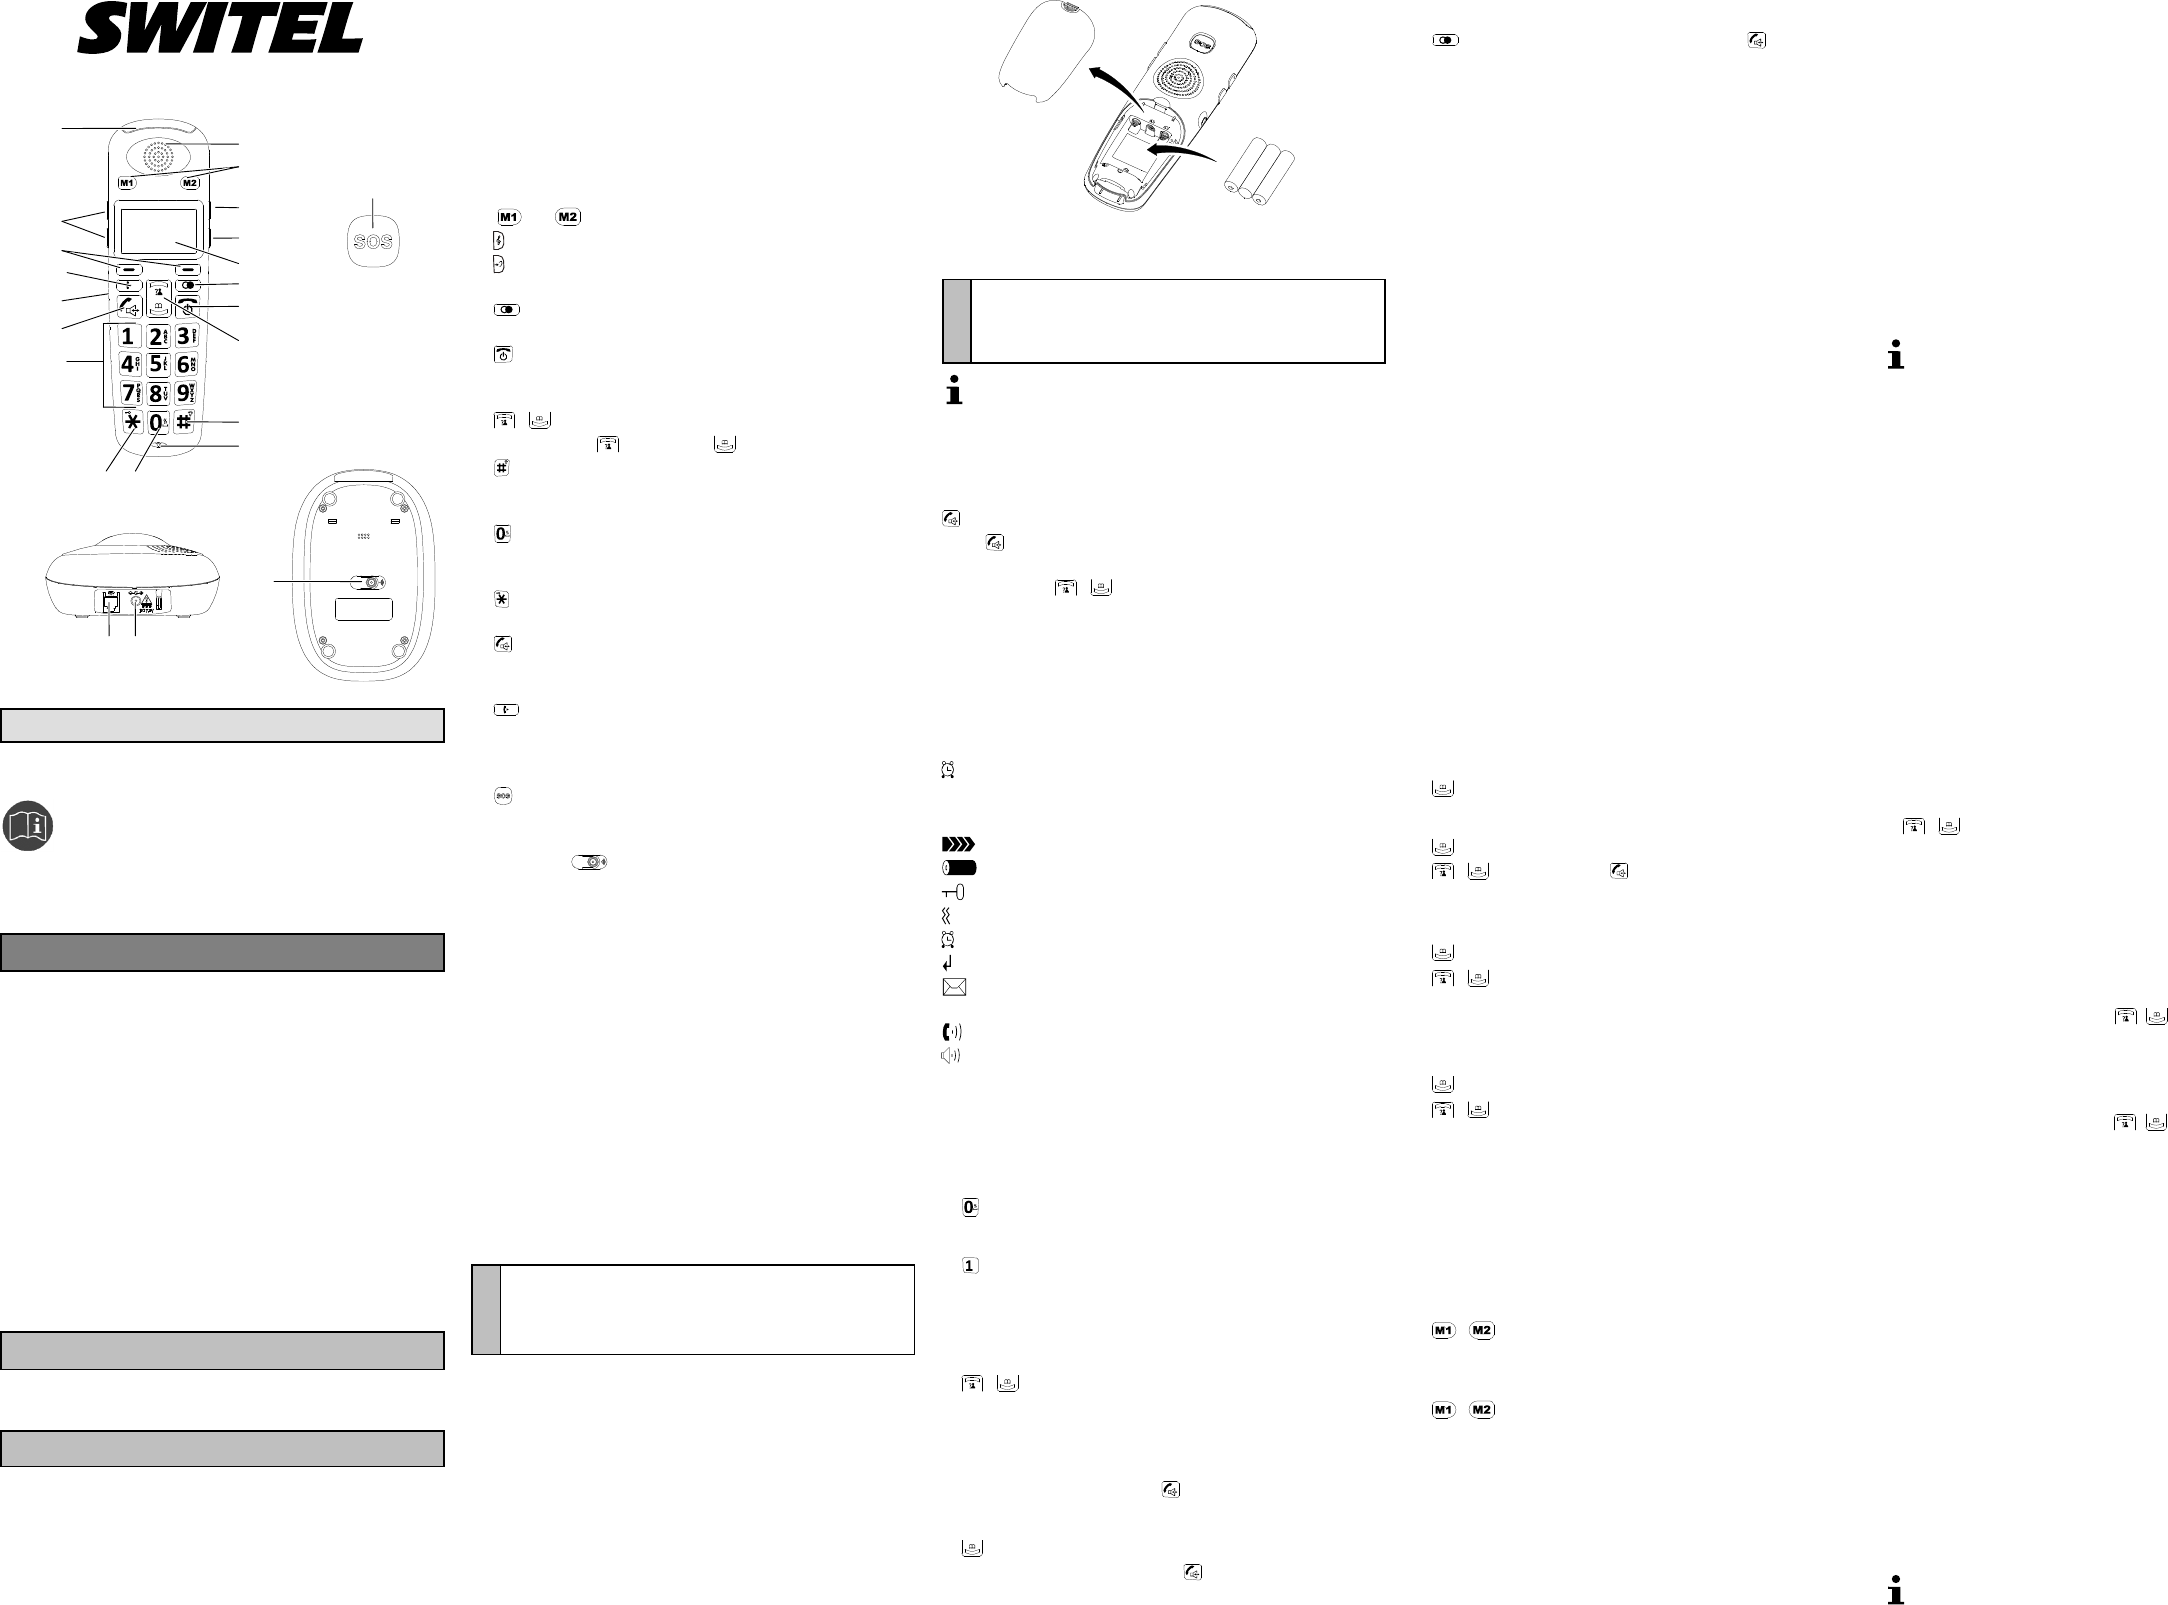
Inserting the batteries
ATTENTION!
• The batteries or phone could be damaged.
Æ Pay attention that the batteries are inserted correctly.
Switch the phone off before removing the battery compartment
cover. Only switch it on again when the battery compartment cover
has been replaced.
Insert the batteries according to the diagram.
Charging the batteries
ATTENTION!
Æ Observe the safety instructions provided at the beginning
of this manual.
Charge the batteries for at least 12 hours when charging for
the first time and ensure they are subsequently discharged
and charged fully. This aids a long service life of the batteries.
Æ Place the handset back in the base station.
Display and notation of operating sequences
Press the key depicted
2 sec.
Press the key depicted for 2 seconds
Move to the menu option with the Navigation keys
/ to mark it and confirm selection with the
left-hand softkey.
Ê Sequence for correct entry
Enter digits or letters
[Example] Texts in brackets give instructions to select
something or make an entry.
PhonebookText in the display (example)
Menu Softkey function in the display (example)
Icon in the display (example)
Icons
Signal strength of the communication connection
Battery charge status
Key is locked against use
Vibration is switched on
Alarm clock is switched on
Missed call
New mailbox message received (condition: your
network provider supports this function)
Handset has been raised and the line is free
Handsfree function is activated
Entering text
The keys on the keypad are also labelled with letters for the entry
of text.
Entering spaces and punctuation marks
Æ
Entering special characters
Æ
Deleting characters
Æ Delete
Moving the cursor left or right
Æ /
Telephoning
Dialling a phone number
Æ [Enter the phone number]
Selecting a phone number from the phone book
Æ [Open the phone book]
Æ [Select the phone book entry]
Redialling
Æ / Redial [Select the phone number]
Muting (microphone) off/on
During a call:
Æ CallMuted
Phone book
Creating a new phone book entry
Æ Menu Phonebook New
Æ [Enter the name] Next
Æ
[Enter the phone number] Next
Æ [Select a melody]
Deleting a phone book entry
Æ Menu Phonebook Delete
Æ [Select the entry] OK [Confirm the prompt]
Editing a phone book entry
Æ Menu Phonebook Edit
Æ [Select the entry]
Æ
[Enter the name] Next
Æ
[Enter the phone number] Next
Æ [Select a melody]
Deleting all phone book entries
Æ Menu Phonebook DeleteAll OK [Confirm
the prompt]
Displaying the phone book memory status
Æ Menu Phonebook PBStatus
Call list
Open the call list
Æ
Dialling from the call list
Æ
Æ / [Select the entry]
Storing phone numbers from the call list in the phone
book
Æ
Æ / [Select the entry] More AddtoPB
Æ [Enter the name] Next [Edit the number] Next
Æ [Select a melody]
Deleting an entry / all entries from the call list
Æ
Æ / [Select the entry] More
Æ
Delete / DeleteAll OK [Confirm the prompt]
One-touch dialling keys
Saving numbers for the one-touch dialling keys
The one-touch dialling key numbers are stored in the phone book
and assigned to "M1" and "M2". If these entries are not already in
your phone book, save them for the one-touch dialling keys as
follows:
Æ
/ [Enter the respective phone number] Next
Æ [Select a melody]
Dialling using the one-touch dialling keys
Æ /
Editing/Deleting numbers assigned to one-touch dialling
keys
To edit or delete the phone numbers assigned to the one-touch
dialling keys, proceed as for other phone book entries.
Basic settings
Setting the language
Æ Menu HSSettings Language
Æ [Select the language]
Setting the time and date
Æ Menu HSSettings Date&Time
Æ SetDate [Enter the date] Save
Æ
SetTime [Enter the time] Save
Setting the display format for time and date
Æ Menu HSSettings Date&Time
Æ DateFormat / TimeFormat [Select the format]
Restoring the factory settings
You require the PIN in order to restore the default settings. On
leaving the factory, the PIN was 0000.
You can restore the default settings on the base station and hand
set separately.
Æ Menu
BSSettings / HSSettings
HSReset
Æ [Enter the PIN] Reset
Changing the PIN code
Æ Menu BSSettings ModifyPIN
Æ [Enter the old PIN] Next
Æ
[Enter the new PIN] Next
Æ
[Confirm the new PIN] Save
Setting the alarm clock
Æ Menu HSSettings Alarm On / Off
Æ [Enter the time for the alarm] Next
Æ
SnoozeOn / SnoozeOff Save
Setting the display contrast
Æ Menu HSSettings LCDContrast
Æ / [Set the contrast] Save
Ringing tone settings
Setting the ringing tone for internal/external calls
Æ Menu HSSettings RingSetup
Æ INTRing / EXTRing [Select the ringing tone]
Switching the key tone and range warning signal on/off
Æ Menu HSSettings ToneSetup
Æ KeyTone / RangeAlarm / [Switch tone on/off]
Save
Setting the loudspeaker and earpiece volume levels
Æ Menu
HSSettings AudioSetup
Æ SpeakerV. / EarpieceV. / [Set the volume]
Save
Setting the amplified call volume
Æ Menu
HSSettings Amplified
Æ Off / On
Automatic answering
Æ Menu HSSettings AutoAnswer Off /
On
Setting the dialling mode
Æ Menu BSSettings DialMode Tone /
Pulse
Entering handset names
Æ Menu HSSettings HSName
Æ [Enter the name] Save
Additional functions
Flash function
Your telephone supports supplementary services provided by
your telephone network provider, such as brokering, call wait