• Check battery charger and components periodically for wear and tear. Return to manufacturer for replacement of worn or defective
parts immediately.
CONNECTION PRECAUTIONS
• Connect and disconnect terminal rings, battery clamps or vehicle accessory plug only after removing AC cord from electric outlet.
• Never allow clamps or ring terminals to touch each other.
• Attach clamps only as indicated in “Charging Using the Supplied Battery Clamps.”
FIRST AID
• Skin: If battery acid comes in contact with skin, rinse immediately with water, then wash thoroughly with soap and water. If redness,
pain, or irritation occurs, seek immediate medical attention.
• Eyes: If battery acid comes in contact with eyes, flush eyes immediately, for a minimum of 15 minutes and seek immediate medical
attention.
SAVE THESE INSTRUCTIONS
WARNING: TO REDUCE THE RISK OF INJURY OR PROPERTY DAMAGE: Follow these instructions and those published by the
manufacturer of any engine you intend to use with this battery charger. Review cautionary markings on the battery charger and engine.
INTRODUCTION
Congratulations on purchasing your new Stanley
®
Battery Charger/Maintainer. Read this Instruction Manual and follow the
instructions carefully before using your new battery charger.
SETTING UP THE UNIT
Ensure that all installation and operating instructions and safety precautions are understood and carefully followed by anyone installing or
using the battery charger. Follow the steps outlined in the “Important Safety Instructions” section of this manual.
Mounting Instructions
This battery charger is designed to be able to mount to flat surface. The unit has incorporated two mounting holes at the corners of the
unit.
Note: Always disconnect the charger at AC power source and at battery terminal when mounting the unit.
TO MOUNT THE UNIT USING THE MOUNTING BRACKETS:
1. Make sure the surface is flat and free of obstruction so the unit can rest flat on the surface.
2. Make sure the unit is disconnected from both AC power source and the battery.
3. Use 8/32 inches (6.35mm) wood screw to mount the unit through the mounting hole.
4. Do not over tighten the screw, it will damage the housing.
WARNING: Do not put the screw through the plastic housing as this will permanently damage the unit and cause a potential electrical
hazard.
TO MOUNT THE UNIT USING THE MAGNETIC DISCS:
The magnetic discs in the bottom of the unit allow you to position the battery charger on any flat, secure metallic surface.
USING THE HANGING HOOK:
The hanging hook can also be used to conveniently position the unit.
CAUTION: TO REDUCE THE RISK OF PRODUCT DAMAGE:
• When the charger is hung by the hanging hook or attached using the magnetic discs, do not shake the charger or object that it is
hanging from or attached to. Do not hang the charger from or attach the charger to any electrical wires or anything that it is not secure.
• Only use the hanging hook or magnet discs for hanging or positioning the charger. The hanging hook and magnetic discs are not
intended to support additional weight. Do not attach or hang anything additional to the charger or risk of breakage may occur.
Charger Location
• Locate charger as far away from battery as cables permit.
• Never place charger directly above battery being charged; gases from battery will corrode and damage charger.
• Never allow battery acid to drip on charger.
• Never operate charger in a closed-in area or restrict ventilation in any way.
• Marine batteries must be removed and charged on shore.
• Do not set a battery on top of charger.
PREPARING TO CHARGE
1. Remove battery completely from boat/airplane or any confined area before charging.
2. If it is necessary to remove battery from vehicle to charge, or to clean terminals, always remove grounded terminal from battery first.
Make sure all accessories in the vehicle are off, so as not to cause an arc.
3. Clean battery terminals, taking care to avoid getting corrosive material in eyes.
4. Add distilled water in each cell until battery acid reaches level specified by battery manufacturer. This helps purge excessive gas from
cells. Do not overfill. For a battery without cell caps (maintenance free), carefully follow manufacturer's charging instructions.
5. Study all battery manufacturer’s specific precautions, such as removing or not removing cell caps while charging, and recommended
rates of charge.
OPERATING INSTRUCTIONS
IMPORTANT: ALWAYS disconnect the AC power cord from the AC power outlet before connecting (or disconnecting) the charger to (or
from) the battery.
Charging the Battery with the Battery Clamps
The charger’s output leads have color-coded battery clamps (RED-POSITIVE and BLACK-NEGATIVE).
1. Unplug the charger's AC power cord from the AC power outlet.
2. Disconnect the Battery Clamps, Terminal Rings or DC Accessory Plug from the battery charger's Double Barrel Charger Connector.
3. Check polarity of battery posts. POSITIVE (POS, P, +) battery post usually has larger diameter than NEGATIVE (NEG, N, –) post.
4. Determine which post of battery is grounded (connected) to the chassis. If NEGATIVE post is grounded to chassis (as in most vehicles),
see 5. If POSITIVE post is grounded to the chassis, see 6.
5. For negative-grounded vehicle, connect POSITIVE (RED) clamp from battery charger to POSITIVE (POS, P, +) ungrounded post of battery.
Connect NEGATIVE (BLACK) clamp to vehicle chassis or engine block away from battery. Do not connect clamp to carburetor, fuel lines,
or sheet-metal body parts. Connect to heavy gauge metal part of the frame or engine block.
6. For positive-grounded vehicle, connect NEGATIVE (BLACK) clamp from battery charger to NEGATIVE (NEG, N, –) ungrounded post of
battery. Connect POSITIVE (RED) clamp to vehicle chassis or engine block away from battery. Do not connect clamp to carburetor, fuel
lines or sheet-metal body parts. Connect to a heavy gauge metal part of the frame or engine block.
7. Insert the double barrel tip of the Battery Clamp cable into the double barrel tip of the Double Barrel Charger Connector (male-to-
female and female-to-male) and position it as far away from the battery as possible.
8. Insert the AC plug of the battery charger into a (powered) standard North American 120 volt 60Hz outlet. The Charging/Charged LED
will flash green to indicate the unit is charging mode.
Notes: If the Clamps are incorrectly connected with regard to polarity, the reverse polarity LED will light. Disconnect the charger, disconnect the Clamps,
then reconnect them properly.
If the Charging/Charged LED did not come on, check the connection to the battery and the AC outlet. If the Clamps are properly connected to the
battery with a functional AC outlet, the battery may be in fault condition. Manufacturer suggests to have the battery tested by a qualified battery
service technician.
9. When the Charging/Charged LED lights solid, the charging process is complete.
When disconnecting charger, disconnect AC cord, remove the Clamp from the vehicle chassis, and then remove the Clamp from the
battery terminal.
WARNING: FOLLOW THE STEPS OUTLINED IN “IMPORTANT SAFETY INSTRUCTIONS” AT THE FRONT OF THIS MANUAL TO
REDUCE RISK OF A SPARK NEAR THE BATTERY. DO NOT CHARGE THE BATTERY WHILE THE ENGINE IS OPERATING.
Connecting and Charging the Battery with the Terminal Rings
CONNECTING THE CHARGER WITH TERMINAL RINGS
The charger’s output leads have crimped, color-coded terminal rings (RED-POSITIVE and BLACK-NEGATIVE). These rings connect directly to
the corresponding connectors on the battery posts.
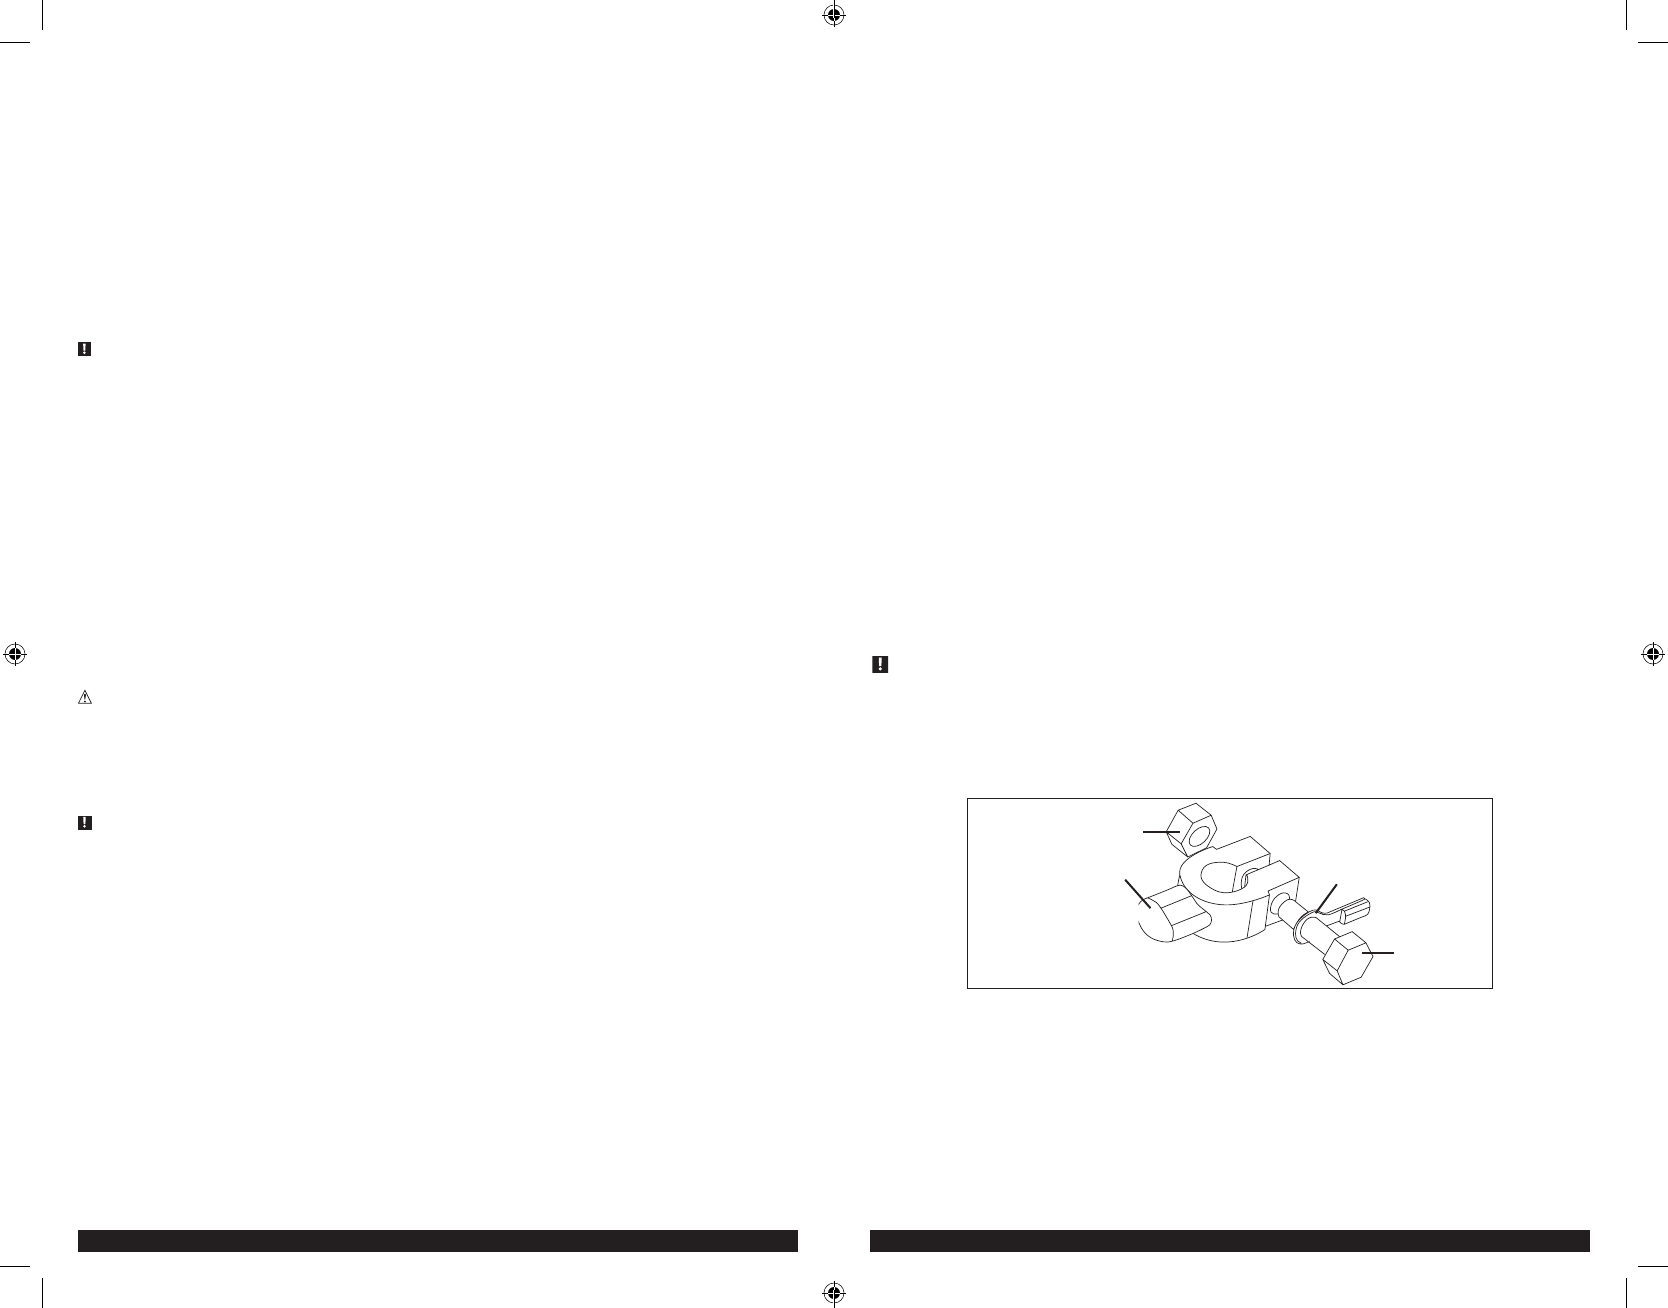
NUT
CONNECTOR
TERMINAL RING
BOLT
1. Remove the nuts from the bolts of the battery post’s connectors.
2. Position the RED terminal on the bolt of the POSITIVE battery post connector.
3. Position the BLACK terminal on the NEGATIVE post connector; then replace the nuts.
IMPORTANT: If there is any problem connecting the output leads, check with a reputable auto supply store or contact the Customer
Service Department toll-free at 1-877-571-2391 for assistance in finding an appropriate connection device for your particular application.
CHARGING WITH THE TERMINAL RINGS
1. Disconnect AC power cord from AC power outlet
2. Disconnect the Battery Clamps, Terminal Rings or DC Accessory Plug from the battery charger's Double Barrel Charger Connector.
3. With the Terminals Rings properly connected to the battery posts, connect the Terminal Ring connector with the unit's Double Barrel
Charger Connector (male-to-female and female-to-male) and position it as far away from the battery as possible.
Libble takes abuse of its services very seriously. We're committed to dealing with such abuse according to the laws in your country of residence. When you submit a report, we'll investigate it and take the appropriate action. We'll get back to you only if we require additional details or have more information to share.
Product:
Forumrules
To achieve meaningful questions, we apply the following rules:
First, read the manual;
Check if your question has been asked previously;
Try to ask your question as clearly as possible;
Did you already try to solve the problem? Please mention this;
Is your problem solved by a visitor then let him/her know in this forum;
To give a response to a question or answer, do not use this form but click on the button 'reply to this question';
Your question will be posted here and emailed to our subscribers. Therefore, avoid filling in personal details.
Register
Register getting emails for Stanley BC209 at:
new questions and answers
new manuals
You will receive an email to register for one or both of the options.
Get your user manual by e-mail
Enter your email address to receive the manual of Stanley BC209 in the language / languages: English, Spanish as an attachment in your email.
The manual is 0,86 mb in size.
You will receive the manual in your email within minutes. If you have not received an email, then probably have entered the wrong email address or your mailbox is too full. In addition, it may be that your ISP may have a maximum size for emails to receive.
The manual is sent by email. Check your email
If you have not received an email with the manual within fifteen minutes, it may be that you have a entered a wrong email address or that your ISP has set a maximum size to receive email that is smaller than the size of the manual.
The email address you have provided is not correct.
Please check the email address and correct it.
Your question is posted on this page
Would you like to receive an email when new answers and questions are posted? Please enter your email address.