SPIN MASTER LTD., 450 FRONT STREET WEST, TORONTO, ON M5V 1B6 CANADA
Customer Service/ Service clientèle : 1-800-622-8339 Email : customercare@spinmaster.com
• Conforme aux exigences de sécurité de la CPSC.
• Le contenu peut différer des images.
• Conserver les informations, adresses et numéros de téléphone pour consultation ultérieure.
• Retirer tout l'emballage avant utilisation.
INSTALLATION DES PILES
1. À l'aide d’un tournevis cruciforme (non fourni), ouvrir le compartiment des piles.
2. Fonctionne avec 2piles C (R14) (non fournies). Insérer les piles comme indiqué.
3. Refermer le couvercle du compartiment, puis revisser.
Informations de sécurité relatives aux piles: 2piles alcalines C (R14) (non fournies).
Le remplacement des piles doit être effectué par un adulte.
Respecter le schéma de polarité (+/-) du compartiment des piles.
Retirer immédiatement toute pile usagée du jouet.
Jeter correctement les piles usagées.
Retirer les piles du jouet en cas d'inutilisation prolongée.
N'utiliser que des piles d'un même type ou d'un type équivalent à celui recommandé.
NE PAS incinérer les piles usagées.
Ne PAS jeter les piles au feu; elles pourraient exploser ou fuir.
NE PAS mélanger des piles neuves et des piles usagées, ou des piles
de types différents (ex: alcalines/standard/rechargeables).
Retirer les piles rechargeables du jouet avant de les recharger
(sauf s'il s'agit d'une batterie LiPo).
Les piles rechargeables doivent être rechargées sous la surveillance d'un adulte.
NE PAS court-circuiter les bornes d'alimentation.
Âge : 3+
2 à 3 joueurs
FONCTIONNE AVEC 2PILES C (R14) 1,5V (NON FOURNIES)
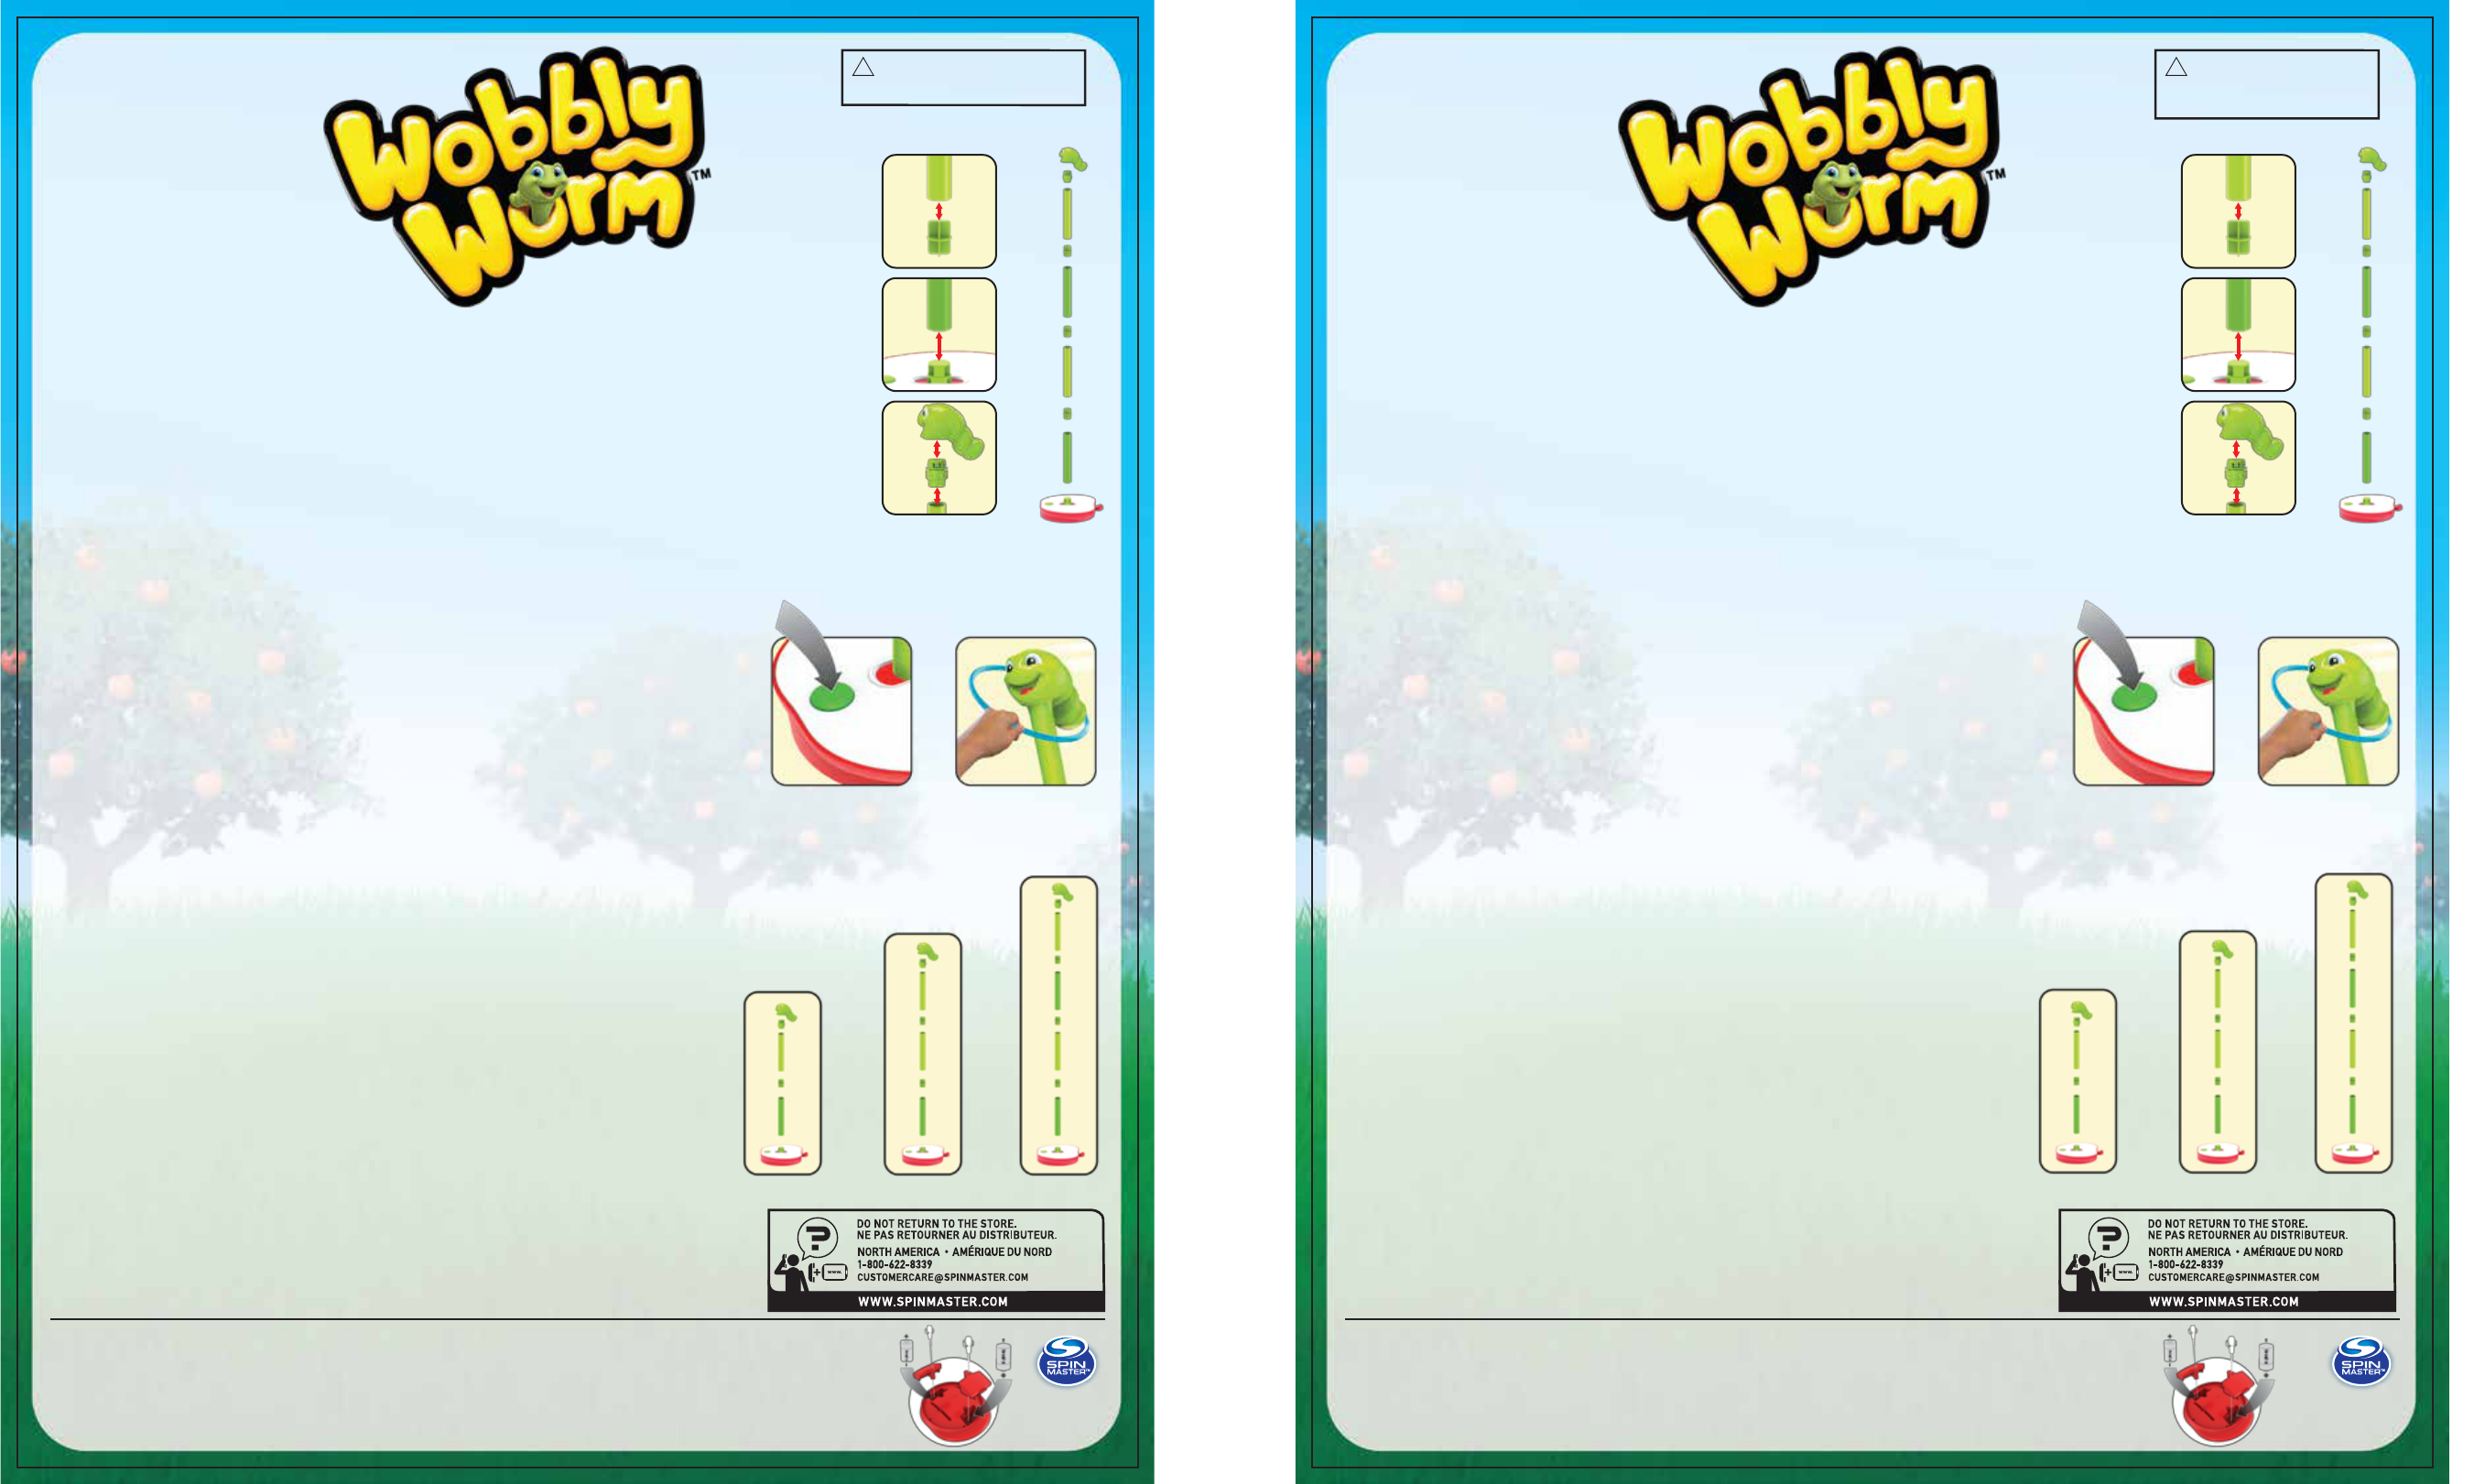
MONTAGE
1. Insérer 2 piles C (R14) comme indiqué dans la rubrique INSTALLATION DES PILES ci-dessous.
2. Accrocher les 4 tubes à l'aide des raccords de manière à obtenir un seul tube géant pour former le
corps du ver. Respecter l'alternance de couleurs suivantes : vert pâle - vert foncé - vert pâle - vert foncé.
3. Fixer le corps du ver au socle en forme de pomme.
4. Connecter le cou (côté à visser) à la tête du Wobbly Worm. Ensuite, insérer le cou dans l'extrémité supérieure du corps.
5. Une fois le Wobbly Worm assemblé, poser le socle sur une surface dure dans un endroit bien dégagé.
Les enfants peuvent commencer à jouer!
RÉGLAGE DU NIVEAU DE DIFFICULTÉ
II est possible de régler le niveau de difficulté du jeu Wobbly Worm en fonction de l'âge de joueurs. Plus on ajoute de tubes, plus le
jeu est difficile.
Joueurs plus jeunes : Uliliser 1 ou 2 tubes
Joueurs plus âgés : Uliliser 3 ou 4 tubes.
RÈGLES DU JEU
BUT DU JEU
Une jolie pomme est tombée tout en bas du pommier. Elle a roulé, roulé, roulé avant de s'arrêter. Oh, un ver
en est sorti, il a l'air tout étourdi! Le premier joueur qui réussit à lui passer trois cerceaux autour de la tête
remporte la partie!
RÈGLES DE BASE pour les plus petits : PLACER LES CERCEAUX
1. Chaque joueur reçoit trois cerceaux de la même couleur.
2. Les joueurs mettent la main sur la tête du Wobbly Worm, puis font un GRAND pas en arrière. À partir
de ce moment, ils doivent rester sur place avec les pieds toujours bien au sol.
3. L'un des joueurs appuie sur le bouton DÉMARRER, le Wobbly Worm commence à s'agiter. Pour le désactiver,
il suffit d'appuyer à nouveau sur le bouton.
4. Lorsqu'il est en marche, le ver balance la tête dans tous les sens. Les joueurs doivent se pencher pour
essayer de faire passer un cerceau autour de sa tête. Attention, ils n'ont pas le droit de décoller les
pieds du sol!
5. Lorsqu'un joueur réussit à placer l'un de ses cerceaux, il recommence avec le suivant. Les joueurs doivent
toujours n'avoir qu'un seul cerceau en main.
FIN DE LA PARTIE
Le premier joueur qui parvient à passer ses trois cerceaux autour de la tête du Wobbly Worm l'emporte!
RÈGLES AVANCÉES pour les plus grands : LANCER LES CERCEAUX
1. Chaque joueur reçoit trois cerceaux de la même couleur.
2. Les joueurs mettent la main sur la tête du Wobbly Worm, puis font TROIS GRANDS pas
en arrière. Chacun se trouve alors dans son « camp » et devra y rester pour le reste du tour.
3. L'un des joueurs appuie sur le bouton DÉMARRER, le Wobbly Worm commence à s'agiter.
Pour le désactiver, il suffit d'appuyer à nouveau sur le bouton.
4. Lorsqu'il est en marche, le ver balance la tête dans tous les sens. Depuis leur camp,
les joueurs lancent leurs cerceaux un à un pour essayer de les faire passer autour
de la tête du ver.
5. Si aucun des trois cerceaux n’atteint son but, les joueurs doivent les récupérer rapidement.
Ils retournent dans leur camp et tentent à nouveau leur chance!
FIN DE LA PARTIE
Le premier joueur qui parvient à lancer ses trois cerceaux autour de la tête du
Wobbly Worm l'emporte!
RANGEMENT
Avant de ranger le ver, le démonter dans le sens inverse du montage.
CONTENU :
4 tubes
3 raccords
Tête du Wobbly Worm
Cou
Socle pomme
9 cerceaux
ATTENTION!
RISQUE D’ÉTOUFFEMENT
— Contient de petits éléments.
Ne convient pas aux enfants de moins de 3 ans.
!
START BUTTONPLACE YOUR HOOP
OVER HIS HEAD
BOUTON DÉMARRER
CHAQUE JOUEUR
PASSE SON CERCEAU
AUTOUR DE LA
TÊTE DU VERS
ASSEMBLY
1. Insert 2 C-size (R14) batteries as shown in BATTERY INSTALLATION, below.
2. Connect the 4 tubes together to form one long tube by inserting a connector between each tube.
Alternate the tube colors (light green/dark green/light green/dark green).
3. Attach the assembled long tube to the Apple Base.
4. Connect the screw end of the Neck Connector to the Wobbly Worm head. . Then, attach the Neck Connector to the open
end of the long tube.
5. Set Wobbly Worm down on a hard surface with plenty of room around him. Now you're ready to play!
ADJUSTING GAME DIFFICULTY
You can adjust the difficulty of Wobbly Worm to better match the ages of the players. The more tubes you add, the greater the difficulty.
Younger players: Use 1 or 2 tubes
Older players: Use 3 or 4 tubes
HOW TO PLAY
OBJECT
A tasty red apple fell off the tree and rolled around and around on the ground. Out popped a Worm,
and now he's all Wobbly! Be the first to get all three of your hoops over Wobbly Worm's head, and you win!
BASIC GAME for Younger Players: PLACE THE HOOPS
1. Give each player a set of three same-colored hoops.
2. Each player puts their hand on top of Wobbly's head, then takes one BIG step back away from Wobbly.
Once you've taken your step back, stay put -- you can't move your feet!
3. One player pushes the START button to make Wobbly Worm start to wobble! If you ever need to stop Wobbly,
just press the button again.
4. As Wobbly Worm moves around, his head will sway from side to side. Reach out and try to place one of your hoops over his head.
Remember, you can't move your feet!
5. Once you place one of your hoops over his head, try again with another. You can only have one hoop in your hand at a time!
WINNING THE GAME
First player to place all three of their hoops over Wobbly Worm's head wins!
ADVANCED GAME for Older Players: TOSS THE HOOPS
1. Give each player a set of three same-colored hoops.
2. Each player puts their hand on top of Wobbly's head, then takes THREE BIG steps back away
from Wobbly. Once you've taken your step back, stay put -- this is your "Home Base"
during this round.
3. One player pushes the START button to make Wobbly Worm start to wobble! If you ever need
to stop Wobbly, just press the button again.
4. As Wobbly Worm moves around, his head will sway from side to side. Try to toss one of
your hoops over his head while standing on your Home Base.
5. If you toss all three of your hoops and none of them go over Wobbly's head,
quickly pick up your three hoops, jump back to your Home Base position and try again!
WINNING THE GAME
First player to toss all three of their hoops over Wobbly Worm's head wins!
STORAGE
To store Wobbly back in his box, disassemble in the reverse order.
ADJUSTING THE GAME DIFFICULTY
EASYMEDIUMHARD
RÉGLAGE DE LA DIFFULTÉ DU JEU
FACILEMOYENDIFFICILE
BATTERY INSTALLATION
1. Open the two battery doors with a Phillips-head screwdriver (Not included).
2. Requires 2 x C (R14) batteries (not included). Insert batteries as shown.
3. Replace the battery compartment door and tighten the screw.
Battery Safety Information: 2 x C (R14) alkaline batteries (not included).
Replacement of batteries must be done by adults.
Follow the polarity (+/-) diagram in the battery compartment.
Promptly remove dead batteries from the toy.
Dispose of used batteries properly.
Remove batteries for prolonged storage.
Only batteries of the same or equivalent type as recommended are to be used.
Need help? Post your question in this forum.
Report abuse
Libble takes abuse of its services very seriously. We're committed to dealing with such abuse according to the laws in your country of residence. When you submit a report, we'll investigate it and take the appropriate action. We'll get back to you only if we require additional details or have more information to share.
Product:
Forumrules
To achieve meaningful questions, we apply the following rules:
First, read the manual;
Check if your question has been asked previously;
Try to ask your question as clearly as possible;
Did you already try to solve the problem? Please mention this;
Is your problem solved by a visitor then let him/her know in this forum;
To give a response to a question or answer, do not use this form but click on the button 'reply to this question';
Your question will be posted here and emailed to our subscribers. Therefore, avoid filling in personal details.
Register
Register getting emails for SpinMaster Wobbly Worm at:
new questions and answers
new manuals
You will receive an email to register for one or both of the options.
Get your user manual by e-mail
Enter your email address to receive the manual of SpinMaster Wobbly Worm in the language / languages: English, French as an attachment in your email.
The manual is 0,36 mb in size.
You will receive the manual in your email within minutes. If you have not received an email, then probably have entered the wrong email address or your mailbox is too full. In addition, it may be that your ISP may have a maximum size for emails to receive.
The manual is sent by email. Check your email
If you have not received an email with the manual within fifteen minutes, it may be that you have a entered a wrong email address or that your ISP has set a maximum size to receive email that is smaller than the size of the manual.
The email address you have provided is not correct.
Please check the email address and correct it.
Your question is posted on this page
Would you like to receive an email when new answers and questions are posted? Please enter your email address.