2-673-237-12 (1)© 2006 Sony Corporation Printed in Japan
Printed on 100% recycled paper using VOC
(Volatile Organic Compound)-free vegetable
oil based ink.
continued on the re
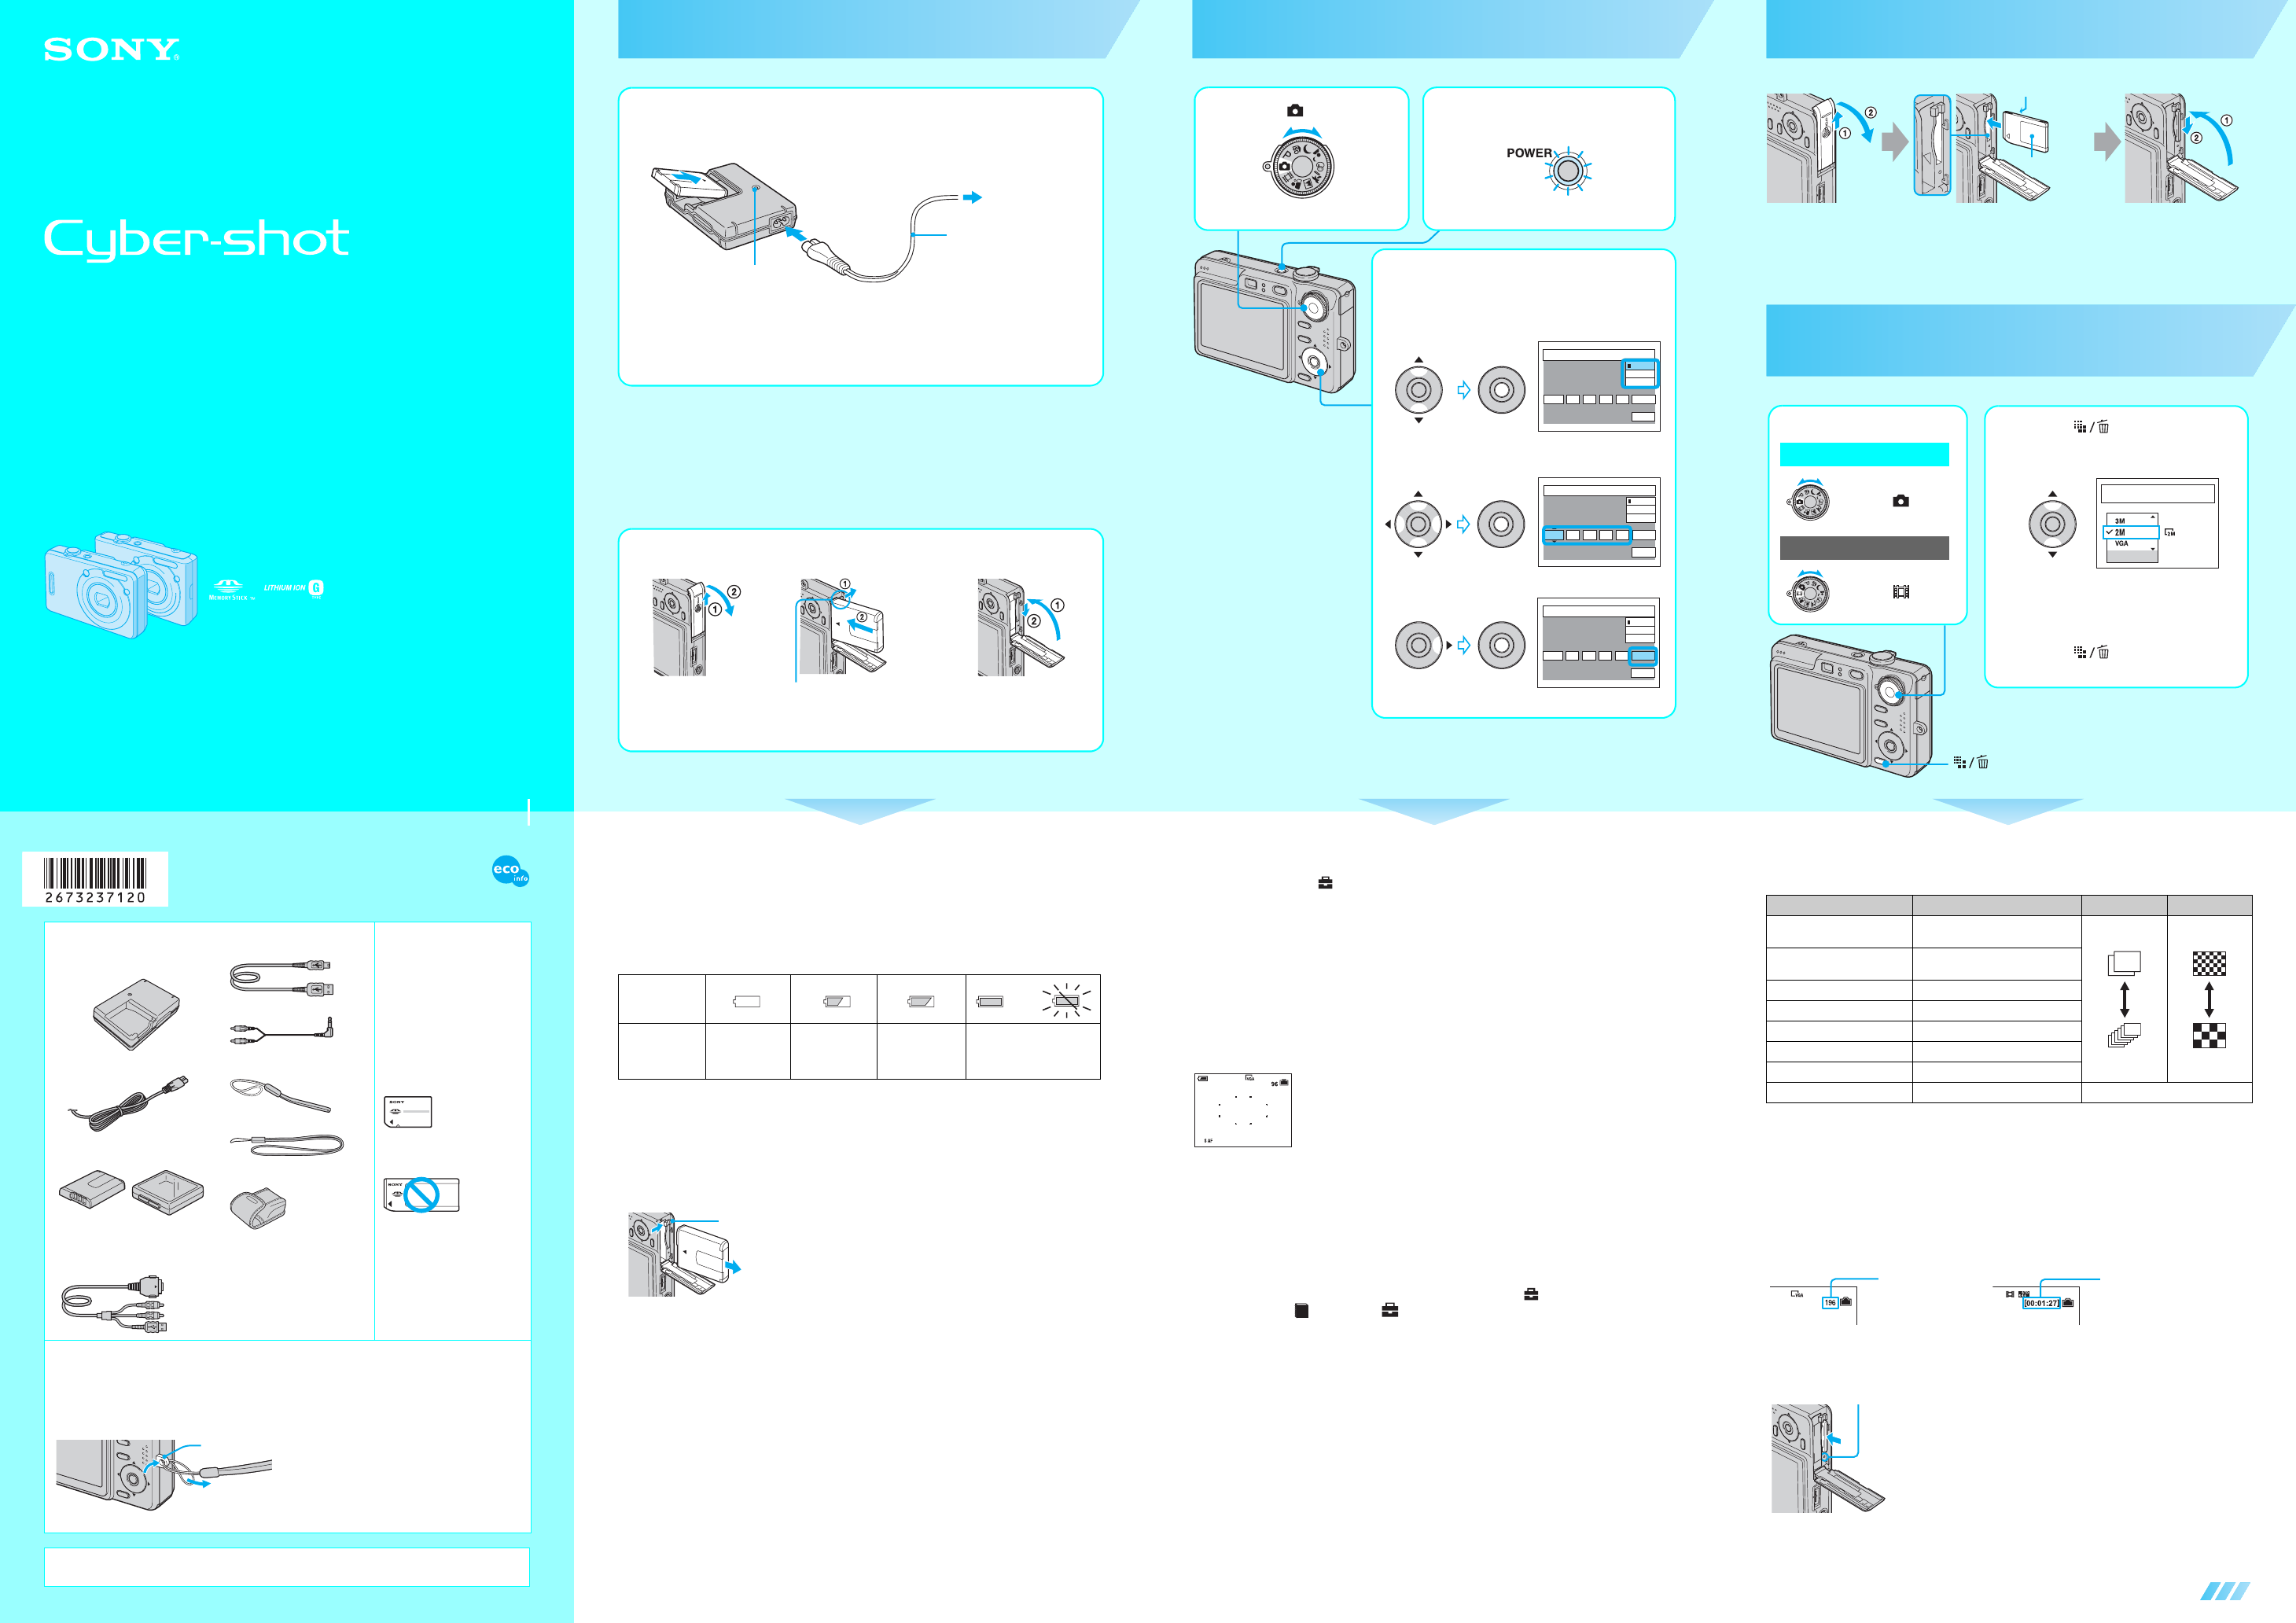
Prepare the battery pack
• Connect the battery charger to an easily accessible wal
• Even if the CHARGE lamarger is not
(mains) as long as it is connected
battery charger, immedsconnecti
• When charging is finished, d(mains
remove the battery pack from th
• The time required to ful
temperature of 25°C (77°F) is appr
270 min. Charging may take loncertain circumstances or conditions.
1
Battery char
2 Connect the power
cord (mains lead).
3 To wall outlet
(wall socket)
Power cord (mains lead)
1 Insert the battery pack.
Push the battery pack gently until it clicks into place.
CHARGE lamp
Light on: Charging
Light off: Completed (Practical c
If you continue charging the battery pack for about one more hourfully
charged), the charge will last slightly longer.
4 Insert the charged battery pack.
Open the battery/
“Memory Stick Duo”
cover.
Insert the batte
pressing the battery
with the tip of the batte
Close the battery/
“Memory Stick Duo”
cover.
Battery eject lever
Using the AC Adaptor
You can connect the camera to a wall outlet (wall socket) using the AC-LS5K AC Adaptor (not
supplied). t “User’s Guide/Troubleshooting” (page 18)
To check the remaining battery time
Press POWER button to turn on and check the re maining battery on the LCD screen.
• It takes ab
• The displayedycertain circ
To remove the battery pack
Slide the battery eject lever to not to drop the battery pack
when pulling it out.
To use your camera abroad — Power sources
You can use your camera, the battery charger,
any country or region where the power su
• Do not use an elec
malfunction.
Battery
remaining
indicator
Battery
remaining
guidelines
Sufficient
pow
remaining
Battery half Battery low
recording/
playback will
stop soon.
Change the battery with
fully charged one, or charge
the battery
indicator flashes.)
Battery eject lever
Turn the camera on/set the clock
1 Select . 2 Press the POWER button.
Lighting
3 Set the clock with the control
button.
1 Select v /V , then press
z.
2 Select b /B and set the numer
with v/ V , then press z.
3 Select [OKB, then press z.
• To cancel, select [Cancelz.
2006
/:
/
1 1
12 00
AM
OK
Cancel
Clock S et
D/M/Y
M/D/Y
Y/M/D
2006
/:
/
1 1
12 00
AM
OK
Cancel
Clock S et
D/M/Y
M/D/Y
Y/M/D
2006
/:
/
1 1
10 30
AM
OK
Cancel
Clock S et
D/M/Y
M/D/Y
Y/M/D
To change the date and time
Select [Clock Set] in the (Setup) screen and perform the pr3 above.
t “User’s Guide/Troubleshooting”
On the clock display
• Midnight is i
• If you sele3-1, set the time on a 24-ho
When turning on the power
• Unless you set t
• Do not touch the lens the lens portion extends.
with the lens portiome
• The following screen appears when the camera is turned on for the seco
To turn off the power
Press the POWER butto
• If the camera is run
camera turnsg down the battery pack (Auto power-off function).
Changing the language setting
You can change the screen display to show
language setting, press MENU to display (Setup) with the
button, then, select [ Languag (Setup1), and select the desirt “User’s
Guide/Troubleshooting” (page 53)
A
1
Insert a “Memory Stick Duo” (not
supplied)
Select the image size for use
When there is no “Memory Stick Duo” inserted
The camera records/plays back images using the internat “User’s Guide/
Troubleshooting” (page 26)
Insert the “Memory Stick Duo”
all the way in until it clicks.
Terminal side
Labeled side
button
1 Select a mode.
Select .
Select .
Still image:
Movie:
2 Press (Image Size).
3 Select the size with v / V.
• The screen above is for s
• For mo
Duo” only), [640(Standard)] or [160].
4 Press (Image Size) to
complete the setting.
Image Size
Up to 10x15cm/4x6"print
Appx. Image Capacity
33pics
On still image sizes
For details on the image size t “User’s Guide/Troubleshooting” (page 15)
1)
Images are recorded in the same 3:2 astio as
2)
Both edges of the image may be cut ot “User’s Guide/Troubleshootin
3)
By using a Memory Stick slot o
On the recordable number of still images and recordable time of movies
Recordable number of still images and recordable time
size selected.
For details on recordable number or t “User’s Guide/Troubleshooting” (page 24)
• The number of recordab
To remove a “Memory Stick Duo”
Image size Guidel No. of images Printing
7M (DSC-W70 the default
setting)
Up to A3/11×17"print
Less
More
Fine
Rough
6M (DSC-W30/W40/W50 the
default setting)
Up to A4/8×1
3:2
1)
Match 3:2 Aspect Ratio
5M (DSC-W70) Up to A4/8×1
3M Up to 13×18cm/5×7"print
2M Up to 10×15cm/4×6"print
VGA For E-mail
16:9
2)
Display On 16:9 HDTV
3)
Still images Movies
Access lamp
Open the battery/“Memory Stick Duo” cover, then push the
“Memory Stick Du
When the access lamp is lit
Never remove the battery
the power. The data may be corr
Maximum number
of recordable
images
Maximum
recordable time
Digital Still Camera
Read This First
DSC-W30/W40/W50/W70
Operating Instructions
Before operating the uni“User’s Guide/Troubleshooting” (separate
volume) thoroughly, and retain them for future referen
http://www.sony.net/
Checking the accessories su
A “Memor
supplied.
The camera has its own int
memory 58 MB (DSC-W70) or
32 MB (DSC-W30/W40/W50),
however, purchase of a
“Memory Stick Duo” is
recommended for shooting more
images.
“Memory Stick Du
use a “Memory
with your c
“Memory Stic
use a “Memory
your camera.
Other memory
be used.
• For details on “Memory Stick
Duo” t
“User’s Gu
Troubleshooting
(page 95)
• Battery charger BC-
BC-CSGB (1)
• Power cord (mains lead) (1)
• Rechargeable battery pack
NP-BG1
• USB, A/V ca
use terminal (1)
(DSC-W50/W70)
•
USB cable (1
• A/V cable (1) (DSC-W30/W40)
• Wrist strap (1) (DS
W70)
• Neck strap (1) (DSC-W40)
• Soft carrying cas
(DSC-W40)
• CD-ROM (Cyber-shot
application software) (1)
• Opera
This First” (this m
• Opera
Guide/Troubles
Notes
• Charge the battery pack (supplied) before using the camera for the first time.
• The LCD screen is manufactured us
pixels are operational for effective usthere may b k points and/or brig
points (white, red, blue or green in color) tonstantly appear on the LCD
normal in the manufactur
• The camera is a precision inst
to bump the lens or the LCD screen
force to i
from damage by being dropped, etc.
• Designed for use with compatibl
Additional information on this pr
found at our C
Hook