fig.c
fig.e
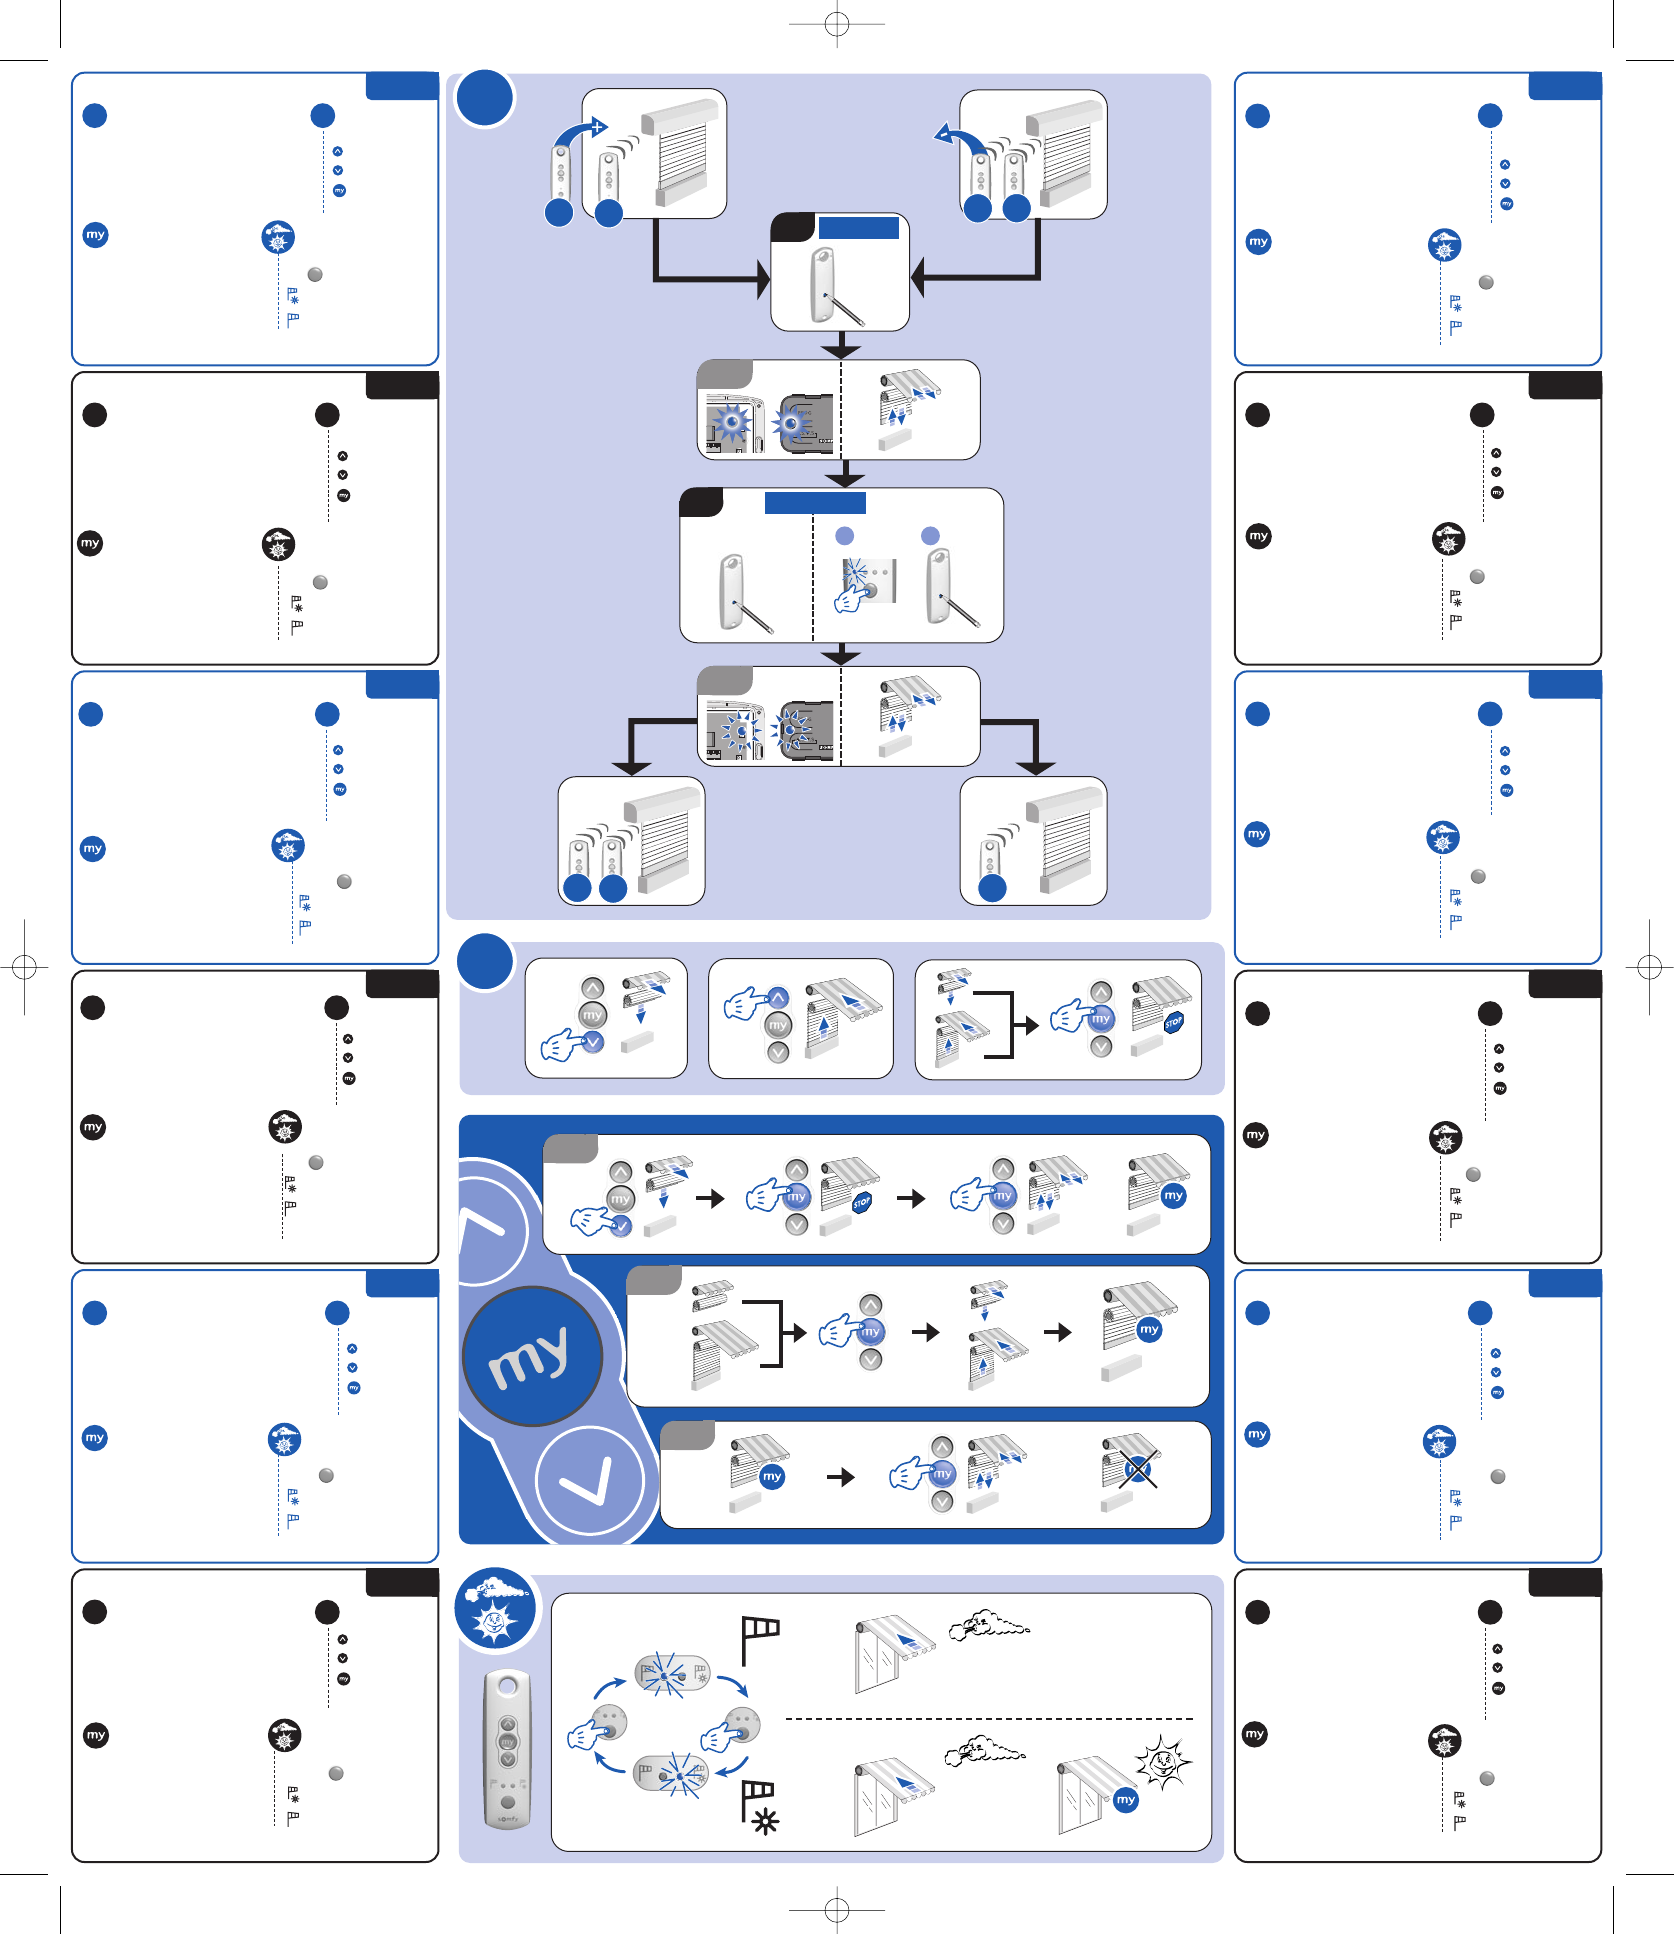
C
• Recording or changing (fig.c) :
stop at
the required position and
press 5 sec. “my”.
• Using (fig.d):
Press briefly “my”
• Deleting (fig.e) :
press 5 sec. “my”.
Press 2 sec. :
=
Wind and Sun configuration
=
Wind configuration
5 sec.
1.
Press 2 sec. “prog” (
control N°1)
-> the LED lights ON
or short up & down movement (fig.a)
2.
Press briefly “prog” (
control N°2*)
->
Blinking of the LED
or short up & down movement (fig.b)
*Telis 4 :
Channel selection
= UP
=
DOWN
=
STOP or interme-
diate position (fig.d)
Wind / Sun
Telis soliris + Soliris/Eolis sensor
RTS + Altus RTS / Orea RTS**
Using hand-held
transmitters
Intermediate position
Altus RTS / Orea RTS / Oximo RTS**
C
GB
• Instellen of wijziging (fig.c) :
stop op de
gewenste positie en druk 5 sec. “my”.
• Gebruik (fig.d) :
Kort indrukken “my”
• wissen (fig.e) :
Druk 5 sec. “my”.
indrukken 2 sec. :
=
Selectie Zon/Wind-functie
=
Selectie Wind-functie
1.
indrukken 2 sec. “prog” (
zender N°1)
:
->
controllelampje “ON”
/
Korte OP en NEER beweging (fig.a)
2.
Kort indrukken “prog” (
zender N°2*)
:
->
knipperen van het controllelampje
/ Korte OP en NEER bewe-
ging (fig.b)
*Telis 4 :
Selectie van het kanaal
= OP
=
NEER
=
STOP of
Tussenpositie (fig.d)
Een zender toevoegen of wissen
Met behulp van een geprogrammeerde zender
Zon / Wind
TELIS Soliris + Soliris/Eolis sen-
sor RTS + Altus RTS / Orea RTS**
Gebruik van de
afstandsbediening
Tussenpositie
Altus RTS / Orea RTS / Oximo RTS**
B C
NL
• Enregistrement ou modification
(fig.c) :
arrêt
à la position souhaitée puis
appui 5 sec. sur
“my”.
• Utilisation (fig.d) :
Appui bref “my”
• Suppression (fig.e) :
appui 5 sec. sur “my”.
Appui 2 sec. :
=
Sélection Vent et Soleil
=
Sélection Vent
1.
Appui 2 sec. “prog” (
émetteur N°1)
:
-> La LED s’allume ou
bref mouvement (fig.a)
2.
Appui bref “prog” (
émetteur N°2*)
:
->
Clignotement de la LED
ou Bref mouvement (fig.b)
*Telis 4 :
Sélection du canal
= MONTEE
=
DESCENTE
=
ARRET ou
Position favorite
(fig.d)
Ajout ou suppression d’un émetteur
A l’aide d’un émetteur mémorisé
Vent / Soleil
TELIS soliris + capteur soliris/Eolis
RTS + Altus RTS / Orea RTS**
Utilisation des
télécommandes
Position favorite
Altus RTS / Orea RTS / Oximo RTS**
B C
FR
• Memorizar o cambiar (fig.c) : stop en la
posición deseada,
Pulsación
5 sec. “my”.
• Uso (fig.d) :
Pulsación breve
“my”
• Borrar (fig.e) :
Pulsación
5 sec. “my”.
Pulsación
2 sec.
:
=
Configuración Viento y Sol
=
Configuración Viento
1.
Pulsación
2 sec. “prog” (
emisor N°1)
:
->
indicador “ON”
/ Breve movimiento arriba/abajo (fig.a)
2.
Pulsación breve
“prog” (
emisor N°2*)
:
->
parpadeo del indicador
/ Breve movimiento arriba/abajo (fig.b)
*Telis 4 :
Selección del canal
= SUBIDA
=
BAJADA
=
STOP o Posición
preferida
(fig.d)
Añadir o borrar un emisor
Con la ayuda de un emisor ya grabado
Viento / Sol
TELIS soliris + Soliris/Eolis sen-
sor RTS + Altus RTS / Orea RTS**
Uso del emisor
posición preferida
Altus RTS / Orea RTS / Oximo RTS**
B
C
ES
• Gravação ou alteração (fig.c) :
parar na
posição desejada,
apertar 5 sec. “my”.
•
Utilização
(fig.d) : Apertar breve “my”
• Apagar (fig.e) : apertar 5 sec. “my”.
Apertar 2 sec. :
=
Selecção Vento e Sol
=
Selecção Vento
1.
Apertar 2 sec. “prog” (
emissor N°1)
:
->
indicador “ON”
o
Breve movimento cima/abaixo (fig.a)
2.
Apertar breve “prog” (
emissor N°2*)
:
->
o
indicador pisca
o Breve movimento cima/abaixo (fig.b)
*Telis 4 :
Selecção do canal
= SUBIDA
=
DESCIDA
=
STOP o Posições
intermédias
(fig.d)
Adicionar ou apagar um emissor
Com a ajuda de um emissor já gravado
Vento / Sol
TELIS soliris + Soliris/Eolis sensor
RTS + Altus RTS / Orea RTS**
Utilização dos
comandos à
distância
posição intermédia
Altus RTS / Orea RTS / Oximo RTS**
B
C
PT
• Programmering eller endring (fig.c) :
stopp ved ønsket posisjon,
trykk 5 sec.
“my”.
• Bruk (fig.d) :
Kort trykk “my”
• Ta bort (fig.e) :
trykk 5 sec. “my”.
trykk 2 sec. :
=
Konfigurering av Vind og Sol
=
Konfigurering av Vind
1.
trykk 2 sec. “prog” (
sender N°1)
:
->
lys “ON”
/
Kort bevegelse opp og ned (fig.a)
2.
Kort trykk “prog” (
sender N°2*)
:
->
Blinkende lys
/ Kort bevegelse opp og ned (fig.b)
*Telis 4 :
Valg av kanal
= OPP
=
NED
=
STOPP /
Utfallsposisjoner
(fig.d)
Legge til eller ta bort en sender
Ved hjelp av en allerede programmert sender
Vind / Sol
TELIS soliris + Soliris/Eolis sensor
RTS + Altus RTS / Orea RTS**
Bruk av
fjernkontrollene
mellomposisjonen
Altus RTS / Orea RTS / Oximo RTS**
B C
NO
Pidätysaika
2 sec. :
=
Tuuli- ja aurinkotilan valinta
=
Tuulitilan valinta
1.
Pidätysaika
“prog” 2 sec. (
lähetin N°1)
:
->
valo
“ON”
(fig.a)
/
Lyhyt liike ylös ja alas (fig.a)
2.
Lyhyt painallus “prog” (
lähetin N°2*)
:
->
Vilkkuva valo
/ Lyhyt liike ylös ja alas (fig.b)
*Telis 4 :
Kanavan valinta
= YLÖS
=
ALAS
=
SEIS tai väliasento
alas
(fig.d)
lisätkää tai poistakaa lähettimen
Jo ohjelmoidun lähettimen avulla
valinta
/
aurinkotilan
TELIS soliris + Soliris/Eolis sensor
RTS + Altus RTS / Orea RTS**
Kaukosäätimien
käyttö
Väliasennon
Altus RTS / Orea RTS / Oximo RTS**
B C
FI
• Programmera eller förändra (fig.c) :
stoppa
vid önskat läge,
tryck 5 sec. “my”.
• Använda (fig.d) :
Kortvarigt tryck “my”
• Ta bort (fig.e) :
tryck 5 sec. “my”.
tryck 2 sec. :
=
konfigurering av Vind och Sol
=
konfigurering av Vind
1.
tryck 2 sec. “prog” (
sändare N°1)
:
->
ljus “ON”
o
Kort upp-och nedrörelse (fig.a)
2.
Kortvarigt tryck “prog” (
sändare N°2*)
:
->
Blinkende ljus
o Kort upp-och nedrörelse (fig.b)
*Telis 4 :
Val av kanal
= UPP
=
NED
=
STOPP / Utfallslägen
(fig.d)
Lägga till eller ta bort en sändare
Med hjälp av en redan inprogrammerad sändare
Vind / Sol
TELIS soliris + Soliris/Eolis sen-
sor RTS + Altus RTS / Orea RTS**
Använda fjärr-
kontrollerna
mellanläget
Altus RTS / Orea RTS / Oximo RTS**
B C
SE
• Programmering eller ændring (fig.c) :
stop i ønsket stilling,
tryk 5 sec. “my”.
• Brug (fig.d) :
Kortvarigttryk“my”
• Fjernelse (fig.e) :
tryk 5 sec. “my”
tryk 2 sec. :
=
konfigurering af Vind og Sol
=
konfigurering af Vind
1.
tryk 2 sec. “prog” (
sender N°1)
:
->
lys “ON”
/
Kort op- og nedbevægelse (fig.a)
2.
Kortvarigt tryk “prog” (
sender N°2*)
:
->
Blinkende lys /
Kort op- og nedbevægelse (fig.b)
*Telis 4 :
Valg af kanal
= OP
=
NED
=
STOP / Udfældede
positioner
(fig.d)
Tilføje eller fjerne en sender
Ved hjælp af en alleredeindprogrammeret sender
Vind / Sol
TELIS soliris + Soliris/Eolis sensor
RTS + Altus RTS / Orea RTS**
Brug af
fjernbetjeningerne
mellemste position
Altus RTS / Orea RTS / Oximo RTS**
B C
DK
•
Προγραμματισμός ή αλλαγή (fig.c) :
Σταμάτημα στη ζητούμενη θέση & πίεση
5 δευτ. "my"
•
Χρήση (fig.d) :
Σύντομη πίεση
"my"
•
Κατάργηση (fig.e) :
Πίεση 5 δευτ. "my"
πίεση 2
δευτ
.
:
=
Επιλογή Άνεμος και Ήλιος
=
Επιλογή Άνεμος
1.
Πίεση 2 δευτ. "prog"
(
control N°1)
:
->
Ανάβει το ενδεικτικό φως/Σύντομη κίνηση πάνω & κάτω
(fig.a)
2.
Σύντομη πίεση “prog” (
control N°2*)
:
->
Ενδεικτικό φως αναβοσβήνει/Σύντομη κίνηση πάνω & κάτω
(fig.b)
*Telis 4 :
Επιλογή του καναλιού
=
Πάνω
=
Κάτω
=
Στόπ Ενδιάμεση
θέση (fig.d)
Πρόσθεση ή αφαίρεση τηλεχειρισμού
Με τη βοήθεια προγραμματισμένου
τηλεχειρισμού
Άνεμος
/
Ήλιος
TELIS soliris + Soliris/Eolis sen-
sor RTS + Altus RTS / Orea RTS**
Χρήση των
τηλεχειριστηρίων
ενδιάμεσης θέσης
Altus RTS / Orea RTS / Oximo RTS**
B C
GR
Add or delete a control
With help of a recorded control
B
5 sec.
=
=
=
+
=
B
n°2
n°2
n°1
n°1
n°1
n°2
n°1
1
control n°1
2
Telis 1 / Soliris
Telis 4
control n°2
prog
0,5sec.
prog
0,5 sec.
1 2
prog
2 sec.
1..2..3..4..5
OK
fig.a
(1 min.)
fig.b
(5 sec.)
fig.d
**Remote receiver :
refer to the instructions of the corresponding receiver.
**Récepteur déporté :
se reporter à la notice du récepteur correspondant
.
**Losse ontvanger :
Raadpleeg de montagehandleiding van de betreffende ontvanger.
**Receptor externo :
consulte la guía de instalación del receptor.
**Receptor n
ão
integrado :
consulte o manual do receptor correspondente.
**Icke integrerad mottagare :
var god se motsvarande mottagare bruksanvisning.
**Fjernbetjent modtager :
Se venligst brugsanvisningen for den pågældende modtager.
**Φορητός δέκτης : ανατρέξτε στο εγχειρίδιο του αντίστοιχου δέκτη.
**Erillinen vastaanotin :
Jos asennat uuden vastaanottimen, lue ensin sen käyttöohje.
**Forskjøvet mottaker :
se bruksanvisningen for den tilsvarende mottakeren.
• Programmazione
o modifica
(fig.c) : arresto
alla posizione desiderata, Impulso 5 sec.“my”.
• Uso (fig.d) :
Impulso breve “my”
• Cancellazione (fig.d) :
Impulso 5 sec.“my”.
Impulso 2 sec. :
=
Selezione Vento e Sole
=
Selezione Vento
1.
Impulso 2 sec. “prog” (
comando N°1)
:
->
led “ON”
/
Breve movimento di salita e discesa (fig.a)
2.
Impulso breve “prog” (
comando N°2*)
:
->
il led lampeggia /
Breve movimento di salita e discesa (fig.b)
*Telis 4 :
Selezione del canale
= SALITA
=
DISCESA
=
STOP o Posizioni
intermedie
(fig.d)
Aggiungere o cancellare un comando
Con l'aiuto di un trasmettitore memorizzato
Vento / Sole
TELIS soliris + Soliris/Eolis sensor
RTS + Altus RTS / Orea RTS**
Uso dei
telecomandi
Posizioni intermedie
Altus RTS / Orea RTS / Oximo RTS**
B C
IT
**Ricevitore remoto :
riferirsi al manuale del relativo ricevitore.
•
Programmieren oder ändern der
Zwischenposition (fig.c): Behang an der gewünschten
Position stoppen und dann 5. sec. „my“ drücken.
• Aufruf der Zwischenposition (fig.d):
kurz „my“ drücken.
• Löschen der Zwischenposition (fig.e):
Zwischenposition anfahren dann 5. sec. „my“ drücken.
2 sec. drücken :
=
Sonnen- und Windautomatik ein
=
Windautomatik ein
= Auf / Einfahren
=
Ab / Ausfahren
=
Stopp oder
Zwischenposition
(fig.d)
Wind / Sonne
TELIS soliris + Soliris/Eolis sensor
RTS + Altus RTS / Orea RTS**
Bedienung der
Sender
Zwischenposition
Altus RTS / Orea RTS / Oximo RTS**
B C
DE
** Separate Empfänger: zunächst die Bedienungsanleitung des entsprechenden Empfängers lesen.
• tallentaminen tai muuttaminen (fig.c) :
haluttuun asentoon pysäyttäminen,
Pidätysaika
“my” 5 sec.
• Kaukosäätimien (fig.d) :
Lyhyt painallus “my”
• poistaminen (fig.e) :
Pidätysaika
“my” 5 sec.
Weitere Sender programmieren oder löschen
Mit Hilfe eines bereits eingelernten Senders
1.
2 sec. die Programmiertaste „prog.“ am Sender n°1 drücken
->
Die LED leuchtet oder kurze Auf- / Ab Bewegung (fig.a)
2.
Die Programmiertaste „prog“ am Telis kurz drücken (Sender n°2*)
->
Die LED blinkt oder kurze Auf- / Ab Bewegung (fig.b)
*Telis 4 :
Kanalwahltaste
2 sec.
2 sec.