- De sensor niet rechtstreeks naar de zon gericht. De sensor weg houden bij elektromagnetische bronnen deze kunnen storing veroorzaken.
- Let op dat de toegang van zonlicht niet geblokkeerd is door objecten.
- Richt de sensor niet op reflecterende oppervlaktes.
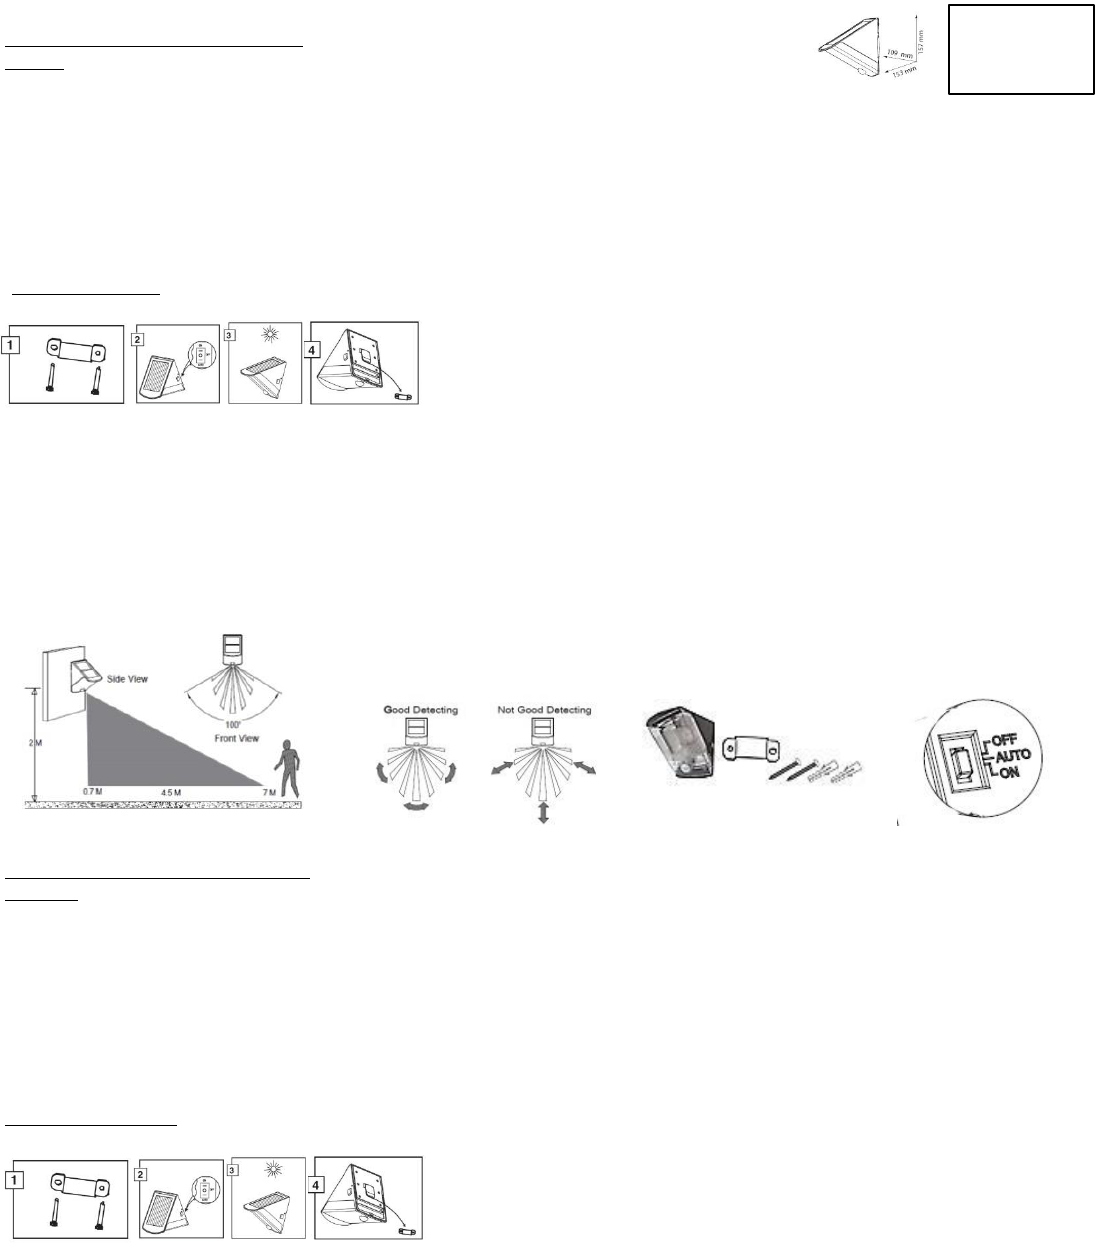
- De PIR sensor heeft een detectiebereik van ± 7 m - 100° rond. Dit kan variëren afhankelijk van de hoogte en locatie. Het bereik van de sensor kan ook
veranderen door temperatuur verschillen. (B)
- Houd er rekening mee, voor het installeren, dat de sensor gevoeliger is voor beweging over het scangebied dan rechtstreeks naar of weg van de sensor.
Montage aanwijzingen
- Inhoud pakket: 1 x Solar Sensor Led 1x Muurplaat 2 x Schroef 2 x Plug (C)
1. Boor 2 gaten om de metalen muurplaat te bevestigen. Let erop dat de plek waar u de Solar Sensor Led wilt installeren voldoende zonlicht heeft. Plaats de
muurplaat met de schroeven.
2. Zet de lamp op ‘OFF’ , de knop zit aan de zijkant. Er zijn 3 functies te selecteren: (D)
OFF: Geen licht – Oplaad modus – Uit stand voor opslag en lange tijd opladen
AUTO: Automatische stand – Normaal gebruik van de Solar Sensor Led – De lamp gaat aan in het donker en brandt 60 seconden bij detectie van de sensor.
ON: Continu verlichting – Noodverlichting – De lamp blijft branden.
3.Het is belangrijk om de batterij voor het eerste gebruik volledig op te laden, ongeveer 3 dagen, in direct zonlicht. Zorg ervoor dat de knop op ‘OFF’ staat.
Het is beter om de batterij eerst op te laden in zonlicht om er zo voor te zorgen dat deze volledig is opgeladen voor het gebruik.
4. Als de batterij is opgeladen zet de knop op ‘AUTO’. Schuif de lamp voor bevestiging over de metalen muurplaat.
A B C D
(GB) Instruction manual for Solaris Sensor Led
Installation
For best detecting effect of PIR, please take the following points into account:
- Ideal installation height, for maximum detection range, 1,8-2,5 meter. Install vertically flat. (A)
- Do not aim the sensor towards the sun. Keep the sensor away from strong electromagnetic disturbance source.
- Do not install the entrance light in an area where sunlight may be blocked by opjects.
- Do not aim the sensor at reflective surfaces.
- The PIR sensor’s detection range (± 7 m at 100° round) may vary slightly depending on the mounting height and location. The detection range may also alter
with environment temperature change. (B)
- Before install, please note that the sensor is more sensitive to movement across the scan area than to movement directly toward or away from the sensor.
Separate installation steps
- Package contents: 1 x Solar Powered Entrance Light 1x Wall Mounting Base Unit 2 x Wall Mounting Screws 2 x Wall Mounting Plugs (C)
1. Drill two holes to install the metal base unit on the surface where the light will be mounted. Ensure that your desired mounting location is in an area of
sufficient sunlight. Then mount the mountplate by screws.
2. Switch the unit to ‘OFF’ by using the switch on the side of the light. The light has 3 operating functions selectable by the switch. (D)
OFF: No light – Charge mode -Power off for storage and long time charging
AUTO: Normal work automatically – Use as a motion sensing light – The light only works at night, and illuminates for 60 seconds when motion is detected.
ON: Constantly light on as emergency lamp – Light stays on continuously
3. It is reccommended that you fully charge the battery in direct sunlight in daytime before the first use. Ensure the switch is at ‘OFF’ and place the light in a
position where the solar panel is in direct sunlight for 3 days. It is better to charge the solar cell in sunlight before switching it on, so that the light can work
with a full charge.
4. After the battery is fully charged, turn the switch tot ‘AUTO’. Hang the light on the metal base.
Libble takes abuse of its services very seriously. We're committed to dealing with such abuse according to the laws in your country of residence. When you submit a report, we'll investigate it and take the appropriate action. We'll get back to you only if we require additional details or have more information to share.
Product:
Forumrules
To achieve meaningful questions, we apply the following rules:
First, read the manual;
Check if your question has been asked previously;
Try to ask your question as clearly as possible;
Did you already try to solve the problem? Please mention this;
Is your problem solved by a visitor then let him/her know in this forum;
To give a response to a question or answer, do not use this form but click on the button 'reply to this question';
Your question will be posted here and emailed to our subscribers. Therefore, avoid filling in personal details.
Register
Register getting emails for Solaris 7374 Solar Sensor Led at:
new questions and answers
new manuals
You will receive an email to register for one or both of the options.
Get your user manual by e-mail
Enter your email address to receive the manual of Solaris 7374 Solar Sensor Led in the language / languages: German, Dutch as an attachment in your email.
The manual is 0,37 mb in size.
You will receive the manual in your email within minutes. If you have not received an email, then probably have entered the wrong email address or your mailbox is too full. In addition, it may be that your ISP may have a maximum size for emails to receive.
The manual is sent by email. Check your email
If you have not received an email with the manual within fifteen minutes, it may be that you have a entered a wrong email address or that your ISP has set a maximum size to receive email that is smaller than the size of the manual.
The email address you have provided is not correct.
Please check the email address and correct it.
Your question is posted on this page
Would you like to receive an email when new answers and questions are posted? Please enter your email address.