Door/window alarm
SMA-40250
NL Deu
ES Ala
SV Dör
RU / RO Ala
EN PARTS D NL ON DE TEI
FR DE ES DES IT DE
PT DE SV B TR PARÇAL
PL OP R ОПИС RO DES CS PO
SK PO
1
2 3
4
ENInstruction manual
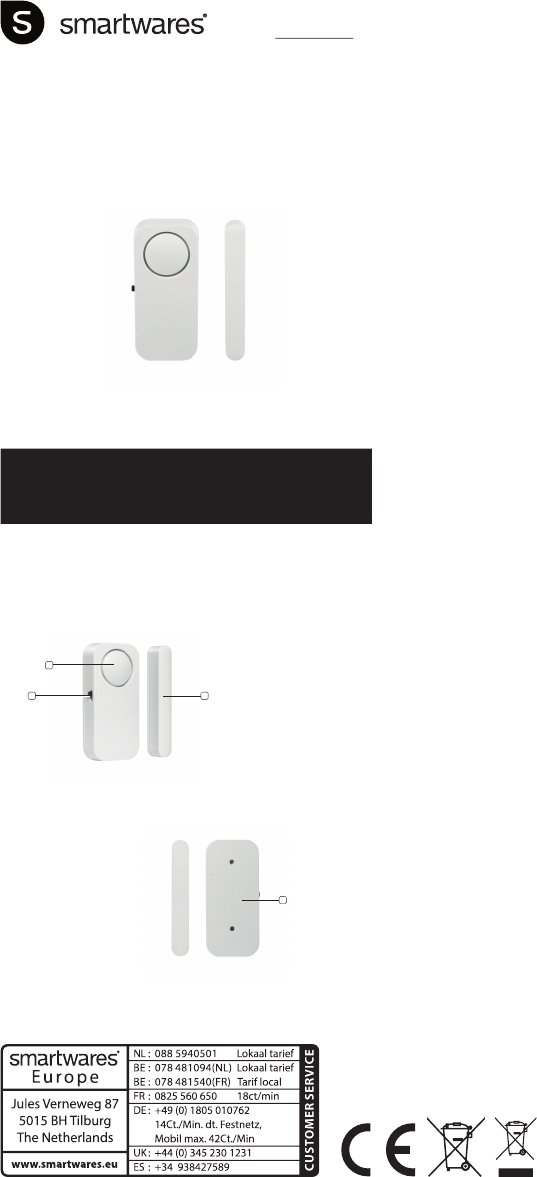
PARTS DESCRIPTION
1. Speaker
2. On/Off switch
3. Magnet
4. Back cover
INSTALLATION
• Remove the back cover from the device.
• Mount the back cover to your doorcasing or windowsill using the included
double sided adhesive tape.
• Remove the back cover from the magnet.
• Mount the back cover of the magnet to the door leaf or window sash using the
included double sided adhesive tape.
• Make sure that the back covers are mounted no more than 5mm apart.
• Now click the sensor and magnet in to place on the back covers.
USE
• Arm the alarm by moving the on/off switch to the “I” position. You will hear a
beep sound.
• The alarm will now be armed within 30 seconds. If the door or window is
opened the alarm will now be triggered after 7 seconds.
• To turn off the alarm when triggered, move the on/off switch to the “O”
position.
• To disarm the alarm, move the on/off switch to the “O” position. When the
alarm is triggered it will sound for 30 seconds.
REPLACING THE BATTERIES
• Remove the back cover from the sensor.
• Remove the battery cover using a coin or a screwdriver.
• Remove the old batteries.
• Insert the new batteries (2* 3V CR2032). Make sure the polarity is correct.
• Replace the battery cover and the back cover.
NLGebruiksaanwijzing
BESCHRIJVING VAN ONDERDELEN
1. Luidspreker
2. Aan/uit-schakelaar
3. Magneet
4. Achterbehuizing
INSTALLATIE
• Verwijder de achterbehuizing van het apparaat.
• Plaats de achterbehuizing met de meegeleverde dubbelzijdige tape op het
deur- of raamkozijn.
• Verwijder de achterbehuizing van de magneet.
• Plaats de achterbehuizing van de magneet met de meegeleverde
dubbelzijdige tape op de deur- of raamvleugel.
• Zorg ervoor dat de achterbehuizingen niet meer dan 5mm uit elkaar worden
geplaatst.
• Klik nu de sensor en magneet op hun plek op de achterbehuizingen.
GEBRUIK
• Activeer het alarm door de aan/uit-schakelaar in de stand 'I' te zetten. U hoort
een piepgeluid.
• Het alarm wordt nu binnen 30seconden geactiveerd. Het alarm gaat nu af na
7 seconden als de deur of het raam wordt geopend.
• Als u een actief alarm wilt uitschakelen, zet u de aan/uit-schakelaar in de
stand 'O'.
• Als u het alarm wilt deactiveren, zet u de aan/uit-schakelaar in de stand 'O'.
Wanneer het alarm wordt geactiveerd, luidt het gedurende 30 seconden.
DE BATTERIJEN VERVANGEN
• Verwijder de achterbehuizing van de sensor.
• Verwijder het batterijdeksel met een munt of schroevendraaier.
• Verwijder de oude batterijen.
• Plaats de nieuwe batterijen (2 x 3V CR2032). Controleer of de batterijpool de
juiste kant op is gericht.
• Plaats het batterijdeksel en de achterbehuizing terug.
FRManuel d'instructions
DESCRIPTION DES PIÈCES
1. Haut-parleur
2. Interrupteur Marche/Arrêt
3. Aimant
4. Panneau arrière
INSTALLATION
• Retirez le panneau arrière du dispositif.
• Fixez le panneau arrière à l'aide du ruban adhésif double face inclus sur le
chambranle de votre porte ou le rebord de votre fenêtre.
• Retirez le panneau arrière de l'aimant.
• Fixez le panneau arrière de l'aimant au battant de la porte ou au châssis de la
fenêtre à l'aide du ruban adhésif double face inclus.
• Veillez à ce que les panneaux arrière ne soient pas distants de plus de 5 mm.
• Maintenant, cliquez sur le capteur et l'aimant pour les placer sur les panneau
arrière.
UTILISATION
• Pour enclencher l'alarme, réglez l'interrupteur marche/arrêt en position "I".
Vous entendrez un bip sonore.
• L'alarme est maintenant enclenchée dans les 30 secondes. Si la porte ou la
fenêtre est ouverte, l'alarme se déclenche après 7 secondes.
• Pour éteindre l'alarme une fois enclenchée, réglez l'interrupteur marche/arrêt
sur la position «O».
• Pour désenclencher l'alarme, réglez l'interrupteur marche/arrêt sur la position
«O». Lorsque l'alarme est déclenchée, elle sonne pendant 30 secondes.
REMPLACER LES PILES
• Retirez le panneau arrière du capteur.
• Retirez le couvercle de la pile à l'aide d'une pièce ou d'un tournevis.
• Retirez les piles usagées.
• Insérez les nouvelles batteries (2* 3V CR2032). Assurez-vous que la polarité
est correcte.
• Remettez en place le couvercle de la pile et le panneau arrière.
DEBedienungsanleitung
TEILEBESCHREIBUNG
1. Lautsprecher
2. Ein/Aus-Schalter
3. Magnet
4. Gehäusedeckel
MONTAGE
• Entfernen Sie den rückwärtigen Gehäusedeckel.
• Befestigen Sie den Gehäusedeckel mit dem mitgelieferten doppelseitigen
Klebeband am Tür- oder Fensterrahmen.
• Entfernen Sie die rückwärtige Abdeckung des Magneten.
• Befestigen Sie die rückwärtige Abdeckung des Magneten mit dem
mitgelieferten doppelseitigen Klebeband am Türblatt oder Fensterflügel.
• Achten Sie darauf, dass die beiden rückwärtigen Gehäuseteile maximal 5mm
Abstand haben.
• Klipsen Sie nun den Sensor an den angebrachten Gehäusedeckeln fest.
BENUTZUNG
• Aktivieren Sie den Alarm, indem Sie den Ein/Aus-Schalter auf Stellung „I“
bringen. Daraufhin ertönt ein Piepton.
• Der Alarm ist nun nach 30 Sekunden scharfgeschaltet. Sobald sich die Tür
oder das Fenster öffnet, wird nun Alarm ausgelöst nach 7 Sekunden.
• Um den Alarm unscharf zu schalten, bringen Sie den Ein/Aus-Schalter in die
Stellung „O“.
• Um den Alarm zu deaktivieren, bringen Sie den Ein/Aus-Schalter in die
Stellung „O“. Wenn der Alarm ausgelöst wird, ertönt er 30 Sekunden lang.
BATTERIEN WECHSELN
• Entfernen Sie den rückwärtigen Gehäusedeckel vom Sensor.
• Entfernen Sie die Batterieabdeckung mit einer Münze oder einem
Schraubendreher.
• Entnehmen Sie die alten Batterien.
• Setzen Sie die neuen Batterien (2x 3V CR2032) ein. Achten Sie auf die
korrekte Polarität.
• Bringen Sie die Batterieabdeckung wieder an.
ESManual de instrucciones
DESCRIPCIÓN DE LAS PIEZAS
1. Altavoz
2. Interruptor de encendido/apagado
3. Imán
4. Cubierta posterior
INSTALACIÓN
• Retire la cubierta posterior del dispositivo.
• Utilizando la cinta adhesiva de doble cara incluida, monte la cubierta
posterior en el marco de la puerta o en el alféizar.
• Retire la cubierta posterior del imán.
• Utilizando la cinta adhesiva de doble cara incluida, monte la cubierta
posterior del imán en la hoja de la puerta o en la ventana guillotina.
• Asegúrese de montar las cubiertas posteriores con una separación inferior a
5mm.
• A continuación, encaje el sensor y el imán en los lugares correspondientes
de las cubiertas posteriores.
USO
• Para armar la alarma, sitúe el interruptor de encendido/apagado en la
posición “I”. Escuchará un pitido.
• La alarma estará armada en 30 segundos. Si se abre la puerta o la ventana,
la alarma se activará después de 7 segundos.
• Para apagar la alarma una vez se haya activado, mueva el interruptor de
encendido/apagado a la posición “O”.
• Para desarmar la alarma, mueva el interruptor de encendido/apagado a la
posición “O”. Cuando se dispara la alarma, sonará durante 30 segundos.
SUSTITUCIÓN DE LAS PILAS
• Retire la cubierta posterior del sensor.
• Con la ayuda de una moneda o destornillador, retire la cubierta de las pilas.
• Extraiga las pilas antiguas.
• Introduzca las pilas nuevas (2* CR2032 de 3V). Asegúrese de que la
polaridad sea correcta.
• Vuelva a colocar la cubierta de las pilas y la cubierta posterior.
PTManual de Instruções
DESCRIÇÃO DAS PEÇAS
1. Altifalante
2. Interruptor de ligar/desligar
3. Íman
4. Tampa traseira
INSTALAÇÃO
• Remova a tampa traseira do aparelho.
• Monte a tampa traseira no caixilho da porta ou no parapeito da janela
utilizando a fita adesiva dupla-face incluída.
• Remova a tampa traseira do íman.
• Monte a tampa traseira do íman na folha da porta ou no caixilho da janela
utilizando a fita adesiva dupla-face incluída.
• Monte as tampas traseiras de modo a não ficarem mais de 5mm afastadas
entre si.
• Em seguida, fixe o sensor e o íman nas tampas traseiras, até ouvir um clique.
UTILIZAÇÃO
• Arme o alarme movendo o interruptor de ligar/desligar para a posição “I”. Irá
ouvir um sinal sonoro.
• O alarme ficará armado em 30 segundos. Se a porta ou a janela se abrir, o
alarme é acionado após 7 segundos.
• Para desligar o alarme quando este estiver acionado, mova o interruptor de
ligar/desligar para a posição “O”.
• Para desarmar o alarme, mova o interruptor de ligar/desligar para a posição
“O”. Quando o alarme é acionado, ele soará por 30 segundos.
SUBSTITUIÇÃO DAS PILHAS
• Remova a tampa traseira do sensor.
• Remova a tampa das pilhas utilizando uma moeda ou uma chave de fendas.
• Remova as pilhas usadas.
• Insira as pilhas novas (2x CR2032 de 3 V). Certifique-se de que a polaridade
está correta.
• Volte a colocar a tampa das pilhas e a tampa traseira.
ITIstruzioni per l'uso
DESCRIZIONE DELLE PARTI
1. Altoparlante
2. Interruttore on/off
3. Magnete
4. Coperchio posteriore
INSTALLAZIONE
• Rimuovere il coperchio posteriore dal dispositivo.
• Montare il coperchio posteriore sul telaio della porta o sul davanzale della
finestra usando il nastro biadesivo incluso.
• Rimuovere il coperchio posteriore dal magnete.
• Montare il coperchio posteriore del magnete sul battente della porta o sul
telaio mobile della finestra usando il nastro biadesivo incluso.
• Accertarsi che i coperchi posteriori siano montati ad una distanza massima di
5 mm l'uno dall'altro.
• Poi fissare a scatto il sensore e il magnete ai coperchi posteriori.
USO
• Attivare l'allarme spostando l'interruttore on/off sulla posizione "I". Viene
emesso un segnale acustico.
• L'allarme verrà attivato entro 30 secondi. Se la porta o la finestra vengono
aperte, scatterà l'allarme dopo 7 secondi.
• Per disattivare l'allarme quando scatta, spostare l'interruttore on/off sulla
posizione "O".
• Per disabilitare l'allarme, spostare l'interruttore on/off sulla posizione "O".
Quando viene attivato l'allarme, suonerà per 30 secondi.
SOSTITUZIONE DELLE BATTERIE
• Rimuovere il coperchio posteriore del sensore.
• Rimuovere il coperchio della batteria con una moneta o un cacciavite.
• Rimuovere le batterie esauste.
• Inserire le nuove batterie (2* 3V CR2032). Verificare che la polarità sia
corretta.
• Riposizionare il coperchio della batteria e il coperchio posteriore.
SVInstruktionshandbok
BESKRIVNING AV DELAR
1. Högtalare
2. På/av-brytare
3. Magnet
4. Baksideshölje
MONTERING
• Avlägsna baksideshöljet från enheten.
• Montera baksideshöljet på din dörrkåpa eller fönsterbräda använd den
medföljande dubbelsidiga tejpen.
• Avlägsna baksideshöljet från magneten.
• Montera magnetens baksideshölje på dörrbladet eller fönsterbågen använd
den medföljande dubbelsidiga tejpen.
• Se till att baksideshöljen inte monteras mer än 5 mm från varandra.
• Klicka nu sensorn och magneten i rätt läge på baksideshöljena.
ANVÄNDNING
• Larma larmet genom att ställa på/av-brytaren i läge‘I'. Du kommer att höra ett
pip låta.
• Larmet kommer nu larmas inom 30 sekunder. Om dörren eller fönstret
öppnas, utlöses larmet efter 7 sekunder.
• För att stänga av larmet när det utlöses, ställ på/av-brytaren i läge‘O'.
• För att avaktivera larmet, ställ på/av-brytaren i läge "O". När larmet utlöses
låter det i 30 sekunder.
BYTA BATTERIET
• Avlägsna baksideshöljet från sensorn.
• Avlägsna batterilocket med ett mynt eller en skruvmejsel.
• Avlägsna de gamla batterierna.
• Sätt i de nya batterierna (2 * 3V CR2032). Se till att polariteten är korrekt.
• Byta ut batterilocket och baksideshöljet.