Wireless door/windo
sensor
porte/fenêtre sans fil, Bezprzewodowy czujnik
drzwi/okien, Sensor para puer
brico
W
De gekoppelde ontvanger wordt ingeschak
van de zender op is geïnstalleerd
vooraf ingestelde tijdsduur van de z
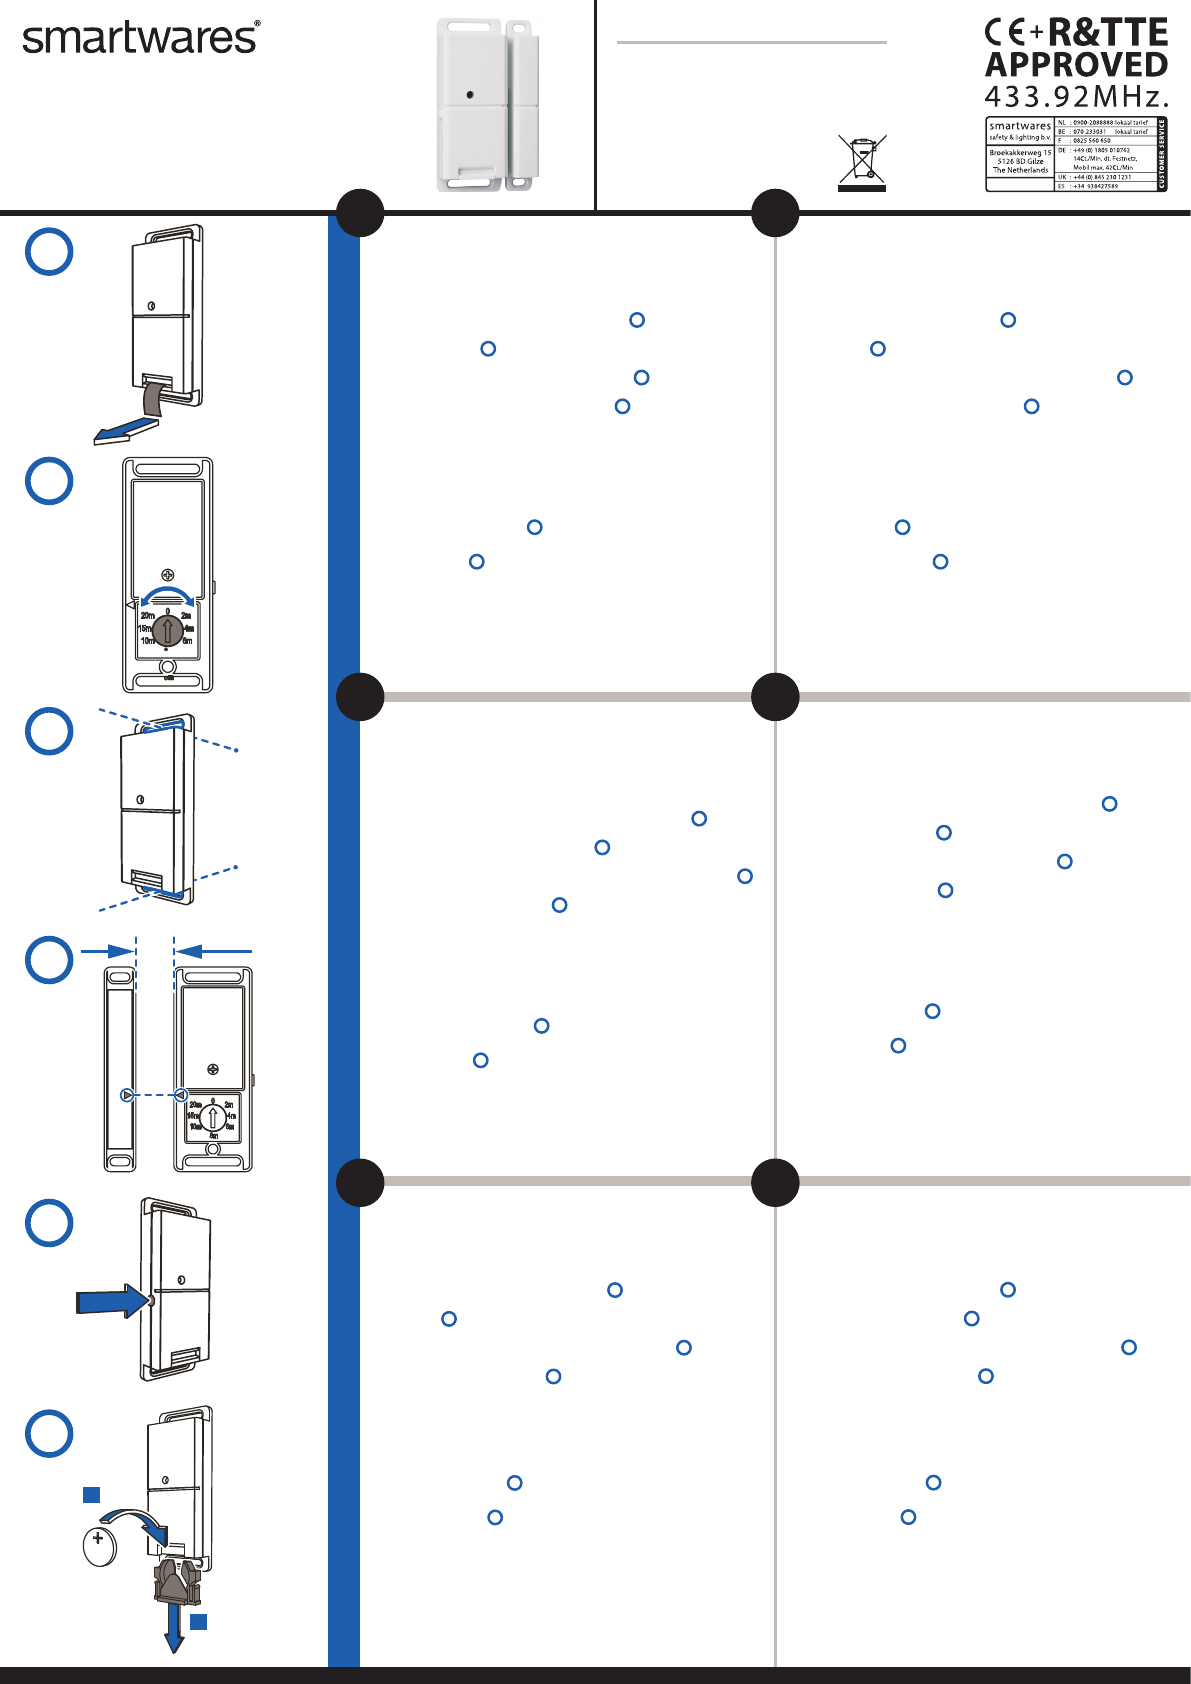
Installatie zender
a. Activeer de batterij door het lipje uit de zender t
1
.
b. Stel de tijdsduur in die de ontvanger blijft ingeschakeld, door de draaischakelaar te dr
0 en 20 min
2
.
c. Bevestig de zender op de deur- of raampost, daar w
meegeleverde pluggen en schroev
3
.
d. Bevestig het magneetonderdeel op het bew
maximaal 10 mm afstand van de zender
4
.
Let op! De pijl van de magneet moet naar de pijl van de zender wijzen en in één lijn liggen.
De zender met een ontvanger koppelen
a. Druk 3 seconden op de knop op de ontvanger en laat deze v
LED knipperen. Uw ontvanger bevindt zich nu in de k
Let op! De LED mag pas knipperen na het loslaten. Als de LED gaa
wordt er niet gek
b. Druk op de knop op de zender
5
.
Bij deze handeling gaat de LED op de ontvanger branden.
Batterij vervangen
6
• Schuif de batterijhouder uit de zender en plaats een nieuw
batterij boven ligt
Alle koppelingen ongedaan maken
a. Druk 10 seconden op de knop op de ontvanger
b. Bij deze handeling gaat de LED knipperen.
c. Zodra de LED dooft zijn alle koppelingen ongedaan gemaakt
Specifications:
Maximum range: 50 m.
Time adjustment: 0 – 20 min.
Battery: 3VDC, type CR 2032 (incl.)
1 Channel
W
GB
D
NL
F
PL
www.smartwares.eu
SH5-
E
10 mm
1
2
1
2
3
4
5
6
Operation of the transmitter (SH5-
The paired rec
transmitter is installed, is opened.
time of the transmitter has expired
Installing the transmitter
a. Activate the battery by pulling out the tab from the transmitt
1
.
b. Set the duration of time in which the receiver remains switched on, by r
between 0 and 20 min
2
.
c. Mount the transmitter on the door frame or window frame
the supplied plugs and screws or the supplied double-sided tape
3
.
d. Mount the magnetic component on the moving part of the door or window
transmitter and up to 10 mm distance fr
4
.
Attention: the arrow of the magnet must point t
aligned.
Pairing the transmitter with a r
a. Press and hold the button on the r
LED starts to blink. Y
Attention: the LED should blink only after releasing the button. If the LED starts to blink while
holding the button, there will be no pairing
b. Press the button on the transmitter
5
to pair it with a receiver
During this operation the LED on the receiver will ligh
Battery change
6
• Slide the battery holder from the transmitter and insert a new battery. Mak
battery is facing up.
Disconnecting all links
a. Press and hold the button on the r
b. During this operation the LED star
c. When the LED on the receiver turns o
Betrieb des T
Der verbundene Empfänger wird aktiviert, sobald die
magnetische T
eingeschaltet, bis die vor
den Empfänger dann aus.
Installation des Senders
a. Aktivieren Sie die Batterie, indem Sie den Str
1
.
b. Zur Festlegung der Zeitdauer
Drehschalter auf eine Stellung zwischen 0 und 20 min
2
.
c. Montieren Sie den Sender dort an den T
wird.
3
.
d. Montieren Sie den Magnetteil gegenüber dem Sender in einem Abstand v
beweglichen
4
.
Achtung: Der Pfeil auf dem Magnet muss auf den Pfeil des Senders zeigen und korrekt ausgerich
V
a. Drücken und halten Sie die
los.
Verbindungsmodus geschalt
Achtung: Die LED darf erst nach der Freigabe blinken.
die T
b. Drücken Sie am T
5
um ihn mit dem Empfänger zu verbinden.
Bei diesem V
Batteriewechsel
6
• Schieben Sie den Batteriehalter vom
sicher
Pairing löschen (alle)
a. Drücken und halten Sie die
b. Während dieses
c. Wenn die LED am Empfänger erlisch
Utiliser l’
Le récept
du récepteur est installé est ouverte. L
prédéterminée sur l’
Installation de l’
a. Actionnez la pile en tirant sur l’
1
.
b. Réglez la durée pendant laquelle le récepteur rest
0 et 20 minutes
2
.
c. Installez l’
Utilisez les vis et les chevilles fournies ou le ruban adhésif à double face en dotation
3
.
d. Montez le composan
de l’
4
.
Attention : la èche de l’
s’
Réaliser la liaison entre l’
a. Maintenez le bouton du r
opération, la DEL commence à clignoter
Attention : la DEL doit clignoter uniquement une fois le bouton r
clignoter lorsque le bouton est enfoncé, aucune conne
b. Appuyez sur le bouton
5
de l’
Pendant cett
Changement de batterie
6
• Fait
que le pôle + de la batterie est dirigé vers le haut
Déconnecter tous les liens
a. Maintenez le bouton du r
b. Pendant cette opération, la DEL commence à clignot
c. Lorsque la DEL du récept
Praca nadajnika (SH5-
Podłączon
jest zamontowana cz
momentu upływu zadanego czasu pracy nadajnika. Następnie nadajnik w
Montaż nadajnika
a. Uaktywnij baterię poprzez wyciągnięcie paska zabezpieczającego na nadajniku
1
.
b. Ustaw czas trwania, w jakim odbiornik pozostaje włączony
obrotow
2
.
c. Umocuj nadajnik na ramie drzwi lub okna, tam, gdzie drzwi lub okno się otwierają. Użyj
dołączonych k
3
.
d. Umocuj element magnetyczny na ruchomej części drzwi lub okna naprzeciwko nadajnika, w
odległości do 10 mm od nadajnika
4
.
Uwaga: strzałka na magnesie musi wskazywać na strzałkę na nadajniku i musi być z nią
wyrównana.
Łączenie nadajnika z odbiornikiem
a. Naciśnij i przytrz
operacji kontrolka LED zaczyna migać. Odbiornik jest teraz przełącz
Uwaga: Kontr
trakcie naciskania przycisku, wtedy nie będzie połączenia.
b. Naciśnij prz
5
aby połączyć go z odbiornikiem.
Podczas wykonywania tej czynności zaświeci się kontr
Wymiana baterii
6
• Zsuń uchwyt baterii z nadajnika i włóż nową bat
w górę.
Rozłączanie wszystkich połączeń
a. Naciśnij i przytrz
b. W trakcie tej operacji kontrolka LED zaczyna migać.
c. Gdy kontrolka LED na odbiorniku zgaśnie, wszystkie połącz
Uso del transmisor (SH5-
El receptor c
magnética del transmisor para abrirla. El recept
transcurra el tiempo establecido en el transmisor
Instalación del transmisor
a. Active la pila tirando de la pestaña en el transmisor
1
.
b. Programe la duración de tiempo durante el cual el recept
interruptor girat
2
.
c. Monte el transmisor en la marco de la puerta o de la ventana en la parte por la que se abren. Utilic
los tornillos y tacos propor
3
.
d. Monte el component
hasta una distancia de 10 mm del transmisor
4
.
Atención: la echa del imán debe apuntar hacia la echa del transmisor y deben estar alineadas.
Conexión del tr
a. Presione y mantenga el bot
LED comenzará a parpadear
Atención: el LED solamente debe parpadear tras soltar el botón. Si el LED comienza a parpadear
durante la pulsación no se producirá la c
b. Pulse el botón en el transmisor
5
para conectarlo a un receptor
Durante la operación se encenderá el LED del r
Cambiar la batería
6
• Deslice el soporte de la batería del transmisor e introduzca una nuev
polo + de la batería mire hacia arriba.
Desconectar todas las conexiones
a. Presione y mantenga el bot
b. Durante esta operación el LED comenzará a parpadear
c. Cuando el LED del recept