590804
1
Zoom out
Zoom in
Previous page
1/2
Next page
Wireless build-in remote, Eingebaute Funkfernbedie-
nung, Draadloze inbouwafstandsbediening, Télécom-
mande intégrée sans fil, Bezprzewodowy wbudowany
zdalny sterownik, Mando a distancia integrado
inalámbrico
Werking van de zender (SH5-TBR-A)
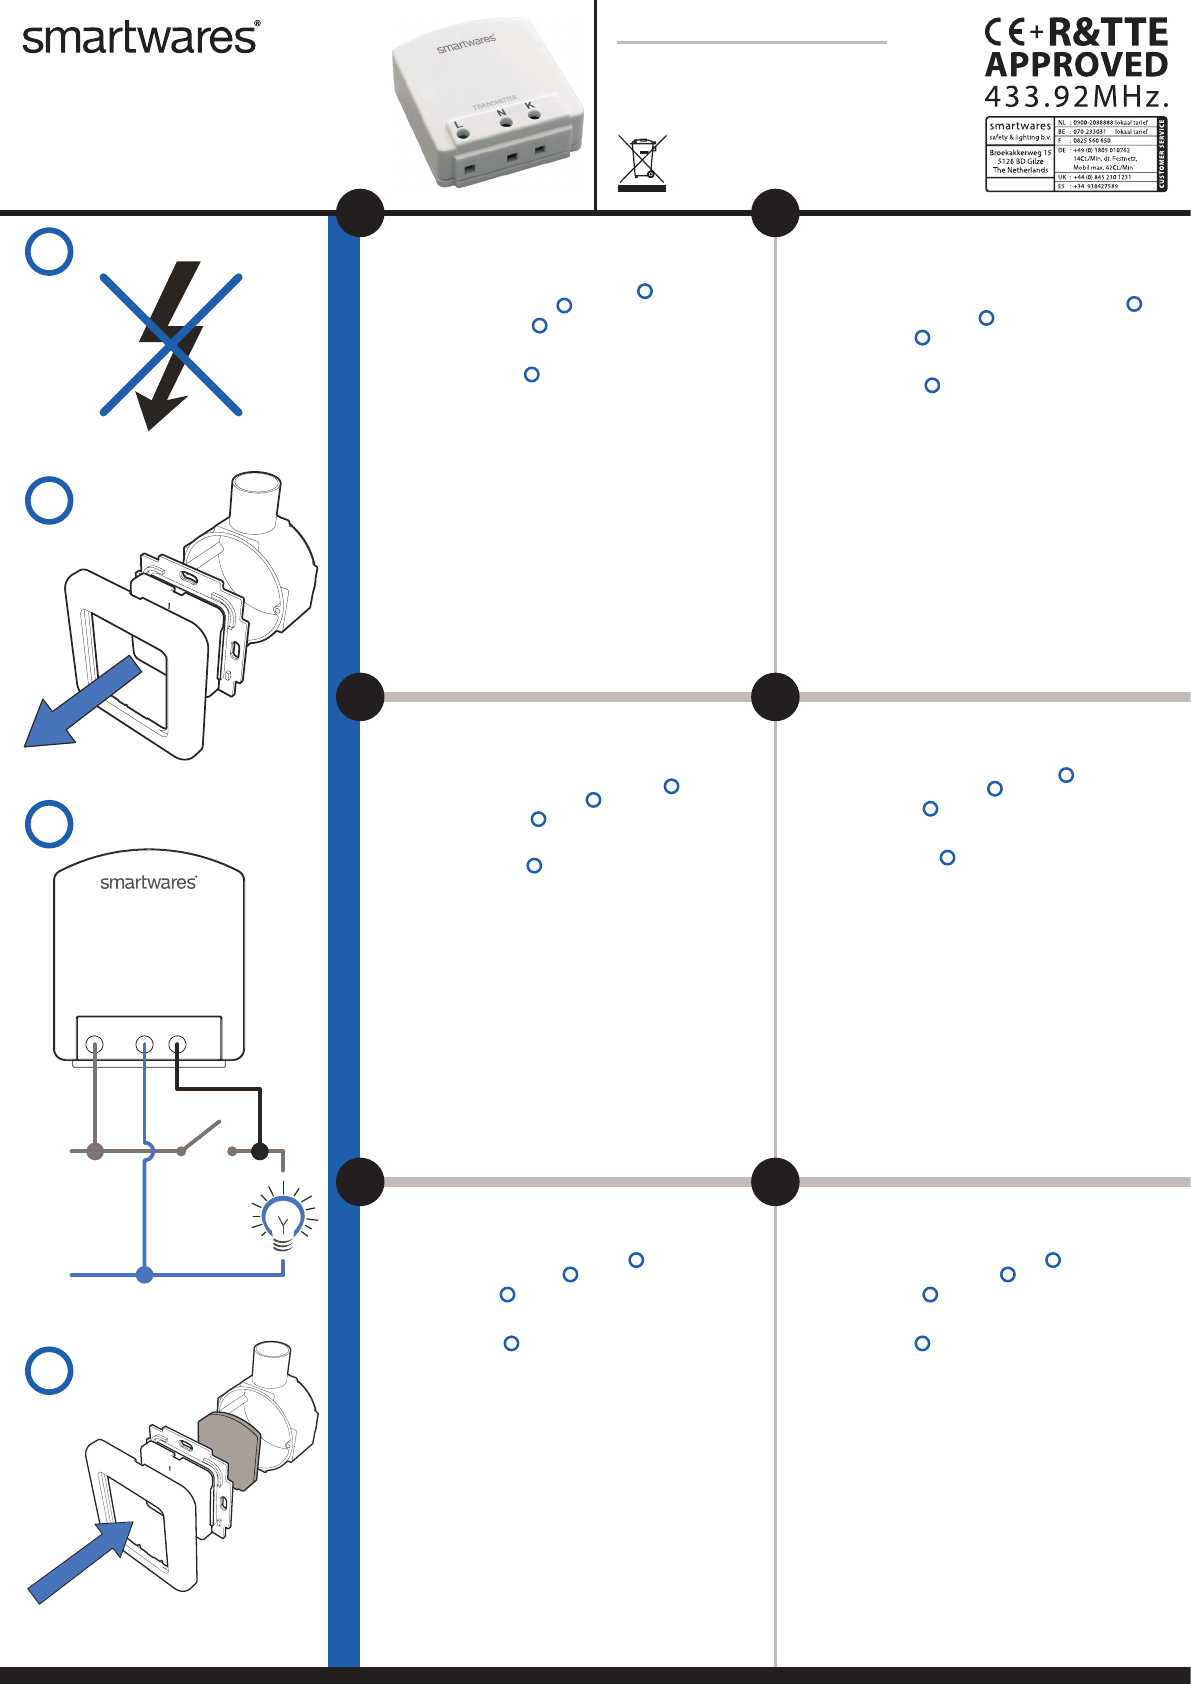
De zender zorgt ervoor dat u met uw bestaande inbouwschakelaar ook draadloos kunt schakelen.
Voorbereiding voor gebruik
a. Schakel de stroom uit met de hoofdschakelaar in uw meterkast
1
.
b. Schroef de schakelaar los van de inbouwdoos
2
.
De zender aansluiten
3
a. Verbind de fasedraad (bruin) met L en verbind de nuldraad (blauw) met N.*
b. Verbind de zwarte draad, tussen de schakelaar en de lamp, met K.
De zender bevestigen
4
a. Plaats de zender in de inbouwdoos.
b. Schroef de schakelaar op de inbouwdoos.
c. Schakel de stroom in met de hoofdschakelaar in uw meterkast.
De zender met een ontvanger koppelen of ontkoppelen
a. Druk 3 seconden op de knop op de ontvanger en laat deze vervolgens los. Bij deze handeling gaat de
LED knipperen. Uw ontvanger bevindt zich nu in de koppelmodus.
Let op! De LED mag pas knipperen na het loslaten. Als de LED gaat knipperen tijdens indrukken dan
wordt er niet gekoppeld.
b. Zet de schakelaar aan om de zender te koppelen of zet de schakelaar uit om de zender te
ontkoppelen.
Uw zender is klaar voor gebruik na het koppelen met een ontvanger.
Alle koppelingen ongedaan maken
a. Druk 10 seconden op de knop op de ontvanger.
b. Bij deze handeling gaat de LED knipperen.
c. Zodra de LED dooft zijn alle koppelingen ongedaan gemaakt.
*De nuldraad is niet altijd aanwezig bij de schakelaar. In bepaalde situaties zal de nuldraad aangelegd
moeten worden.
Uso del transmisor (SH5-TBR-A)
El transmisor garantiza que pueda conmutar inalámbricamente usando su interruptor integrado.
Preparación de uso
a. Apague la alimentación con el interruptor de su cuadro de luces
1
.
b. Desenrosque el interruptor de la caja de instalación
2
.
Conectar el transmisor
3
a. Conecte el hilo de fase (marrón) con L y conecte el hilo neutro (azul) con N.*
b. Conecte el hilo negro entre el interruptor y la luz con K.
Montar el transmisor
4
a. Ponga el transmisor en la caja de instalación.
b. Desenrosque el interruptor de la caja de instalación.
c. Encienda la alimentación con el interruptor de su cuadro de luces.
Conectar/desconectar el receptor a un transmisor
a. Presione y mantenga el botón del receptor durante 3 segundos y suéltelo. Durante esta operación el
LED comenzará a parpadear. El receptor pasará a modo conexión.
Atención: el LED solamente debe parpadear tras soltar el botón. Si el LED comienza a parpadear
durante la pulsación no se producirá la conexión.
b. Active el interruptor para emparejar con el transmisor o apáguelo para desconectar.
Tras emparejar con un receptor el transmisor estará listo para el uso.
Desconectar todas las conexiones
a. Presione y mantenga el botón del receptor durante 10 segundos.
b. Durante esta operación el LED comenzará a parpadear.
c. Cuando el LED del receptor se apague se desconectarán todas las conexiones.
*El hilo neutro puede no estar siempre presente en el interruptor. En algunas situaciones, el hilo neutro
puede tener que instalarse.
Betrieb des Transmitters (SH5-TBR-A)
Der Transmitter stellt sicher, dass Sie drahtlos mithilfe Ihres gegenwärtig eingebauten Schalters
schalten können.
Benutzung vorbereiten
a. Schalten Sie den Strom mit dem Netzschalter in Ihrem Zählerschrank aus
1
.
b. Schrauben Sie den Schalter vom Montagekasten ab
2
.
Anschluss des Transmitters
3
a. Verbinden Sie die Phase (braun) mit L und den Neutralleiter (blau) mit N.*
b. Verbinden Sie den schwarzen Draht zwischen dem Schalter und der Lampe mit K.
Montage des Transmitters
4
a. Platzieren Sie den Transmitter im Montagekasten.
b. Schrauben Sie den Schalter in den Montagekasten.
c. Schalten Sie den Strom mit dem Netzschalter in Ihrem Zählerschrank ein.
Verbindung/Trennung des Transmitters mit dem/vom Empfänger
a. Drücken und halten Sie die Taste am Empfänger 3 Sekunden lang und lassen Sie sie wieder
los. Während dieses Vorgangs beginnt die LED zu blinken. Ihr Empfänger wurde jetzt in den
Verbindungsmodus geschaltet.
Achtung: Die LED darf erst nach der Freigabe blinken. Wenn die LED beginnt zu blinken, während
die Taste noch gedrückt wird, wird keine Verbindung aufgebaut.
b. Schalten Sie den Schalter ein, um den Transmitter zu koppeln, oder schalten Sie den Schalter zum
Trennen aus.
Nach der Kopplung mit einem Empfänger ist Ihr Transmitter einsatzbereit.
Pairing löschen (alle)
a. Drücken und halten Sie die Taste am Empfänger 10 Sekunden lang.
b. Während dieses Vorgangs beginnt die LED zu blinken.
c. Wenn die LED am Empfänger erlischt, werden alle Verbindungen getrennt.
*Der Neutralleiter ist eventuell nicht immer am Schalter vorhanden. In bestimmten Situationen muss
der Neutralleiter eventuell erst installiert werden.
Działanie nadajnika (SH5-TBR-A)
Nadajnik zapewnia bezprzewodowe przełączanie wbudowanego przełącznika.
Przygotowanie do użytkowania
a. Wyłącz zasilanie za pomocą wyłącznika zasilania w szafce miernika
1
.
b. Odkręć przełącznik i wyjąć z puszki montażowej
2
.
Podłączenie nadajnika
3
a. Podłączyć przewód fazowy (brązowy) do L, a przewód zerowy (niebieski) podłączyć do N.*
b. Czarny przewód ma łączyć przełącznik z lampą poprzez K.
Zamontowanie nadajnika
4
a. Nadajnik umieścić w puszce montażowej.
b. Przykręć przełącznik w puszcze montażowej.
c. Wyłącz zasilanie za pomocą wyłącznika zasilania w szafce miernika .
Łączenie/rozłączanie nadajnika z odbiornikiem
a. Naciśnij i przytrzymaj przycisk na odbiorniku przez 3 sekundy, a następnie zwolnij go. W trakcie tej
operacji kontrolka LED zaczyna migać. Odbiornik jest teraz przełączony na tryb łączenia.
Uwaga: Kontrolka LED powinna migać tylko po zwolnieniu. Jeśli kontrolka LED zacznie migać już w
trakcie naciskania przycisku, wtedy nie będzie połączenia.
b. Włącz przełącznik w celu sparowania z nadajnikiem lub wyłącz, aby się z nim rozłączyć.
Po sparowaniu z odbiornikiem nadajnika jest gotowy do użycia.
Rozłączanie wszystkich połączeń
a. Naciśnij i przytrzymaj przycisk na odbiorniku przez 10 sekund.
b. W trakcie tej operacji kontrolka LED zaczyna migać.
c. Gdy kontrolka LED na odbiorniku zgaśnie, wszystkie połączenia zostaną rozłączone.
*Przewód zerowy może nie zawsze być obecny na przełączniku. W pewnych sytuacjach przewód zerowy
wymaga zainstalowania.
Operation of the transmitter (SH5-TBR-A)
The transmitter ensures that you can switch wirelessly using your current built-in switch.
Preparation for use
a. Turn o the power with the power switch in your meter cupboard
1
.
b. Unscrew the switch from the mounting box
2
.
Connecting the transmitter
3
a. Connect the phase wire (brown) with L and connect the neutral wire (blue) to N.*
b. Connect the black wire, between the switch and the lamp, with K.
Mounting the transmitter
4
a. Place the transmitter in the mounting box.
b. Screw the switch on the mounting box.
c. Turn on the power with the power switch in your meter cupboard.
Pairing/disconnecting the transmitter with/from a receiver
a. Press and hold the button on the receiver for 3 seconds and then release it. During this operation the
LED starts to blink. Your receiver is now switched into the pairing mode.
Attention: the LED should blink only after releasing the button. If the LED starts to blink while
holding the button, there will be no pairing.
b. Turn the switch on to pair with the transmitter or turn the switch o to disconnect.
After pairing with a receiver, your transmitter is ready for use.
Disconnecting all links
a. Press and hold the button on the receiver for 10 seconds.
b. During this operation the LED starts to blink.
c. When the LED on the receiver turns o, all links will be disconnected.
*The neutral wire may not always be present on the switch. In certain situations, the neutral wire may
have to be installed.
Utilisation de l’émetteur (SH5-TBR-A)
Lémetteur garantit que vous puissiez mettre en marche des appareils sans l en utilisant votre
interrupteur existant.
Préparation à l’utilisation
a. Coupez le courant à l’aide de l’interrupteur d’alimentation dans l’armoire du compteur
1
.
b. Dévissez l’interrupteur du boîtier de montage
2
.
Connecter l’émetteur
3
a. Connectez le l de phase (marron) au L et connectez le l neutre (bleu) au N.*
b. Connectez le l noir, entre l’interrupteur et la lampe, avec K.
Montage de l’émetteur
4
a. Placez l’émetteur dans le boîtier de montage.
b. Vissez l’interrupteur sur le boîtier de montage.
c. Allumez le courant à l’aide de l’interrupteur d’alimentation dans l’amoire du compteur.
Connecter/Déconnecter l’émetteur à un récepteur
a. Maintenez le bouton du récepteur enfoncé pendant 3 secondes avant de le relâcher. Pendant cette
opération, la DEL commence à clignoter. Votre récepteur est à présent en mode de connexion.
Attention : la DEL doit clignoter uniquement une fois le bouton relâché. Si la DEL commence à
clignoter lorsque le bouton est enfoncé, aucune connexion ne se produira.
b. Allumez l’interrupteur pour eectuer la connexion de l’émetteur ou éteignez l’interrupteur pour le
déconnecter.
Après la connexion avec un récepteur, votre émetteur est prêt à l’utilisation.
Déconnecter tous les liens
a. Maintenez le bouton du récepteur enfoncé pendant 10 secondes .
b. Pendant cette opération, la DEL commence à clignoter.
c. Lorsque la DEL du récepteur s’éteint, tous les liens seront déconnectés.
*Le l neutre ne sera pas toujours installé sur l’interrupteur. Dans certaines situations, il est possible
que le l neutre doive être installé.
Specifications:
AC Input Voltage: 230V~ 50Hz.
Maximum distance: 50 m.
Frequency: 433 MHz.
Warranty: 2 years
GB
D
NL
F
PL
www.smartwares.eu
SH5-TBR-A
E
KNL
TRANSMITTER
L
N
1
2
3
4
1


Need help? Post your question in this forum.

Forumrules


Report abuse

Libble takes abuse of its services very seriously. We're committed to dealing with such abuse according to the laws in your country of residence. When you submit a report, we'll investigate it and take the appropriate action. We'll get back to you only if we require additional details or have more information to share.

Product:

For example, Anti-Semitic content, racist content, or material that could result in a violent physical act.

For example, a credit card number, a personal identification number, or an unlisted home address. Note that email addresses and full names are not considered private information.

Forumrules

To achieve meaningful questions, we apply the following rules:

Register

Register getting emails for Smartwares SH5-TBR-A at:


You will receive an email to register for one or both of the options.


Get your user manual by e-mail

Enter your email address to receive the manual of Smartwares SH5-TBR-A in the language / languages: English, German, Dutch, French, Polish, Swedish, Spanish, Norwegian as an attachment in your email.

The manual is 0,46 mb in size.


You will receive the manual in your email within minutes. If you have not received an email, then probably have entered the wrong email address or your mailbox is too full. In addition, it may be that your ISP may have a maximum size for emails to receive.

The manual is sent by email. Check your email

If you have not received an email with the manual within fifteen minutes, it may be that you have a entered a wrong email address or that your ISP has set a maximum size to receive email that is smaller than the size of the manual.

The email address you have provided is not correct.

Please check the email address and correct it.

Your question is posted on this page

Would you like to receive an email when new answers and questions are posted? Please enter your email address.


Info