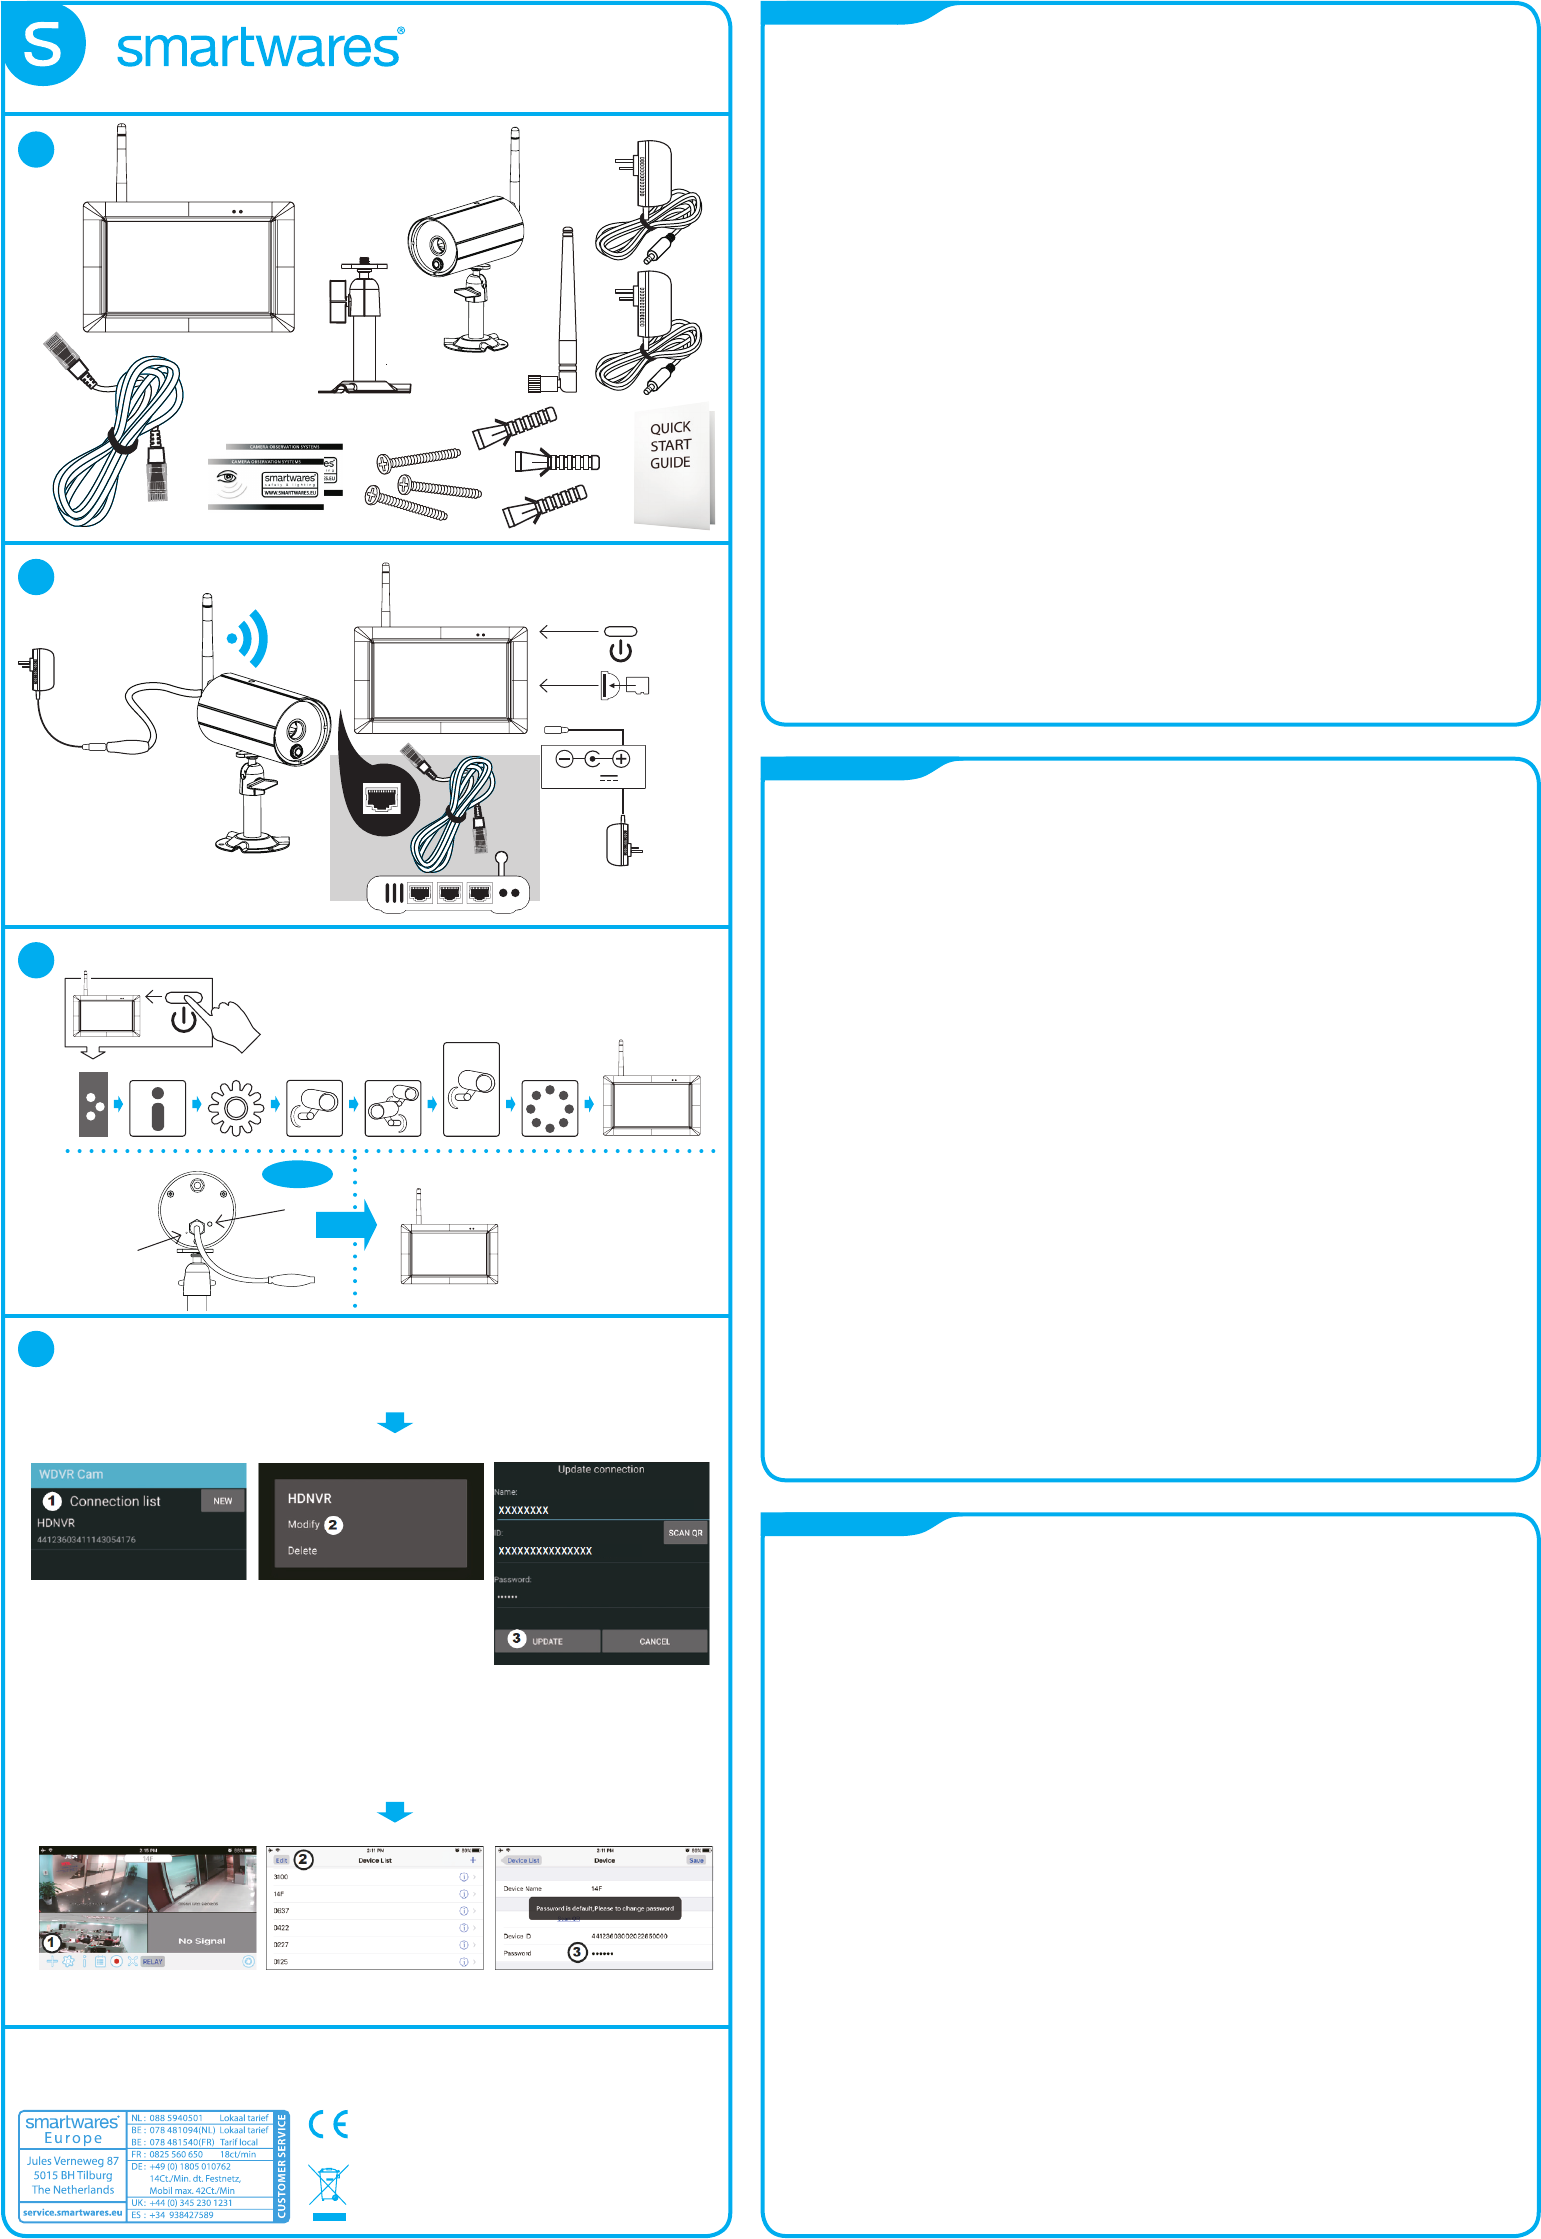
1. Insert the memory card and/or connect a HDD device to the USB port.
2. Screw on the antenna to the left side of the monitor.
3. Connect the Ethernet cable from the back of the monitor to your router.
4. Connect the 12V power adaptor and power on the system.
5. Use the stand on the back of the monitor to stabilize it.
6. Secure the camera stand to a stable surface, ceiling or wall mount using three screws.
7. Loosen the thumb screw of the camera stand and secure the camera body to the bracket.
8. Screw the antenna onto the rear of the camera.
9. Connect the supplied power adaptor to the camera and the power source. The RED LED will light up to indicate the camera is ready for setup
Note: Keep a distance of at least 1 meter between the camera and the monitor.
C. Pairing the camera to the monitor
1. Tap the camera setup icon to access the camera pairing screen.
2. Select the Camera channel (Camera 1/2/3/4).
3. Tap the “Camera Pairing” icon.
4. Within 35 seconds, press and hold the pairing button on the back of the camera for 5 seconds.
The Green Link LED will light up which indicate the camera is paired successfully.
5. The monitor will now reboot, after this you see the live feed from the camera on your monitor.
D. Set up the HDNVR app
1. Connect the device to your router, and make sure DHCP and UPnP service are enabled on your router setting.
2. Power up and turn on CS97DVR. In the Live View mode, wait for the system to get ready for internet connection. This process takes around 30 seconds.
3. Download the “WDVR Cam” app and run the app on a smartphone or tablet.
4. Add a New Device
• Android: Tap the “NEW” icon to add new device.
• iOS: Tap the “+” icon to add new device.
5. Tap the QR code icon to scan the QR code on the back of the monitor with the camera of your smartphone or tablet.
You can also enter the ID manually.
6. Enter the default password “123456”. Give your device a name and tap “save” to exit.
7. Change the default password: For security reasons, please follow the steps below to change the security code on both device and app.
a. Device:
1. In the main menu section, tap “storage setup” 3. check “DHCP”, then change the password
2. Tap “network” status 4. Tap “OK” once you’re nished
b. WDVR CAM APP
• For Android
1. Go to the device list
2. Press and hold the device name, the menu will appear on the panel. Then tap “modify”.
3. Tap “update” once you’re nished password modication
• For iOS
1. Go to the device list
2. Tap the information (i) button
3. Change the default password
8. Tap the device from the list, then tap “play” to connect. It will take a few seconds to access the remote video, depending on the network environment.
For more information and the complete user manual please visit our website: service.smartwares.eu and search for: “CS97DVR”
Hereby, Europe declares that the radio equipment type CS97DVR is in compliance with Directive 2014/53/EU The full text of the EU declaration of
conformity is available at the following internet address: service.smartwares.eu/doc
A. Teilebeschreibung
1. Monitor 4. Schrauben 7. UTP-Kabel
2. Kamera 5. Schnellstartanleitung
3. 2 Netzteile 6. 2 Antennen
B. Einrichten des Monitors/Installieren der Kamera
1. Legen Sie die Speicherkarte ein und/oder schließen Sie ein HDD-Gerät an den USB-Anschluss an.
2. Schrauben Sie die Antenne auf die linke Seite des Monitors.
3. Verbinden Sie das Ethernet-Kabel an der Rückseite des Monitors mit dem Router.
4. Schließen Sie den 12-V-Netzadapter an und schalten Sie die Anlage ein.
5. Benutzen Sie das Gestell auf der Rückseite des Monitors, um diesen zu stabilisieren.
6. Sichern Sie das Kameragestell mit drei Schrauben an einer stabilen Oberäche, der Decken- oder der Wandhalterung.
7. Lösen Sie die Flügelschraube des Kameragestells und befestigen Sie das Kameragehäuse an der Halterung.
8. Schrauben Sie die Antenne auf die Rückseite der Kamera.
9. Schließen Sie das mitgelieferte Netzteil an die Kamera und die Stromquelle an.
Die ROTE LED-Anzeige leuchtet auf, um anzuzeigen, dass die Kamera zum Einrichten bereit ist.
Hinweis: Halten Sie einen Abstand von mindestens 1 Meter zwischen der Kamera und dem Monitor ein.
C. Kopplung von Kamera und Monitor
1. Tippen Sie auf das Kamera Einrichten Symbol um zum Kamera-Kopplungsbildschirm zu gelangen.
2. Wählen Sie den Kamerakanal aus (Kamera 1/2/3/4).
3. Tippen Sie auf das „Kamera Koppelung“ Symbol.
4. Innerhalb von 35 Sekunden müssen Sie den Kopplungsknopf, auf der Rückseite der Kamera, drücken und für 5 Sekunden halten.
Das Grüne Link LED leuchtet auf und zeigt an, dass die Kamera erfolgreich gekoppelt wurde.
5. Der Monitor startet jetzt neu. Danach können Sie die Livebilder Ihrer Kamera auf Ihrem Monitor sehen.
D. Einrichten der HDNVR-App
1. Verbinden Sie das Gerät mit Ihrem Router und stellen Sie sicher, dass der DHCP- und der UPnP-Service in Ihrer Router-Einstellung aktiviert sind.
2. Schalten Sie die CS97DVR ein. Warten Sie im Live-Ansicht-Modus, bis das System für die Internetverbindung bereit ist.
Dieser Vorgang dauert ca. 30 Sekunden.
3. Laden Sie die App “WDVR Cam” herunter und lassen Sie die App auf einem Smartphone oder Tablet laufen.
4. Ein neues Gerät hinzufügen
• Android: Tippen Sie auf das Symbol “NEU”, um ein neues Gerät hinzuzufügen.
• (IOS): Tippen Sie auf das Symbol “+”, um ein neues Gerät hinzuzufügen.
5. Tippen Sie das QR-Code-Symbol an, um den QR-Code auf der Rückseite des Monitors mit der Kamera Ihres Smartphones oder Tablets zu scannen.
Sie können die ID-Nummer auch manuell eingeben.
6. Geben Sie das Standardpasswort “123456” ein. Geben Sie Ihrem Gerät eine Bezeichnung und tippen Sie auf “Speichern”, um den Vorgang zu verlassen.
7. Änderung des Standardkennworts: Aus Sicherheitsgründen folgen Sie bitte den unten aufgeführten Schritten, um den Sicherheitscode auf beiden
Geräten und der App zu ändern.
a. Gerät:
1. Tippen Sie im Hauptmenü auf “Speichereinrichtung” 3. “DHCP” antippen und dann das Passwort ändern
2. Tippen Sie auf “Netzwerk”-Status 4. Tippen Sie zum Abschluss auf “OK”.
b. WDVR-KAMERA-APP
• Für Android
1. Greifen Sie auf die Geräteliste zu
2. Halten Sie den Gerätenamen gedrückt, das Menü erscheint auf dem Bedienfeld. Tippen Sie dann auf “ändern”.
3. Tippen Sie auf “Aktualisieren”, sobald Sie die Passwortänderung abgeschlossen haben
• Für iOS
1. Greifen Sie auf die Geräteliste zu
2. Tippen Sie auf die Schaltäche Information (i)
3. Ändern Sie das Standardkennwort.
8. Wählen Sie auf das Gerät aus der Liste und tippen Sie zur Verbindungsherstellung auf “Wiedergabe”. Es dauert ein paar Sekunden, bis der Zugri auf die
Video-Fernsteuerung möglich ist, abhängig von der Netzwerkumgebung
Für weitere Informationen und das komplette Benutzerhandbuch besuchen Sie bitte unsere Website service.smartwares.eu und suchen Sie nach:
“CS97DVR” Hiermit erklärt Smartwares Europe dass der Funkanlagentyp CS97DVR der Richtlinie 2014/53/EU entspricht.
Der vollständige Text der EU-Konformitätserklärung ist unter der folgenden Internetadresse verfügbar: service.smartwares.eu/doc
A. Opis części
1. Monitor 4. Śrubki 7. Kabel UTP
2. Kamera 5. Skrócona instrukcja obsługi
3. 2x zasilacz 6. 2x antena
B. Konguracja monitora/ Instalacja kamery
1. Włóż kartę pamięci i/lub podłącz urządzenie HDD do portu USB.
2. Przykręć antenę po lewej stronie monitora.
3. Podłącz kabel Ethernet z tyłu monitora do routera.
4. Podłącz zasilacz 12V i włącz system.
5. Użyj podstawy z tyłu monitora, aby go ustabilizować.
6. Przymocuj statyw kamery do stabilnej powierzchni, sutu lub ściany za pomocą trzech wkrętów.
7. Poluzuj śrubę motylkową statywu kamery i przymocuj korpus kamery do wspornika.
8. Przykręć antenę do tylnej części kamery.
9. Włóż wtyczkę zasilacza do kamery i do gniazdka elektrycznego. CZERWONA dioda zaświeci się, wskazując na gotowość kamery do konguracji
Uwaga: Zachowaj odległość co najmniej 1 metra między kamerą a monitorem.
C. Parowanie kamery z monitorem
1. Stuknij ikonę konguracji kamery, aby uzyskać dostęp do ekranu parowania kamery.
2. Wybierz kanał kamery (kamera 1/2/3/4).
3. Stuknij ikonkę „parowania kamery”.
4. W ciągu 35 sekund naciśnij i przytrzymaj przez 5 sekund przycisk parowania z tyłu kamery. Zaświeci się zielona dioda połączenia, wskazując
na prawidłowe parowanie kamery.
5. Monitor ponownie się teraz uruchomi, po tym wyświetli się podgląd na żywo z kamery.
D. Skonguruj aplikację HDNVR
1. Podłącz urządzenie do routera i upewnij się, że usługa DHCP i UPnP jest włączona w jego ustawieniach.
2. Podłącz zasilanie do CS97DVR i włącz go. W trybie podglądu na żywo poczekaj, aż system zostanie przygotowany do połączenia z Internetem.
Czynność ta trwa około 30 sekund.
3. Pobierz aplikację „WDVR Cam” i uruchom ją na smartfonie lub tablecie.
4. Dodaj nowe urządzenie
• Android: Stuknij ikonkę „NEW”, aby dodać nowe urządzenie.
• iOS: Stuknij ikonkę „+”, aby dodać nowe urządzenie.
5. Stuknij ikonę kodu QR, aby zeskanować kod QR z tyłu monitora kamerą smartfona lub tabletu. Możesz również wprowadzić ID manualnie.
6. Wprowadź domyślne hasło „123456”. Nadaj urządzeniu nazwę i stuknij „save”, aby wyjść.
7. Zmień domyślne hasło: Ze względów bezpieczeństwa wykonaj poniższe kroki, aby zmienić kod zabezpieczający na obu urządzeniachi aplikacji.
a. Urządzenie:
1. W części menu głównego stuknij „storage setup” 3. Zaznacz „DHCP”, a następnie zmień hasło
2. Stuknij „network status” 4. Dotknij „OK”, gdy skończysz
b. WDVR CAM APP
• Dla systemu Android
1. Przejdź do listy urządzeń
2. Naciśnij i przytrzymaj nazwę urządzenia, na panelu pojawi się menu. Następnie stuknij „modify”.
3. Stuknij „update” po zakończeniu modykacji hasła
• Dla systemu iOS
1. Przejdź do listy urządzeń
2. Dotknij przycisku informacyjnego (i)
3. Zmień domyślne hasło
8. Stuknij urządzenie z listy, a następnie stuknij „play”, aby się połączyć. Uzyskanie dostępu do zdalnego wideo potrwa zaledwie kilka sekund w zależności
od środowiska sieciowego. Aby uzyskać więcej informacji i pełną instrukcję obsługi, odwiedź naszą witrynę internetową: service.smartwares.eu i
szukaj: “CS97DVR” Smartwares Europe niniejszym oświadcza, że typ urządzenia radiowego CS97DVR jest zgodny z dyrektywą 2014/53/UE. Pełny tekst
deklaracji zgodności UE jest dostępny pod następującym adresem internetowym: service.smartwares.eu/doc
Libble takes abuse of its services very seriously. We're committed to dealing with such abuse according to the laws in your country of residence. When you submit a report, we'll investigate it and take the appropriate action. We'll get back to you only if we require additional details or have more information to share.
Product:
Forumrules
To achieve meaningful questions, we apply the following rules:
First, read the manual;
Check if your question has been asked previously;
Try to ask your question as clearly as possible;
Did you already try to solve the problem? Please mention this;
Is your problem solved by a visitor then let him/her know in this forum;
To give a response to a question or answer, do not use this form but click on the button 'reply to this question';
Your question will be posted here and emailed to our subscribers. Therefore, avoid filling in personal details.
Register
Register getting emails for Smartwares CS97DVR - 10.100.01 at:
new questions and answers
new manuals
You will receive an email to register for one or both of the options.
Get your user manual by e-mail
Enter your email address to receive the manual of Smartwares CS97DVR - 10.100.01 in the language / languages: English, German, Dutch, French, Italian, Polish, Portuguese, Swedish, Turkish, Spanish as an attachment in your email.
The manual is 3,75 mb in size.
You will receive the manual in your email within minutes. If you have not received an email, then probably have entered the wrong email address or your mailbox is too full. In addition, it may be that your ISP may have a maximum size for emails to receive.
Others manual(s) of Smartwares CS97DVR - 10.100.01
If you have not received an email with the manual within fifteen minutes, it may be that you have a entered a wrong email address or that your ISP has set a maximum size to receive email that is smaller than the size of the manual.
The email address you have provided is not correct.
Please check the email address and correct it.
Your question is posted on this page
Would you like to receive an email when new answers and questions are posted? Please enter your email address.