DE
Sehr geehrter Anwender
Mit dem Sievert PRO 95 Lötkolben haben Sie ein Produkt erworben,
das nach den gesetzlichen V
eine sichere und wirtschaftliche Handhabung beachten Sie bitte diese
Bedienungsanleitung.
Anwendung
Der Kolbenbrenner ist speziell für Weichlötarbeiten konzipiert. Beachten
Sie, dass eine nicht bestimmungsgemäße V
gefährdet und Schäden am Gerät hervorrufen kann.
Sicherheitshinweise
Achtung! Brennervorderteil (5), Kolbenhalter (6), (7), (8) oder
andere Einsätze erreichen im Einsatz sehr hohe T
V
Achten Sie darauf, dass alle
Beschädigte Schläuche sofort ersetzen. Beschädigungen am
sofort reparieren lassen. Während des Betriebes entstehen hohe
T
Berühren der Kupferspitze bzw
zu Brandverletzungen führen kann. Brenner nie unbeaufsichtigt
brennen lassen. Bei V
V
der Berufsgenossenschaften (z.B. Flüssiggas auf Baustellen,
Schriftenreihe der BAU-BG), sowie das Regelwerk des DVGW und alle
länderspezifischen Regeln, V
Pflege und Wartung
Der PRO 95 Lötkolben ist wartungsfrei. Es sollte jedoch beachtet werden,
dass V
Gerätes beeinträchtigen können.
Reparaturen
Reparaturen dürfen nur vom Hersteller oder autorisierten
Reparaturwerkstätten durchgeführt werden. Bei eigenmächtiger Reparatur
gefährden Sie Ihre Sicherheit, weiterhin erlischt der Garantie- und
Haftungsanspruch gegenüber dem Hersteller
Anschluss Propan-Hochdruckschlauch
Propan-Hochdruckschlauch am
anschließen;
Achtung! Nur geeignete Gabelschlüssel verwenden, Rohrzangen
beschädigen die 6-Kant-Mutter – Unfallgefahr!
Brenngas/Druck
Gasflaschenventil öffnen. Druckminderer – sofern nicht fest eingestellt
– auf den erforderlichen
Zündvorgang
Luftschieber (2) einen geringen Spalt öffnen, Handrad zur Gasregulierung
(1) so weit öffnen, bis Gas ausströmt. Brenner an der Mündung des
Brenneinsatzes zünden. V
für Hände! Sicherheitsabstand halten! Flamme nicht auf Personen und
Gegenstände richten!
Arbeitsflamme
Je nach Einsatzbedingung muss zwischen einer weichen (Luftmangel)
bzw
indem das V
Luftschieber (2) und Gasregulierung (1) verändert wird.
Arbeitsunterbrechung
Bei
das Handrad (1) zu schließen.
Arbeitsende
Bei Beendigung oder
schließen; die Flamme erlischt langsam. Damit wird die Einstellung der
Arbeitsflamme nicht verändert und der Brenner und Brenngasschlauch
druckentlastet. Danach Handrad schließen.
T
Propan-Kolbenbrenner Griffstück
Nenndruck P = 1,5 - 2 bar
Nenndrucksdurchgangsleistung
Störungen
Wirkung:
Brenner brennt nur noch mit weicher Flamme
Ursache:
Flasche leer oder Flaschen-T
Abhilfe:
Flasche mit Flüssiggas nach DIN 51622 füllen lassen. Flasche in warmen
Wasserbad erwärmen
Wirkung:
Flamme spuckt
Ursache:
Flasche ist z.B. umgefallen und flüssiges Propan gelangt zum Brenner
Abhilfe:
Flasche senkrecht stellen, Flaschenventil schließen und Schlauch leer
brennen
Produktänderungen vorbehalten. Bei unsachgemäßer Handhabung wird
keine Haftung vom Hersteller übernommen.
BEDIENUNGSANLEITUNG - SIEVERT PRO 95 TIT
Art no: 770361 - M10x1 LH (Titanium) Art no: 770341 - M10x1 LH
Art no: 770360 - BSP 3/8”LH (T Art no: 770370 - BSP
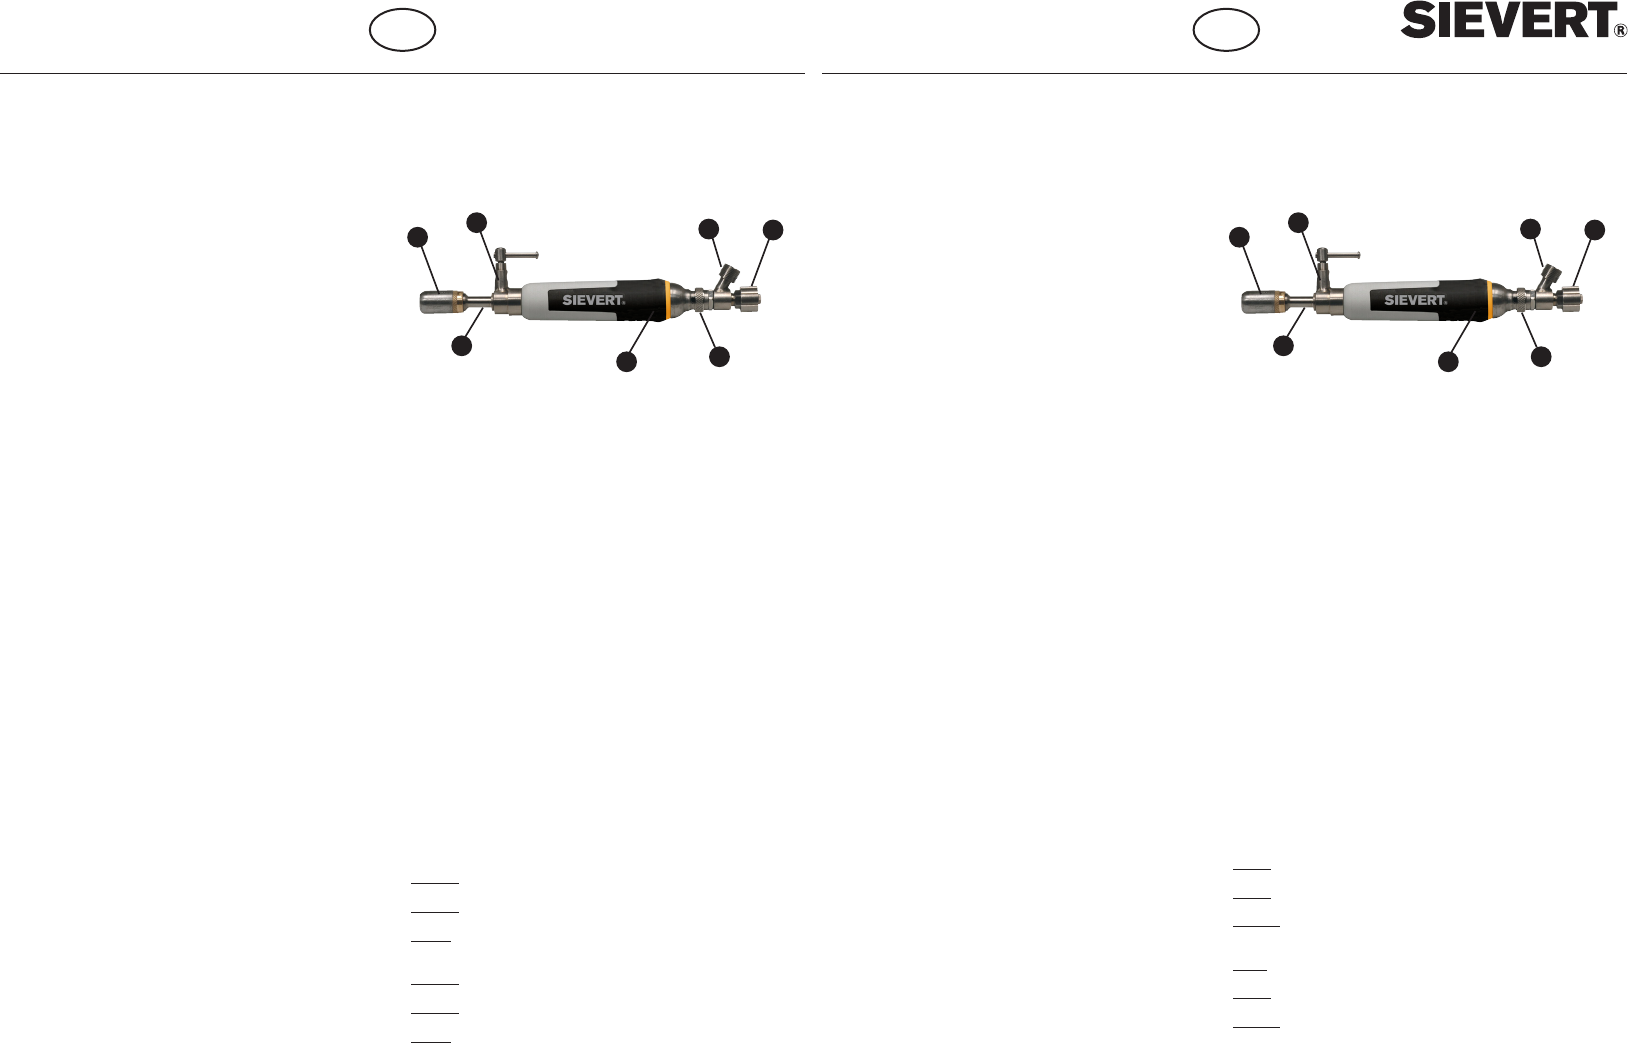
Für Holzhand griff mit Kolbenhalter
ohne Kupferkolben und Windschutz
1. Handrad zur Gasregulierung
2. Luftschieber zum Einstellen einer weichen oder harten Flamme
3. Anschlussstutzen für Propan-Hochdruckschlauch
mit M10x1LH oder G 3/8 LH
4. Handgriff
5. Kolbenhalter
6. Brennerdüse
7. Brennerhülse
1
2
6
5
4
7
3
GB
INSTRUCTIONS FOR USE - SIEVERT PRO 95 TIT
Art no: 770361 - M10x1 LH (titanium) Art no: 770341 - M10x1 LH
Art no: 770360 - BSP 3/8”LH (titanium) Art no: 770370 - BSP 3/8”LH
For handle with soldering bit holder
without soldering bit and wind screen
1. Knob for gas regulation
2. Air regulator for adjustment between hard & soft flame
3. Connection for propane high pressure hose
with BSP 3/8”LH or M10x1LH thread
4. Handle
5. Copper bit holding device
6. Burner nozzle
7. Burner cover
1
2
6
5
4
7
3
Dear user
With the Sievert Pro 95 handle with soldering bit holder you have bought
a product which has been manufactured and tested according to the legal
descriptions. Please observe these operating instructions for safe and
economical handling.
Application
The soldering torch is especially designed for soldering work. Please
take into consideration that in case of misuse you risk your safety and the
handle can be damaged.
Safety instructions
Attention! With articles (5) and (7) see above picture or other inserts
you reach very high temperatures. Danger of burning! Please do not
touch!
Please pay attention that all connections are installed gastight.
Damaged hoses have to be replaced immediately
unit have to be repaired immediately
temperatures at working unit. Please pay attention that the touch of the
copper bit respectively holder
injuries.
Do not leave the burner unattended in operation. In case of application
of fluid gas the prescriptions as DIN-EN-ISO-Norms, accident prevention
prescriptions of the “Berufsgenossenschaften” (for example fluid gas
at site instructions of BAU-BG), as well as the DVGW standard and all
special country instructions, prescriptions and laws have to be observed.
Maintenance
No maintenance is required for the soldering bit holder
attention that in case of dirt the function of the unit can be influenced.
Repair
Repairs may be performed may only be carried out by the manufacturer or
authorized repair workshops. If you repair the unit yourself you endanger
your safety
manufacturer becomes invalid.
Connection Propane high pressure hose
Propane high pressure hoses at connection thread (3) have to be
connected with a wrench; connection threads for burner gases have left
hand threads.
Attention! Only use suitable spanner
hexagon nut. Danger of accident.
Burning gas pressure
Open gas cylinder valve. Set pressure reducer – in case not adjusted fix
– to the required working pressure up to max. 1,5 bar
Ignition
Open the air regulator (2) slightly
wide enough until gas flows out. Ignite torch at the mouth of the burner
Attention! Danger of burning. Protect hands because of heat. Keep safety
distance. Please do not focus the flame on persons and equipment.
Working flame
According to operation conditions you have to regulate between a soft (air
deficiency) respectively a hard (air surplus) working flame by means of
changing the proportion fluid gas to sucked air with air regulator (2) and
knob (1).
Interruption of work
In case of interruption of work, the gas flow has to be closed by the knob
(1) for safety reasons.
End of work
At the end of work or during interruption it is advisable to close the bottle
valve; the flame will extinguish slowly
flame will therefore not be changed; the burner and the burning gas hose
will be reduced of pressure. Hand wheel should be closed afterwards.
T
Propane torch handle
Nomination pressure: P = 1,5 bar
Nomination pressure flow through capacity
Disturbances
Effect:
Burner only burns with soft flame.
Cause:
Empty bottle or temperature of bottle too low
Solution:
Bottle has to be filled with liquid gas according to DIN 51622. The bottle
has to be heated up in a warm water bath.
Effect:
Flame spits
Cause:
Bottle has fallen and the liquid propane reaches the burner
Solution:
Install bottle vertically
We reserve the right for production changes. In case of improper use the
manufacturer does not take over any liability
52686/0