797019
1
Zoom out
Zoom in
Previous page
1/2
Next page
1
89111213
161718
20212223
10
2 3 4 5
14
19
15 14
6 7
RDS
A B C
I
H
G
D
E
F
a
b
c
d
e
f
g
h
i
j
k
l
v
u
t
s
r
q
p
o
n
m
The Bluetooth® word mark and logos are registered trademarks owned by
Bluetooth SIG, Inc. and any use of such marks by SANGEAN ELECTRONICS
INC. is under license.
Important safety instructions
For United States:
Cautions to the user
The changes or modications not expressly approved by the party responsible for
compliance could void the user’s authority to operate the equipment.
RF exposure statements
IMPORTANT NOTE:
To comply with the FCC RF exposure compliance requirements, the antenna (s)
used for this transmitter must be installed to provide a separation distance of at
least 20cm (8 inches) from all persons and must not be colocated or operating in
conjunction with any other antenna or transmitter. No change to the antenna or
the device is permitted. Any change to the antenna or the device could result in
the device exceeding the RF exposure requirements and void user’s authority to
operate the device.
Note:
This equipment has been tested and found to comply with the limits for a Class B
digital device, pursuant to part 15 of the FCC Rules.
These limits are designed to provide reasonable protection against harmful
interference in a residential installation. This equipment generates, uses and
can radiate radio frequency energy and, if not installed and used in accordance
with the instructions, may cause harmful interference to radio communications.
However, there is no guaranty that interference will not occur in a particular
installation. If this equipment does cause harmful interference to radio or television
reception, which can be determined by turning the equipment off and on, the user
is encouraged to try to correct the interference by one or more of the following
measures:
Reorient or relocate the receiving antenna.
Increase the separation between the equipment and receiver.
Connect the equipment into an outlet on a circuit different from that to which the
receiver is connected.
Consult the dealer or an experienced radio / TV technician for help.
1
2 3
6 7 8 9
CAUTION:
These servicing instructions are for use by qualied service personnel only. To
reduce the risk of the electric shock, do not perform any servicing other than
that contained in the operating instructions unless you are qualied to so.
VERY IMPORTANT PLEASE READ
Sangean suggest that you keep your AC Adapter at least 12 inches away from
the radio while listening to the AM Band.
Your Sangean Radio is powered by an AC adapter which is a “switching” or
“switch-mode” type. The DOE (Department Of Energy) has a Federal mandate;
requiring all manufactures to use this type of power supply. This newer power
saving technology has the unfortunate side effect of causing interference to the
AM radio band.
Therefore, we recommend that customers keep at least a 1 foot distance
between the AC adapter and the radio. This interference will not affect the FM
Band. If you have any questions please contact customer service at (888)726-
4326, (562)941-9900 or service@sangean.com
If an AC adapter isn’t included in this model and if you wish to purchase an AC
Adapter separately, please refer to the specications for the AC Adapter stated
on the nal page of the manual, or please contact Sangean for the correct AC
Adapter and specications.
To learn more about the DOE mandate please visit http://www1.eere.energy.
gov/ buildings/appliance_standards/product.aspx/productid/23
Please note not all AC adapters are alike.
The AC adapter that is included with this radio is designed to be used
exclusively with this device. Do not use an AC adapter that differs from the
specications on the AC adapter that is included.
If an AC adapter is NOT included with your radio and in order not to damage
the unit and void your warranty, specications for the AC Adapter are stated
on the final page of the manual, or please contact Sangean for the correct
AC Adapter and specications. For customers in the US and Canada, please
call 562-941-9900 or 888-726-4326. For all other areas, please contact us via
contact@sangean.com.
Do not use an AC adapter that does not meet the correct specications.
Cautions
Do not allow this radio to be exposed to water, steam or
sand. Do not leave your radio where excessive heat
could cause damage such as in a parked car where the
heat from the sun can build up even though the outside
temperature may not seem too high.
Your radio should not be exposed to dripping or splashing water and that no objects
lled with liquids, such as vases, shall be placed on the radio.
It is recommended to operate the product such that there is a minimum distance (4”
recommended) to adjacent objects in order to ensure good ventilation.
The ventilation of the product should not be restricted by covering it or its ventilation
openings with items such as newspapers, tablecloths, curtains etc.
No open ame sources such as lighted candles should be placed on the product.
It is recommended to avoid using or storing the product at extr eme temperatures.
Avoid leaving the unit in cars, on window sills or in direct sunlight etc.
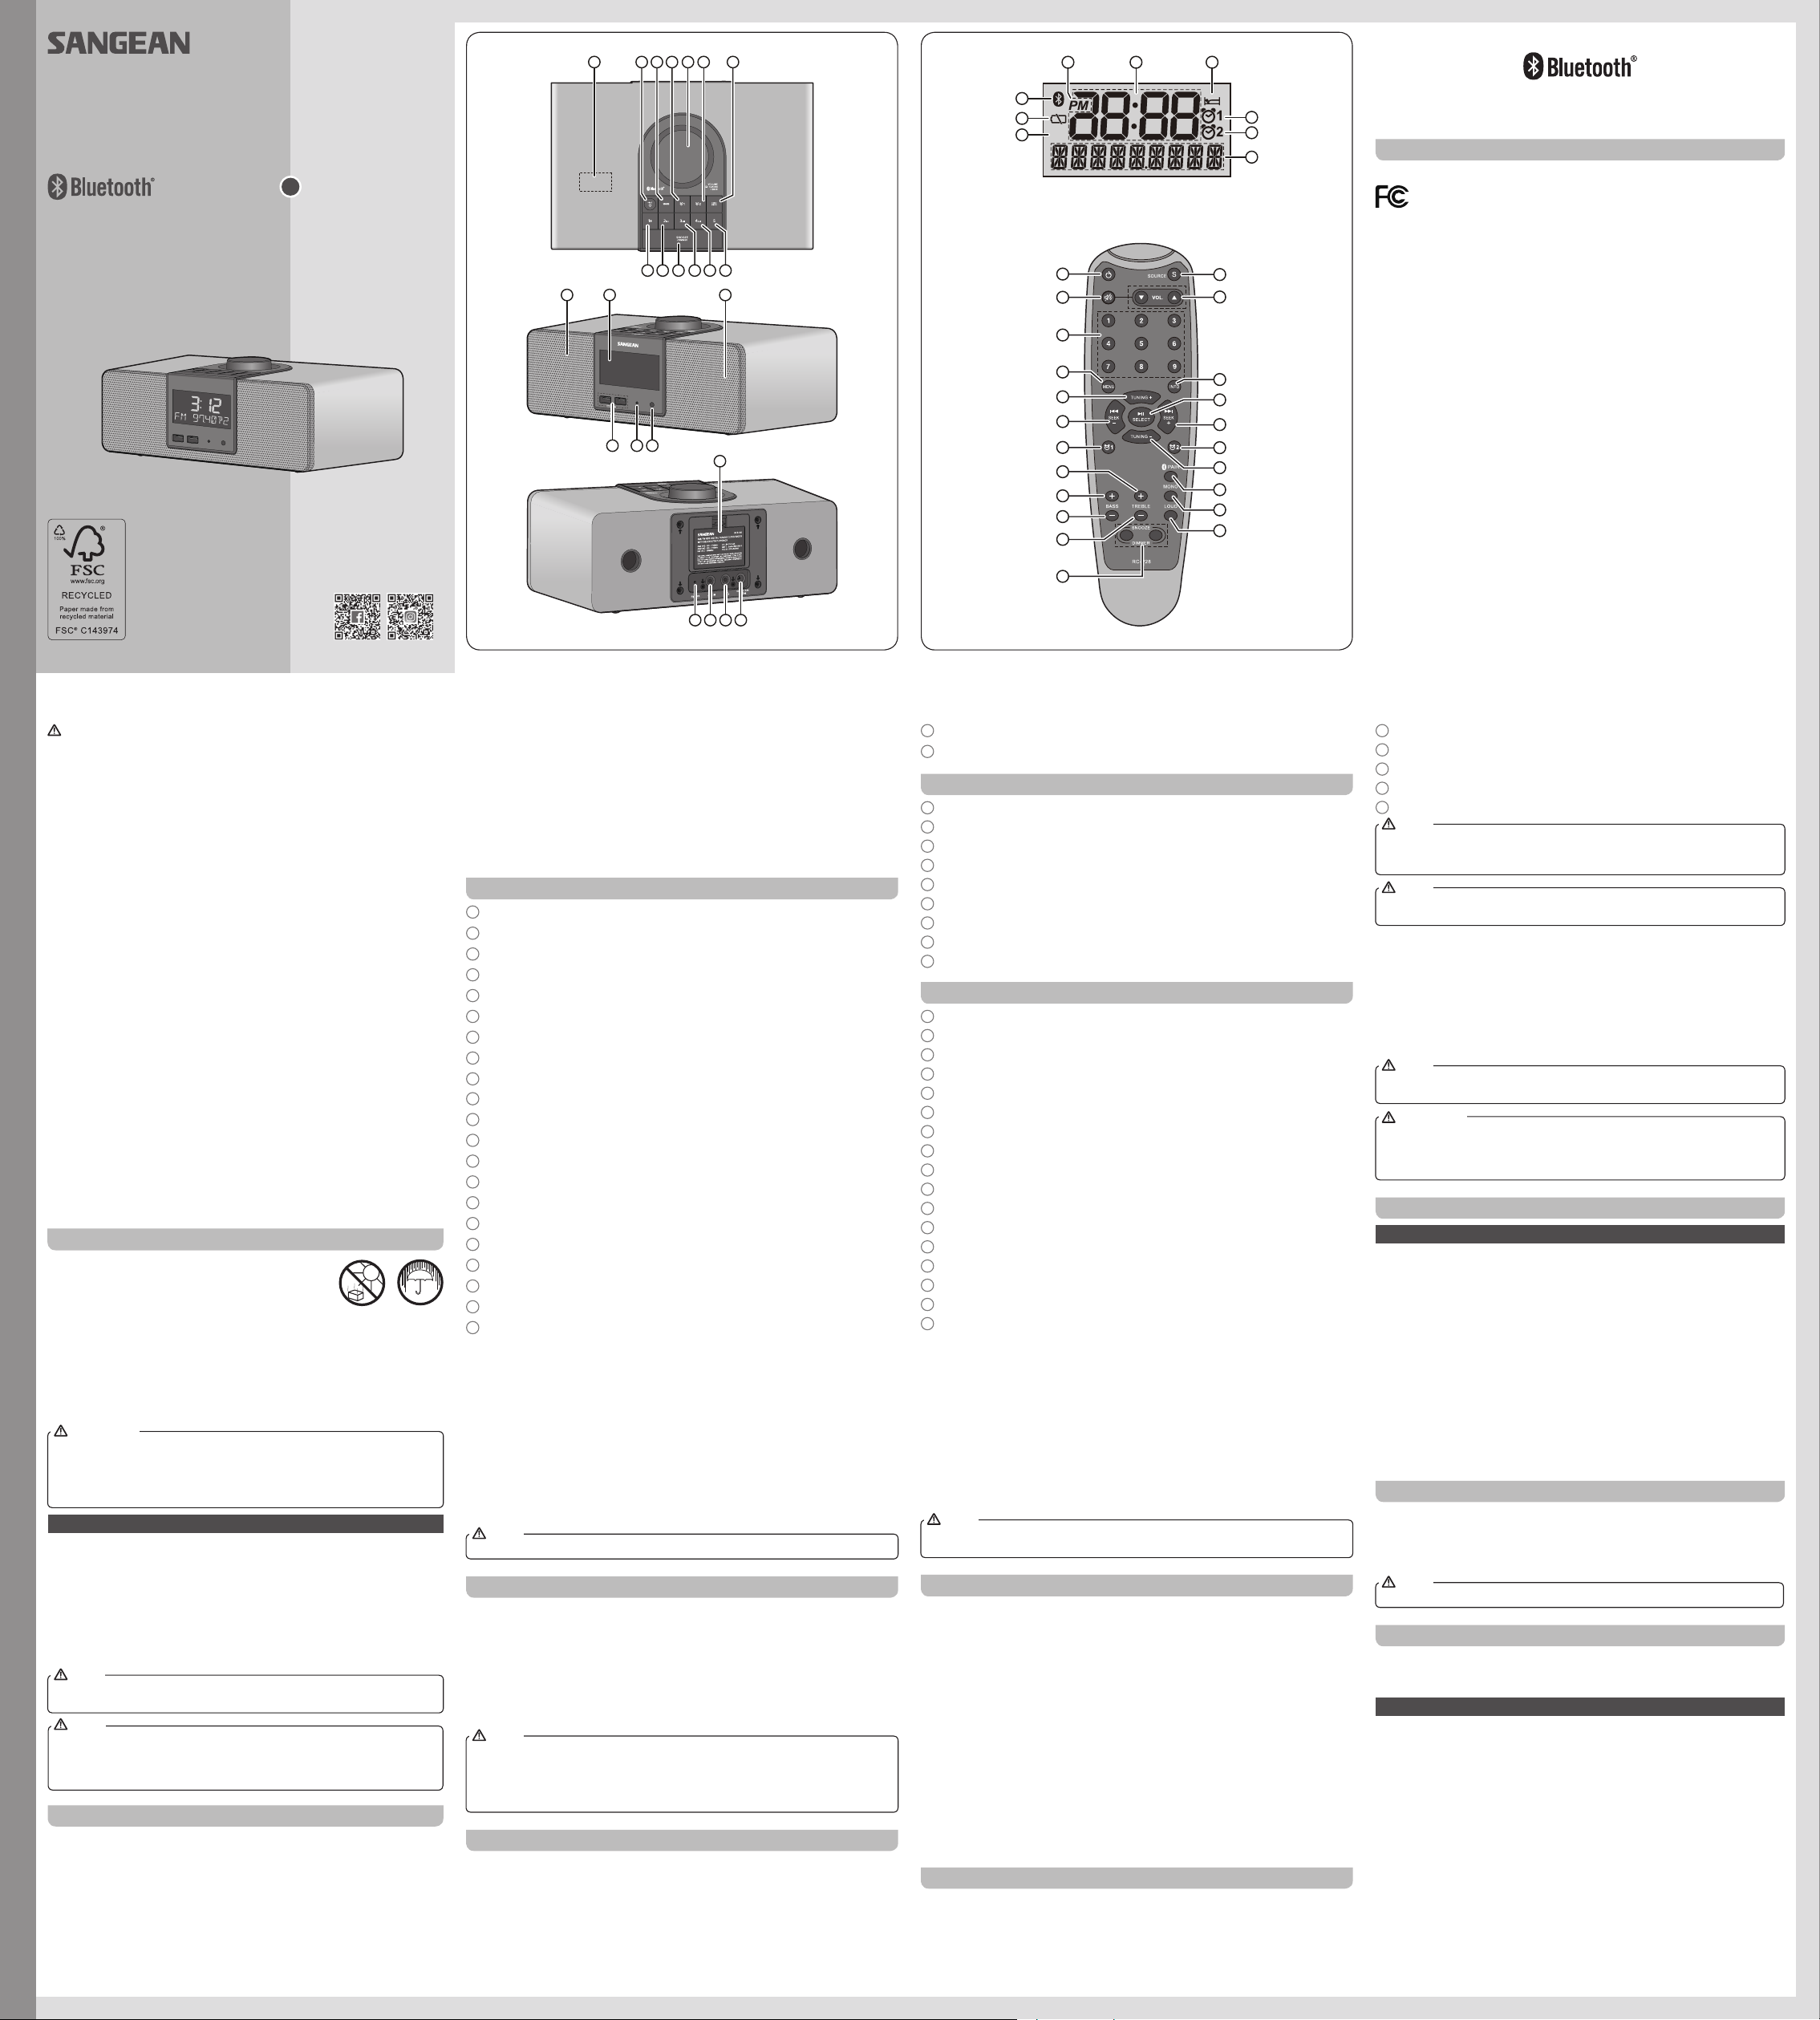
Controls
1
NFC detection area
2
Standby (Main Power) button / Sleep timer button
3
Source button
4
Alarm 1 button
5
Volume / Tuning control / Seek / Select button
6
Alarm 2 button
7
Info / Menu button
8
Preset 5 button
9
Preset 4 / Next track / Fast-forward button
10 Preset 3 / Play / Pause button
11 Snooze / dimmer button
12 Preset 2 / Previous track / Rewind button
13 Preset 1 / Bluetooth pairing button
14 Speaker
15 LCD display
16 Remote control sensor
17 Dimmer sensor
18 USB-L and USB-R sockets for iPhone / Smartphone charging
19 Backup battery compartment
20 DC IN socket
21 Headphone socket
4 5
22 Auxiliary input socket
23 FM wire antenna
Display icons
A
PM indicator
B
Time display
C Sleep timer icon
D Alarm 1 icon
E Alarm 2 icon
F Frequency / information for station display
G RDS indicator
H Backup battery capacity indicator
I Bluetooth icon
Remote control
a Standby button (Main Power)
b Mute button
c Preset button
d Menu button
e Tuning up button
f Seek down button / Previous track / Rewind button
g Alarm 1 button
h Treble up button
i Bass up button
j Bass down button
k Treble down button
l Snooze button / Dimmer button
m Loudness button
n Mono / Stereo button
o Bluetooth pairing button
p Tuning down button
q Alarm 2 button
r
Seek up button / Next track / Fast-forward button
s Select button / Play / Pause button
t Info button
u Volume button
v Source button
NOTE
For the sake of clarity, the instructions for the use of the controls throughout this
instruction manual show the buttons on the radio. The buttons on the remote
control can be used if you prefer.
NOTE
The operations described below for the radio are the same as the operations for
the remote control.
1. Rotating the Tuning control knob of the radio is the same as pressing the
Tuning Up or Down buttons on the remote control.
2. Pressing the Tuning control button of the radio is the same as pressing and
releasing the Select button on the remote control.
3. Rotating the Volume Knob of the radio is the same as pressing the Volume Up
or Down buttons on the remote control.
4. Pressing and holding the Info / Menu button of the radio is the same as pressing
and releasing the Menu button on the remote control.
NOTE
If the remote is not to be used for an extended period of time it is recommended
that the batteries be removed.
IMPORTANT
Batteries should not be exposed to excessive heat such as sunshine, fire or
the like. After use, disposable batteries should be taken to a suitable recycling
center. On no account should batteries be disposed of by incineration. Do not
leave batteries within reach of young children, they can be a choking hazard.
Power your radio
Using the AC power adaptor
The AC power adaptor required for this unit should be 9 volts DC at 2.5A center
pin positive.
Insert the adaptor plug into the DC socket on the rear of the radio.
Plug the adaptor into a standard AC outlet. If no time is displayed, the screen will
show “- : - -”.
Whenever the adaptor is used, the batteries are automatically disconnected. The
AC adaptor should be disconnected from the AC outlet when not in use for long
periods of time.
IMPORTANT
The AC adaptor is used as the means of connecting the radio to your
power supply. The AC Adapter used for the radio must remain accessible
during normal use. In order to disconnect the radio from the power supply
completely, the AC Adaptor should be removed from the power supply outlet
completely.
Backup battery operation
1. Remove the battery cover on the rear of the unit.
2. Insert two UM-3 (AA size) batteries into the spaces in the compartment.
3. Take care to ensure all batteries are inserted with correct polarity as shown
inside the compartment. Replace the battery cover.
4. When the low battery capacity indicator shows on the display please replace
the batteries immediately.
5. When the radio is used as a clock radio or as an alarm, always keep the
batteries inserted.
NOTE
Batteries will only back up preset memories and clock functions during a
power outage and is not intended for normal radio operation.
Do not use a mix of rechargeable and non-rechargeable batteries.
Do not use batteries that have a different mAh capacity.
Do not use damaged, deformed or leaking batteries.
NOTE
Search tuning AM / FM
1. Press the Standby (main power) button to switch on your radio.
2. Press the Source button as needed until the AM or FM band is selected.
3. Press and hold the Tuning control button to carry out an auto-tune. Your
radio will scan up the AM / FM band from the currently displayed frequency
and will stop scanning automatically when it finds a station of sufficient
strength.
4. Alternatively, to scan down in frequency, first press the Tuning control
button to switch to the tuning control mode and the “FM” or “AM” will ash
on the display. Rotate the Tuning control knob in an anti-clockwise direction
and then press and hold the Tuning control button. Your radio will scan in
a downwards direction and stop automatically when it nds a station of sufcient
strength.
5. After a few seconds the display will update. The display will show the frequency
of the signal found. If the signal is strong enough and there is RDS data present
then the radio will display the station name. When the end of the frequency band is
reached your radio will recommence tuning from the opposite end of the frequency
band.
6. To adjust the volume, press the Tuning control button again to switch to the volume
control mode. Rotate the Volume knob to adjust the sound level as desired.
NOTE
While adjusting the volume, make sure the FM / AM is not ashing on the screen.
Manual tuning – AM / FM
1. Press the Standby (main power) button to switch on your radio.
2. Press and release the Source button to select AM or FM radio mode.
3. Press the Tuning control button to switch to the tuning control mode and the “FM”
or “AM” will ash on the display. Rotate the Tuning control knob to tune to a station.
The FM frequency will change in steps of 100kHz / 50kHz and AM frequency will
change in steps of 10kHz / 9kHz.
4. To adjust the volume, press the Tuning control button again to switch to the volume
control mode. Rotate the Volume knob to adjust the sound level as desired.
NOTE
If your radio has any interference on the AM band it might be the AC adaptor, please
move your radio away from the AC adaptor at least 12”. Your Radio is equipped with
a switching AC Adapter that is mandated by the Department of Energy (EOD) to save
energy. The unfortunate side effect of this mandate sometimes appears as noise on
the AM band.
Display modes – FM
Your radio has a range of display options for FM radio mode.
1. Repeatedly press and release the Info / Menu button to view the RDS information of
the station you are listening to.
a. Station name Displays the name of the station being listened to.
b. Program type Displays the type of station being listened to such as Pop, Classic,
News, etc.
c. Radio text Displays radio text messages such as news items etc.
d. Stereo / Mono Displays the radio broadcasting is in Stereo or Mono mode.
e. Year / Day Displays the year and day of the week according to the date setting
of your radio.
f. Da t e / Da y Displays the date and day of the week according to the date setting
of your radio.
g. Frequenc y Displays the frequency of the FM station you’re listening to.
NOTE
If no RDS information is available, the radio will be unable to display the station
name, scrolling text and program type information.
FM stereo (auto) / mono
If the FM radio station being listened to has a weak signal some hiss may be audible.
It is possible to reduce this hiss by forcing the radio to play the station in mono rather
than stereo.
1. Press and release the Standby (main power) button to switch on your radio.
2. Press the Source button as needed to select the FM radio mode display and tune to
the required FM station as previously described.
3. Press and hold the Info / Menu button until you hear a beep (then release the
button) to enter the menu setting.
4. Rotate the Tuning control knob until the FM AUTO / MONO setting shows on the
display. If the setting is Auto press the Tuning control button and rotate the Tuning
control knob to switch to Mono mode to reduce the hiss. Press and release the
Tuning control button to conrm the setting.
5. To return to Auto (Stereo) mode, press and hold the Info / Menu button to enter the
menu setting. Rotate the Tuning control knob until the "FM MONO" shows on the
display. Press and release the Tuning control button and rotate the Tuning control
knob to select AUTO. Press and release the Tuning control button to conrm the
setting.
Presetting stations in AM / FM mode
There are 5 preset stations each for AM and FM radio. They are used in the same way
for each frequency band.( Please note that 9 memory presets for each band can be
accessed via remote control.)
1. Press the Standby (main power) button to switch on your radio.
2. Press the Source button to select the desired frequency band. Tune to the required
radio station as previously described.
3. Press and hold the required Preset button until the display shows “P4” for
example after the frequency. The station will be stored using the preset number.
Repeat this procedure for the remaining presets as you wish.
4. Preset stations which have already been stored may be overwritten by following
the above procedure if required.
Recalling a preset in AM / FM mode
1. Press the Standby (main power) button to switch on your radio.
2. Select the required frequency band by pressing the Source button.
3. Momentarily press the required Preset button to have your radio tune to one of
the stations stored in the preset memory.
NOTE
The display will show “EMPTY” if no station has been stored to that preset.
Listening music via Bluetooth streaming
You need to pair your Bluetooth device with your RCR-40 before you can auto-link
to play / stream Bluetooth music through your RCR-40. Paring creates a ‘bond’ so
two devices can recognize each other.
PairingandplayingyourBluetoothdeviceforthersttime
1. With your radio switched on, press the Source button to select Bluetooth (BT)
function. “BT PAIRING” will appear on the display. Both “PAIRING” and the
Bluetooth icon will ash to show the radio is discoverable.
2. Activate Bluetooth on your device according to the device’s user manual to
link to the radio. Locate the Bluetooth device list and select the device named
“RCR-40” (With some Smartphone’s that are equipped with earlier versions
than BT2.1 Bluetooth device, you may need to input the pass code “0000”).
3. Once connected, there will be a conrmation tone sound and the display will
change to “BT LINKED”. The Bluetooth icon will remain illuminated. You can
simply select and play any music from your source device. The volume control
can be adjusted from your source device, or directly from the radio.
4. Use the controls on your Bluetooth-enabled device or on the radio to play /
pause and navigate tracks.
Note:
If 2 Bluetooth devices are pairing for the rst time, both must search for your
radio, it will show its availability on both devices. However, if one device links
with this unit rst, then the other Bluetooth device will not be found on the list.
If you take your source device out of range, the connection will be temporarily
3A81dW0S10GB0
AM / FM RDS Digital Tuning Clock Radio
With Bluetooth Playback
Operating instruction
RCR-40
GB
1


Need help? Post your question in this forum.

Forumrules


Report abuse

Libble takes abuse of its services very seriously. We're committed to dealing with such abuse according to the laws in your country of residence. When you submit a report, we'll investigate it and take the appropriate action. We'll get back to you only if we require additional details or have more information to share.

Product:

For example, Anti-Semitic content, racist content, or material that could result in a violent physical act.

For example, a credit card number, a personal identification number, or an unlisted home address. Note that email addresses and full names are not considered private information.

Forumrules

To achieve meaningful questions, we apply the following rules:

Register

Register getting emails for Sangean RCR-40 at:


You will receive an email to register for one or both of the options.


Get your user manual by e-mail

Enter your email address to receive the manual of Sangean RCR-40 in the language / languages: English as an attachment in your email.

The manual is 0.96 mb in size.


You will receive the manual in your email within minutes. If you have not received an email, then probably have entered the wrong email address or your mailbox is too full. In addition, it may be that your ISP may have a maximum size for emails to receive.

The manual is sent by email. Check your email

If you have not received an email with the manual within fifteen minutes, it may be that you have a entered a wrong email address or that your ISP has set a maximum size to receive email that is smaller than the size of the manual.

The email address you have provided is not correct.

Please check the email address and correct it.

Your question is posted on this page

Would you like to receive an email when new answers and questions are posted? Please enter your email address.


Info