Instructional icons
Note: notes, usage tips, or additional
information
→
Followed by: the order of options or menus
you must select to perform a step; for
example: In Menu mode, select Messages
→ Create message (represents Messages ,
followed by Create message )
[ ]
Square brackets: phone keys; for example:
[
] (represents the Power/End key)
< >
Angled brackets: softkeys that control
different functions at each screen; for
example: <Save > (represents the Save
softkey)
T
T
Press and hold [
].
Enter your PIN and press < OK > (if necessary).
When the setup wizard opens, customise your
phone as desired by following the screen.
If the battery remains fully discharged or removed
from the phone, the time and date will be reset.
T
Manage your SIM cards
Y
to use two SIM cards at the same time without changing
them. Learn to activate SIM cards and change the card
settings.
T
In Menu mode, select Settings → SIM cards
management.
Select Network and scroll left or right to a SIM
card.
Press < Change > to activate the card.
T
In Menu mode, select Settings → SIM cards
management.
Select SIM auto switch .
Press < Change > to activate the auto switch
feature.
Set the starting and ending time to use the SIM
card.
T
In Menu mode, select Settings → SIM cards
management.
Select Register card .
Select a SIM card.
Change the name and the icon of the card.
Press < Back >.
Repeat steps 3-5 for another SIM card.
Access menus
T
In Idle mode, press < Menu > to access Menu mode.
Y
Menu mode depending on your region or service
provider
Use the Navigation key to scroll to a menu or
option.
Press < Select > or the Confirm key to confirm the
highlighted option.
Press < Back > to move up one level; Press [
] to
return to Idle mode.
When you access a menu requiring the PIN2, you •
must enter the PIN2 supplied with the SIM card.
For details, contact your service provider
Samsung is not responsible for any loss of •
passwords or private information or other
damages caused by illegal software.
Make a call
In Idle mode, enter an area code and a phone
number
Press [
] to dial the number
T
].
Change your ringtone
In Menu mode, select Settings → Profiles .
Scroll to the profile you are using.
If you are using the silent, meeting, or offline profile,
you are not allowed to change the ringtone.
Press < Options > → Edit .
Select Call ringtone .
Select a memory location (if necessary).
Select a ringtone.
T
Call a recently dialled number
In Idle mode, press [ ].
Scroll left or right to a call type.
Scroll up or down to a number or name.
Press the Confirm key to view details of the call or 4.
[
] to dial the number
Charge the battery
If the battery is completely discharged, you cannot
turn on the phone, even with the travel adapter
connected.
few minutes before you try to turn on the phone.
Plug a travel adapter When charging is
finished, unplug
the travel adapter
Do not remove the battery before removing the •
travel adapter
the phone.
T•
not in use. The travel adapter does not have
a power switch, so you must unplug the travel
adapter from the electrical socket when not in use
to avoid wasting power
close to the electrical socket while charging.
Enter text
T
Press and hold [• ] to switch between T9 and
modes. Depending on your region, you may be able to
access an input mode for your specific language.
Press [•
] to change case or switch to Number mode.
Press [•
] to switch to Symbol mode.
Press and hold [•
] to select an input mode or change
the input language.
T9 mode
Press appropriate alphanumeric keys to enter an
entire word.
When the word displays correctly 0 ] to
insert a space. If the correct word does not display
press the Navigation key up or down to select an
alternative word.
This feature may be unavailable depending on the
selected input language.
ABC mode
Press an appropriate alphanumeric key until the
character you want appears on the display
Number mode
Press an appropriate alphanumeric key to enter a
number
Symbol mode
Press an appropriate alphanumeric key to enter a
symbol.
T
T•
T• Clear>. T
delete words quicklyClear >.
T• 0 ].
T• 1]
repeatedly
T• 0 ] three times.
Add a new contact
The memory location to save new contacts may
be preset depending on your service provider
change the memory location, in Menu mode, select
Contacts → Management → Save new contacts
to → a memory location.
In Idle mode, enter a phone number and press
<Options>.
Select Create contact .
Select a memory location (if necessary).
Select a number type (if necessary).
Enter contact information.
Press the Confirm key to add the contact to
memory
Send and view messages
T
In Menu mode, select Messages → Create
message.
Enter a recipient number and scroll down.
Enter your message text.
See "Enter text."
Press the Confirm key to send the message.
Answer a call
When a call comes in, press [ ].
T
].
Adjust the volume
T
In Menu mode, select Settings → Profiles .
Scroll to the profile you are using.
If you are using the silent or offline profile, you are
not allowed to adjust the volume of the ringtone.
Press < Options > → Edit .
Select V.
Scroll to Call alert .
Scroll left or right to adjust the volume level and
press <Save >.
T
While a call is in progress, press the Navigation key up
or down to adjust the volume.
In noisy environments, you may have difficulty
hearing some calls while using the speakerphone
feature. For better audio performance, use the
normal phone mode.
T
In Menu mode, select Messages → Inbox .
Select a text message.
Make fake calls
Y
out of meetings or unwanted conversations.
T
In Menu mode, select Settings → Applications → Call
→ Fake call → Fake call hot key → On .
T
In Idle mode, press and hold the Navigation key down.•
When the keys are locked, press the Navigation key •
down four times.
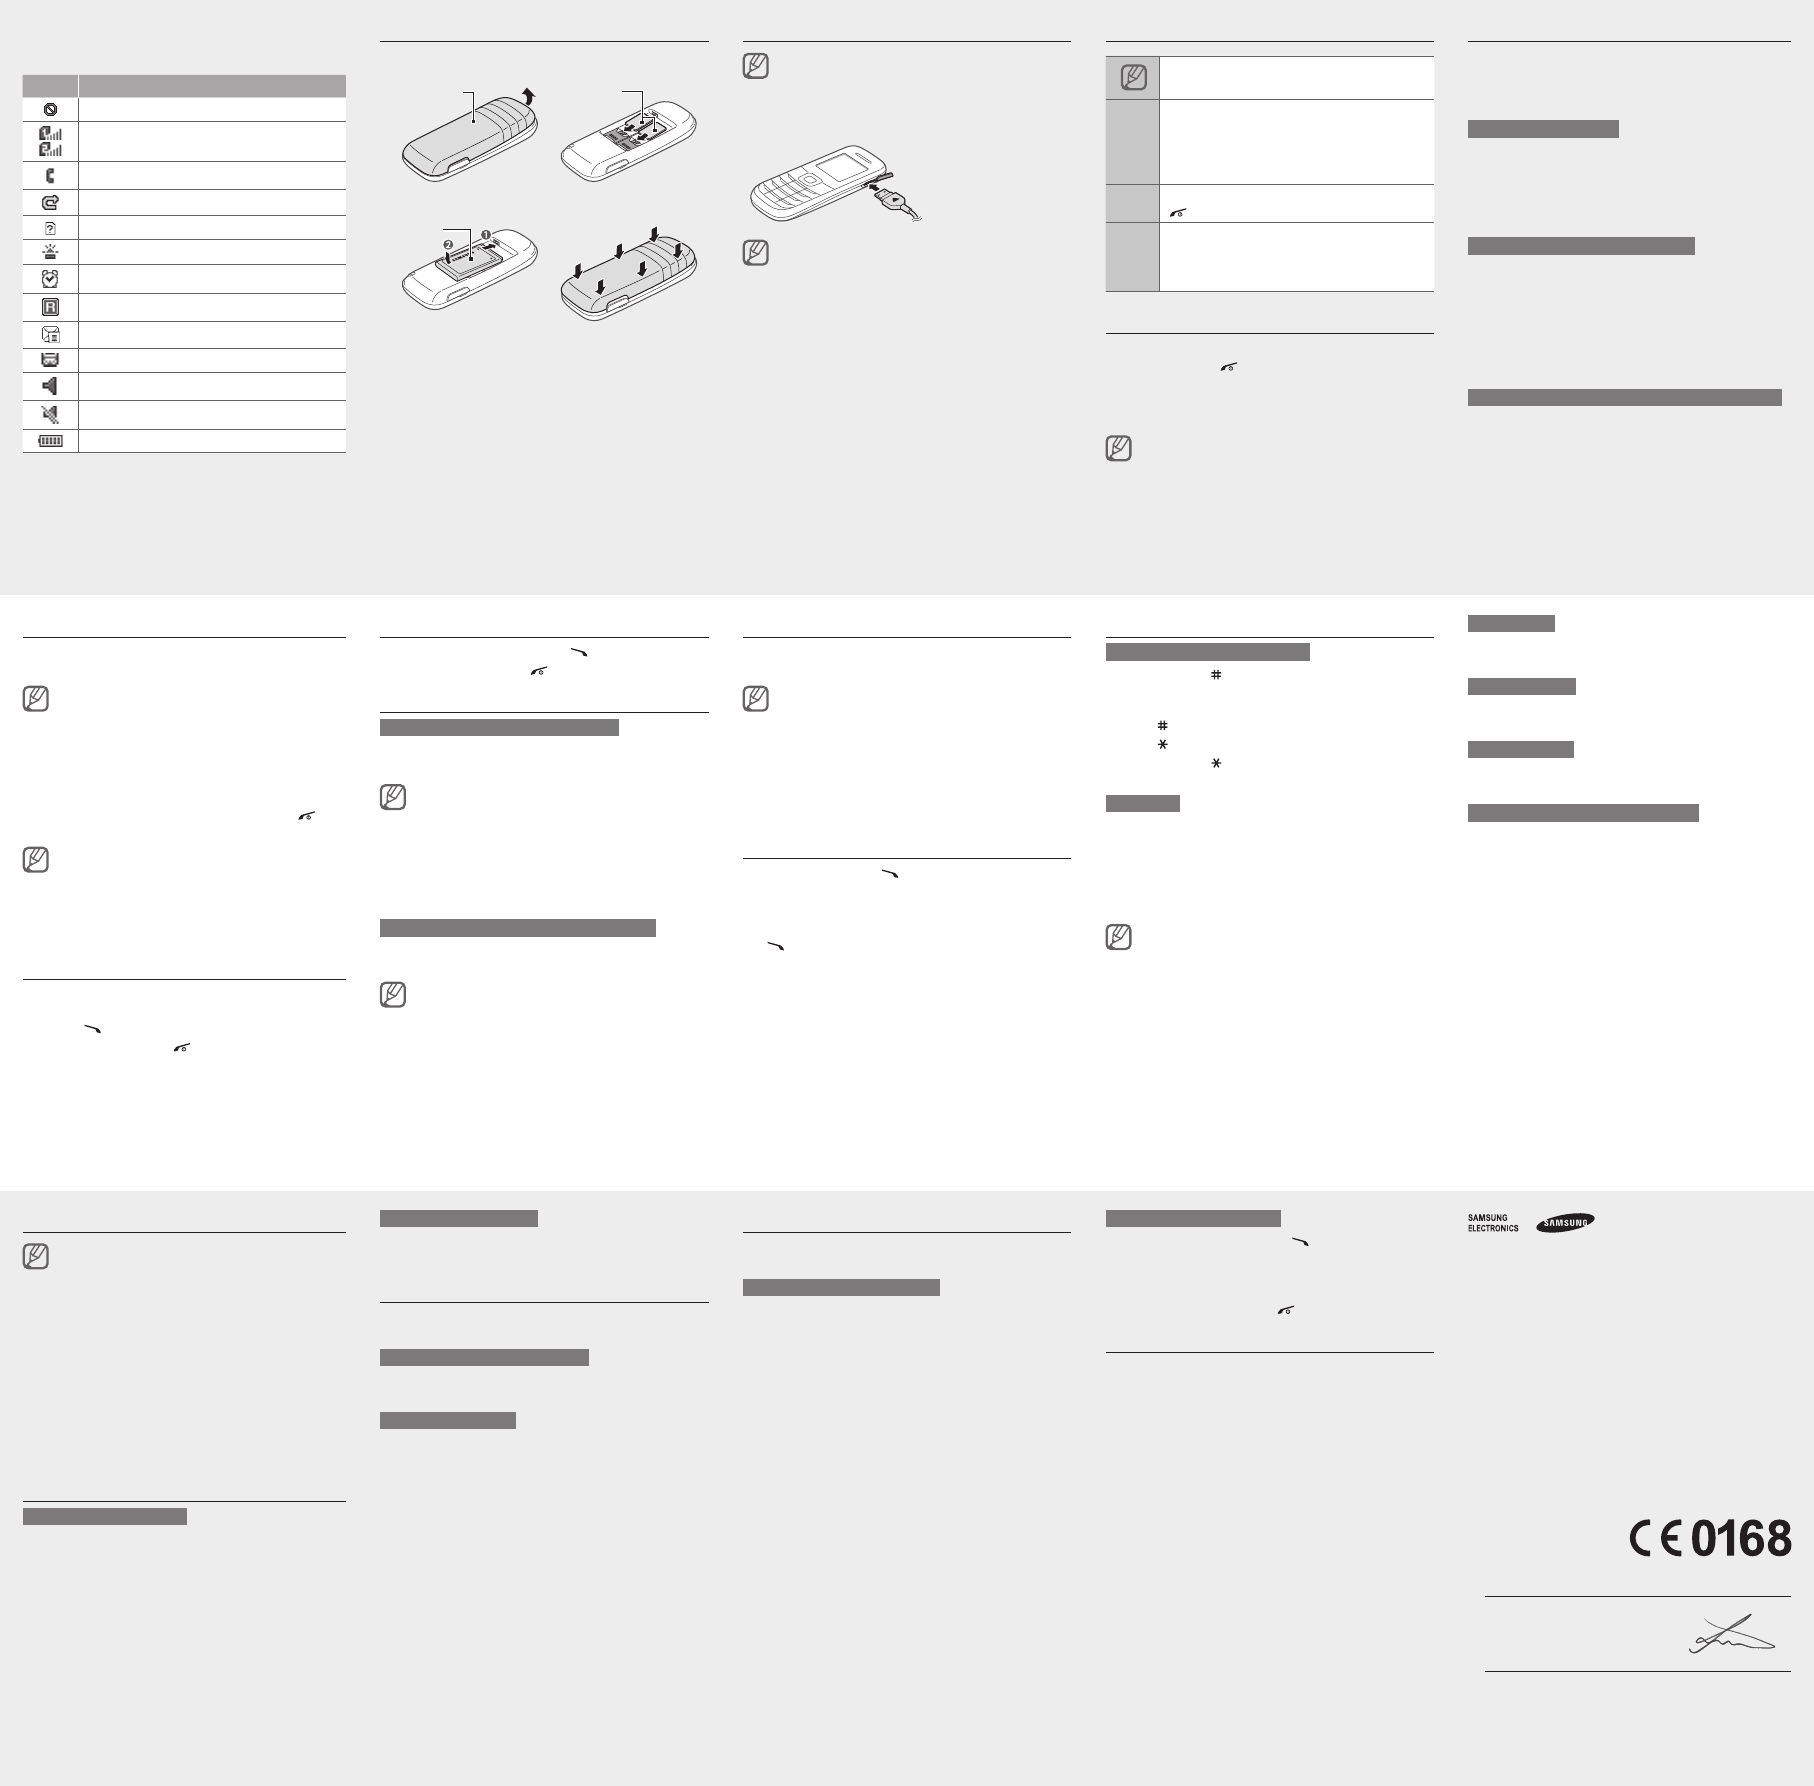
Install the SIM card and battery
Remove the back cover and battery and insert the
SIM card.
Insert the battery and replace the back cover
Declaration of Conformity (R&TTE)
We,
Samsung Electronics
declare under our sole responsibility that the product
GSM Mobile Phone : GT
to which this declaration relates, is in conformity with the following standards and/or
other normative documents.
SAFETY EN 60950-1 : 2006 + A1 : 2010
SAR EN 50360 : 2001/AC2006
EN 62209-1 : 2006
EN 62209-2 : 2010
EN 6231
EMC EN 301 489-01 V1.8.1 (04-2008)
EN 301 489-07 V1.3.1 (1
RADIO EN 301 51
We hereby declare that [all essential radio test suites have been carried out and that]
the above named product is in conformity to all the essential requirements of Directive
1999/5/EC.
The conformity assessment procedure referred to in Article 10 and detailed in
of Directive 1999/5/EC has been followed with the involvement of the following Notified
Body(ies):
BABT
Churchfield Road,
Walton-on-Thames,
Surrey
Identification mark: 0168
The technical documentation kept at :
Samsung Electronics QA Lab.
which will be made available upon request.
(Representative in the EU)
Samsung Electronics Euro QA Lab.
Blackbushe Business Park, Saxony Way
Y
2012.06.28 Joong-Hoon Choi / Lab Manager
(place and date of issue) (name and signature of authorised person)
* It is not the address of Samsung Service Centre. For the address or the phone number of
Samsung Service Centre, see the warranty card or contact the retailer where you purchased
your product.
Icon Description
No signal
Signal strength
1
Call in progress
Call diverting activated
No SIM card
SOS message feature activated
Alarm activated
Roaming (outside of normal service area)
New text message (SMS)
New voice mail message
Normal profile activated
Silent profile activated
Battery power level
1.
setting.
Y
the top of the screen:
Activate and send an SOS message
In an emergency
family or friends for help.
T
In Menu mode, select Messages → Settings →
SOS messages → Sending options.
Scroll left or right to On .
Scroll down and press the Confirm key to open the
recipient list.
Press < Options > → Contact list to open your
contact list.
Y
list. Skip to step 7.
Select a contact.
Select a number (if necessary).
When you are finished selecting contacts, press the
Confirm key → Save to save the recipients.
Scroll down and set the number of times to repeat
the SOS message.
Press < Save > → <Ye >.
T
With the keys locked, press [ ] four times to send
an SOS message to preset numbers.
The phone switches to SOS mode and sends the
preset SOS message.
T
].
Activate the torch light
The torch light feature helps you see in dark places by
making the display and backlight as bright as possible.
In Idle mode, press and hold the Navigation key
up to activate the torch light mode. The torch light
automatically turns on.
TOff >. T
torch light mode, press <Back >.
T
power outlet
Back cover
SIM card
Battery