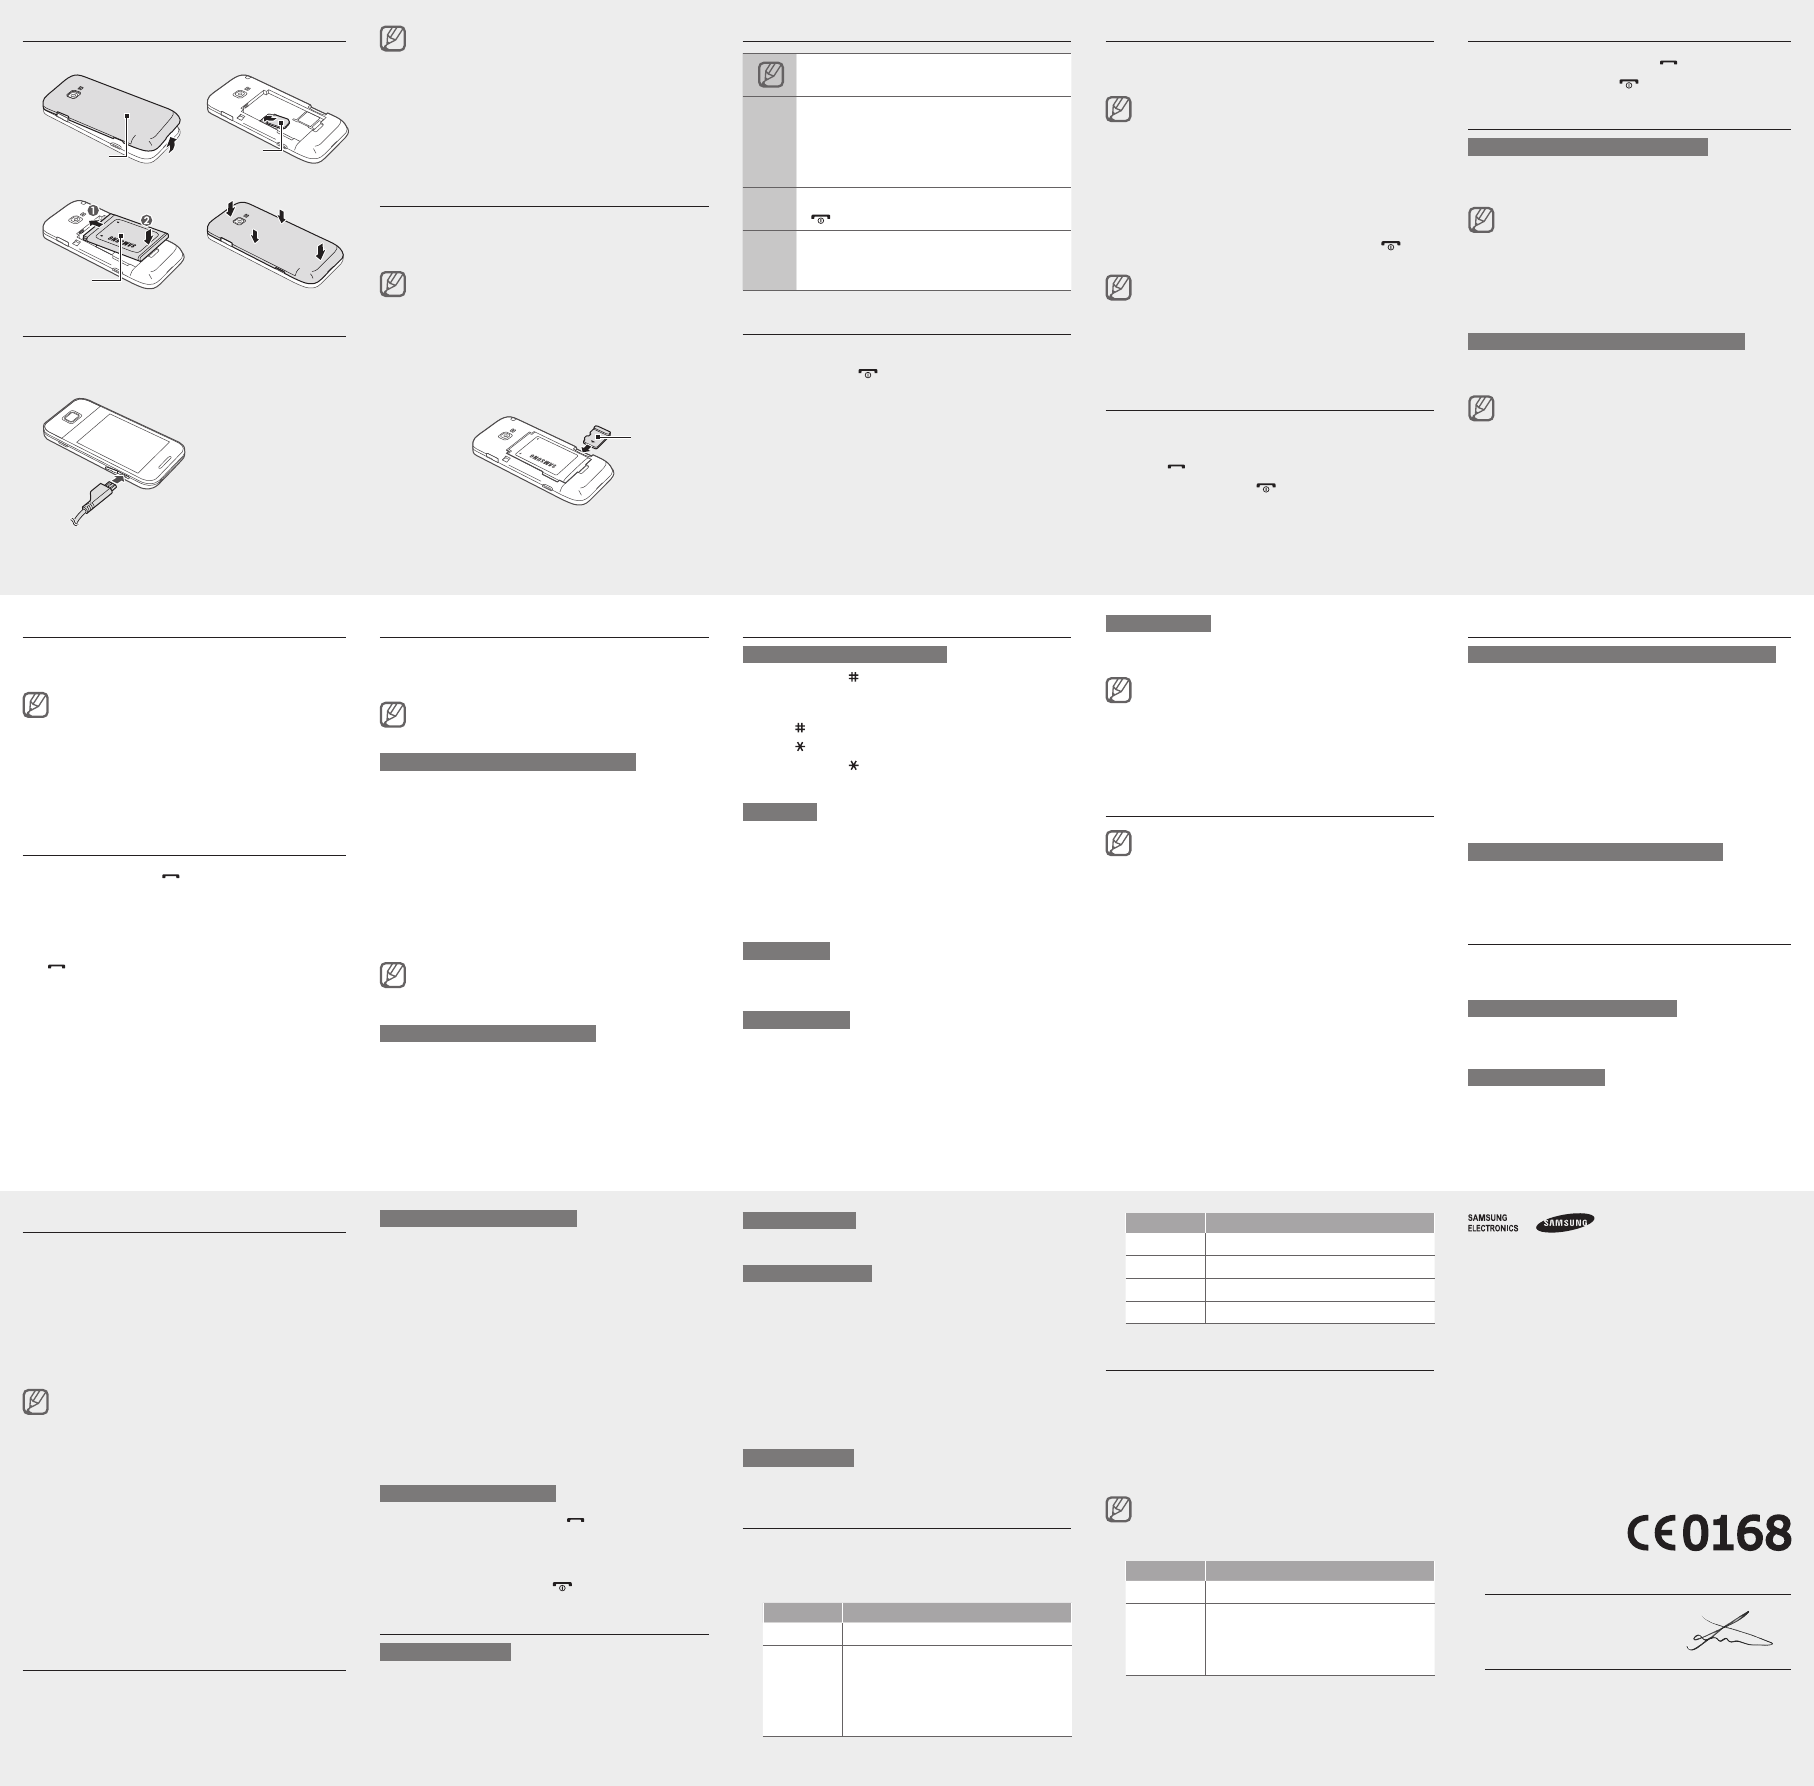
Install the SIM card and battery
Remove the back cover and insert the SIM card.
Insert the battery and replace the back cover
Charge the battery
Plug the supplied travel 1.
adapter into the multifunction
jack.
When charging is
nished,unplug
the travel adapter
Do not remove the battery from the phone before •
unpluggingthetraveladapterrst.Otherwise,the
phone may be damaged.
T•
not in use. The travel adapter does not have
a power switch, so you must unplug the travel
adapter from the outlet to interrupt the power
supply
the socket when in use.
Insert a memory card (optional)
Y
memory cards up to 16 GB (depending on memory card
manufacturer and type).
Formatting the memory card on a PC may cause •
incompatibility with your phone. Format the
memory card only on the phone.
Frequent writing and erasing of data will shorten •
the life span of memory cards.
Remove the back cover
Insert a memory card with the gold-coloured
contacts facing down.
Push the memory card in the memory card slot until
it locks in place.
Replace the back cover
Instructional icons
Note: notes, usage tips, or additional
information
→
Followed by: the order of options or menus
you must select to perform a step; for
example: In Menu mode, select Messages
→ Create message (represents Messages ,
followed by Create message )
[ ]
Square brackets: phone keys; for example:
[
] (represents the Power/End key)
< >
Angled brackets: softkeys that control
different functions at each screen; for
example: <OK > (represents the OK softkey)
T
T
Press and hold [
].
Enter your PIN and press < OK > (if necessary).
T
Access menus
T
In Idle mode, press < Menu > to access Menu mode.
Y
Menu mode depending on your region or service
provider
When you are using the smart home screen, you •
cannotusetheConrmkeytoaccessMenumode.
Use the Navigation key to scroll to a menu or option.
Press < Select >, <Save>,ortheConrmkeyto
conrmthehighlightedoption.
Press < Back > to move up one level; Press [
] to
return to Idle mode.
When you access a menu requiring the PIN2, you •
must enter the PIN2 supplied by the SIM card.
For details, contact your service provider
Samsung is not responsible for any loss of •
passwords or private information or other
damages caused by illegal software.
Make a call
In Idle mode, enter an area code and a phone
number
Press [
] to dial the number
T
].
Answer a call
When a call comes in, press [ ].
T
].
Adjust the volume
T
In Menu mode, select Settings → Sound proles .
Scrolltotheproleyouareusing.2.
Ifyouareusingthesilentprole,youarenot
allowed to adjust the volume of the ringtone.
Press < Edit > → V.
Scroll to Call alert .
Scroll left or right to adjust the volume level and 5.
press <Save >.
T
While a call is in progress, press the Navigation key up
or down to adjust the volume.
Innoisyenvironments,youmayhavedifculty
hearing the calls while using the speakerphone
feature. For better audio performance, use the
normal phone mode.
Change your ringtone
In Menu mode, select Settings → Sound proles .
Scrolltotheproleyouareusing.2.
Ifyouareusingthesilentprole,youarenot
allowed to change the ringtone.
Press < Edit > → V.
Select a memory location (if necessary).
Select a ringtone.5.
T
Call a recently dialled number
In Idle mode, press [ ] to display a list of recent
numbers.
Scroll left or right to a call type.
Scroll up or down to a number or name.
PresstheConrmkeytoviewdetailsofthecallor 4.
[
] to dial the number
Use the smart home screen
The smart home screen allows you to access
applications, contacts, and calendar events or view the
clock from Idle mode.
When you are using the smart home screen, the
Navigation key does not work as shortcuts.
T
In Menu mode, select Settings → Display → Smart
home.
Press < Edit >.
Select the items to display on the smart home
screen.
For the shortcuts toolbar
the shortcuts as desired. Press <Options > → Edit
shortcuts.
Press < Options > → Save .
PresstheConrmkey
Y
In Menu mode, select Settings → Display → Smart
home and scroll left or right to a style you want.
T
Press the Navigation key to scroll through the items on
thesmarthomescreenandpresstheConrmkeyto
select an item.
Enter text
T
Press and hold [• ]toswitchbetweenT9and
modes. Depending on your region, you may be able to
accessaninputmodeforyourspeciclanguage.
Press [•
] to change case or switch to Number mode.
Press [•
] to switch to Symbol mode.
Press and hold [•
] to select an input mode or change
the input language.
T9 mode
Press the appropriate alphanumeric keys to enter an
entire word.
When the word displays correctly 0 ] to insert
a space. If the correct word does not display
the Navigation key up or down to select an alternate
word.
ABC mode
Press an appropriate alphanumeric key until the
character you want appears on the display
Number mode
Press an appropriate alphanumeric key to enter a
number
Symbol mode
Press an appropriate alphanumeric key to enter a
symbol.
T•
T• Clear>.
T
<Clear >
T• 0 ].
T• 1 ].
Add a new contact
The memory location to save new contacts may
be preset depending on your service provider
change the memory location, in Menu mode, select
Contacts → < Options> → Settings → Save new
contact to → a memory location.
In Idle mode, enter a phone number and press
<Options>.
Select Add to Contacts → Create contact →
a memory location (if necessary).
Select a number type (if necessary).
Enter contact information.
PresstheConrmkeyorpress< Options> → Save
to add the contact to memory
Send and view messages
T
In Menu mode, select Messages → Create
message.
Enter a destination number and scroll down.
Enter the message text. ►
Enter text
Forsendingasatextmessage,skiptostep5.
For attaching multimedia, continue with step 4.
Press < Options > → Add multimedia and add
an item.
PresstheConrmkeytosendthemessage.
T
In Menu mode, select Messages → Inbox .
Select a text or multimedia message.
Make fake calls
Y
out of meetings or unwanted conversations.
T
In Menu mode, select Settings → Call → Fake call →
Fake call hot key.
T
In Idle mode, press and hold the Navigation key •
down.
When the keys are locked, press the Navigation key •
down four times.
Activate the mobile tracker
When someone inserts a new SIM card in your phone,
the mobile tracker feature will automatically send the
contactnumbertospeciedrecipientstohelpyou
locate and recover your phone.
T
In Menu mode, select Settings → Security →
Mobile tracker.
Enter your password and select < OK >.
ThersttimeyouaccessMobiletracker
promptedtocreateandconrmapassword.
PressConrmkeytoselect3. On .
ScrolldownandpresstheConrmkeytoopenthe4.
recipient list.
Press <5. Options> → Contacts to open your
contact list.
PresstheConrmkeytoselectacontactandthen6.
press <Add >.
Select a number (if necessary).
PresstheConrmkeytosavetherecipients.8.
Scroll down and enter the sender
Press < Save > → <Accept >.
Activate and send an SOS message
In an emergency
family or friends for help.
T
In Menu mode, select Messages → Settings →
SOS messages → Sending options.
Press < Change > to select On .
ScrolldownandpresstheConrmkeytoopenthe3.
recipient list.
Press < Options > → Search to open your contact
list.
Select a contact.5.
Select a number (if necessary).
PresstheConrmkeytosavetherecipients.7.
Scroll down and set the number of times to repeat
the SOS message.
Press < Back > → <Ye >.
T
With the keys locked, press [ ] four times to send
an SOS message to preset numbers.
The phone switches to SOS mode and sends the
preset SOS message.
T
].
Use the camera
T
In Menu mode, select Camera to turn on the camera.
Rotate the phone anti-clockwise to landscape view
Aimthelensatthesubjectandmakeany3.
adjustments.
PresstheConrmkeytotakeaphoto.Thephotois4.
saved automatically
Declaration of Conformity (R&TTE)
We, Samsung Electronics
declare under our sole responsibility that the product
GSMMobilePhone:GT
to which this declaration relates, is in conformity with the following standards and/or
other normative documents.
SAFETY EN60950-1:2006+A1
SAR EN50360:2001/AC2006
EN 62209-1 : 2006
EMC EN 301 489-01 V1.8.1 (04-2008)
EN301489-07V1.3.1(1
EN301489-17V2.1.1(05-2009)
RADIO EN30151
EN 300 328 V1.7.1 (10-2006)
We hereby declare that [all essential radio test suites have been carried out and that]
the above named product is in conformity to all the essential requirements of Directive
1999/5/EC.
TheconformityassessmentprocedurereferredtoinArticle10anddetailedin
ofDirective1999/5/EChasbeenfollowedwiththeinvolvementofthefollowingNotied
Body(ies):
BABT
ChurcheldRoad,
Walton-on-Thames,
Surrey
Identicationmark:0168
The technical documentation kept at :
SamsungElectronicsQALab.
which will be made available upon request.
(Representative in the EU)
SamsungElectronicsEuroQALab.
Blackbushe Business Park, Saxony Way
Y
201 Joong-Hoon Choi / Lab Manager
(place and date of issue) (name and signature of authorised person)
*
Samsung Service Centre, see the warranty card or contact the retailer where you purchased
your product.
T
In Menu mode, select My les → Images →aphotole.
T
In Menu mode, select Camera to turn on the camera.
Rotate the phone anti-clockwise to landscape view
Press [ 1 ] to switch to the camcorder
Aimthelensatthesubjectandmakeany4.
adjustments.
PresstheConrmkeytostartrecording.
Press the < Stop > to stop recording. The video is
saved automatically
T
In Menu mode, select My les → V →avideole.
Listen to music
In Menu mode, select Music → Library .
Select a music category →amusicle.
Control playback using the following keys:
Key Function
Conrm Pause or resume playback
Navigation
Left: Skip backward; Scan backward •
inale(pressandhold)
Right: Skip forward; Scan forward in •
ale(pressandhold)
Up/Down:
Key Function
1 Rate the current track
2 Select a sound effect
3 Change the repeat mode
4 ActivateordeactivateShufemode
Listen to the FM radio
Plug a headset into the phone.
In Menu mode, select Apps → FM radio .
PresstheConrmkeytostarttheFMradio.3.
Press < Ye > to start automatic tuning.
The radio scans and saves available stations
automatically
ThersttimeyouturnontheFMradio,youwillbe
prompted to start automatic tuning.
Control the FM radio using the following keys:5.
Key Function
Conrm T
Navigation
Left/Right: Fine-tune the frequency; •
Search for an available radio station
(press and hold)
Up/Down:
Back cover
SIM card
Memory
card
Battery
T