R
Installation Guide
Introduction
The RT510SR module will switch y
completed RT510SR series consists of a tr
Product Compliance
This product complies with EMC 2014/30/EU, L
Declaration of Conformity on www.saluslegal.c
Safety Information
Use in accordanc
equipment before cleaning it with a dry towel
Einleitung
Der SALUS RT510SR schalt
einem Sender - dem RT510TX und einem Relais SR868 (Empfänger).
Produktkonformitä
Dieses Produkt erfüllt die wesentlichen Anforderungen der EMC 2014/30/EU
2011/65/EU. Den
Sicherheitsinformationen
Produkt muss gemäß den gängigen Richtlinien verwendet wer
Gerät trock
Introduction
Le module RT510SR allumera ou ét
RT510SR complète compr
Conformité du produit
Ce produit est c
de la déclaration de conformité de l'UE disponible sur le sit
Utilisation des informations sur la sécurité
Conforme aux réglemen
appareil avan
Inleiding
De RT510SR module zal uw toestel aan- en uitschakelen in o
De complete RT510SR serie bestaat uit een transmitt
Productconformiteit
Dit product voldoet aan de richtlijn EMC 2014/30/EU
EU-conformiteitsverklaring vindt u op www.saluslegal.com
Veiligheidsinforma
Gebruik in overeenst
helemaal droog blijft. Ontk
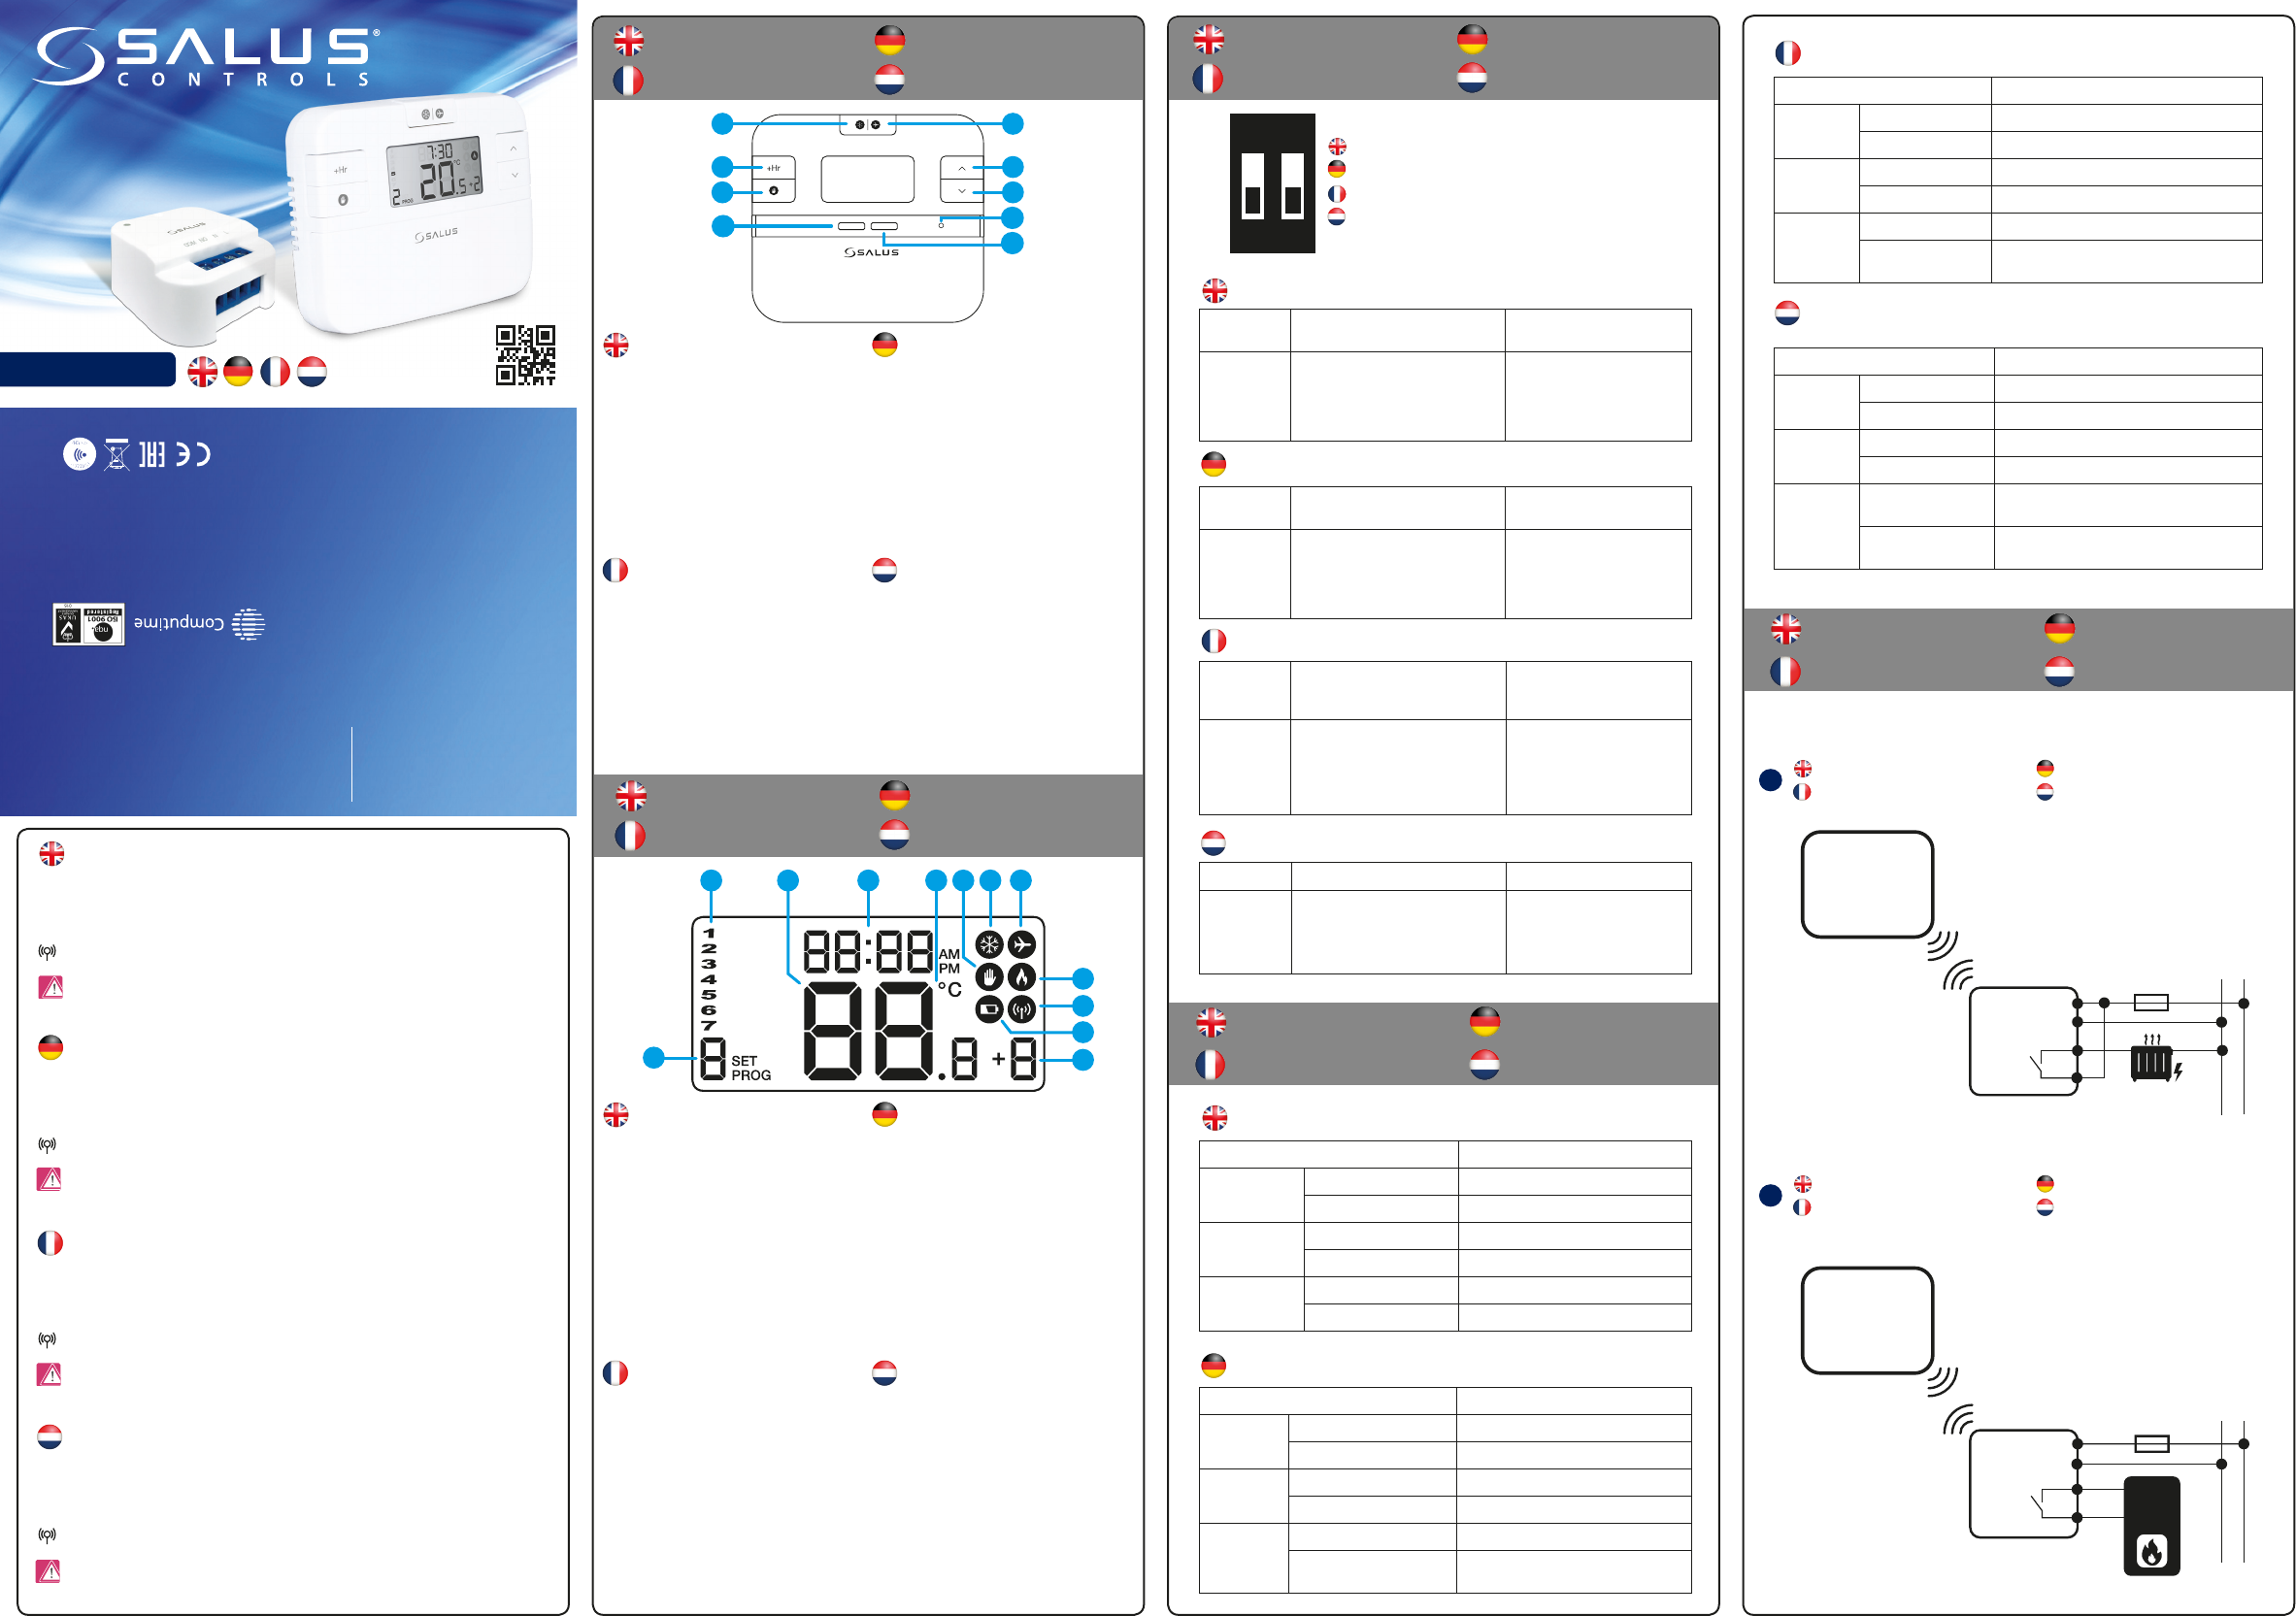
Button Functions T
Fonctions de boutton
Knop functies
L LED Symbole
Icônes de l' Lcd-pictogrammen
Issue date: F
Version: V004
Head Office:
SAL
SAL
Dodworth Business Park South,
Whinby Road, Dodworth,
Barnsley S75 3SP
T: +44 (0) 1226 323961
E: sales@salus-tech.com
E: techsupport@salus-tech.com
FR/ NL / DE:
support@salus- controls.de
tel: +49 6108 8258515
ww
SAL
Maintaining a policy of continuous product development SALUS Controls plc r
the right to change specification, design and materials of products listed in this brochure
without prior notice.
For PDF Installation guide please go t
Electric heater
Chauage électrique
Elektrische Heizung
Elektrische verwarming
Boiler
Chaudière
Kessel
Boiler
The DIP Switches can be found on the r
Die DIP Schalter benden sich auf der Rückseite ihres
L
De DIP Switch vindt u op de achterkant v
Control
feature
TPI Span
Operation
When
the DIP switch № 1 is functional.
choose the C
lower comfort level (6CPH) and a higher
comfort level (9CPH).
When Span is selected on DIP
switch № 2, the DIP switch № 1 is
not functional.
accuracy of your thermostat is set
to ± 0.25 °C.
Regeleigen-
schaften
TPI Spreizung
Bedienung
W
ausgewählt ist so ist der DIP Schalter Nr
aktiv
zwischen niedriger komfortebene ( 6 Z/h)
oder höherer Komfortebene wählen.
W
Schalter Nr 2 gewählt wurde ist
der DIP Schalter Nr1 inaktiv
T
0.25C eingestellt.
Fonction-
nalités de
régulation
TPI (Proportionnalité Intégrale) Span (Ecar
Fonctionne-
ment
Quand TPI est sélectionné sur l'interrupt
DIP N°2, l'interrupteur N°1 est activable.
V
Par Heur
(6CPH) ou un plus haut niveau (9CPH).
Quand Span est selctionné sur
l'interrupteur DIP N°2, l'int
N°1 n'est pas activable. La pr
de températur
+-0,25°C.
Bediening TPI Span
In werking
Als
dan is DIP Switch nr
het aantal cycli per uur kiezen tussen laag
comfort (6CPH) en hoog comfort (9CPH).
Als u Span kiest op DIP Switch nr
dan werkt DIP Switch nr
accuraatheid van de t
dan ca 0,25 C.
DIP switch settings Einstelllungen der DIP
Réglages du commutateur DIP
Dipswitch-instellingen
LED indication Smart Relay
Installation - Step 1
Smart Relais LED Indik
Installation – Schritt 1
V
Installation – Etape 1
LED-indicatie smart relais
Installatie – Stap 1
LED State Description
Red
On The rela
Flash The rela
Green
On The rela
2 x Flash The rela
Red and Green
Flash alternat The rela
Flash in dieren It indicates the software v
LED Status Beschreibung
Rot
An Das Relais ist oen.
Blinkend Das Relais ist im
Grün
An Das Relais is geschlossen.
2 x blinkend Das Relais sichert den V
Rot und Grün
Abwechselnd blink Das Relais hat die
Blinkt in unterschiedlichen
Frequenz
Zeigt den Softwarestatus nach Neustart an.
Etat des LED Description
Rouge
Marche Le relais est ét
Clignote Le relais est en mode jumelage
Ve
Marche Le relais est activé
Clignote x 2 Le relais écrit le code de jumelage
Rouge et Ve
Clignote en alternance Le relais est jumelée mais la c
Clignote dans une
certaine séquence
Il indique la version du logiciel après le r
Ledtoestand O
Rood
Aan Het relais is uit.
Knipperend Het relais is in k
Groen
Aan Het relais is aan.
2 x knipperend Het relais schrijft koppelingsc
Rood en groen
Afwisselend knipperend
Het relais is gek
verbrok
Sequentieel knipperend Geeft de softwareversie na opnieuw opstarten aan.
1
2
9CPH
6CPH TPI
Span
±0.25°C
RT510TX
RT510TX
L
L
NO
N
N
COM
SR868
SR868
AC 230 V
COM
L
L
M
N
N
NO
OR
AC 230 V
MAX
16 (5) A
RT510TX
SR868
COM
L
L
N
N
NO
AC 230 V
MAX
16 (5) A
RT510TX
L
L
NO
N
N
COM
SR868
AC 230 V
COM
L
L
M
N
N
NO
OR
AC 230 V
MAX
16 (5) A
RT510TX
SR868
COM
L
L
N
N
NO
AC 230 V
MAX
16 (5) A
MAX
16 (5) A
868.0-868.6MHz; <13dBm
868.0-868.6MHz; <13dBm
868.0-868.6MHz; <13dBm
868.0-868.6MHz; <13dBm
1
12
2 3 4 6 7
8
9
11
5
10
TEST / PAIRING
SELECT
SET
4
1 5
6
7
2
3
8
9
1. Curren
2.
3. Curren
4. T
5. T
6. Frost Pr
7. V
8. Heating Mode ON
9. RF signal
10. Low ba
11. Boost Mode
12. Program number
1. Aktueller
2.
3. Aktuelle Uhrzeit
4. T
5. Kurzfristige / dauerhafte Änderung
6. Frostschutz
7. Urlaubsmodus
8. Heizungsmodus AN
9. Funk-Signal
10. Batterieladung niedrig
11. Boost Modus
12. Programm Nummer
1. Programme du jour actuel
2. T
3. Heure actuelle
4. Unité de températur
5. Cont
6. Protection contr
7. Mode vacances
8. Mode chauage allumé
9. Signal RF
10. Pile faible
11. Mode Boost
12. Numéro de progr
1. Huidige dag van het programma
2. Huidige temperatuur
3. Huidige tijd
4. T
5. Tijdelijk / permanent negeren
6. V
7. V
8. V
9. RF-signaal
10. Laag batterijniv
11. Boostmodus
12. Nummer van het programma
1. Betätigen für Frostschutz
2. Betätigen um den Boost-Modus zu aktivieren /
deaktvieren
3. Betätigen um den manuellen Modus zu
aktivieren / deaktivieren
4. Betätigen um Einstellungen auszuwählen
5. Für 3 Sekunden gedrückt halten für den
Urlaubsmodus
6. Erhöhen T
7. Senken T
8. T
9. Betätigen um die Einstellung zu bestätigen
1. Appuyez pour le mode antigel
2. Appuyer pour activer / quitter le mode boost
3. Appuyer pour activer / quitter le con
permanent
4. Appuyez pour sélectionner le réglage
5. Appuyez pendant 3 sec
vacances
6. Bouton Augmenter
7. Bouton Diminuer
8. Mode
9. Appuyez pour conrmer le r
1. Press for fr
2. Press to en
3. Press to en
4. Press to select setting
5. Press 3 sec for holida
6. Increase button
7. Decrease button
8. T
9. Press to c
1. Druk hierop voor v
2. Druk hierop om in / uit boostmodus te gaan
3. Druk op enter / exit permanent ov
4. Druk hierop om de instelling te selecter
5. Druk hier 3 sec op voor vakantiemodus
6. V
7. V
8. T
9. Druk hierop om de instelling te bev