Battery type: 395 (diameter 9.5mm x 2.6mm / SR 927 SW)
Accuracy: +20 / -10 seconds per month
In case your watch needs to be repaired or to raise claims
under a guarantee, please contact the point of sales
30
10
20
10
1
2
3
4
5
6
7
8
9
15
60
30
45
21
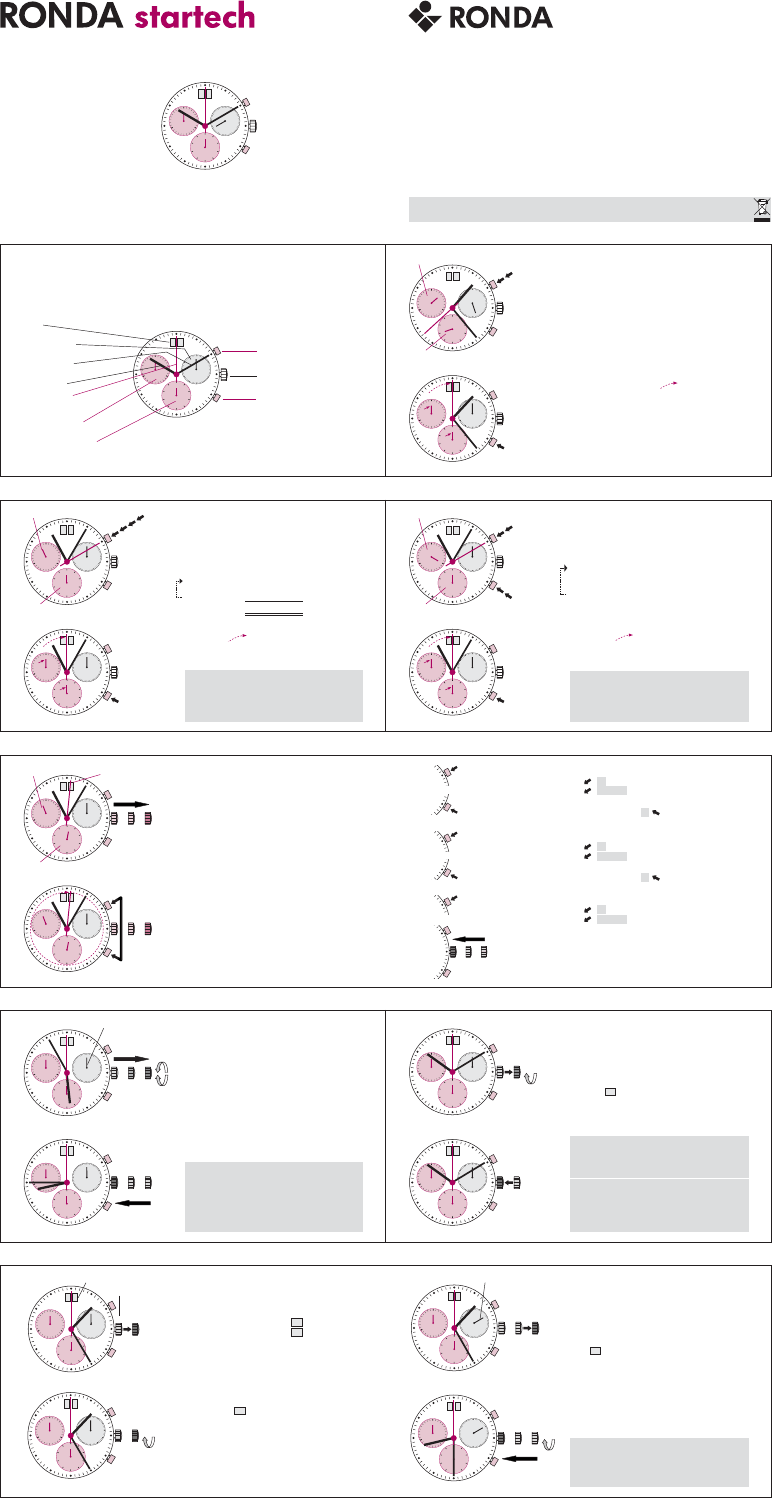
Description of the display and control buttons
Display elements
Date
Second hand
Minute hand
Hour hand
Centre stop-second
Minute counter
1
⁄
10
second counter
(houer counter after 30 minutes)
Control buttons
Push button A
Crown
Push button B
10
20
30
10
1
2
3
4
5
6
7
8
9
15
60
30
45
21
10
20
30
10
1
2
3
4
5
6
7
8
9
15
60
30
45
21
Chronograph: Basic function
(Start / Stop / Reset)
Example:
ᕡ
Start:
Press push-button
A
.
ᕢ
Stop:
to stop the timing, press push-
button A once more and read the three
chronograph hands:
4min
/
38sec
/
7
⁄
10sec
ᕣ
Zero positioning:
Press push-button
B
.
(The three chronograph hands will be reset
to their zero positions).
ᕡ
ᕢ
Push-button A
Push-button B
ᕣ
Minute counter
1
⁄
10
second counter
10
20
30
10
1
2
3
4
5
6
7
8
9
15
60
30
45
21
10
20
30
10
1
2
3
4
5
6
7
8
9
15
60
30
45
21
Chronograph:
Accumulated timing
Example:
ᕡ
Start:
(start timing)
ᕢ
Stop:
(e.g.
15
min
5
sec following
ᕡ
)
ᕣ
Restart:
(timing is resumed)
ᕤ
*
Stop:
(e.g.
13
min
5
secfollowing
ᕣ
)
= 28min10 sec
(
The accumulated measured time is shown
)
ᕥ
Reset:
The three chronograph hands are returned
to their zero positions.
ᕣ
ᕢ
ᕡ
ᕤ
Push-button A
Push-button B
ᕥ
Please note:
* Following
ᕤ
, the accumulation of the
timing can be continued by pressing
push-
button A
(Restart / Stop, Restart / Stop, …)
Minute counter
1
⁄
10
second counter
10
20
30
10
1
2
3
4
5
6
7
8
9
15
60
30
45
21
10
20
30
10
1
2
3
4
5
6
7
8
9
15
60
30
45
21
Chronograph:
Intermediate or interval timing
Example:
ᕡ
Start:
(start timing)
ᕢ
Display interval:
e.g.
10 minutes 10 seconds
(timing
continues in the background)
ᕣ
Making up the measured time:
(the 3 chronograph hands are quickly
advanced to the ongoing measured time).
ᕤ
Stop:
(Final time is displayed)
ᕥ
Reset:
The 3 chronograph hands are returned to
their zero position
Push-button A
Push-button B
Push-button B
ᕤ
ᕡ
ᕥ
Please note:
* Following
ᕣ
, further intervals or inter-
mediates can be displayed by pressing
push-button B
(display interval / make up
measured time, ...)
*
ᕢ
ᕣ
Minute counter
1
⁄
10
second counter
10
20
30
10
1
2
3
4
5
6
7
8
9
15
60
30
45
IIIIII
21
10
20
30
10
1
2
3
4
5
6
7
8
9
15
60
30
45
21
III
Adjusting the chronograph
hands to zero position
Example:
One or several chronograph hands are not in
their correct zero positions and have to be
adjusted (e.g. following a battery change).
ᕡ
Pull out the crown to position
III
(all 3
chronograph hands are in their correct or
incorrect zero position).
ᕢ
Keep push-buttons
A and B
depressed
simultaneously
for at least 2 seconds
(the centre stop-second rotates by
360°
Ǟ
corrective mode is activated).
Center stop-
second
Push-button A
Push-button B
ᕡ
ᕢ
ȇ
Minute counter
1
⁄
10
second counter
Adjusting the centre stop second
A
A
1 x short
long
Single step
Continuous
Adjusting the next hand
B
Adjusting the next hand
B
ᕣ
Returning the crown to position
I
Termination of the chronograph hands adjustment
(can be carried out at any time).
III
III
A
B
A
A
B
A
A
1 x short
long
Single step
Continuous
A
A
1 x short
long
Single step
Continuous
ᕣ
ȇ
Adjusting the
1
⁄
10
second counter hand (position 6h)
Adjusting the minute counter hand (position 9h)
ȇ
ȇ
ȇ
ȇ
ȇ
IIIIII
10
20
30
10
1
2
3
4
5
6
7
8
9
15
60
30
45
21
IIIIII
10
20
30
10
1
2
3
4
5
6
7
8
9
15
60
30
45
21
Setting the time
ᕡ
*
Pull out the crown to position
III
(the watch stops).
ᕢ
Turn the crown until you reach the correct
time
8:45
.
ᕣ
*
Push the crown back into position
I.
Please note:
* In order to set the time to the exact second,
ᕡ
must be pulled out when the second hand
is in position «60».
Once the hour and minute hands have been
set,
ᕣ
must be pushed back into position I at
the exact second.
Second hand
ᕡᕢ
ᕣ
III
10
20
30
10
1
2
3
4
5
6
7
8
9
15
60
30
45
31
III
10
20
30
10
1
2
3
4
5
6
7
8
9
15
60
30
45
1
0
Setting the date (quick mode)
ᕡ
Pull out the crown to position
II
(the watch
continues to run).
ᕢ
Turn the crown until the correct
date appears.
ᕣ
Push the crown back into position
I
.
01
ᕡᕢ
ᕣ
Please note:
During the date changing phase between
9 PM and 12 PM; the date must be set to the
date of the following day.
An extreme acceleration in setting the date
with quick mode can induce a false date indi-
cation. The synchronization is re-established
by setting the date from 01 till 31 (crown in
position II).
Need help? Post your question in this forum.
Report abuse
Libble takes abuse of its services very seriously. We're committed to dealing with such abuse according to the laws in your country of residence. When you submit a report, we'll investigate it and take the appropriate action. We'll get back to you only if we require additional details or have more information to share.
Product:
Forumrules
To achieve meaningful questions, we apply the following rules:
First, read the manual;
Check if your question has been asked previously;
Try to ask your question as clearly as possible;
Did you already try to solve the problem? Please mention this;
Is your problem solved by a visitor then let him/her know in this forum;
To give a response to a question or answer, do not use this form but click on the button 'reply to this question';
Your question will be posted here and emailed to our subscribers. Therefore, avoid filling in personal details.
Register
Register getting emails for Ronda Startech 5040B at:
new questions and answers
new manuals
You will receive an email to register for one or both of the options.
Get your user manual by e-mail
Enter your email address to receive the manual of Ronda Startech 5040B in the language / languages: English as an attachment in your email.
The manual is 0,16 mb in size.
You will receive the manual in your email within minutes. If you have not received an email, then probably have entered the wrong email address or your mailbox is too full. In addition, it may be that your ISP may have a maximum size for emails to receive.
The manual is sent by email. Check your email
If you have not received an email with the manual within fifteen minutes, it may be that you have a entered a wrong email address or that your ISP has set a maximum size to receive email that is smaller than the size of the manual.
The email address you have provided is not correct.
Please check the email address and correct it.
Your question is posted on this page
Would you like to receive an email when new answers and questions are posted? Please enter your email address.