EN-1
GETTING TO KNOW YOUR CAMERA
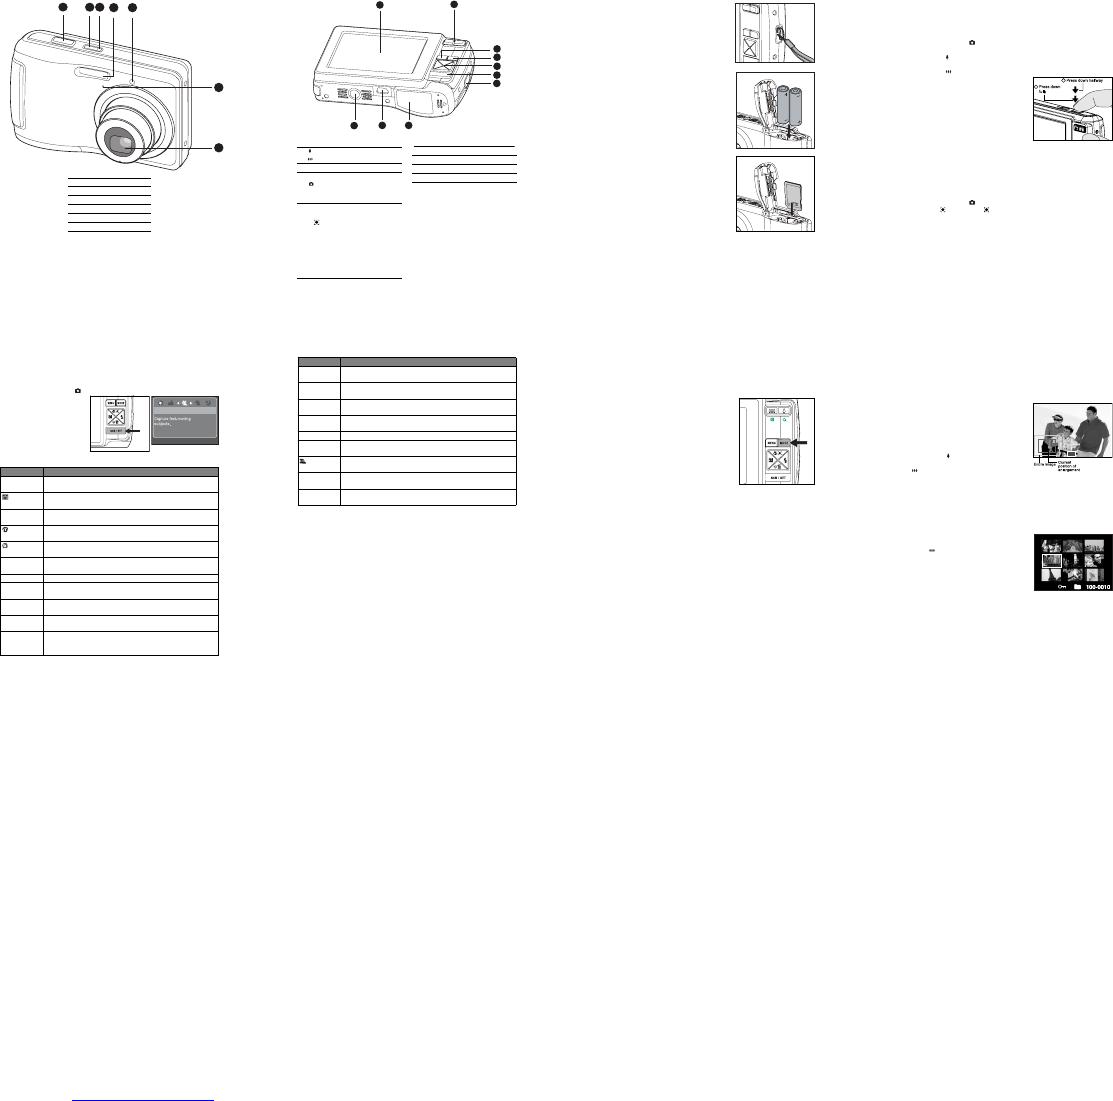
Front View
1. Shutter button
2. Power button
3. Status LED
4. Flash
5. Self-timer LED
6. Microphone
7. Lens
EN-2
Rear View
1
2
5
7
10
8
6
3
4
9
1. LCD monitor
2. Zoom in button
Zoom out button
3. MENU Menu button
4. MODE Mode button
Capture mode
S Video mode
x Playback mode
5. 4-way control button
S Up button
m Focus button
X Right button
X Flash button
T Down button
%F Self-timer/Delete button
W Left button
[
Backlight/Exposure compensation
button
6. SCN/SET Scene mode / Set button
7. Strap holder
8. Battery / Memory card cover
9. USB connector
10.Tripod socket
EN-3
GETTING STARTED
Preparation
1. Attach the camera strap.
2. Open the battery/memory card cover.
3. Load the supplied batteries with correct
orientation as shown.
4. Insert an SD/SDHC memory card (Optional).
The camera has 16MB internal memory
(12MB available for image storage), but you
can load an SD/SDHC memory card to
expand the camera’s memory capacity.
Be sure to format the memory card with this
camera before its initial usage.
5. Close the battery/memory card cover and
make sure it is locked securely.
EN-4
CAPTURE MODE
Capturing Images
Your camera is equipped with a 3.0" full color TFT LCD monitor to help you compose
images, playback recorded images/video clips or adjust menu settings.
1. Press the Power button to turn the power on.
The status LED lights green and the camera is initiated.
2. Set the camera mode to [ ].
3. Compose your image in the LCD monitor.
Pressing the button zooms in on the subject, and enlarges the subject on the
LCD monitor.
Pressing the button provides a wider angle image.
4. Press the shutter button.
Pressing the shutter button down halfway
automatically focuses and adjusts the
exposure, and pressing the shutter button
down fully captures the images.
The focus area frame turns blue when the
camera is in focus and the exposure is
calculated.
When the focus or exposure is not suitable,
the frame of the focus area turns yellow.
Recording Shots using Face Detection Technology
Face Detection Technology can identify and focus on the human faces in the image.
This advanced function simultaneously detects up to 5 human faces regardless of
their position in the scene.
1. Set the camera mode to [ ].
2. Toggle the [
m
] button until [ ] icon appears on the LCD monitor.
The white frame is identified as the “top priority” face (main focus frame), and
gray ones around the other faces.
3. Press the shutter button halfway down to lock the focus.
The main focus frame simultaneously turns green.
If the “top priority” face is out of focus, the main focus frame turns red.
4. Press the shutter button down fully to capture your image.
1
2
EN-5
Setting the Scene Mode
By simply selecting one of the following 20 modes, you can capture the image with the
most!appropriate settings.
1. Set the camera mode to [ ].
2. Press the SCN/SET button.
3. Select the desired scene
mode with the e / f
buttons, and press the
SCN/SET button.
4. Compose the image and
press the shutter button.
The table below will help you choose the appropriate scene mode:
Scene mode Description
P Program AE This mode allows you to manually set parameters other than the
shutter speed and the aperture value.
Smile Shot Select this mode to automatically capture an image when a smiling
face is detected.
n Anti-Shake This mode minimizes the influences of hand shaking when you want
to capture an image.
Portrait Man Select this mode when you want to capture an image that makes a
man stand out against a blurred background.
Portrait Lady Select this mode when you want to capture an image that makes a
lady stand out against a blurred background.
l Landscape Select this mode when you want to capture an image with infinity
focus, hard sharpness and high saturation.
l Sports Select this mode when you want to capture fast-moving subjects.
g
Night Portrait
Select this mode when you want to capture people with an evening
or night scene background.
h Night Scene Select this mode when you want to capture dark scenes such as
night views.
c Candlelight Select this mode when you want to capture photos of candlelit
scene, without spoiling the ambience.
d Fireworks Select this mode when you want to capture fireworks clearly with
optimal exposure. The shutter speed becomes slower, so using a
tripod is recommended.
Sports
07/20
EN-6
| Text Select this mode when you want to capture an image that contains
black and white subjects like printed documents.
e Sunset Select this mode when you want to capture a sunset. This mode
helps keep the deep hues in the scene.
m Sunrise Select this mode when you want to capture a sunrise. This mode
helps keep the deep hues in the scene.
k
Splash Water
Select this mode when you want to capture photos of splashing
water.
e Flow Water Select this mode when you want to capture the soft flowing water.
_ Snow Select this mode when you want to capture clear snow scenes
without darkened subjects and bluish tint.
Beach Select this mode when you want to capture bright beach scenes and
sunlit water surfaces.
a Pets Select this mode when you want to capture your pets. Shoot from
their eye level.
\ User Setting This mode allows you to manually set your favorite parameters and
these settings will be memorized.
Scene mode Description
EN-7
VIDEO MODE
Recording Video Clips
This mode allows you to record video clips at a resolution of 320 x 240 / 640 x 480 pix-
els. Voice can also be recorded.
1. Set the camera mode to [w].
2. Compose the image.
3. Press the shutter button.
The recording of the video clip will start.
Pressing the shutter button one more time will
end the recording of the video clip.
The recording time depends on the storage
size and the subject of the image to be
recorded.
The zoom function cannot be used during
video recording.
Playing Back Video Clips
You can play back recorded video clips on the camera.
1. Set the camera mode to [x].
The last image appears on the screen.
2. Select the desired video clip with the e / f buttons.
3. Press the SCN/SET button.
A press of the f / e buttons during playback allows fast forward play / fast
reverse play.
To stop video playback, press the d button.
This stops playback and returns to the start of the video clip.
To pause video playback, press the SCN/SET button.
This pauses video playback.
To cancel pause, press the SCN/SET button again.
EN-8
PLAYBACK MODE
Playing Back Still Images
You can play back the still images on the LCD monitor.
1. Set the camera mode to [x].
The last image appears on the screen.
2. The images can be displayed in reverse or
forward sequence with the e / f buttons.
To view the previous image, press the e
button.
To view the next image, press the f button.
Pressing the!!button enlarges the image.
To return to normal magnification, press the
button.
Thumbnail Display
This function allows you to view 9 thumbnail images on the LCD monitor at the same
time, which can let you quickly search for the image that you want.
1. Set the camera mode to [x].
The last image appears on the screen.
2. Press the button.
The images are displayed in the thumbnail
display.
Images that have been selected with the e
/ f / c / d buttons will be indicated by a
yellow frame.
When there are ten or more images, scroll
the screen with the c / d buttons.
3. Press the e / f / c / d buttons to select the image to be displayed at regular size.
4. Press the SCN/SET button.
The selected image is displayed at its regular size.
x1.5
1
2
3
5
6
7
4