If available, use the text at the bottom of each screen for help.
Screen Size
Screen Size: Select a screen aspect ratio. (Available ratio: Wide,
Cinema, Zoom, and Normal.) Please choose the ratio that applies
to your video signal format best.
Color Temperature
This option allows you to select one of three automatic color
adjustments: Cool for a bluer palette of picture colors; Normal or
Warm for a redder palette of color.
Advanced Picture Settings
• Dynamic Contrast: Set dynamic contrast Off/low/Medium/High.
• Film Mode: Set film mode on/off.
• Noise Reduction: Set noise reduction as Off/low/Medium/High.
• MPEG Noise Reduction: Set MPEG noise reduction as Off/low/
Mediumor High.
Note: Noise reduction helps to reduce the picture “static” or
any type of interference. This feature is especially useful for
providing a clearer picture in weak analog signal conditions.
The MPEG Noise Reduction specifically works on video signal
with MPEG coding.
Surround Mode
Creates a 3D sound surround from standard stereo material, with
deep and rich enhancement.
Auto Volume
Set auto volume control on/off.
Analog Sound
Select analog TV audio sound type: Stereo, Mono or SAP (only
available in TV mode).
Digital Sound
Select digital TV audio language type: English, French or Spanish
(only available for DTV channel).
Digital Audio Output
Set the audio output type as Off, PCM or Raw. Please set this
option according to your power amplifier.
• Sound Mode: Choose the preset sound mode of your TV:
Standard, Soft, User, Dynamic. Only in User mode you can
adjust Bass, Treble, Balance.
• Bass: Adjust the bass component of TV sound.
• Treble: Adjust the treble component of TV sound.
• Balance: Adjust the balance between the left and right channel.
Sound Settings
Sound Menu
Use up/down to choose the function you need, press ENTER or right
arrow to adjust or enter a sub-menu. Thesub-menu image and
explanation are shown below.
The Sound Menu lets you adjust audio output. To access the Sound
Menu, press MENU on the remote, and then select SOUND from the
Main Menu. Press ENTER/down button to proceed to SOUND menu.
The seven-band graphic equalizer allows you to adjust the audio
frequency settings. You can select one of the equalizer presets
(Off, Pop, Rock, Jazz) or create your own personal preset (User).
Press the left or right arrow to select the frequency (100Hz, 250Hz,
500Hz, 1KHz, 2KHz, 4KHz, 10KHz) you want to adjust. Use the
up or down arrow to adjust.
Equalizer Settings
Use up/down to choose the function you need, press ENTER or right
arrow to adjust or enter a sub-menu. Thesub-menu image and
explanation are shown below.
Channel Menu
The Channel Menu enables you to search, view and edit channels. It is
available in TV mode only. Press MENU and choose CHANNEL from
the Main menu. Press the ENTER/down button to proceed to
CHANNEL menu.
Channel List
Displays a channel list. It shows the current channels.
Favorite List
Displays a favorite channel list. It shows the current
favorite channels.
Channel: Press up/down arrow to switch the channel you want to
edit.
Skip: Set if the current channel is skipped.
Favorite: Set if the current channel is the favorite channel.
Label: Enter a channel label to rename the current channel.
Channel Settings
Go to channel setting sub-menu.
Signal Type
Select your TV signal type: Air or Cable.
Auto Channel Search
Execute an auto channel search (see page 7).
• When the Parental Control Menu is accessed from the Main
Menu, you need to enter password to unlock the menu function.
Please enter your four-digit password with numeric keys 0~9.
Note: The original password is “0000”.
• After unlocking, the items in parental control menu can be used.
Use arrow up/down to highlight the function you need and press
ENTER or right arrow to use V-chip, Change Password, Keypad
Lock and Source Lock, Clear Channel List sub-menu.
Lock Parental Control
V-Chip
Press ENTER or right arrow to enter V-Chip sub-menu, the detail
as follow:
Parental Menu
The Setup Menu enables you to lock program with special content,
panel key board and input source. Press MENU and choose
PARENTAL from the Main menu. Press the ENTER/down button to
proceed to PARENTAL menu.
US V-Chip
Press ENTER or right arrow to enter US V-Chip ratings menu,
which contains two sub-menus: Movie Rating and TV rating. See
next page for more details.
Movie Rating
Use arrow keys to select the rating level you want to block, press
ENTER to lock/unlock the rating level. If you have blocked a lower
level rating, the higher ratings will be blocked too.
For example, when PG-13 is blocked, R, NC-17 and X will be
blocked at the same time.
TV Rating
Similar with Movie Rating. After adjusting, press MENU to return or
press EXIT to exit the menu.
For more rating explanation, see page 12.
TV Rating Overview
TV-Y7
Directed to Children 7
Years and Older
TV All Children
FV Fantasy Violence
Age-Based Ratings
TV-MA Mature Audience Only
TV-14 Parents Strongly Cautioned
TVG
Parents Guidance Suggested
TV-G General Audience
D
Sexually Explicit Dialogue
L Adult Language
S Sexual Situations
V Violence
Content Themes
French Rating
Press ENTER or right arrow to enter French rating menu.
Similar with English Rating.
Canada V-Chip
Press ENTER or right arrow to enter US V-Chip ratings menu,
which contains two sub-menus: English Rating and French Rating.
English Rating
Press ENTER or right arrow to enter English rating menu.
Use arrow keys to select the rating level you want to block, press
ENTER to lock/unlock the rating level. If you have blocked a lower
level rating, the higher ratings will be blocked too.
For example, when PG is blocked, 14+ and 18+ will be blocked at
the same time.
8 9
10 11
Picture Menu
OSD Menu Operations
P S C PA S O
Adjust the OSD Screen
The OSD (On Screen Display) menu enables you to approach to the TV
functions.
To use OSD menu system, press MENU button on remote control,
then use left/right arrow to highlight an option from PICTURE, SOUND,
CHANNEL, PARENTAL, SETUP or OTHERS and press ENTER/down
button.
Press the up and down arrow to move to a different option within each
menu. If necessary, press ENTER or right arrow to display the choices
of the option you’ve highlighted. If available, use the text at the bottom
of each screen for help. To return to the previous menu, press the
MENU button.
To exit the OSD menu:
• Press the EXIT button. The menu will clear from the screen.
• Press the MENU button repeatedly until the menus disappear.
PICTURE
Adjust settings to affect picture quality.
MOVE
SELECT
: Exit
SO CH N PA T OT SPI R
Sc e S
Pi u e i
Co r e e r
Ad n d i e e i s
Wa
Wi
Use up/down to choose the function you need, press ENTER or right
arrow to adjust or enter a sub-menu. The sub-menu image and
explanation are shown below.
The Picture Menu contains menus and controls to configure the way
the picture appears. The Picture Menu options apply to the video for
the main TV and VIDEO INPUT selections. All picture options can be
applied to each input.
Press MENU on the remote. Select Picture from the Main menu. Press
the ENTER/down button to proceed to PICTURE menu.
EPG (Electronic Program Guide)
Press EPG button on the remote control, the electronic program guide
will appear in the center of screen. The electronic program guide gives
the TV program playing project. You can use left/right arrows to switch
pages.
Menu Transparency
To choose your menu transparency mode, press the left/right
arrow until the transparency you need appears: Off, Low, Medium,
High.
Block Unrated Show
Block all the unrated program.
Note: These ratings are available only if the broadcaster is sending
rating information.
Downloadable Rating, Clear Downloadable Data
Activate or downloadable rating data. if available.
Remote
Select your Remote: Off, Remote1 or Remote2. This is for special
purpose.
Keypad Lock
Select this option to block or unblock the TV’s side panel buttons
so that they can’t be used.
Change Password
Change the password of parental menu.
Old PIN: Input the old password.
New PIN: Input the new password.
Confirm: Input the new password again to confirm.
Clear Channel List
This option allows you to execute Clear Channel List function. This
function will reset the whole TV system to factory default (not only
reset OSD menu).
Source Lock
This option allows you to lock or unlock the input source. The
source blocked can not be chosen from input list unless you input
the correct parental password.
Use up/down arrow to select the source, press ENTER to lock or
unlock it.
Setup Menu
The Setup Menu lets you config the TV with your preferences. Select
SETUP from the Main Menu. Press ENTER/down button to proceed to
SETUP menu.
Use up/down to choose the function you need, press ENTER or right
arrow to adjust or enter a sub-menu. The sub-menu image and
explanation are shown below.
Press ENTER or right arrow to enter closed caption sub-menu, the
detail as follow:
Closed Caption
Caption Display
Press left/right arrow to select caption display on or off.
Analog Caption Type
Press left/right arrow to select analog closed caption type: CC1,
CC2, CC3, CC4, TEXT1, TEXT2, TEXT3, TEXT4.
Digital Caption Type
Press left/right arrow to select digital closed caption type: Service1,
Service2, Service3, Service4, Service5, Service6.
Digital CC Preset
Press left/right arrow to select digital closed caption preset: Default,
Custom. Only in custom mode you can adjust the digital closed
caption style.
Menu Language
To choose your menu language, press the left/right arrow until the
language you need appears.
Available languages: English, French and Spanish.
Digital CC Style
Press left/right arrow to go to digital closed caption style sub-menu,
to select the closed caption style.
Select the item you want to adjust in Digital CC Style menu with
up/down arrows.
After changing, you can preview the caption style in the bottom.
Picture Settings
Picture Mode: Choose the preset visual mode of your TV:
Standard, Movie, User, Dynamic, Power Saving. (Only in User
mode you can adjust Brightness, Contrast, Color, Tint and
Sharpness. Changes to Power Saving mode can decrease the
power consumption.)
• Brightness: Adjust the brightness of picture.
• Contrast: Adjust the contrast of color.
• Color: Adjust the richness of color.
• Tint: Adjust the balance between red and green level (only
available in NTSC signal).
• Sharpness: Adjust the sharpness level of picture.
Initial Setup Wizard
To set the initial settings. (see page 7)
Video Style
If you connect the HDMI/DVI port of PC to HDMI jack of the TV
and the video signal is 1080p, please choose the compatible video
style: Video, Graphic.
Press ENTER or right arrow to enter Clock sub-menu, the detail as
follow:
Clock
Time Zone
Select your time zone: Eastern, Central, Mountain, Pacific, Alaska,
Hawaii, Samoa, Newfoundland, Atlantic.
Auto Clock
Select auto clock on/off. Auto clock helps you synchronize your TV
time to standard time (from DTV signal).
Setup Time
Set your TV time manually (needs to turn off auto clock).
Day of Week
Displays what day it is (can’t be adjusted, displays only).
Daylight Saving Time
Set your daylight saving time on or off (needs to turn on auto clock).
Others Menu
Use up/down to choose the function you need, press ENTER or right
arrow to adjust or enter a sub-menu. The sub-menu image and
explanation are shown below.
The Others Menu lets you config the TV with your preferences in other
features. Choose OTHERS from the Main Menu. Press ENTER/down
button to proceed to SETUP menu.
Blue Back
Press ENTER button to select Blue Back on or off. If the Blue Back
is turned on, the TV will display a blue background when there is
no signal input.
No Signal Power Off
Press ENTER button to select “No Signal Power Off” on or off. If it
is turned on, the TV will shut off after 10-minute no signal time. We
suggest you turn on this function when Blue Back is turned on. It
may hurt the LED LCD panel if blue screen is on for too long.
Note: In PC mode, the monitor standby and power off settings
depend on the No Signal Off time.
No Operation Power Off
Press ENTER button to select “No Operation Power Off” on or off.
If it is turned on, the TV will shut off after a 3-hour no operation
time.
All Reset
Press ENTER button to execute reset to TV system. All the settings
will be reset to factory default.
Note: The OSD’s appearance and color are referred to the actual
appliance.
Audio Only
Press ENTER button to activate audio only mode. The TV will
output only sound and the LED LCD panel will be turned off. To
restore normal playing, hold POWER button for three seconds.
What’
Definition (HD) video?
Connect an antenna to the TV Input jack to view free local digital
channels. You may need to purchase an antenna. (See page 4 for
more information about antenna setup).
Visit www.antennaweb.org for assistance in deciding what type of
antenna to use to receive the local digital channels available to you.
After entering your location, this mapping program tells you which local
analog and digital stations are available using a certain antenna.
Are there other ways to view High Definition
(HD) video?
Besides using an antenna as mentioned above, you can also use a
set-top box to receive digital video. Contact your cable service provider
or satellite provider to purchase digital programming and have them
connect the box to ensure you are viewing channels in the best way.
How do I tell an analog channel from a digital
channel?
Press the DISPLAY button to display the Channel Bar. Look at the top
right corner of the screen. An “A” is displayed for an analog channel.
A “D” is displayed for a digital channel.
Note: Since the analog TV in America has been cut off, we reserve
analog TV function only for some unexpected use.
Why are there bars on my screen, and can I get
rid of them?
Most digital video is sent in a 16/9 format which fills your screen, but is
sometimes sent in 4/3 which does not fill your screen. It depends on
how the station or device connected to your TV is formatting the video.
If there are bars on the screen,
press the ASPECT button to try a different format that may eliminate
the bars. Some bars can't be removed because of the way the format
is sent by the broadcaster. The format changes as you press the
ASPECT button and the format type is displayed at the bottom of the
screen. For more information on screen size, go to page 8.
Why does channel search find a lot of channels,
but when I try to tune to them, there’s nothing
there?
Frequently Asked Questions (FAQs)
DVD Operations
Identifying Problems
If there are any problems when using the product, please consult the
list below. If the list does not solve the problem, call our Customer
Service Center immediately.
TV Problems
There is no picture or sound but the TV is on and there
is a “No Signal” sign on screen.
• Are you trying to use an input source with no device connected to
it? For using other video/audio device, make sure the external
device works normally first, then press INPUT and choose the right
input source.
• The Signal Type option may be set incorrectly. Go to page 9 for
detailed instructions.
• The channel may be blank. Try to search the channel again or
change another channel.
The sound is fine, but the picture is poor.
• If you can only get black and white pictures from external device
that you've connected to your TV, maybe it is due to the video
cables is not connected well, or they are connected wrongly.
Check the connection stability first, then check the correctness. For
AV input, the yellow video cable connects to the yellow Video In
jack on the side of your TV. For Component input, the three Y, Pb,
Pr video cables (red, blue, and green) should be connect to the
corresponding input jacks on the side of your TV.
• Check the antenna connections. Make sure all of the cables are
firmly connected to the TV jack on side of your TV.
• Try adjusting the color features to improve.
Troubleshooting
Some channels don’t carry programming, such as video On Demand.
When channels are unavailable, your TV screen is blank or appears like
snow. You probably want to remove these channels from your channel
list. Remove these in the Channel List Menu. Go to page 8 for more
information.
Why does it take a long time when I search the
channels at first time?
If you have both analog and digital channels, the TV is looking for all
available channels in the channel list. If you do have digital channels,
the TV is also searching for scrambled channels, non-scrambled
channels, and each sub-channel of that digital channel.
The TV can’t be turned on.
• Make sure the AC cord is plugged in.
• Check the wall outlet, make sure the AC output works normally and
stably.
• The side panel may be locked (disabled). Use the remote control to
turn on the TV.
• Select the Keypad Lock function in the PARENTAL Menu and press
ENTER to uncheck the locking status.
There is no sound, but the picture is fine.
• The sound might be muted. Try pressing the MUTE button to
restore sound.
• For using AV or Component, remember to connect the device’s left
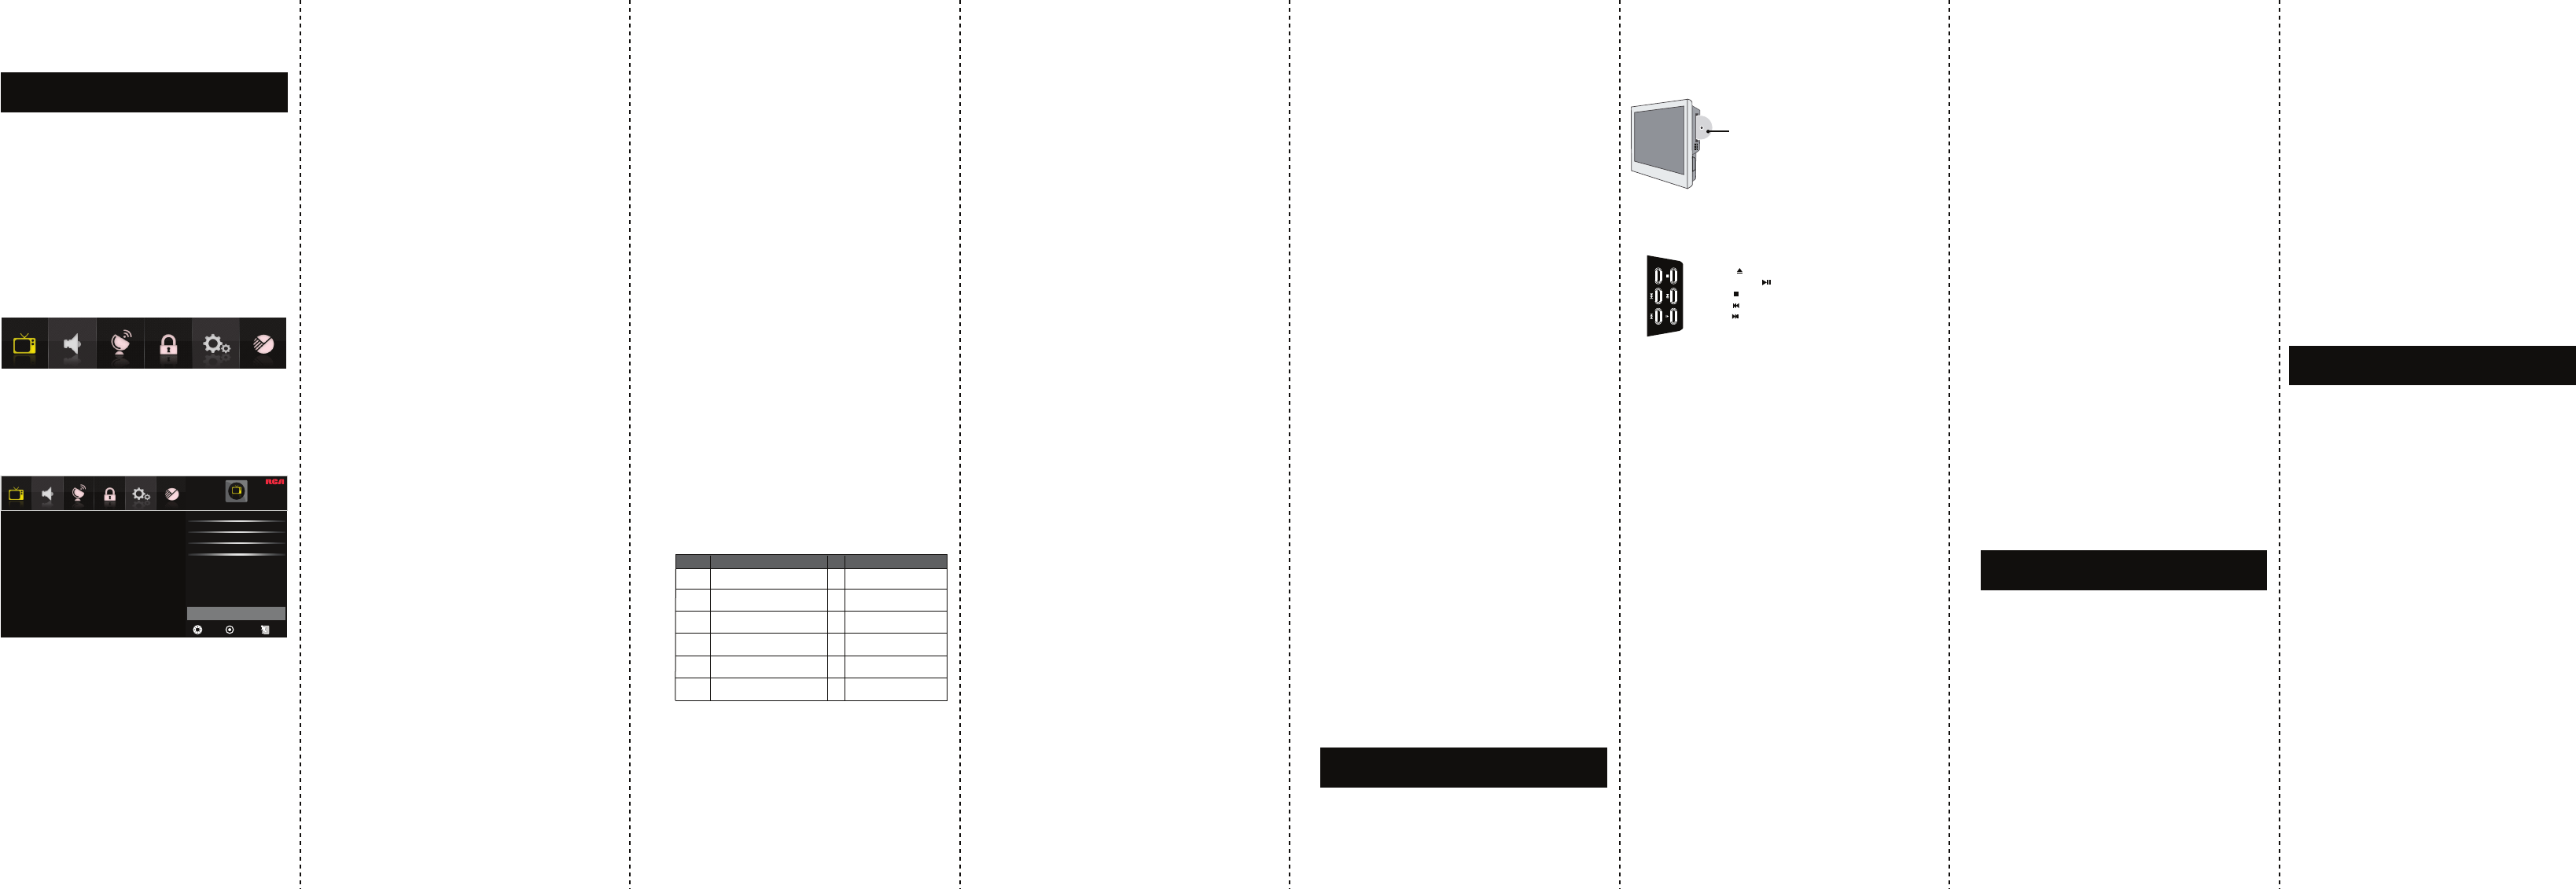
TV LED42C45RQD has a built-in DVD player module, which
you can use to watch DVD disk. The following operation guide gives
the DVD module instruction.
Press INPUT button on remote control, select “DVD” in the Source
Select menu (see page 7), then press ENTER or right arrow to enter
DVD mode of TV LED42C45RQD
1. How to enter DVD mode for TV LED42C45RQD
Insert the DVD disk with reflector surface facing the front of TV.
Note: The TV will turn to DVD mode automatically when you insert a
disk, no matter which mode it is now.
2. Insert a disk to DVD player
ZOOM
Disk reflector surface facing the front of TV.
Note: Do not insert with much strength.
Insert disk gently and the DVD
module will load in the disk
automatically.
4. DVD basic operations
Play/pause the disk: After inserting the disk to DVD module, the TV
will play DVD disk automatically. You can use PAUSE button to
suspend the playing. Press PLAY button, the TV will restore playing.
Stop playing: During playing, you can use STOP button to stop
playing. If you press STOP once, the DVD will be stopped briefly. Press
STOP again, it will stop completely and the disk in DVD module no
longer wheels.
Eject the disk: You can press EJECT button to eject the disk from
DVD module. And press EJECT again, the DVD will load the disk
renewedly.
Going backward or forward: You can press FR for fast review and FF
for fast forward. You can also press PREV to return to the previous
chapter, and press NEXT to skip to next chapter.
Function menu: Press DVD-M, you will return to the selection menu of
current DVD function. For example, you are using “Audio Selection”,
and you choose “Continue playing”, then after selecting, you can press
DVD-M to go back to “Audio Selection” menu while playing.
Title menu: Press TITLE, you can reset the disk to the title menu. It
equals to ejecting and loading the disk again.
Zoom in: Press ZOOM, you can zoom in the screen for 2 times, 3
times or 4 times from centre. This function provide a better view of the
content locate near screen centre.
Subtitle selection: Press SUB-T, you can switch the available subtitles
in DVD disk.
Audio language selection: Press AUDIO, you can switch the available
audio language in DVD disk.
Repeat: There are two kinds of repeat, one is regular repeat and the
other is Atop repeat. For regular repeat, press REPEAT button to
switch between chapter repeat, title repeat and all repeat. For A-to-B
repeat, press A-B once to set the repeating origin and press it twice to
set the repeating end.
DVD-setup menu: Press SETUP button, a specific setup menu for
DVD will display on screen. This menu is especially prepared for DVD
control. For menu instructions, see the follow.
5. DVD setup menu
A. General setup page
There exist three sub-menus in DVD setup menu, the first one is
General Setup. Press SETUP button on remote control to display
General Setup Page. Press up/down arrow to select the item you
want to adjust and press right arrow or ENTER button to activate it.
After activating, use up/down arrow to set item value. When you are
satisfied with the adjustment, press left arrow to return to the upper
B. Speaker setup page
Press SETUP button on remote control to display General Setup Page.
Press left/right arrow to choose Speaker Setup Page. The operating
method is similar with the General Setup Page.
TV Display
Set the TV display shape.
OSD Lang
Set the DVD OSD language as English, French or Spanish.
Last Memory
Set it on to memorize the last stop point. During playing the DVD,
if you change to another mode and then come back to DVD mode,
it can play automatically from the last stop point.
Note: We suggest you turn off the last memory function unless you
really need it. To turn on this function may influence the lifetime of
flash memory of DVD module.
Downmix
This option is preset as Stereo. That means the DVD player will
output a two-channel audio signal (L/R) to TV front speakers
(left/right).
TV Type
Set the TV type as PAL, Auto or NTSC.
Note: American DVD standard is NTSC system, so we suggest you
set the TV Type as NTSC. In addition, you can also set it as PAL to
watch some disks with PAL system, or select Auto for convenience.
Audio
Set the DVD audio language.
Subtitle
Set the DVD subtitle language.
Disc Menu
Set the DVD disk menu language.
Default
Reset the DVD setup menu options as factory default.
Parental
Set the parental control rating as KID SAF, G, PG, PG13, PGR, R,
NC17 or ADULT. To change this option, you need password, and
the original one is “0000”.
C. Preference page
Press SETUP button on remote control to display General Setup Page.
Press left/right arrow to choose Preference Page. The operating
method is similar with the General Setup Page.
DVD mode. The DVD will start playing automatically if there is a disk in
DVD module. If not, the TV will display a standy screen as shown. And
a “No Disc” message will appear on screen.
You can control the DVD playing with keypad on DVD module or with
remote control. For operating information, see the follow.
3. DVD control
Keypad on DVD module
About DVD control buttons on remote control, see page 6, remote control buttons.
level of general setup menu. Press left arrow repeatedly, you can exit
the DVD setup menu. To exit setup menu directly, press SETUP.
EJECT ( ): Ejects or loads the disk from DVD module.
STOP ( ): Stops the DVD playing.
PREV ( ): Goes back to the previous chapter of DVD.
PLAY/PAUSE ( ): Plays or pauses the DVD disk.
NEXT ( ): Skips to the next chapter of DVD.
ZOOM: Zooms the size of screen.
ZOOM