Complies with the essential r
2014/30/EU on the appro
electr
This product has been t
applying ver
EN 55022:2010
EN 55024:2010
EN 61000-4-2
EN 61000-4-3
DECLARA
------------------- Manual/720p Sportscam/04-16/V01----------------
Copyright©Quintezz
GB
NL
FR D
USER’S
MANUAL
ILLUSTRA
Illustration 3
NL
GB
1. INLEIDING
Gefeliciteer
voor
2. ONDERDELEN & (zie illustratie 1)
1. Aan/ Uit / Mode-toets
2. Q-toets
3. Led indicator
4. Pijltje omhoog: bediening menu
5. Pijltje omlaag: bediening menu
6. Micro SD sl
7. Micro USB aansluiting
8. Led indicator
9. Scherm
3. VOOR JE
A. Batterij
a.
Schuif het knopje onderaan de camera totdat het afdekplaatje
loskomt. V
sluit af met het afdekplaatje weer vast te klikk
b. Batterij laden
Plaats de USB-kabel in de USB-poort (7) van de Sportscam.
Plaats het andere uiteinde v
oplaadapparaat. Bij plaatsing in je computer zal de MSDC modus
actief zijn.
De rode en blauw
oplichten wanneer het toestel begint met opladen. De Blauwe LED-
indicator (8) gaat uit als de batterij voll
B. Waterpr (zie illustratie 2)
Om de waterproof behuizing t
het sluitmechanisme weg van de behuizing.
Opmerking: Gedempt geluid is onvermijdelijk wanneer je de camera met
de waterdicht
C. De camer(zie illustratie 3)
Plaats de camer
naar het gewenste punt en maak de schr
Opmerking: we raden u ten zeers
kamertemperatuur te bev
4. AAN DE SLA
A. Plaats SD-kaart
Plaats een micro SD-kaart (optioneel verkrijgbaar via www)
in de micro SD-kaart sl
Plaats de kaart in de micro SD-kaart sl
uw nagel zodat deze als het ware “v
verwijder
zodat deze naar boven “springt”)
Opmerking : De capacit
32 GB en de SD-kaart moet van klasse 10 of hoger zijn.
Het is aangeraden om de SD-kaart voor het eerst
via je computer of via het menu van de c
tot de menu instellingen zichtbaar zijn, druk v
Q-toets om naar de instellingen te gaan en kies f
B. Aan/uitzetten
Aanschakelen: Houd de AAN/UIT-knop (1) ingedrukt tot de rode LED-
indicator (3) oplicht.
Uitschakelen: Houd de AAN/UIT-knop (1) gedurende 3 sec. ingedrukt
totdat de rode LED-indic
C. Ins
1. Schakel het toestel in.
2. Houdt de Q-toets (2) ingedrukt om in het menu t
apparaat in de opnamemode staat.
3. Druk op Q-toets (2) tot u het gewenste tabblad kunt sel
op de pijltjestoetsen (4-5) om een instelling te sel
4. Klik na de selectie op Q-toets (2) om te be
instelling wijzigen naar uw voorkeur
je op de Q-toets (2).
5. Druk op de Aan / uit knop (1) om het menu te verlaten.
D. Basiswerking (foto – film)
LET OP! De opnamemodi zijn niet te bestur
VIDEO-OPNAMEMODUS
Bij het opstarten van de Quintezz Sportscam 720p be
Video-opnamemodus. In de linkerbovenhoek v
videocamera-pictogram weer
Om de opnamemodus te wijzigen, druk je kort op de Aan / Uit toets.
Om te starten met opnemen druk je op de Q-toets (2). Om te s
opnemen, druk je weer op de Q-toets (2).
Loop-opname (indien geactiveer
ieder videobestand elke 1, 3 of 5 minuten automatisch op. W
kaart vol is, wist het toest
DASHCAM MODUS:
• W
aangesloten, begint hij videobeelden op te nemen zodr
de auto wor
uitgezet.
• W
aangesloten, moet u op de knop Aan/uit toets (1) en daarna op de Q-toets
(2) drukken om beelden te beginnen op te nemen. Het toestel s
automatisch in de video-opnamemode. Druk nog eens op de Q-toets (2)
als u de opname wilt stoppen en de bestanden automatisch wilt opslaan.
• Opnemen in een lus: tijdens het opnemen slaat het apparaat ieder
videobestand elke 1, 3 of 5 minuten automatisch op. W
vol is, wist het toest
Opmerking: W
USB car charger (optioneel twww), zal de
camera automatisch aanschakel
secties (veranderbaar in de instellingen) en zal het beeld 180° dr
dashcamervaring te verbeter
wanneer u het toestel verbindt met de Quintezz 12/24V DUO USB car char
(optioneel te verkrijgen op www
FO
In de linkerbovenhoek v
weer
Druk op de Q-toets (2) om een foto te nemen.
AFSPEELMODUS
In de linkerbovenhoek v
• M.b.v de pijtjestoetsen (4-5) kunt u doorheen de opnamen scr
• Druk op de Q-toets (2) om met het afspelen te beginnen.
• Druk op de Q-toets (2) als u de opname tijdelijk wilt onderbrek
• H
oudt de Q-toets (2) ingedrukt om terug naar het begin van de opname te gaan.
PC MODUS (MSDC)
U kunt de Quintezz Sportscam 720p met behulp van de meegel
kabel op uw PC aansluiten. Hiermee kunt u een back-up maken of kunt u
bestanden op uw PC afspel
Om de Quintezz Sportscam 720p op uw PC te gebruiken zijn er geen driver
nodig aangezien deze door Windows zelf geïnstall
Windows pakket*. U moet de QUINTEZZ SPORTSCAM 720P als volgt aansluit
1. Zorg dat de batterij geladen is.
2. Maak enkel gebruik van de MEEGELEVERDE USB kabel, die in de
verpakking zit.
3. Zet de camera AAN.
4. V
5. De driver zal zichzelf nu install
bureaublad zal dan een nieuw
zien zijn (het kan ook zijn dat er automatisch een venster geopend w
waarin u kan aangeven hoe u de bestanden wilt bekijk
6. U kunt dan de bestanden zien in een map en deze dubbelklikken om de
video te laten afspelen door de s
Quicktime (kunt u eventueel zelf sel
Opmerking:
• U kunt ook de SD-kaart uit de Quintezz Sportscam 720p halen en deze
in een (ingebouwde) SD-kaart lezer plaatsen van uw PC of een l
kaartlezer gebruiken indien u deze zou hebben. Dit gaat snell
gemakkelijker in gebruik.
* Indien er wel een conflict zou zijn, de camera niet herk
geïnstall
www.
E. Software updates
Quintezz blijft haar product
basis een product-softwarwww.quintezz.com en klik
op ‘Support’ om te kijken of er een softwar
uw Quintezz Sportscamera.
5. RESET
W
de batterij, wacht 1 minuut en plaats de batterij opnieuw
verwijder
instellingen (datum, tijd, …) gewist w
6. RICHTLIJNEN EN SPECIFIC
• Gelieve de richtlijnen/wetten in uw land na te gaan betreft het l
gebruik van dit pr
• Windows: XP,Vista, 7 en Mac: 10.4 of hoger
• Bedrijfstemperatuur: -5 ° ~ 40 ° C
• Luchtvochtigheid : 10 % ~ 80 %
TIPS!:
• Gebruik het product niet zonder de wat
regent of nat kan w
• Zor
opnames te maken. Richt de camera niet r
andere s
beschadigen.
• Zor
die schade aan de lens of aan ander
• Dit pr
afval. In plaats daarvan bent u ervoor v
bruikbare appar
inzamelpunt voor r
7. SUPPORT
V
support@quintezz.com.
8. GARANTIE
Copyright©Quintezz. Quintezz is een gedeponeer
NV
dienstverl
een garantie van twee (2) jaar , v
tegen alle materiaal- en v
en de reikwijdte v
garantie kunnen van onze website www wor
720p Sportscamera
We, the under
Company: TE-GROUP nv
Addres Kapelsestraat 61, 2950 Kapell
declare, that the f
Product Name: QUINTEZZ SC80
Product T 720p Sports Camera
P
A
B
E
F
G
J
I
D
C
H
Illustration 2
3
9
8 7
2
4
5
1
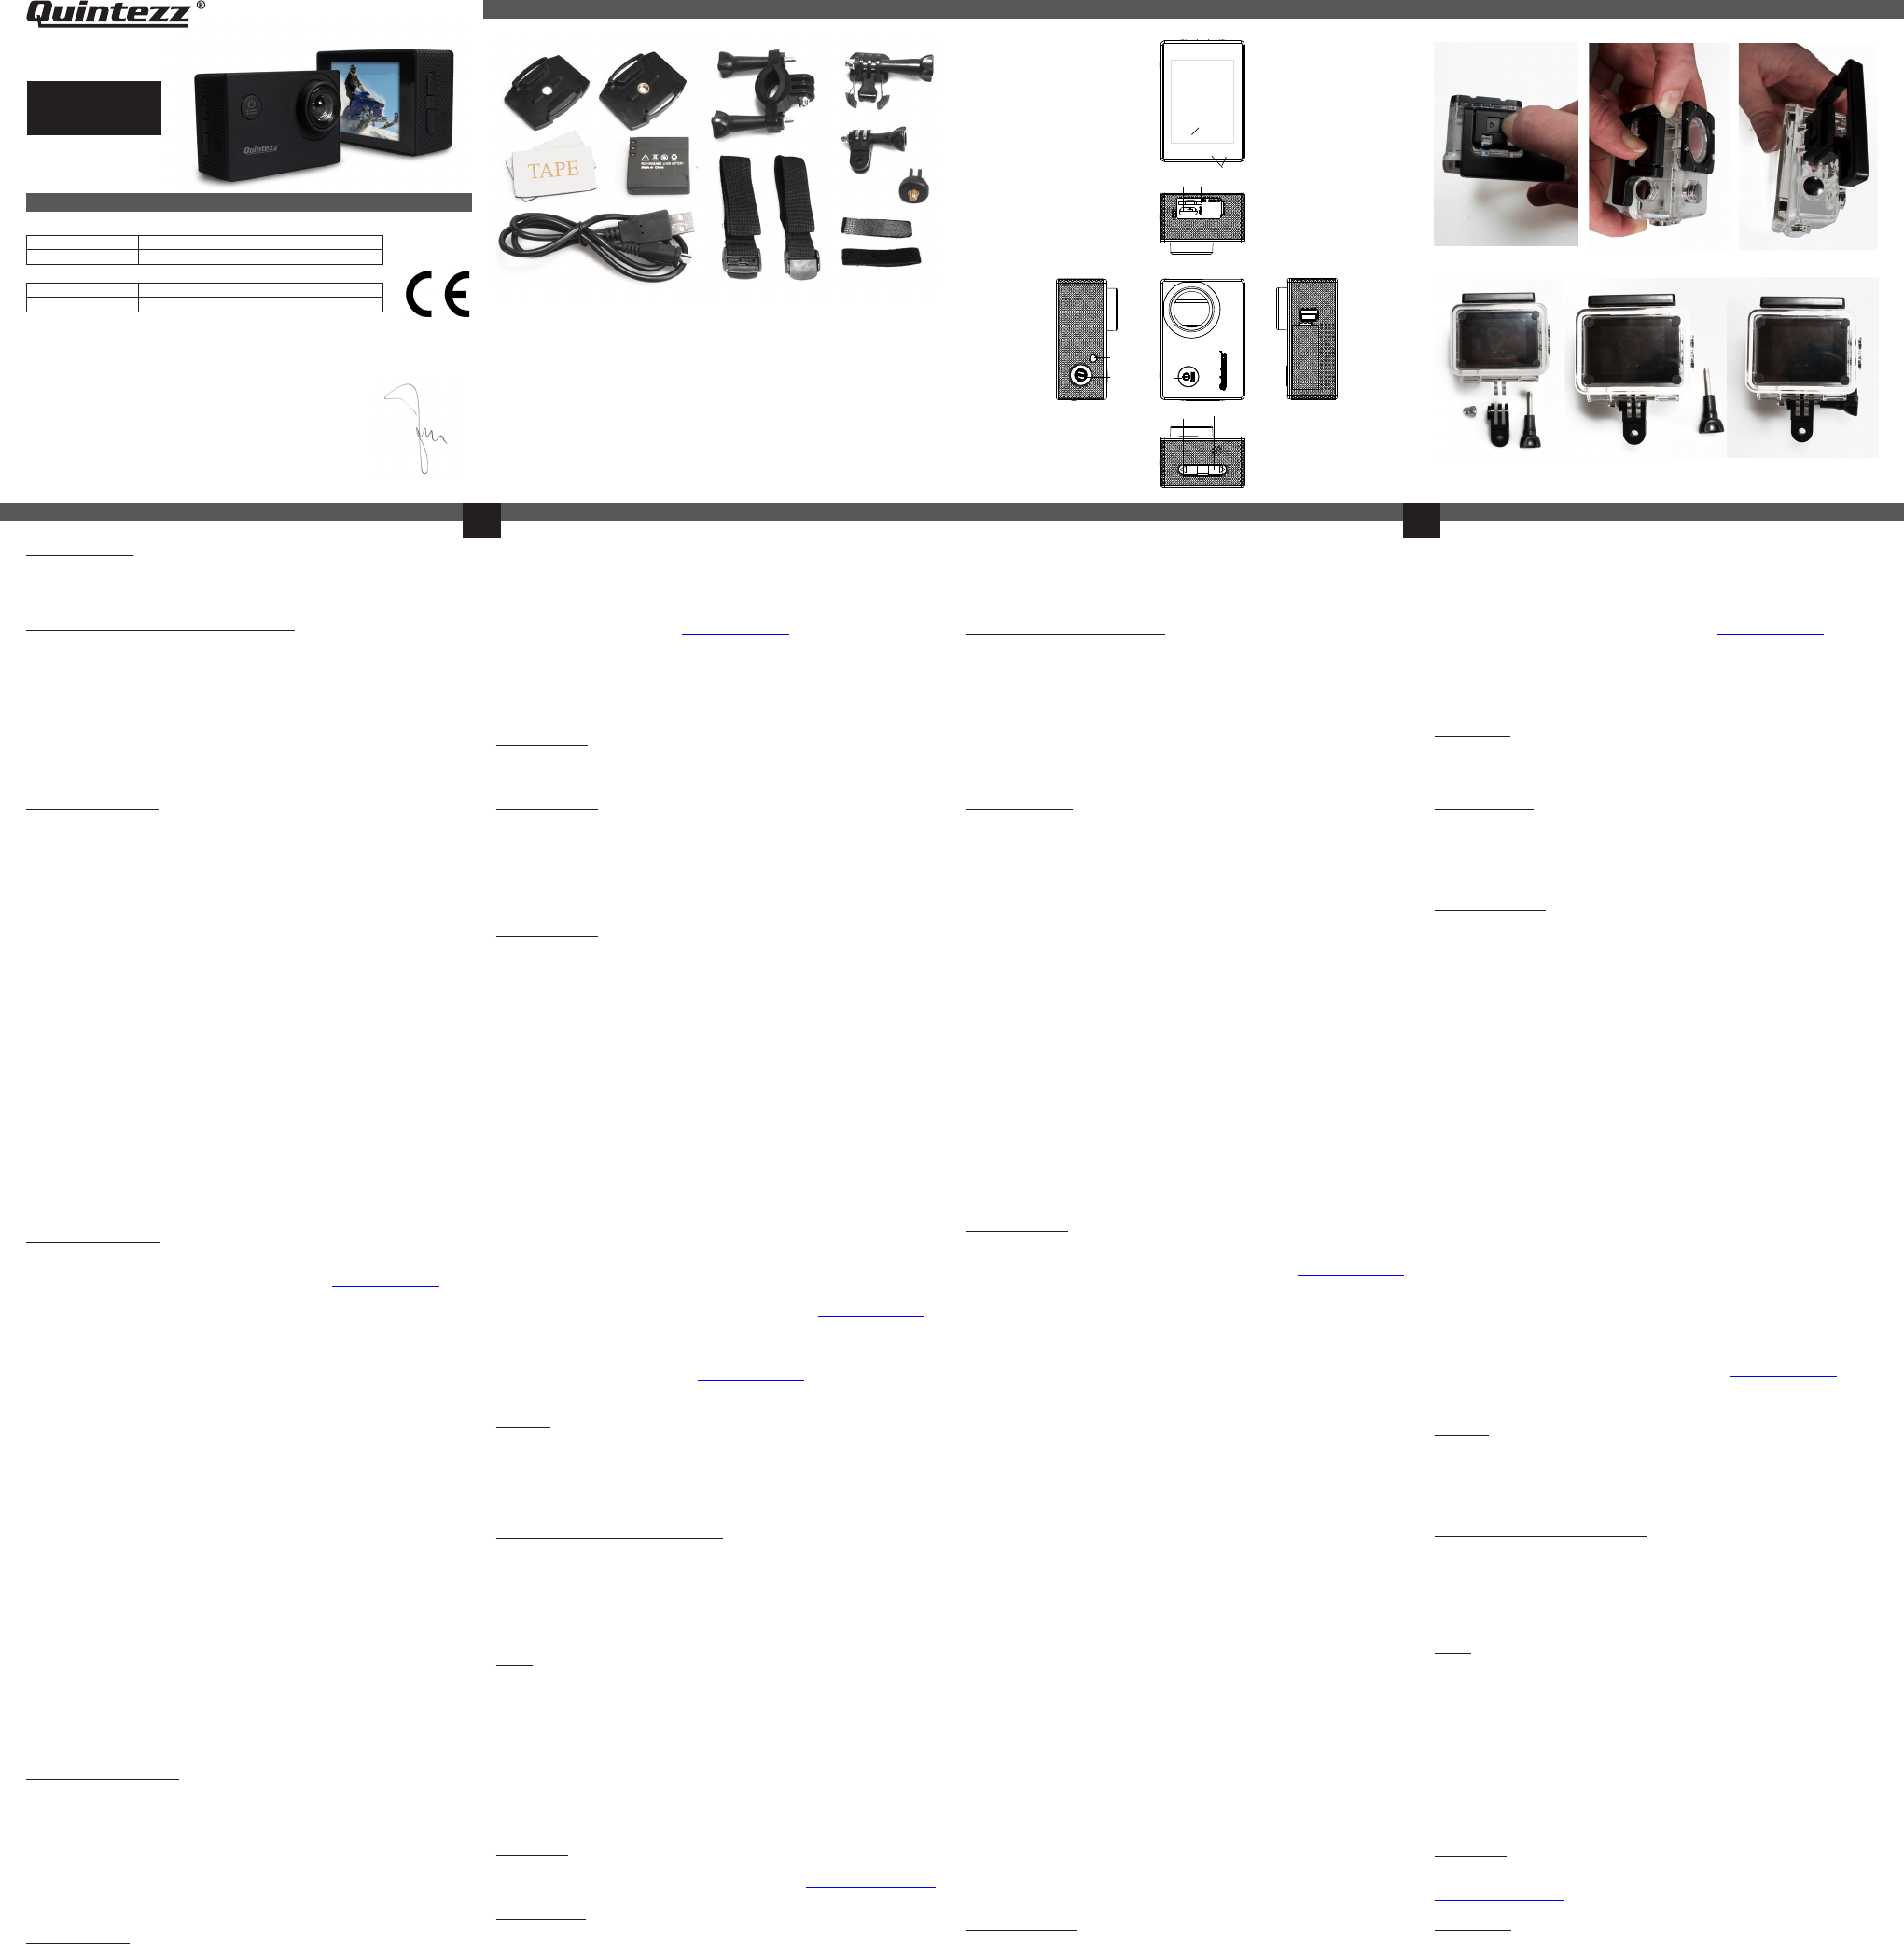
A. Flat Surfac
as: snowboar
B. Curved Surfac-
face such as: helmets, …
C. Bike/Pol
D. Fixation tool: to be used in combination with A or B
E. 90° Side Mount: use your camera in a 90° angl
F Scr
G. V
H. Strap Mounts: to be used in combination with A or B
I. Battery
J. Micro USB Cabl
K. Extra tape: for A or B
K
1. INTRODUCTION
Congratulations with your pur
befor
2. ILLUSTRA(see illustration 1)
1. ON / OFF / MODE-button
2. Q-Button
3. Led indication
4. UP: menu contr
5. DOWN: menu contr
6. Micro SD sl
7. Micro USB sl
8. Led indication
9. Screen
3. BEF
A. Battery
a. Place the battery
Slide the button on the bottom of the camera until the c
be taken out. Remove the c
close the c
b. Charging the batt
Insert the USB-cable in the USB-slot (7) of the Sportsc
Insert the other end of the USB-cable into y
USB-charging de
mode will be active.
The r
is starting to char
battery is full
B. Waterpr(see illustration 2)
T
mechanism.
NOTE: Muffled sound is inevitabl
waterproof c
C. Mounting the camer(see illustration 2)
Place the camera on the scr
the pref
NOTE: we str
normal room temper
4. GETTING ST
A. Placing an SD-card
Insert a micrwww) into
the micro SD-sl
Place the car
it ‘clicks’ in plac
carefull
Note: The c
the SD-car
We r
computer or in the settings-menu of your c
Q-button until the settings ar
settings and choose F
B. ON/OFF
Turning the deKeep the ON/OFF button (1) pushed in until the
red LED-indication (3) lights up.
Turning the deKeep the ON/OFF button (1) pushed in until the
red LED-indication (3) goes out
C. Changing the settings
1. T
2. Keep the Q-button pushed in to go to the menu when the devic
the rec
3. Pres
the UP & DOWN buttons to sel
4. After selecting the desir
and change the setting to your pr
pres
5. Pres
D. Basic Controls (Photo – Video)
NOTE: The diff
VIDEO-RECORDING MODE
When starting up the Quintezz Sportscam 720p, the Video-Rec
is active as default. In the upper-l
purple video-camer
T
T
Q-button (2) again.
Looprec
5 minutes in separate fil
deleted automaticall
DASHCAM MODE:
• When the Quintezz Sportscam 720p is connected to the po
your car
rec
• When the Quintezz Sportscam 720p is not connected to the power outl
of your car
button (1) and pres
will automaticall
again to stop r
• Loop-r
minutes in separate fil
deleted automaticall
Note: When you connect the de
charger (optionallwww), the camera will turn on
automaticall
settings) and will rotat
These actions will only be e
Quintezz 12/24V DUO USB car char
www
PICTURE MODE
In the upper left c
Pres
PLAYBA
In the upper left c
• By using the arro
• Pres
• Pres
• Keep pressing the Q-button (2) to go back to the beginning of the
rec
PC MODE (MSDC)
By using the included USB-cable yQuintezz Sportscam
720p to your computer t
computer
no specific drivers ar
PC. These will be install
operating system*. T
1. Make sur
2. Only use the included USB-c
3. T
4. Connect the USB-cable on one side with the camer
with your PC.
5. The driver will automaticall
will be regis
a window appearing showing dir
6. Y
QuickTime.
Note;
• Y
computer by using an adapter or an SD-car
and more efficient in use.
* If there is a conflict in installation, if the camer
corrwww
E. Software updates
Quintezz keeps impr
updates for softwarwww.quintezz.com and click
verify if a softwar
5. RESET
When the device is not functioning momentaril
Remove the battery
remo
(date, time, …) will be deleted.
6. GUIDELINES AND SPECIFIC
• Please c
of this product.
• Windows: XP, Vista, 7 and Mac: 10.4 or higher
• W
• Humidity: 10% ~80%
TIPS!:
• Do not use the devic
when the camera might get wet.
• Make sure ther
the camera dir
might damage the optic parts of your camera.
• Make sure the pr
could damage the l
• This product cannot be disposed with the r
Instead, you ar
recy
7. SUPPORT
For all quessupport@quintezz.c.
8. GUARANTEE
Copyright © Quintezz. Quintezz is a r
Quintezz brand stands f
service. That is why Quintezz warrants this pr
material and workmanship for a period of tw
original purchase of the pr
extent of r
from our wwww.