ANALOG QUARTZ INSTRUCTION MANUAL
MODE D’EMPLOI DE QUARTZ ANALOGIQUE
MANUAL DE INSTRUCCIONES DE CUARZO ANALOGICO
BEDIENUNGSANLEITUNG FÜR ANALOG-QUARZUHR
CAL. FS00/FS01/FS10/FS11
CAL. FS20/FS21/FS51
5th Floor, CBM Building, 5-68-10
Nakano, Nakano-ku, Tokyo, 164-0001, JAPAN
Tel: 81-3-5345-7860 / Fax: 81-3-5345-7861
TO-0510
WATCH & CLOCK OVERSEAS DIVISION
SPECIFICATIONS
1) Feature
Chronograph 1/1 second basis
Minimum measuring unit : 1/1 second
Maximum measuring range: Up to 59minutes 59seconds
24hours indication
Date indication
2) Accuracy
Average ±20 second/month under normal circumstances
(5°C to 35°C / 41°F to 95°F)
3) Battery
Type of Battery 1 Silver Oxide SR626SW type
Battery Life : About 2 years (*Customer’s use based upon 60
minutes/day for chronograph)
*
The battery is a monitor power cell that has been factory-installed. For this
reason it may wear out before the 2 years from the time of purchase are up.
4) Operating Temperature
–10°C to 60°C / 14°F to 140°F
SPECIFICATIONS
1) Fonction
Chronographe sur la base de 1/1ème de seconde
Unité de mesure minimum : 1/1ème de seconde
Plage de mesure maximum: Jusqu'à 59 minutes et 59 secondes
Indication 24 heures
Indication de la date
2) Accuracy
Moyenne de ±20 secondes/mois en conditions normales
(5°C à 35°C / 41°F à 95°F)
3) Pile
Type de pile : 1 pile à l’oxyde d’argent SR626SW
Autonomie de la pile
:Environ 2 ans (*A raison d’une utilisation client
de 60 minutes/jour pour le chronographe)
*
La pile est une pile de contrôle qui a été montée en usine. Pour cette raison,
elle risque d’être épuisée avant les 2 ans à compter de la date d’achat.
4) Température de fonctionnement
–10°C à 60°C / 14°F à 140°F
ESPECIFICACIONES
1) Características
Cronógrafo con unidades de 1/1 segundo
Mínima unidad de medida: 1/1 segundo
Máxima gama de medición: Hasta 59 minutos 59 segundos
Indicación de 24 horas
Indicación de la fecha
2) Precisión
Promedio ±20 segundos/mes a temperaturas normales
(5ºC – 35ºC/41ºF – 95ºF)
3) Pila
Tipo de pila : 1 de óxido de plata SR626SW o equivalente
Vida de la pila: Unos 2 años (*Utilización por el cliente basado el
uso del cronógrafo durante 60 segundos/día)
*
La pila es una celda eléctrica para el monitor, instala de fábrica. Por esta
razón puede descargarse antes de los 2 años desde el tiempo de compra.
4) Temperatura de funcionamiento
–10ºC – 60ºC / 14ºF – 140ºF
TECHNISCHE DATEN
1) Funktionen
Stoppuhr (Chronograph) auf 1/1 Sekunde genau
Minimale Messeinheit : 1/1 Sekunde
Maximaler Messbereich: bis zu 59 Minuten, 59 Sekunden
24-Stunden-Anzeige
Datumsanzeige
2) Gangabweichung
Durchschnittlich ±20 Sekunden/Monat unter Normalbedingungen
(5 bis 35 ºC)
3) Batterie
Typ : 1 Silberoxid-Knopfzelle Typ SR626SW
Lebensdauer: ca. 2 Jahre (*Bei einer Nutzung der Stoppuhrfunktion
für die Dauer von 60 Minuten/Tag)
*
Die Batterie wurde werkseitig zu Prüfzwecken eingesetzt. Aus diesem Grund
ist sie u.U.bereits vor Ablauf von 2 Jahren nach Kaufdatum erschöpft.
4) Betriebstemperatur
–10 bis 60 ºC
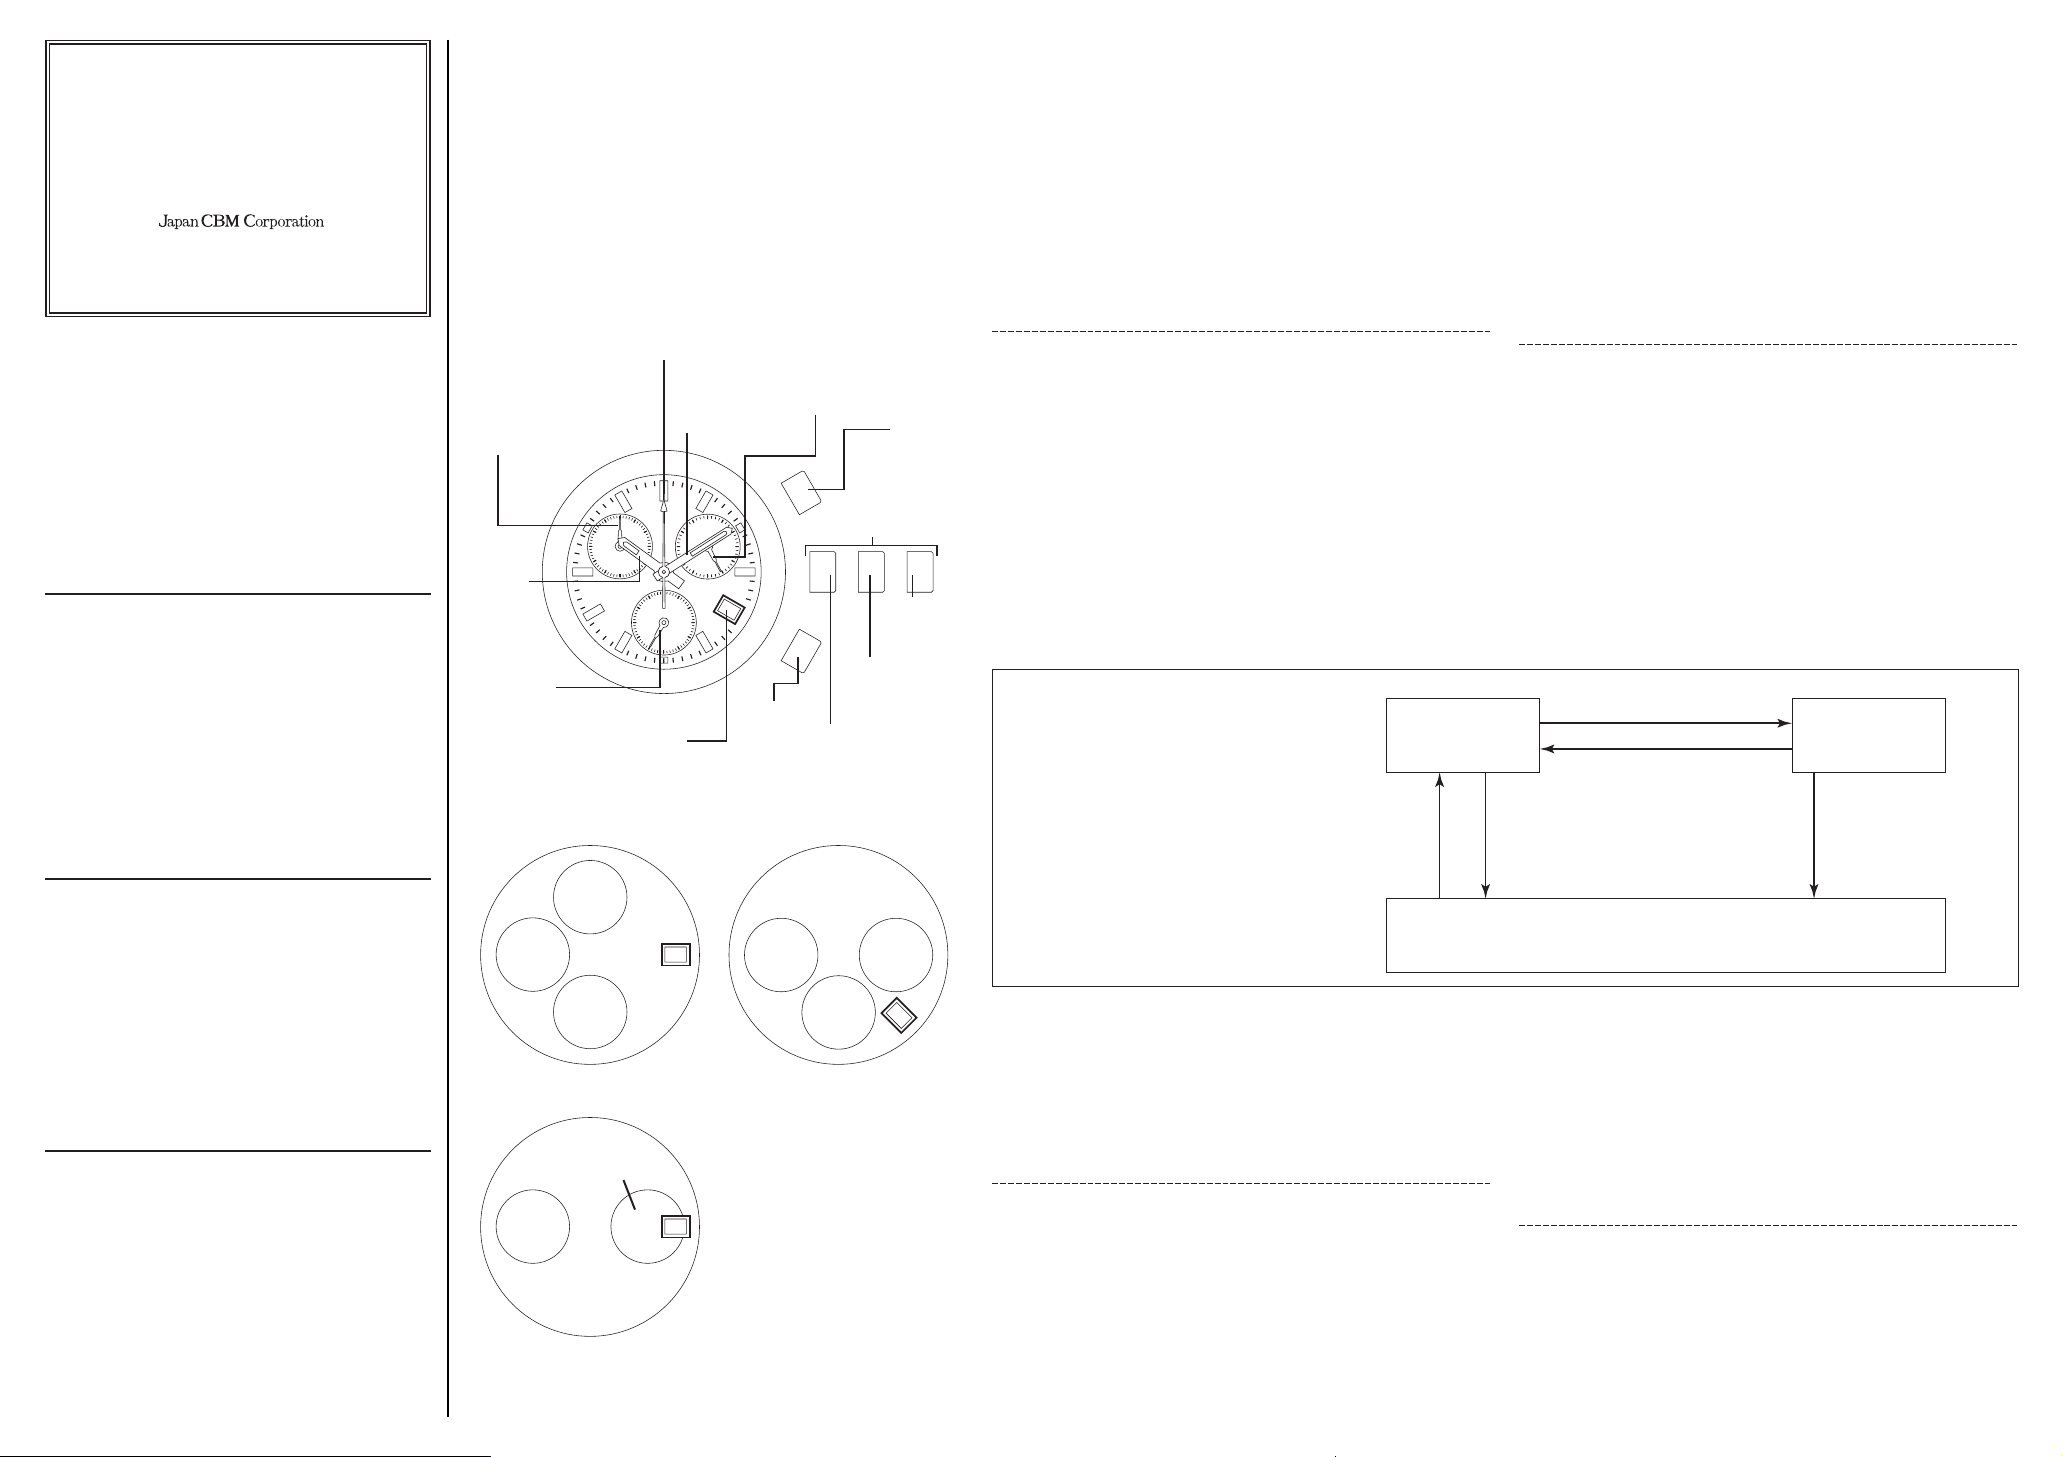
NAMES OF PARTS AND THEIR FUNCTION
The three small dials and the date window are arranged in one of three kinds, depending on
each model. All of them are operated similarly, however.
NOM DES PIECES ET LEURS FONCTIONS
Les trois petits cadrans et la fenêtre de date sont disposés selon une des trois dispositions
prévues selon les modèles. Mais tous opèrent de manière similaire.
NOMBRES DE LAS PIEZAS Y SUS FUNCIONES
Las tres pequeñas esferas y las ventanilla de la fecha están dispuestas en una de tres
formas, dependiendo de cada modelo. Sin embargo, todas ells funcionan de forma similar.
BEZEICHNUNG DER TEILE UND IHRE FUNKTION
Die drei kleinen Zifferblätter und das Fenster für die Datumsanzeige sind je nach Modell in
einer von drei Formen angeordnet. Die Bedienung ist jedoch in allen Fällen identisch.
(FS00/FS01)
12
24
6
18
30
60
15
45
30
60
10
40 20
50
Chronograph second hand
Aiguille de seconde du chronographe
Manecilla de los segundos del cronógrafo
Stoppuhr-Stundenzeiger
Minute hand
Aiguille des minutes
Manecilla de minutos
Minutenzeige
Hour hand
Aiguille des
heures
Manecilla de
las horas
Stundenzeiger
Crown
Couronne
Perilla
Krone
Normal position
Position normale
Posición normal
Normal position
Second hand
Trotteuse
Manecilla de los segundos
Sekundenzeiger
1st position
1er cran
1ª posición
1. position
2nd position
2ème cran
2ª posición
2. position
Button
Bouton
Botón
-Taste
Button
Bouton
Botón
-Taste
Date indication
Indication de date
Indicación de la fecha
Datumsanzeige
Chronograph minute hand
Aiguille des minutes
du chronographe
Manecilla de minutos
del cronógrafo
Stoppuhr-Minutenzeiger
24-hour hand
Aiguille 24 heures
Manecilla
de 24 horas
24-Stunden-Zeiger
OPERATION
1) Setting the Time
1. Pull the crown out to the 2nd position so that the second hand stops at 0 position.
2. Turn the crown to set hour and minute hands.
3. When the crown is pushed back to the normal position in synchonization with a time
signal, small second hand begins to run.
2) Setting the Date
1. Pull the crown out to the 1st position.
2. Turn the crown to right to set the date.
*If the date is set between the hours of around 9:00 PM and 1:00 AM, the date may not change
on the following day.
3. After the date has been set, push the crown back to the normal position.
3) Using the Chronograph
This chronograph is able to measure and display time in 1/1 sencond united up to
maximum of 1 hour.
Measuring time with the chronograph
1. The chronograph can be started and stopped each time button is pressed.
2. To reset, press button and the chronograph hands return to their 0 positions.
UTILISATION
1) Réglage de l’heure
1. Tirez la couronne sur le 2ème cran de façon que la trotteuse s'arrête à la position 0.
2. Tournez la couronne pour régler l'aiguille des heures et l’aiguille des minutes.
3. Lorsque vous repoussez la couronne sur sa position normale en synchronisation avec
un top horaire, la petite trotteuse commence à fonctionner.
2) Réglage de la date
1. Tirez la couronne sur le 1er cran.
2. Tournez la couronne vers la droite pour régler la date.
*Si vous réglez la date à une heure située entre 9:00 PM (soir) et 1:00 AM (matin), la date
risque de ne pas changer le jour suivant.
3. Quand l’heure est réglée, repoussez la couronne sur sa position normale.
3) Utilisation du chronographe
Ce chronographe est capable de mesurer et d'afficher le temps par 1/1 èmes de seconde
jusqu’à la durée maximale cumulée d’1 heure.
Mesure du temps avec le chronographe
1. Le chronographe démarre et s’arrête chaque fois que vous appuyez sur le bouton .
2. Pour remettre à zéro, appuyez sur le bouton et les aiguilles du chronographe
reviendront à leurs positions 0.
FUNCIONAMIENTO
1) Ajuste de la hora
1.
Levante la perilla a la 2ª posición para que la manecilla de los segundos se detenga en
la posición 0.
2. Gire la perilla para ajustar las manecillas de la hora y minutos.
3. Cuando vuelve a presionar la perilla a la posición normal, sincronizado con la señal de
la hora en punto, la manecilla de los segundos empieza a funcionar.
2) Ajuste de la fecha
1. Levante la perilla a la 1ª posición.
2. Gire la perilla a la derecha para ajustar la fecha.
*Si se ajusta la fecha entre las horas entre 9:00 PM y 1:00 AM, la fecha puede no cambiar el
día siguiente.
3. Después de ajustar la fecha, presione la perilla a la posición normal.
3) Utilización del cronógrafo
Este cronógrafo puede medir y mostrar la hora en unidades de 1/1 segundo hasta un
máximo de 1 hora.
Medición del tiempo con el cronógrafo
1. El cronógrafo puede empezar y parar cada vez que presiona el botón .
2.
Para reponer, presione el botón y las manecillas del cronógrafo volverán a sus posiciones de 0.
BEDIENUNG
1) Einstellung der Uhrzeit
1.
Die Krone bis zur 2. Position herausziehen, damit der Sekundenzeiger an der 0-Position stoppt.
2. Mit der Krone den Stunden- und den Minutenzeiger einstellen.
3. Wird die Krone synchron mit einem Zeitsignal in die Normalposition zurückgedrückt, so
beginnt der kleine Sekundenzeiger umzulaufen.
2) Einstellung des Datums
1. Die Krone bis zur ersten Position herausziehen.
2. Durch Drehen der Krone nach rechts das Datum einstellen.
*Bei einer Datumseinstellung in der Zeit zwischen etwa 21.00 und 1.00 Uhr erfolgt u.U. am
nächstfolgenden Tag kein Datumswechsel.
3.
Nach der Einstellung des Datums die Krone wieder in die Normalposition zurückdrücken.
3) Einsatz der Stoppuhr
Diese Stoppuhr kann Zeitspannen bis zu maximal 1 Stunde akkumulierend in Einheiten
von 1/1 Sekunde messen und anzeigen.
Zeitmessung mit der Stoppuhr
1. Durch jedes Drücken der -Taste lässt sich die Stoppuhr starten und stoppen.
2. Zum Rücksetzen der Stopuhr die -Taste drücken, woraufhin die Stoppuhrzeiger in die
Nullstellung zurückkehren.
SELECTION OF DISPLAY
[Chronograph Mode]
SÉlECTION DE L’AFFICHAGE
[Mode Chronographe]
SELECCIÓN DE LA INDICACIÓN
[Modo del cronómetro]
WAHL DER DISPLAYANZEIGE
[Stoppuhr-Modus]
RESET
REINITIALISATION
REPOSICION
RÜCKSETZEN
Reset Chronograph
Réinitialisation du
chronographe
Reposición del
cronógrafo
Stoppuhr rücksetzen
Reset Chronograph
Réinitialisation du chronographe
Reposición del cronógrafo
Stoppuhr rücksetzen
Start
Démarrage
Empieza
Starten
Stop
Parada
Arrêt
Stoppen
Restart
Reinicialización
Redémarrage
Erneut starten
MEASUREMENT
MESURE
MEDICION
ZEIT MESSEN
STOP
ARRET
PARADA
ZEIT STOPPEN
4) Chronograph 0 Position Reset (Including after replacing battery)
This procedure should be performed when the chronograph second hand does not return
to the 0 position even after the chronograph has been reset, and including after the battery
has been replaced.
1. Pull the crown out to the 2nd position.
2. Press button to set the chronograph second hand to the 0 position.
3. The chronograph hands can be advanced rapidly by continuously pressing button .
4. Once the chronograph second hand has been zeroed, reset the time by pushing button
and push the crown back to normal position.
*Do not return crown to normal position while chronograph second hand return to 0 position.
Hands stop on the way when crown is returned to normal position and these hands position are
recognized as 0 position.
4) Réinitialisation à la position 0 du chronographe
(y compris après le remplacement de la pile)
Effectuez ces opérations si la trotteuse du chronographe ne revient pas à la position 0
quand vous réinitialisez le chronographe, et après le remplacement de la pile.
1. Tirez la couronne sur le 2ème cran.
2. Appuyez sur le bouton pour mettre la trotteuse du chronographe sur la position 0.
3. Les aiguilles du chronographe avancent rapidement si vous maintenez la pression sur
le bouton .
4. Lorsque la trotteuse du chronographe est revenue à 0, remettez l'heure à zéro en
appuyant sur le bouton et ramenez la couronne sur sa position normale.
*Ne ramenez pas la couronne sur sa position normale pendant que la trotteuse du chronographe
est en train de revenir à la position 0.
L’aiguille s’arrête à une position intermédiaire si vous ramenez la couronne sur sa position
normale, et ces positions seront considérées comme la position 0.
4) Reposición a la posición 0 del cronógrafo (También después de cambiar la
pila)
Este procedimiento debe hacerse cuando la manecilla de los segundos del cronógrafo no
vuelve a la posición 0 incluso después de reponer el cronógrafo y esto incluye el caso de
cambio de la pila.
1. Levante la preilla a la 2ª posición
2.
Presione el botón para ajustar la manecilla de segundos del cronógrafo a la posición 0.
3. Las manecillas del cronógrafo pueden avanzar rápidamente presionando
continuamente el botón .
4. Cuando la manecilla de los segundos del cronógrafo está en cero, reponga la hora
presionando el botón y vuelva a empujar la perilla a la posición normal.
*No vuelva la perilla a la posición normal cuando la manecilla de segundos del vuelve a la
posición 0.
Cada manecilla se detiene en el medio cuando la perilla vuelve a la posición normal y estas
posiciones se reconocen ahora como posición 0.
4) Rücksetzen der Stoppuhr in die 0-Position (auch nach Batterieaustausch)
Dieses Verfahren ist auszuführen, wenn der Sekundenzeiger nach dem Rücksetzen der
Stoppuhr nicht auf die 0-Position zurückspringt; auch nach jedem Batteriewechsel ist
dieses Vorgehen erforderlich.
1. Die Krone bis zur zweiten Position herausziehen.
2. Durch Drücken der -Taste den Stoppuhr-Sekundenzeiger in die 0-Position bringen.
3. Durch Gedrückthalten von -Taste lassen sich die Stoppuhrzeiger rasch bewegen.
4. Sobald der Stoppuhr-Sekundenzeiger in Ausgangsstellung ist, die Zeit rücksetzen und
die Krone in ihre Normalposition zurückdrücken.
*Während des Rücksetzens des Stoppuhr-Sekundenzeiger auf die 0-Position keinesfalls die
Krone in Normalposition zurückdrücken.
Andernfalls stoppt der Zeiger auf dem Weg, und diese Zeigerstellung wird dann als 0-Positionen
interpretiert.
CM : Chronograph minute
S :
24H : 24hours
D :
CM :
S :
24H : 24
D :
CM :
S :
24H :
D :
CM : Stoppuhr-Minutenzeiger
S :
24H : 24-Stunden
D :
FS51 does not have a second hand.
FS51 est sans trotteuse.
El FS51 no tiene manecilla de los segundos.
FS51 hat keinen Sekundenzeiger.
D
CM
S
24H
D
CM
S
24H
D
CM
24H
(FS10/FS11)
(FS51)
(FS20/FS21)