5th Floor, CBM Building, 5-68-10
Nakano, Nakano-ku, Tokyo, 164-0001, JAPAN
Tel: 81-3-5345-7860 / Fax: 81-3-5345-7861
TO-0518
WATCH & CLOCK OVERSEAS DIVISION
ANALOG QUARTZ INSTRUCTION MANUAL
MODE D’EMPLOI DE QUARTZ ANALOGIQUE
MANUAL DE INSTRUCCIONES DE CUARZO ANALOGICO
BEDIENUNGSANLEITUNG FÜR ANALOG-QUARZUHR
CAL. 6P25
SPECIFICATIONS
1) Feature
Hour, Minute, Second, Day, Date by 5hands.
2) Accuracy
Average ±20 second/month under normal circumstances
(5°C to 35°C / 41°F to 95°F)
3) Battery
Type of Battery : 1 Silver Oxide SR621SW type
Battery Life : About 3 years
*The battery is a monitor power cell that has been factory-installed.
For this reason, it may wear out before the 3 years from the time of
purchase are up.
4) Operating Temperature
–10°C to 60°C / 14°F to 140°F
SPECIFICATIONS
1) Fonction
Heures, Minutes, Secondes, Jour, Date par 5 aiguilles
2) Précision
Moyenne de ±20 secondes/mois en conditions normales
(5° à 35°C/41°F à 95°F)
3) Pile
Type de pile : 1 pile à l’oxyde d’argent SR621SW
Autonome de la pile : Environ 3 ans
*La pile est une pile de contrôle qui a été montée en usine. Pour
cette raison, elle risque d’être épuisée avant les 3 ans à compter de
la date d’achat.
4) Température de fonctionnement
0° à 60°C/14°F à 140°F
ESPECIFICACIONES
1) Funciones
Hora, minutos, segundos, día y fecha mediante 5 manecillas.
2) Precisión
Media de ±20 segundos/mes en circunstancias normales
(5°C a 35°C / 41°F a 95°F)
3) Pila
Tipo de pila : 1 pila de óxido de plata tipo SR621SW
Duración de la pila : Aproximadamente 3 años
*La pila ha sido instalada en la fábrica para comprobación. Por esta
razón, puede agotarse antes de 3 años desde el momento de la
adquisición del reloj.
4) Temperatura de funcionamiento
–10°C a 60°C / 14°F a 140°F
TECHNISCHE DATEN
1) Funktionen
Anzeige von Stunden, Minuten, Sekunden, Wochentag und
Datum mit Hilfe von 5 Zeigern.
2) Gangabweichung
Durchschnittlich ±20 Sekunden/Monat unter Normalbedingungen
(5 bis 35 °C)
3) Batterie
Typ : 1 Silberoxid-Knopfzelle SR621SW
Lebensdauer : ca. 3 Jahre
*Die Batterie wurde werkseitig zu Prüfzwecken eingesetzt. Aus
diesem Grund ist sie u.U. bereits vor Ablauf von 3 Jahren nach
Kaufdatum erschöpft.
4) Betriebstemperatur
–10 bis 60 °C
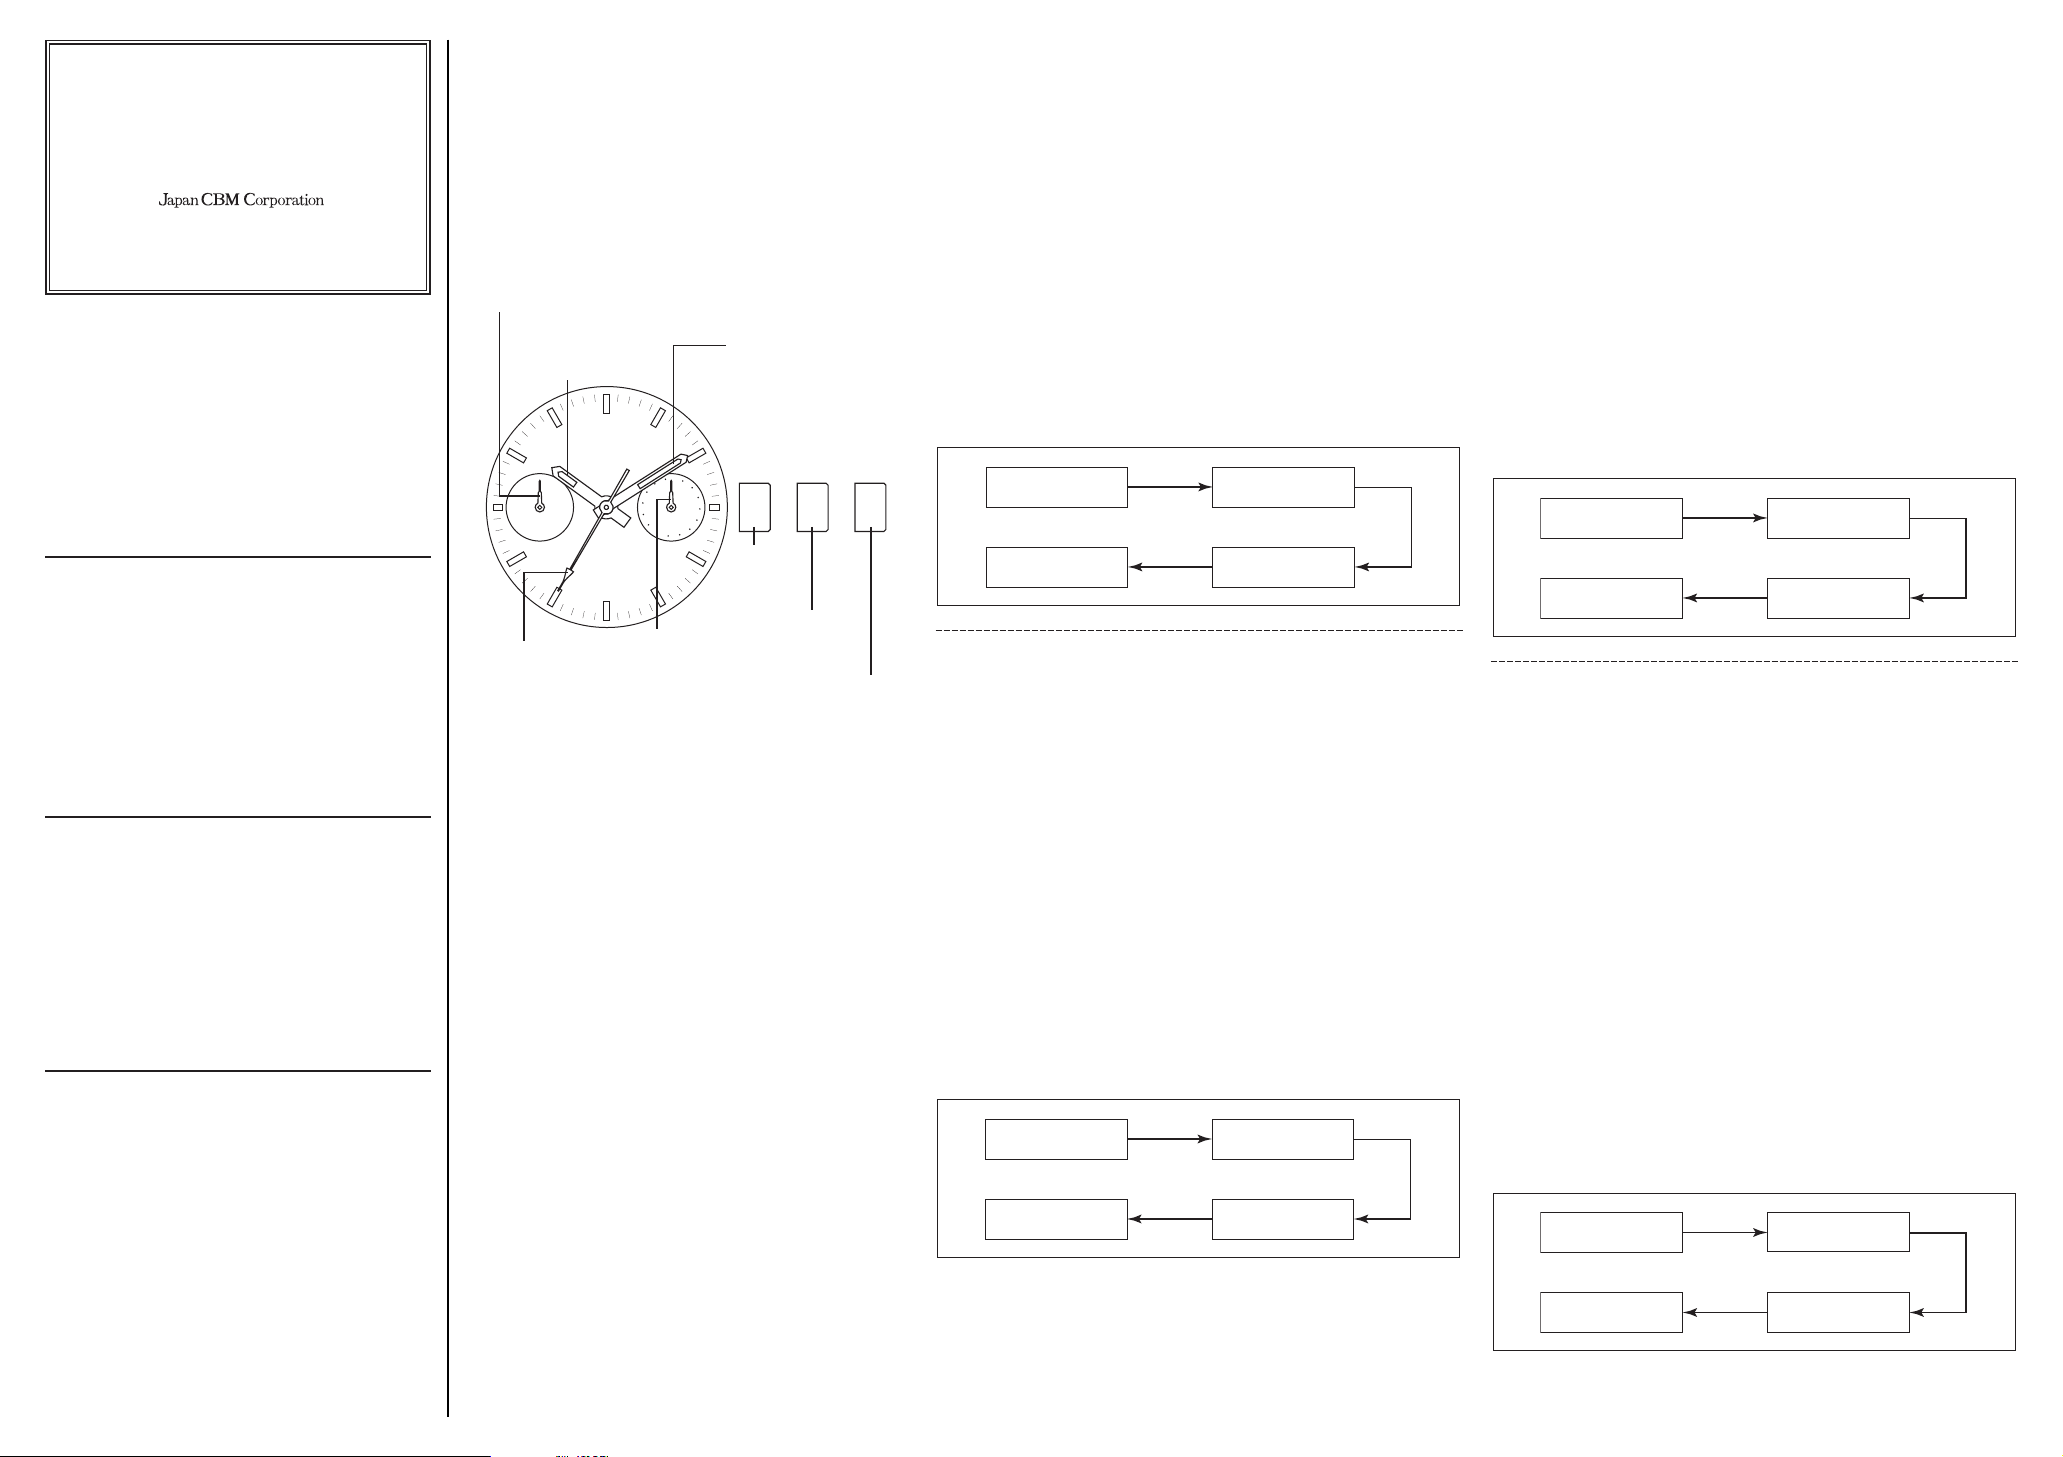
NAMES OF PARTS AND THEIR FUNCTION
NOM DES PIECES ET LEURS FONCTIONS
NOMENCLATURA Y FUNCIONES DE LAS
PARTES
BEZEICHNUNG DER TEILE UND IHRE
FUNKTION
M
O
N
S
A
T
S
U
N
T
U
E
F
R
I
W
E
D
T
H
U
31
1
3
5
7
27
25
29
23
21
19
17
15
13
11
9
Day hand
Aiguille du jour
Manecilla de la fecha
Wochentagszeiger
Second hand
Trtteuse
Manecilla de los segundos
Sekundenzeiger
Minute hand
Aiguille des minutes
Manecilla de los minutos
Minutenzeiger
Hour hand
Aiguille des heures
Manecilla de la hora
Stundenzeiger
Crown
Couronne
Corona
Krone
Normal
Normal
Normal
Normalposition
Date hand
Aiguille de date
Manecilla del día
Datumszeiger
1st Click
1er clic
1.er clic
1.
2nd Click
2ème clic
2.o clic
2.
OPERATION
1) Setting the Date (Quick change function)
Pull the crown out to the first click position and set the date by rotating the crown
backward(to rotate the hour and minute hands counter-crockwise).
If the date is set between 9:00 p.m. and 0:00 a.m., the date will not change correctly.
2) Setting the Second, Minute, Hour, Day
The second, minute, hour, and day are set by the same operation.
Pull out the crown to the second click position when the second hand reaches the 12-
o'clock position to stop the second hand there.
Rotate the crown forward (to rotate the hour and minute hands clockwise) to set the day.
The day hand moves forward 1 step each time the hour hand rotates two round.
You cannot set the day by rotating the crown in reverse.
After setting the day, set the hour and minute hands.
When setting the minute hand, put it 4 or 5 minutes forward from the current time, and
then return it to the current time.
After setting the time, push in the crown to the normal position, synchronizing with the
time signal.
The second hand starts moving again at the time when the crown is pushed back.
Notes
(1)
(2)
Setting Procedure
UTILISATION
1) Réglage de la date (fonction changement rapide)
Tirez la couronne à la position du 1er clic et réglez la date en la tournant en arrière (pour
tourner les aiguilles des heures et des minutes dans le sens anti-horaire).
Si vous réglez la date entre 9:00PM (soir) et 0:00 AM (matin), elle ne changera pas
correctement.
2) Réglage des secondes, minutes, heures, et jour
Les secondes, les minutes, les heures, et le jour se règlent par la même opération.
Tirez la couronne à la position du 2ème clic quand la trotteuse atteint la position 12
heures de sorte que la trotteuse s’y arrête.
Tournez la couronne en avant (pour tourner les aiguilles des heures et des minutes dans
le sens horaire) pour régler le jour.
L’aiguille du jour avance d’1 étape chaque fois que l’aiguille des heures fait deux tours.
Vous ne pouvez pas régler le jour en tournant la couronne en arrière.
Après le réglage du jour, réglez les aiguilles des heures et des minutes.
Au réglage de l’aiguille des minutes, réglez à 4 ou 5 minutes plus tôt que l’heure
présente, puis tournez en arrière pour corriger l’heure.
Après le réglage de l’heure, repoussez la couronne en position normale, en
synchronisation avec un top horaire.
La trotteuse recommence à avancer simultanément à la pression de la couronne.
Remarques
(1)
AM.
(2)
Procédure de réglage
Jour
Secondes
Heures
Minutes
Day
Second
Hour
Minute
OPERACIÓN
1) Ajuste de la fecha (Función de cambio rápido)
Extraiga la corona hasta la posición del primer clic, y ajuste la fecha girando la corona
hacia atrás (para que las manecillas de la hora y los minutos giren hacia la izquierda). Si
ajusta la fecha entre las 9:00 p.m. y 0:00 a.m., la fecha no cambiará correctamente.
2) Ajuste de los segundos, los minutos, la hora, y el día
Los segundos, los minutos, la hora, y el día se ajustan mediante la misma operación.
Extraiga la corona hasta la posición del segundo clic cuando la manecilla de los
segundos alcance la posición de las 12 en punto de forma que se pare allí.
Después gire la corona hacia adelante (para hacer que las manecillas de la hora y los
minutos giren hacia la derecha) para ajustar el día.
La manecilla del día avanzará 1 paso cada vez que la manecilla de la hora complete
dos vueltas.
Usted no podrá ajustar el día girando la corona en sentido contrario.
Después de haber ajustado el día, ajuste las manecillas de la hora y de los minutos.
Cuando ajuste la manecilla de los minutos, colóquela 4 o 5 minutos después de la hora
correcta, y después devuélvala a la hora exacta.
Después de haber ajustado la hora, empuje la corona al oír una señal horaria.
La manecilla de los segundos comenzará a funcionar cuando haya empujado la corona.
Notas
(1)
5:30 a.m.
(2)
Procedimiento de ajuste
BEDIENUNG
1) Einstellung des Datums (Schnelle Umschaltfunktion)
Die Krone bis zur 1. Rastposition herausziehen und durch Drehen entgegen dem
Uhrzeigersinn das Datum einstellen (Stunden- und Minutenzeiger laufen ebenfalls
entgegen dem Uhrzeigersinn um).
Bei einer Datumseinstellung zwischen 21.00 und 0.00 Uhr ist ein korrekter
Datumswechsel nicht möglich.
2) Einstellung von Sekunden, Minuten, Stunden, und Wochentag
Die Einstellung von Sekunden, Minuten, Stunden, und Wochentag erfolgt nach
demselben Verfahren.
Die Krone bis zur 2. Rastposition herausziehen, sobald der Sekundenzeiger die 12-
Stunden-Position passiert, damit der Sekundenzeiger dort stoppt.
Dann durch Drehen der Krone im Uhrzeigersinn den Wochentag einstellen (Stunden-
und Minutenzeiger drehen sich ebenfalls im Uhrzeigersinn).
Der Tageszeiger springt um einen Schritt vorwärts, nachdem der Stundenzeiger zwei
volle Umläufe ausgeführt hat.
Durch Drehen der Krone entgegen dem Uhrzeigersinn lässt sich der Wochentag nicht
einstellen.
Nach der Einstellung des Wochentags die Stunden- und Minuten einstellen.
Bei der Minuteneinstellung den Minutenzeiger 4 bis 5 Minuten gegenüber der aktuellen
Zeit vorstellen und dann auf die aktuelle Zeit zurückdrehen.
Nach der Einstellung der Uhrzeit die Krone synchron mit einem Zeitsignal in die
Normalposition zurück drücken.
Der Sekundenzeiger beginnt wieder seinen Umlauf, sobald die Krone in der
Normalposition ist.
Hinweise
(1)
0.00 und ca. 5.30 Uhr.
(2)
Einstellverfahren
Wochentag
Sekunden
Stunden
Minuten
Día
segundos
hora
minutos