Wi-Fi Smar
Quick setup manual
Wi-Fi Caméra pour extérieur intelligente
Guide de démarrage rapide
W
Kurzanleitung
Wi-Fi Slimme buitencamera
V
EN FR DE NL
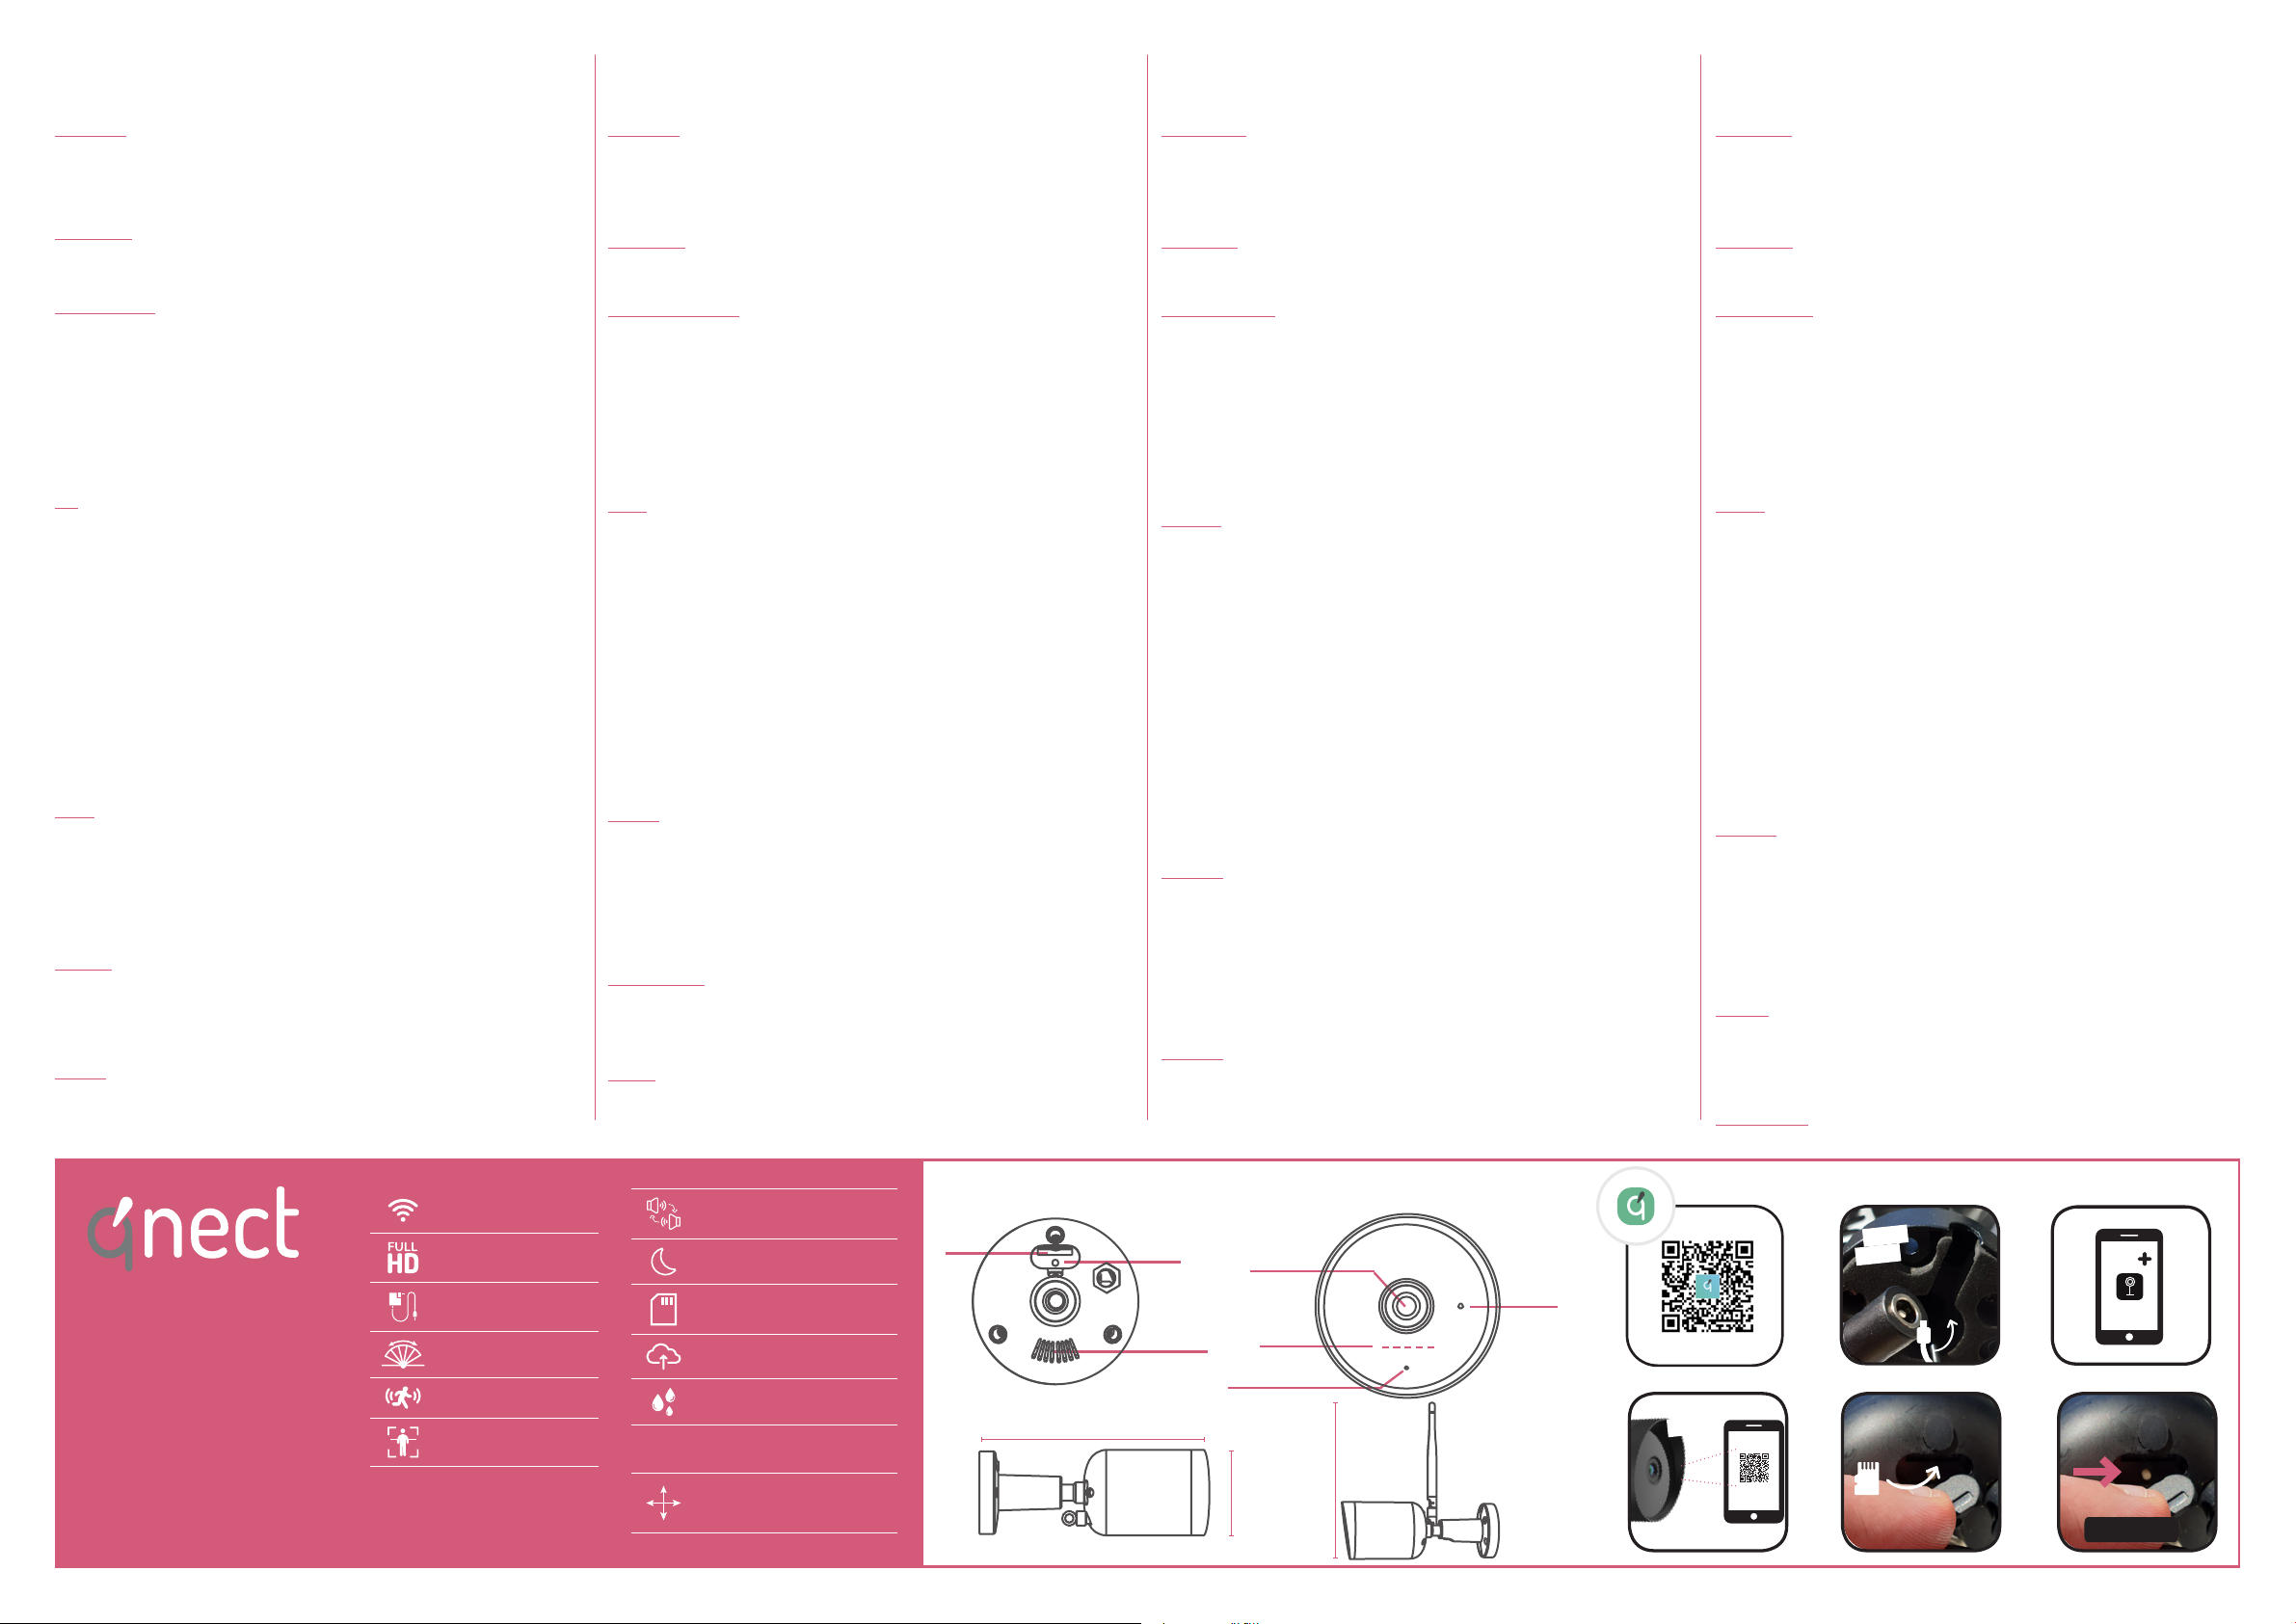
Description
1. Lens
2. IR
3. Speaker
4. Micro-SD car
5. Reset
6. Microphone
7. Status light
Camera LED
RED rapidly ashing: in connection mode BLUE constant : Connected
BLUE ashing : Searching connection
Before you start
‐
‐
described in the manual.
‐The functionality of WiFi connected product depends on the stablity of your home network. W
are not responsible for the stability and capability of your private network, and theref
optimal functionality of our products. If any questions about your private WiFi network, contact
your WiFi providor
‐W
therefore possible that there is a slight diff
operation of the product. If something is different or not clear, alw
most current manual version.
Use
1. Download and install the app ““ from Apple App Store or Google Play Store on
your mobile device.
2. Launch the app “.
3. Create a new account or log in to your e
4. T“+” to add the device.
5. Select Security > QN-IPC04 from the list of products.
Optional : Insert a memor
6. Connect the power adapter to the device. Inser
wall socket.
‐
reset button for about 6s until your hear a beep sound.
‐If the camera makes a beep
7. Confrm the Wi-Fi network and password. T
8. Hold your phone with a 15 – 20 cm distance in front of the camer
If the camera has detected the QR-code, you will hear a sound.
9. Conrm you heard a beep and enter the device
Note: The device name will also be used for push notications and will also be visible in your
Google Home or Amazon account.
10. Install the device on your desir
Safety
‐T
when service is required.
‐Disconnect the product from the mains and other equipment if a problem should occur
‐Do not use the device if any part is damaged or defective. If the device is damaged or defective,
replace the device immediately
‐Regarding the rights of individuals to take photos and videos, or regis
protection of personal data, we accept no liability for the illegal use of the equipment. Please
check your national rights before recor
W
‐Do not use cleaning solvents or abrasives.
‐Do not clean the inside of the device.
‐Do not attempt to repair the device. If the device does not operate correctly
new device.
‐Clean the outside of the device using a soft, damp cloth.
Suppor
‐If you need additional help, visit www.qnecthome.com
Description
1. Lentille
2. IR
3. Haut-parleur
4. Carte Micro-SD [Max 128Gb]
5. Réinitialiser
6. Microphone
7. V
Caméra LED
ROUGE clignotant rapidement: en mode
connexion
Constante BLEUE: Connecté
Clignotement BLEU: Recherche de connexion
Avant de commencer
‐Lisez attentivement le manuel avant utilisation.
‐N’utilisez l’appareil que pour l’usage auquel il est destiné. N’utilisez pas l’appareil à d’autr
que celles décrites dans le manuel.
‐La fonctionnalité du produit connecté WiFi dépend de la stabilité de votre r
Nous ne sommes pas responsables de la stabilité et des capacités de votre r
de la fonctionnalité optimale de nos produits. Si vous avez des ques
privé, contactez votre fournisseur WiFi.
‐Nous améliorons et mettons à jour continuellement nos produits et nos informations sur les
produits. Il est donc possible qu’il y ait une légère différ
et le fonctionnement du produit. Si quelque chose est différent ou pas clair
notre site W
Usage
1. T“qnect home” sur Apple App Store ou Google Play S
votre mobile.
2. Lancez l’appli “
3. Créez un nouveau compte ou connectez
4. T“+” pour ajouter l’appareil.
5. Sélectionnez Securité > QN-IPC04 dans la liste des produits
Option : Insérez une carte mémoire dans le logement prévu.
6. Relier l’adaptateur d’alimentation à l’appareil. Insére
d’alimentation dans la prise murale.
‐Si l’appareil n’
bouton de réinitialisation pendant environ 6 secondes jusqu’à ce que vous entendiez un bip
‐Si l’appareil émet un bip et que la LED rouge clignote rapidement: conrmez dans l’application.
7. Conrmez le réseau Wi-Fi et le mot de passe.
8. T
code QR, vous entendez un son.
9. Appuyez pour conrmer que vous ave
Remarque : Le nom de l’appareil sera également utilisé pour les notications push et sera
également visible dans votre compte Google Home ou Amazon.
10. Installez l’appareil à l’
Sécurité
‐Pour réduire le risque de choc électrique, ce pr
technicien qualié si une réparation s
‐Débranchez l’appareil et les autres équipements du secteur s
‐N’utilisez pas l’appareil si une pièce quelconque est endommagée ou défectueuse. Si l’appareil
est endommagé ou défectueux, remplacez
‐En ce qui concerne les droits des individus à prendre des photos et des vidéos, ou à enregistr
sons, la loi sur la protection des données personnelles, nous déclinons toute responsabilité pour
l’utilisation illégale de l’équipement. V
images.
Avertissement !
‐N’utilisez pas de solvants ni de produits abrasifs.
‐Ne nettoyez pas l’intérieur de l’appareil.
‐Ne tentez pas de réparer l’appareil. Si l’appar
‐Nettoyez l’
Soutien
‐Si vous avez besoin d’aide supplémentaire, visitez www.qnecthome.com
Beschreibung
1. Objektiv
2. IR
3. Lautsprecher
4. Micro-SD [Max 128Gb]
5. Rücksetzen
6. Mikrofon
7. Statusanzeige
Kamera LED
RO BLAUE Konstante: V
BLAUE blinkt : V
Bevor du anfängst
‐Lesen Sie das Handbuch vor Gebrauch sorgfältig durch. Be
späteren Nachschlagen auf.
‐V
andere Zw
‐Die Funktionalität eines Produkts mit WiFi-
Heimnetzwerks ab. Wir sind nicht v
privaten Netzwerks und damit für die optimale F
Fragen zu Ihrem privaten WL
‐Wir verbessern und aktualisieren kontinuierlich unsere P
ist daher möglich, dass zwischen der Beschreibung in diesem Handbuch und dem Betrieb des
Produkts ein geringfügiger Unterschied besteht. W
Sie auf unserer W
Gebrauch
1. Laden Sie die App “ vom Apple App Store oder Google Play Store auf Ihr
Mobilgerät herunter und installieren Sie sie.
2. Starten Sie die App “qnect home”.
3. Erstellen Sie ein neues Konto oder melden Sie sich bei Ihr
4. Tippen Sie auf “+” , um das Gerät hinzuzufügen.
5. WÜberwachung > QN-IPC04 aus der Produktliste.
Hinweis: Setzen Sie eine Speicherkarte in den Speicherkar
6. V
Netzadapters in die W
‐W
Reset-
‐W
App.
7. Bestätigen Sie das Wi-Fi-Netzwerk und das Passwort
wird angezeigt.
8. Halten Sie Ihr T
den QR-Code erkannt hat, hören Sie einen
9. Tippen Sie, um zu bestätigen, dass Sie den T
ein.
Hinweis: Der Gerätename wird auch für Push-Benachrichtigungen verwendet und ist auch in
Ihrem Google Home- oder Amazon-Konto sichtbar.
Installieren Sie das Gerät mithilfe des Installationshandbuchs an Ihrem ge
Sicherheit
‐Um die Gefahr eines elektrischen Schlags zu verringern, sollte dieses Produkt bei erforderlichen
Servicearbeiten ausschließlich von einem autorisier
‐Bei Problemen trennen Sie das Gerät bitte von der Spannungs
Geräten.
‐V
oder defekt, erneuern Sie es unverzüglich.
‐In Bezug auf das Recht von Einzelpersonen, Fotos und Videos aufzunehmen oder T
registrieren, das Gesetz zum Schutz personenbez
für die illegale V
Bilder aufnehmen.
W
‐V
‐Reinigen Sie das Gerät nicht von innen.
‐V
tauschen Sie es gegen ein neues aus.
‐Reinigen Sie das Äußere des Geräts mit einem weichen feuchten T
Beschrijving
1. lens
2. IR
3. Speaker
4. Micro SD-kaart [Max 128Gb]
5. Reset
6. Microfoon
7. Status licht
Camera LED
ROOD snel knipperend: in verbindingsmodus BLAUW constant: V
BLAUW knipperend: verbinding z
V
‐Lees de handleiding zorgvuldig voor gebruik. Bewaar de handleiding voor toek
‐Gebruik het apparaat alleen voor de beoogde doeleinden. Gebruik het apparaat niet voor ander
doeleinden dan beschreven in de handleiding.
‐De functionaliteit van een met wi verbonden product hangt af van de stabiliteit v
thuisnetwerk. Wij zijn niet verantwoordelijk voor de stabiliteit en mogelijkheden van uw priv
netwerk, en dus voor de optimale functionaliteit van onze producten. Neem bij vragen ov
eigen wi-netwerk contact op met uw wi-provider
‐W
mogelijk dat er een klein verschil is tussen de beschrijving in deze handleiding en de bediening
van het product. Als er iets anders is of niet duidelijk is, kijk dan altijd op onze w
meest actuele handmatige versie.
Gebruik
1. Download en installeer de “ app uit de Apple App Store of Google Play Store op
uw mobiele apparaat.
2. Activeer de “ app.
3. Maak een nieuw account aan of log in op uw bestaande account.
4. Druk op “+” om het apparaat toe te voegen.
5. Selecteer Beveiliging > QN-IPC04 uit de pr
Opmerking: plaats een geheugenkaart in de geheugenkaar
6. Gebruik de voedingsadapter om op het apparaat aan te sluiten. Plaats de netstekk
stroomadapter in het stopcontact.
‐Als het apparaat geen “piep
seconden op de resetknop totdat u een pieptoon hoort.
‐Als het apparaat een pieptoon maakt en de rode LED snel knippert: bevestig in de app.
7. Bevestig het wi-netwerk en he
8. Houd uw telefoon op een afstand v
gedetecteerd heeft, hoort u een geluid.
9. Tik op de telefoon om te bevestigen dat u he
apparaat in.
Opmerking: De apparaatnaam wordt ook gebruikt voor pushmeldingen en is ook zichtbaar in je
Google Home- of Amazon-account.
10. Installeer het apparaat op de gewens
V
‐Dit product mag voor onderhoud uitsluitend door een erkende technicus worden geopend om
het risico op elektrische schokken te verkleinen.
‐Koppel het product los van het stopcontact en v
voordoen.
‐Gebruik het apparaat niet als een onderdeel beschadigd of defect is. V
of defect apparaat onmiddellijk.
‐Met betrekking tot de rechten van individuen om f
te registreren, de w
aansprakelijkheid voor illegaal gebruik van de apparatuur. Controleer uw nationale rechten
voordat u beelden opneemt.
Opgelet!
‐Gebruik geen reinigingsmiddelen of schuurmiddelen.
‐Reinig niet de binnenzijde van het apparaat.
‐Probeer het apparaat niet te repar
door een nieuw apparaat.
‐Reinig de buitenzijde van het apparaat met een zachte, vochtige doek.
Ondersteuning
‐Als je meer hulp nodig hebt, ga dan naar www.qnecthome.com
Ar
QN-IPC04
RESET
Max. 128Gb >6s
BEEP
BEEP
BEEP
BEEP
5
3
4
Connects directly to your
home Wi-Fi network
FULL HD 1080P
12V DC 1000mA
130° viewing angle
Motion detection
Smar
T
IR night view 10m
Micro SD Storage
(Max 128Gb)
Cloud Storage option
IP65
Antenna gain : 3 dB
Max. transmit power ≤20 dBm
Dimensions:
Ø 60 x 162 mm (Antenna 115 mm)
BAC
1
6
7
2
FRONT
Suppor
60 mm
162 mm
162 mm