2
How to Install the Receiver
Before the heart rate monitor can be used, the included receiver must be installed.
To install the receiver in an exercise cycle or an elliptical crosstrainer, refer to the instructions in your exer-
cise cycle user’s manual or elliptical crosstrainer user’s manual. After you have installed the receiver, refer to
pages 10 and 11 of this user’s guide. Note: If you have lost your user’s manual, go to www.iconservice.com on
the World Wide Web, or call toll-free 1-800-999-3756.
To install the receiver in a treadmill, refer to the instructions in your treadmill user’s manual. After you have in-
stalled the receiver, refer to pages 10 and 11 of this user’s guide. Note: If you have lost your user’s manual, go to
www.iconservice.com on the World Wide Web, or call toll-free 1-800-999-3756. If your treadmill user’s manual
does not include instructions for installing the receiver, refer to pages 2 through 9 of this user’s manual.
Pages 2 through 9 include 11 different sections that show how the receiver should be installed in different styles
of treadmills. Find the drawings that most closely resemble your treadmill, and follow the instructions in that sec-
tion to install the receiver. Note: Your treadmill may not look exactly like the treadmills shown in the drawings. If
you have questions, call toll-free 1-800-999-3756.
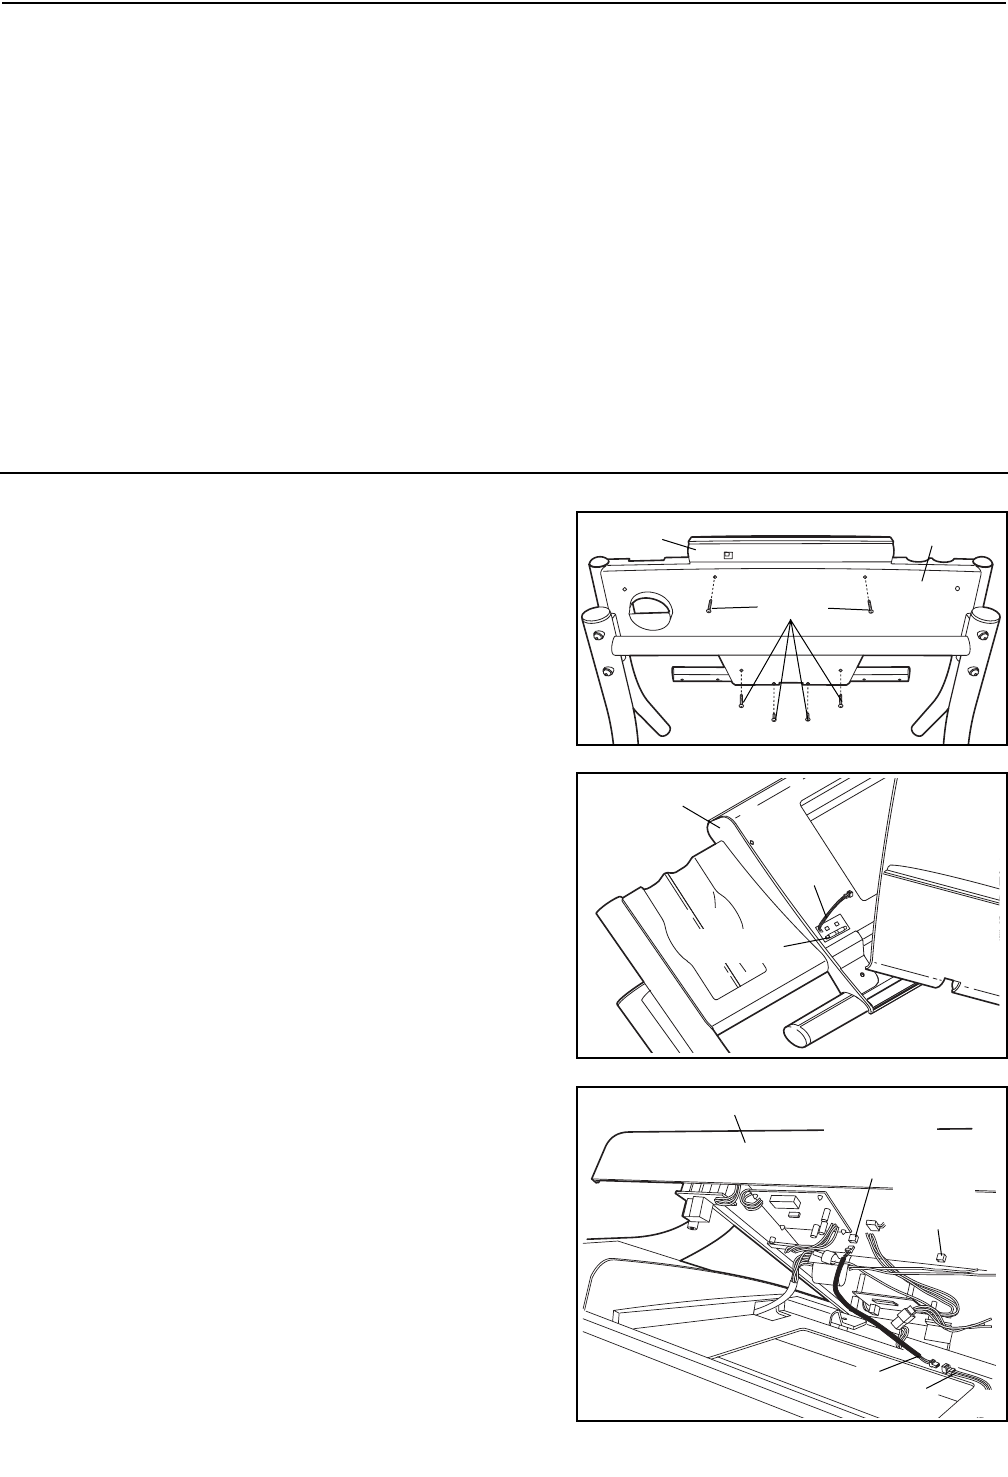
1. Make sure that the power cord is unplugged. Remove
the indicated Screws from the Console Back (A).
Important: The Screws may be different lengths. Keep
track of which Screws were removed from which holes.
2. Peel the paper off the pad on the bottom of the Receiver
(B). Turn the Receiver so the cylinder is on the side
shown, and press the Receiver into the bottom of the
Console Base (C) in the indicated location.
A
C
Screws
1
2
C
B
Cylinder
3. Connect the included Short Jumper Wire (D) to the wire
on the Receiver (B). Connect the other end of the Short
Jumper Wire to the PULSE 2 or PLS2 jack on the back of
the Console (C). If there is a wire already plugged into
the PULSE 2 jack, unplug it. Note: The other wires in-
cluded with the receiver may be discarded. The Wire Tie
can be used to tie wires, if needed.
Make sure that no wires are pinched. See step 1.
Reattach the Console (C) with the Screws. Important: If
the Screws are not put back into the same holes from
which they were removed, the Console will be dam-
aged.
C
PLS2
Jack
PULSE 2
Jack
3
D
B