3
UNPACKING INSTRUCTION
CAUTION! Immediately upon receiving the product, carefully unpack the carton, check the contents to ensure that all parts are
present, and have been received in good condition. Notify the shipper immediately and retain packing material for inspection if
any parts appear damage from shipping or the package itself shows signs of mishandling. Save the package and all packing
materials. In the event that the product must be returned to the factory, it is important that the product be returned in the original
factory box and packing.
If the device has been exposed to drastic temperature fluctuation (e.g. after transportation), do not switch it on immediately. The
arising condensation water might damage your device. Leave the device switched off until it has reached room temperature.
POWERSUPPLY
On the label on the backside of the product is indicated on this type of power supply must be connected. Check that the mains
voltage corresponds to this, all other voltages than specified, the light effect can be irreparably damaged. The product must also
be directly connected to the mains and may be used. No dimmer or adjustable power supply.
Always connect the device to a protected circuit (circuit breaker or fuse). Make sure the device has an appropriate
electrical ground to avoid the risk of electrocution or fire.
REPLACING THE FUSE
If the fuse is defective, replace the fuse with a fuse of the same type and value. Before replacing the fuse, unplug mains lead.
Procedure:
Step 1: Open the fuse holder on the rear panel with a fitting screwdriver.
Step 2: Remove the old fuse from the fuse holder.
Step 3: Install the new fuse in the fuse holder.
Step 4: Replace the fuse holder in the housing.
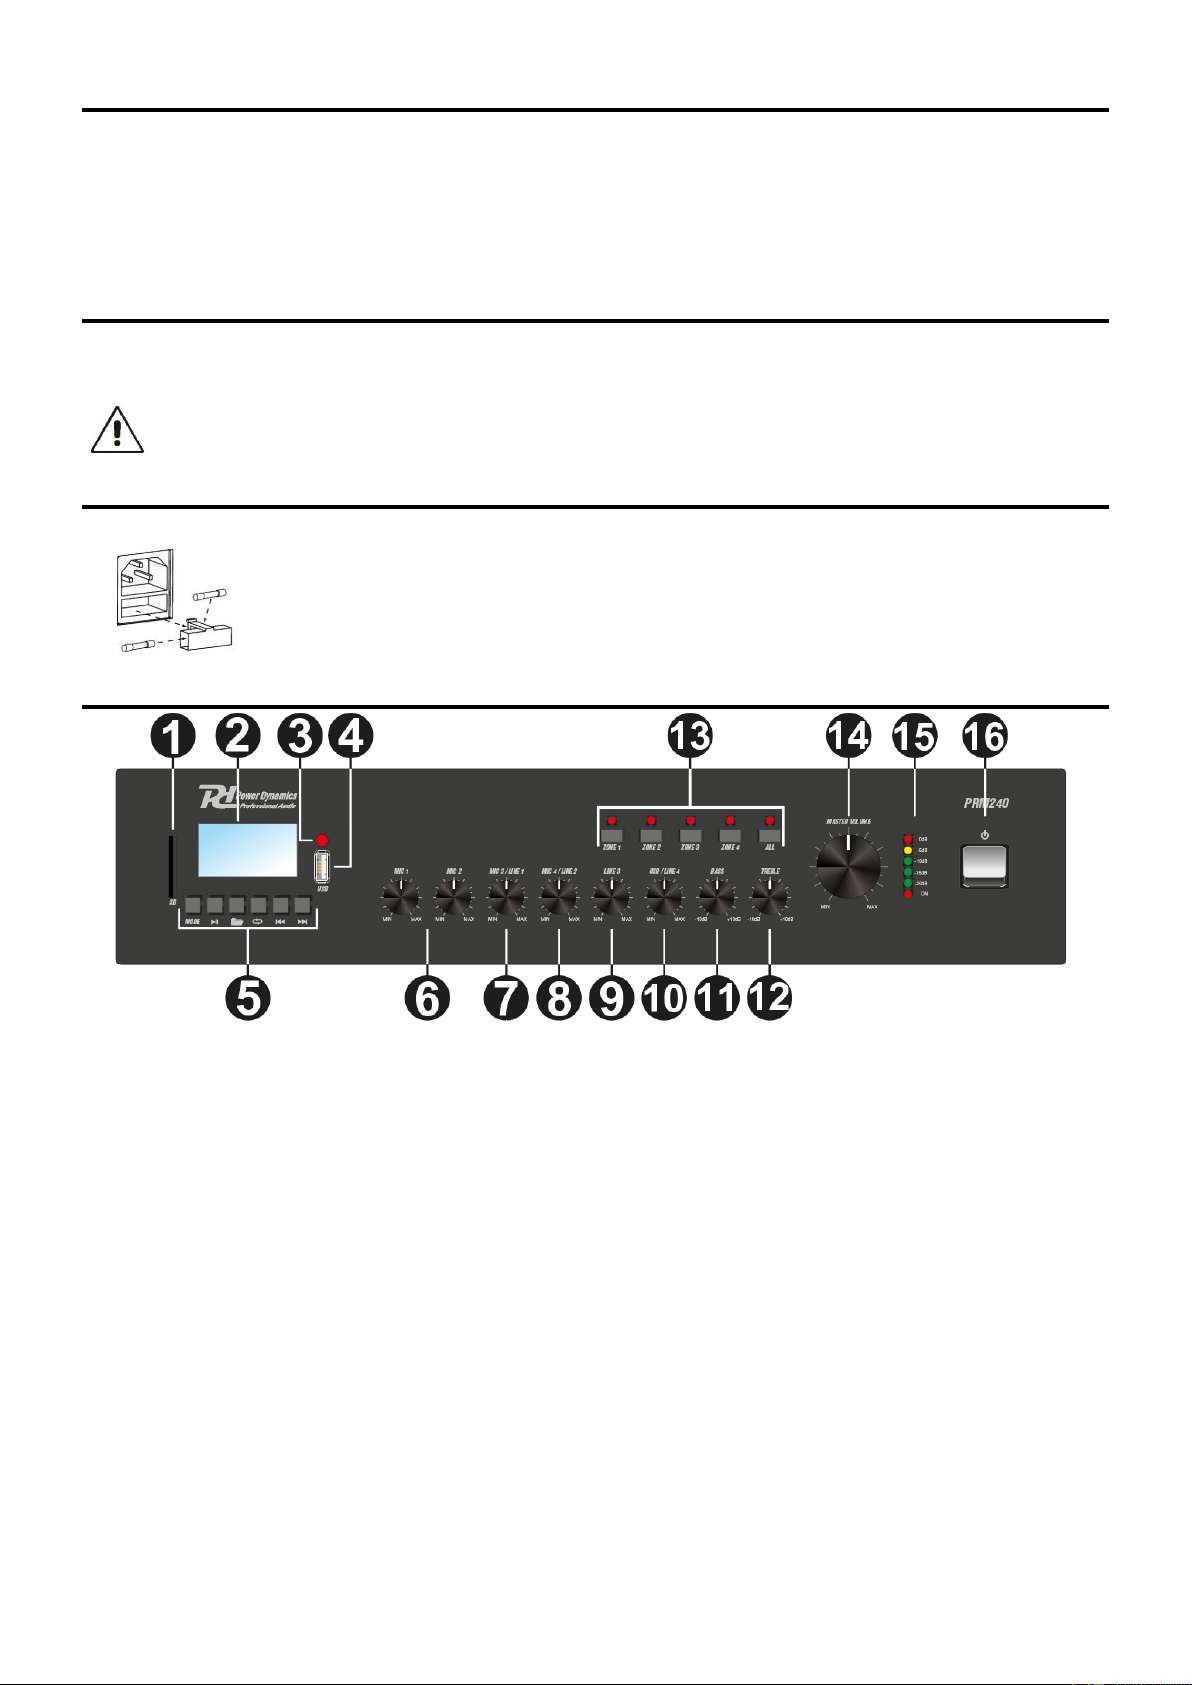
FRONT PANEL
1. SD CARD SLOT: Insert an SD card in this slot.
2. DISPLAY: The display shows multiple forms of information, for example current MODE, elapsed time, etc.
3. REMOTE CONTROL SENSOR: This sensor receives the infrared information from the remote control.
4. USB PORT: You can play media files from a USB device by connecting the device to this slot.
5. BUTTON CLUSTER:
MODE BUTTON - Press to change modes between playing SD, USB, MP3 and BT.
PLAY / PAUSE - Press this button to start or pause play.
FOLDER - Press this button to enter FOLDER selection.
REPEAT MODE - Press the repeat button once to continually repeat ALL tracks, press repeat once more to repeat just the
current track.
PREVIOUS - Press this button to go to the previous track. Press and hold to scan backwards within tracks.
NEXT - Press this button to go to the next track. Press and hold to scan forwards within tracks.
6. MIC 1 & 2 OUTPUT LEVEL CONTROL: Adjust the volume of the MIC 1 & 2 channel.
7. MIC 3/LINE 1 OUTPUT LEVEL CONTROL: Adjust the volume of the MIC 3/LINE 1 channel.
8. MIC 4/LINE 2 OUTPUT LEVEL CONTROL: Adjust the volume of the MIC 4/LINE 2 channel.
9. LINE 3 OUTPUT LEVEL CONTROL: Adjust the volume of the LINE 3 channel.
10. LINE 4/USB OUTPUT LEVEL CONTROL: Adjust the volume of the LINE 4/USB channel.
11. BASS CONTROL: Adjust the low frequencies of the corresponding channel.
12. TREBLE CONTROL: Adjust the high frequencies of the corresponding channel.
13. ZONE 1-4 OUTPUT SWITCHES: The different connected loudspeaker lines (1-4) can be switched on and off by pressing
the switches with the corresponding numbers. When the ‘All’ switch is pressed, all zone (1-4) outputs will be enabled or
disabled.
14. MASTER VOL: This knob controls the master volume.
15. LED INDICATORS (VU-METER): The current system operation is indicated on the 6 digit LED bar graph. The LED’s
monitor the current output level within a range of -20 dB and 0 dB.
16. POWER SWITCH: Turn the device ON or OFF.