Use a coaxial digital cord (not supplied) to connect the digital
output of your DVD player/ recorder to the DIGITAL INPUT
(COAXIAL) DVD/DVR jack.
2
Use a red/white stereo audio cord (not supplied) to connect the
AUDIO TV IN jack on the receiver to the audio output on your
TV.* This will allow you to listen to your TV through this
speaker system.
* Note that you must also connect the DVD player/ recorder's
video output to your TV's video input to watch a DVD video
(video cable is not supplied).
DVD player/ recorder
Receiver
TV
ANTENNA
FM
UNBAL
75Ω
AM
LOOP
AM loop
antenna
FM wire antenna
3/8 in.
(10mm)
4
Connect antennas
1
Connect the FM wire antenna and fully extend along a
window frame or another suitable place that gives good
reception.
2
To connect the AM loop antenna, twist the exposed wire
strands together and insert into the terminal, then snap
the connector shut as shown below.
Receiver
6
VIDEO 1
STANDBY/ON
STANDBY/ON
STANDBY/ON
STANDBY/ON
VIDEO SELECT
Plug the receiver, DVD player/
recorder and TV into a convenient
AC outlet.
1
Press STANDBY/ON to switch on the receiver.
2
Switch on your DVD player/ recorder and TV, and set the TV to
the correct video input.
DVD player/ recorder
Receiver
TV
7
+
–
VOLUME
AUTOSURROUNDSTEREO
FM/AMTAPE/VCRTV
DIGITAL
INPUT SELECTOR
STBDVD/DVR
After switching on, make any
necessary settings required by the
DVD player/ recorder, then you're
ready to start enjoying your home
theater system.
Refer to the receiver's operating instructions for a detailed
explanation of this system's surround sound features.
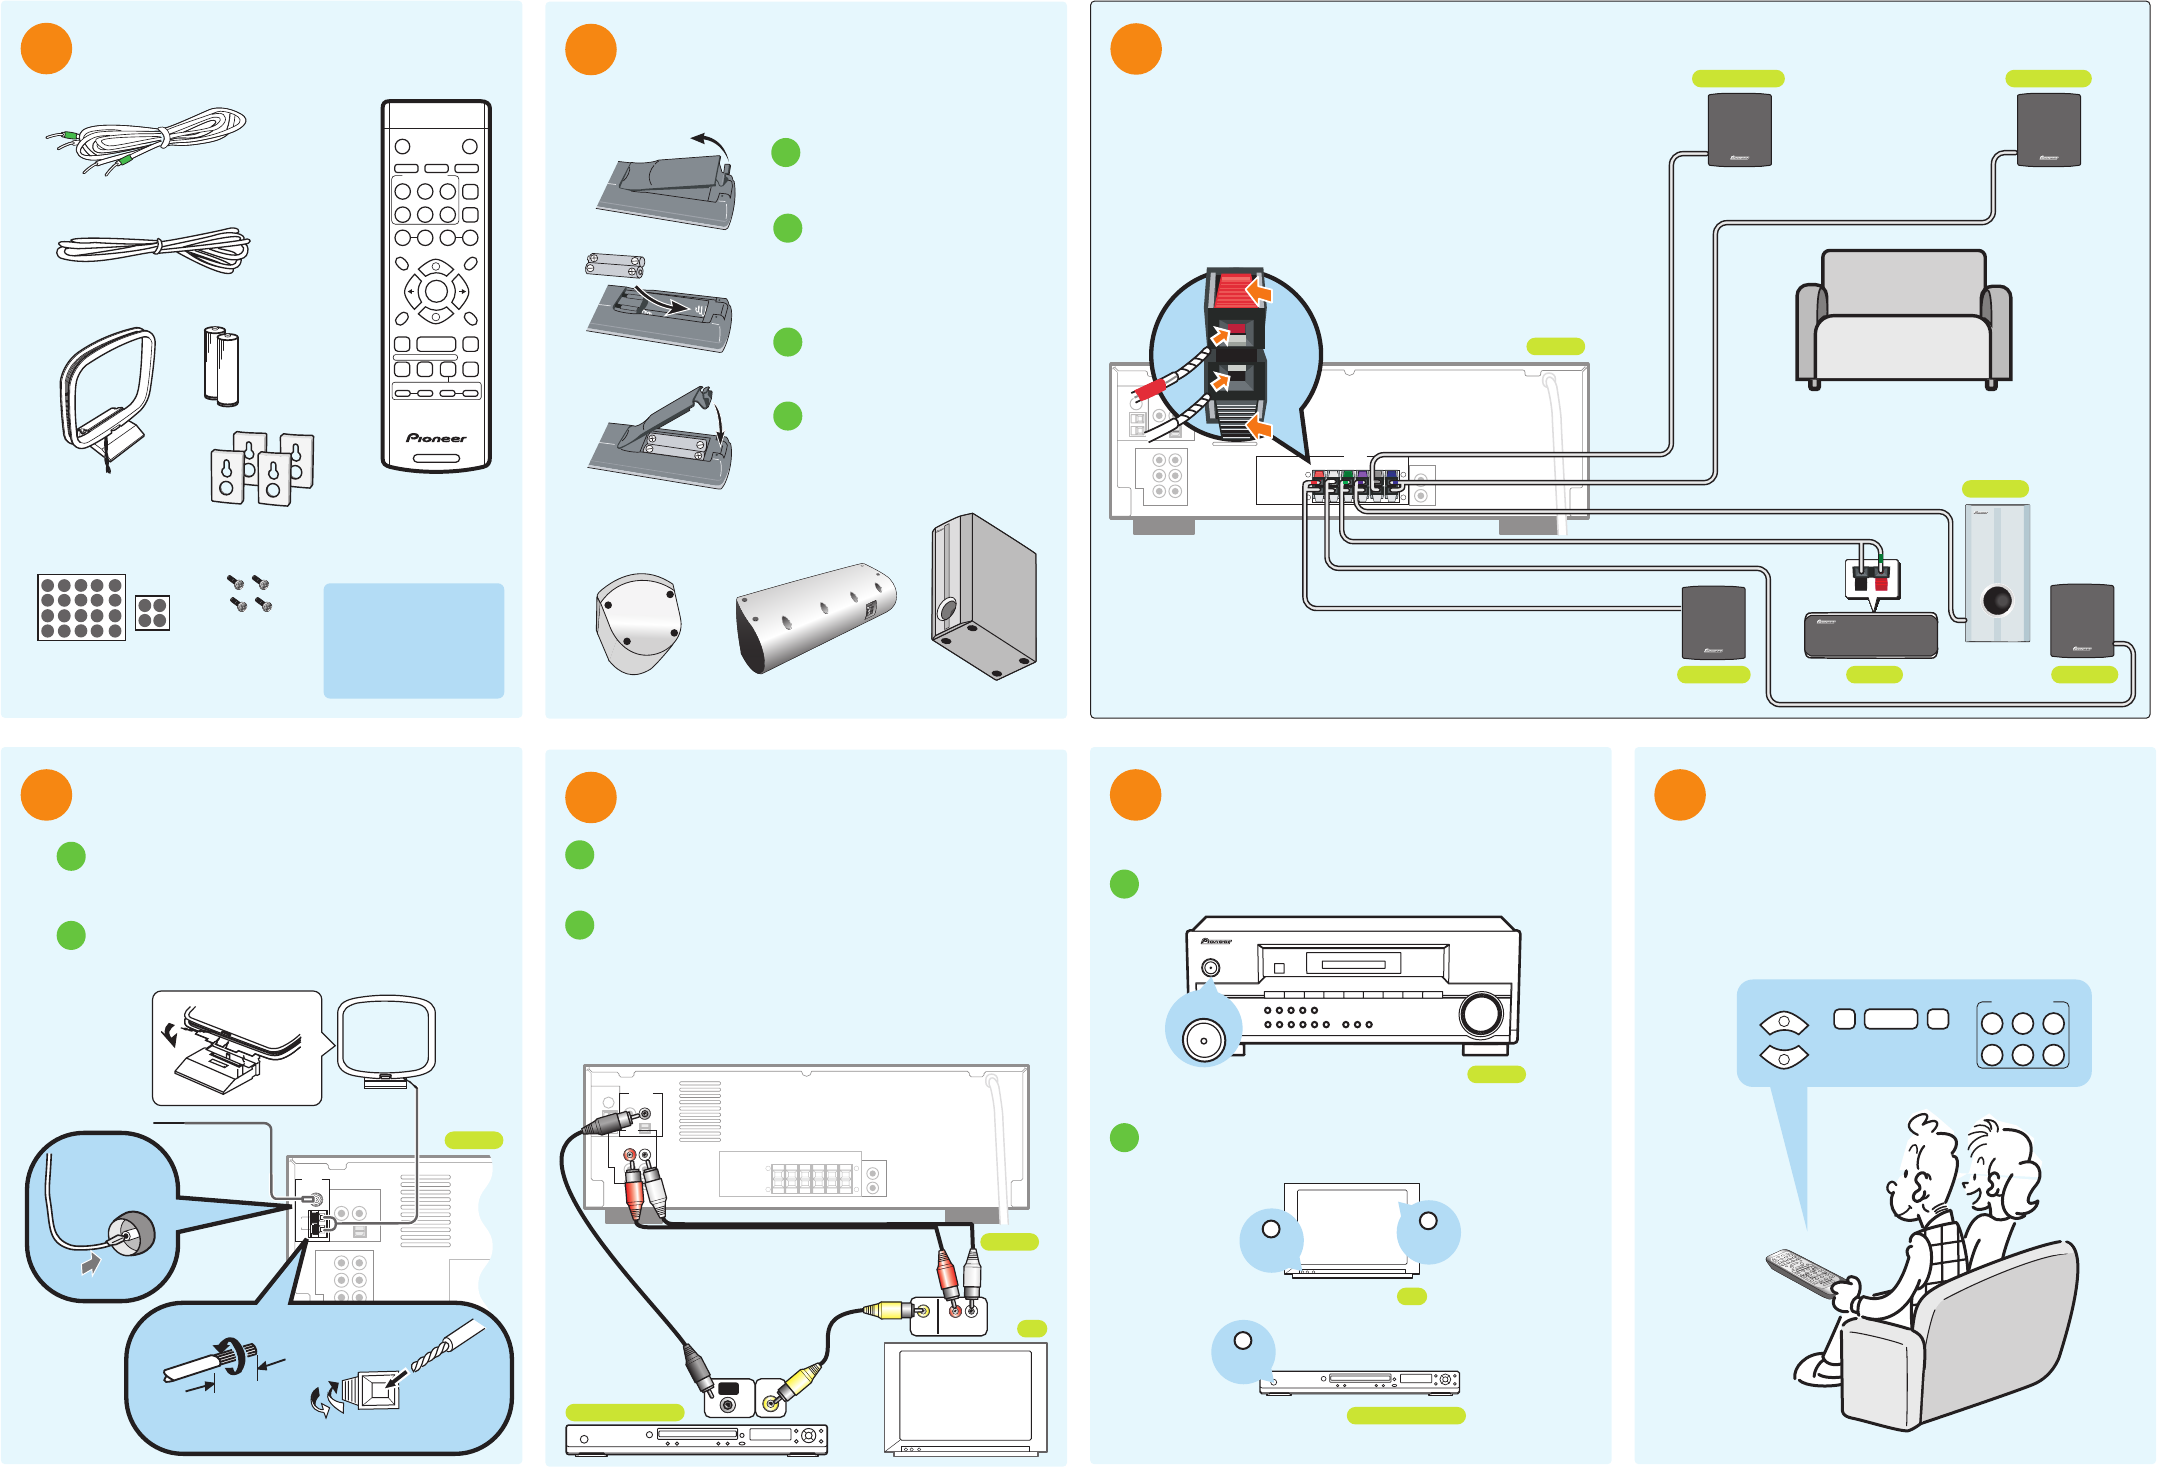
3
For the best surround sound, set up your
speakers like this. The front left and right
speakers should be about 6–9 feet apart.
Connect each speaker to the receiver using the
supplied speaker wires.
To connect, insert the colored wire into the matching colored (+) tab
and the other wire into the black (–) tab as shown below. Connect the
center speaker the same way (matching the wire the color-coded label).
Note that the color-coded tabs are as follows:
• Red :Front right speaker •Purple : Subwoofer
•White : Front left speaker •Grey : Surround right speaker
•Green : Center speaker •Blue : Surround left speaker
Listening position
SPEAKERS
+
–
+
–
RLRL
CENTER
SUB
WOOFER
FRONT
SURROUND
Front leftFront right
Surround leftSurround right
Center
Subwoofer
Receiver
HTP-2500/2600 Quick Start Guide
For detailed instructions, see the Operating Instructions supplied and / or contact one of our knowledgeable Pioneer Customer Service Representatives at 1 - (800) 421-1404.
Libble takes abuse of its services very seriously. We're committed to dealing with such abuse according to the laws in your country of residence. When you submit a report, we'll investigate it and take the appropriate action. We'll get back to you only if we require additional details or have more information to share.
Product:
Forumrules
To achieve meaningful questions, we apply the following rules:
First, read the manual;
Check if your question has been asked previously;
Try to ask your question as clearly as possible;
Did you already try to solve the problem? Please mention this;
Is your problem solved by a visitor then let him/her know in this forum;
To give a response to a question or answer, do not use this form but click on the button 'reply to this question';
Your question will be posted here and emailed to our subscribers. Therefore, avoid filling in personal details.
Register
Register getting emails for Pioneer HTP-2500 at:
new questions and answers
new manuals
You will receive an email to register for one or both of the options.
Get your user manual by e-mail
Enter your email address to receive the manual of Pioneer HTP-2500 in the language / languages: English as an attachment in your email.
The manual is 0,6 mb in size.
You will receive the manual in your email within minutes. If you have not received an email, then probably have entered the wrong email address or your mailbox is too full. In addition, it may be that your ISP may have a maximum size for emails to receive.
The manual is sent by email. Check your email
If you have not received an email with the manual within fifteen minutes, it may be that you have a entered a wrong email address or that your ISP has set a maximum size to receive email that is smaller than the size of the manual.
The email address you have provided is not correct.
Please check the email address and correct it.
Your question is posted on this page
Would you like to receive an email when new answers and questions are posted? Please enter your email address.