Important safeguards
This manual explains how to connect the
in-vehicle product via the connectivity kit.
For details of the operation of the con-
nected product, refer to another manual.
• Read this manual fully and carefully
before installing this product.
•
Keep this manual handy for future reference.
•
Pay close attention to all warnings in this
manual and follow the instructions carefully.
•
Do not install this product where it may
(i) obstruct the driver’s vision, (ii) impair
the performance of any of the vehicle’s
operating systems of safety features,
including airbags, hazard lamp but-
tons, or (iii) impair the driver’s ability
to safely operate the vehicle. In some
cases, it may not be possible to install
this product because of the vehicle type
or the shape of the vehicle interior.
• Make sure that the cables and wires
are routed and secured so they will not
interfere with or become caught in any
of the vehicle’s moving parts, especial-
ly the steering wheel, shift lever, park-
ing brake, sliding seat tracks, doors, or
any of the vehicle’s controls.
Specifications
Power source
........
14.4 V DC (10.8 V to 15.1 V allowable)
Max. current consumption ........1 A
Operation temperature range
........
–10 ºC to +60 ºC
(
+14 ºF to +140 ºF)
Storage temperature range
........
–20 ºC to +80 ºC
(
–4 ºF to +176 ºF)
Dimensions
Power supply box (
W×H×D
)
........
56 mm × 25 mm × 74 mm
(
2-1/4 in. × 1 in. × 2-7/8 in.)
MHL adapter (
W×H×D
)
........
41 mm × 15 mm × 45 mm
(
1-5/8 in. × 5/8 in. × 1-3/4 in.)
Weight
Power supply box ........
120 g (0.3 lbs)
MHL adapter .................
50 g (0.1 lbs)
Note:
Specifications and design are subject to
possible modifications without notice
due to improvements.
HDMI cable
(Type A - A) × 1
Adapter cable
(HDMI Type A - D) × 1
USB - micro USB cable
(Type USB A - micro USB B) × 1
Power supply box × 1 MHL adapter × 1
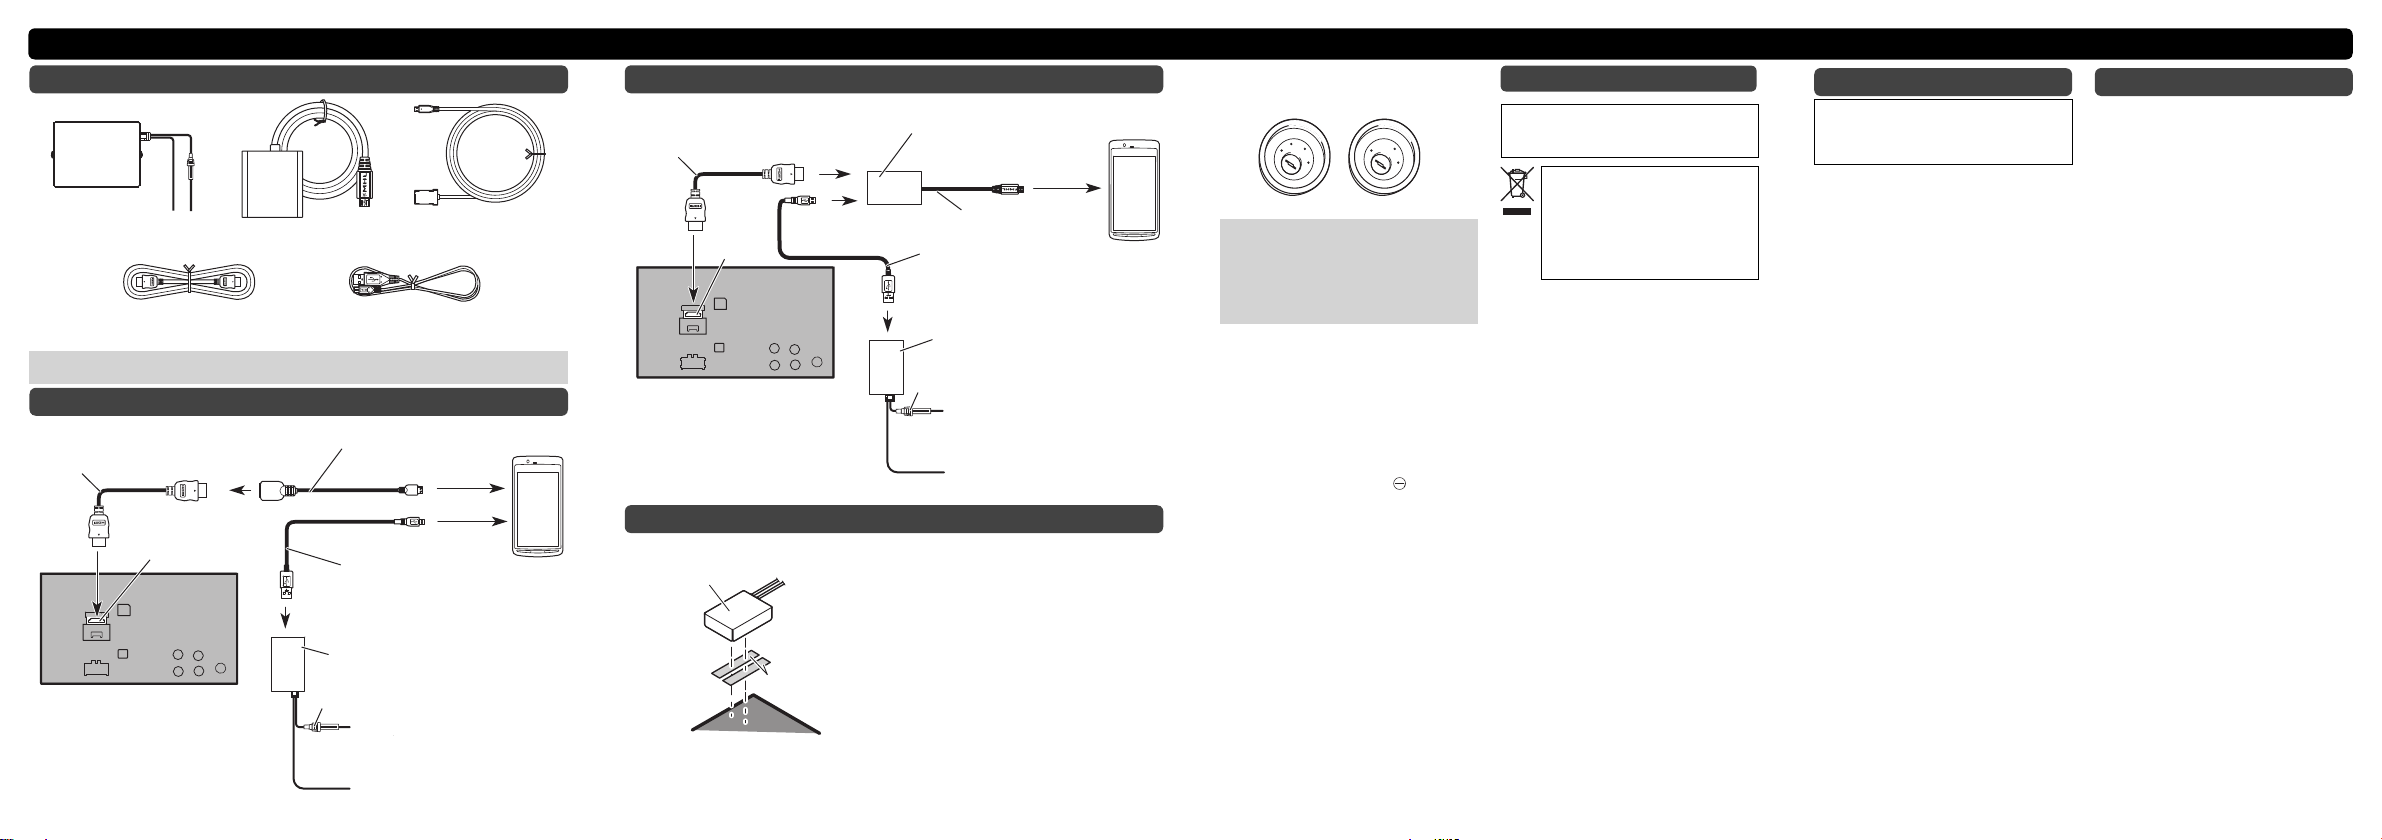
Connecting the in-vehicle product using HDMI cables
Parts supplied
• Use only the cables included in this connectivity kit to ensure proper connection.
• Do not use the cables included in this connectivity kit for other models.
HDMI cable
(Type A - A)
1.5 m (4 ft. 11 in.)
Adapter cable
(HDMI Type A - D)
0.75 m (2 ft. 6 in.)
USB - micro USB cable
(Type USB A - micro USB B)
2.25 m (7 ft. 5 in.)
Power supply box
Fuse (2 A)
Red
To electric terminal controlled by
ignition switch (12 V DC) ON/OFF
Black (ground)
To vehicle (metal) body
Notes:
•
The positions of the HDMI terminals dif-
fer depending on the in-vehicle product.
For details of the terminals’ positions,
refer to the manual of each product.
•
The MHL adapter will not be used if you
use the adapter cable (HDMI Type A-D).
English
• This product cannot be installed in a
vehicle without ACC (accessory) posi-
tion on the ignition switch.
ACC posi on No ACC posi on
Cords for this product and those for other
products may be different colors even if they
have the same function. When connecting
this product to another product, refer to the
supplied manuals of both products and con-
nect cords that have the same function.
•
When replacing the fuse, be sure to only
use a fuse of the rating prescribed on
this product.
•
This product is for vehicles with a 12-volt
battery and negative grounding. Before
installing it in a recreational vehicle,
truck, or bus, check the battery voltage.
• To avoid shorts in the electrical system,
be sure to disconnect the battery
cable before beginning installation.
• Route and secure all wiring so it can-
not touch any moving parts, such as
the gear shift, parking brake and seat
rails. Do not route wiring in places that
get hot, such as near the heater outlet.
If the insulation of the wiring melts or
gets torn, there is a danger of the wir-
ing short-circuiting to the vehicle body.
•
Secure the HDMI cable using the holder
provided with your vehicle’s unit.
•
As the power box can heat up, it should
never be installed in the following locations:
– where it could come into contact with
car wiring or equipment
– where it would easily come into con-
tact with passengers.
Information to User
Alteration or modifications carried out with-
out appropriate authorization may invalidate
the user’s right to operate the equipment.
If you want to dispose this product,
do not mix it with general house-
hold waste. There is a separate
collection system for used elec-
tronic products in accordance with
legislation that requires proper
treatment, recovery and recycling.
Private households in the member states
of the EU, in Switzerland and Norway may
return their used electronic products free
of charge to designated collection facili-
ties or to a retailer (if you purchase a simi-
lar new one). For countries not mentioned
above, please contact your local authori-
ties for the correct method of disposal.
By doing so you will ensure that your dis-
posed product undergoes the necessary
treatment, recovery and recycling and
thus prevent potential negative effects on
the environment and human health.
WARNING:
Handling the cord on this product or
cords associated with accessories sold
with the product may expose you to
chemicals listed on proposition 65 known
to the State of California and other gov-
ernmental entities to cause cancer and
birth defect or other reproductive harm.
Wash hands after handling.
1 Decide on the installation position.
2 Attach the power supply box using
separately sold adhesive tapes.
Notes:
• Thoroughly wipe off the surface before
affixing the adhesive tape.
• Use separately sold adhesive tapes
to secure this product so that it does
not move. It is extremely dangerous if
cords are exposed on the floor as they
may become entangled with the brake
pedal etc. Hide cords so that they do
not get in the way when you are driv-
ing.
• Secure all wiring with cable clamps or
electrical tape. Do not allow any bare
wiring to remain exposed.
Connecting the in-vehicle product using the MHL adapter
Red
To electric terminal controlled by
ignition switch (12 V DC) ON/OFF
Black (ground)
To vehicle (metal) body
Fuse (2 A)
Power supply box
USB - micro USB cable
(Type USB A - micro USB B)
2.25 m (7 ft. 5 in.)
Notes:
•
The positions of the HDMI terminals dif-
fer depending on the in-vehicle product.
For details of the terminals’positions,
refer to the manual of each product.
•
The adapter cable (HDMI Type A-D) will
not be used if you use the MHL adapter.
HDMI cable
(Type A - A)
1.5 m (4 ft. 11 in.) MHL adapter
0.75 m (2 ft. 6 in.)
Installing the power supply box
Adhesive tape
(sold separately)
Power supply box
HDMI terminal
HDMI
terminal