ENGLISH
www.philips.com
u
4203 000 51921
Important
◗ The cord of the charging unit cannot be replaced. If
the cord is damaged,the charging unit must be
discarded.
◗ Make sure the socket is live when you recharge the
toothbrush.The electricity supply to sockets in
mirror cabinets over washbasins or shaver sockets
in bathrooms may be cut off when the light is
turned off.
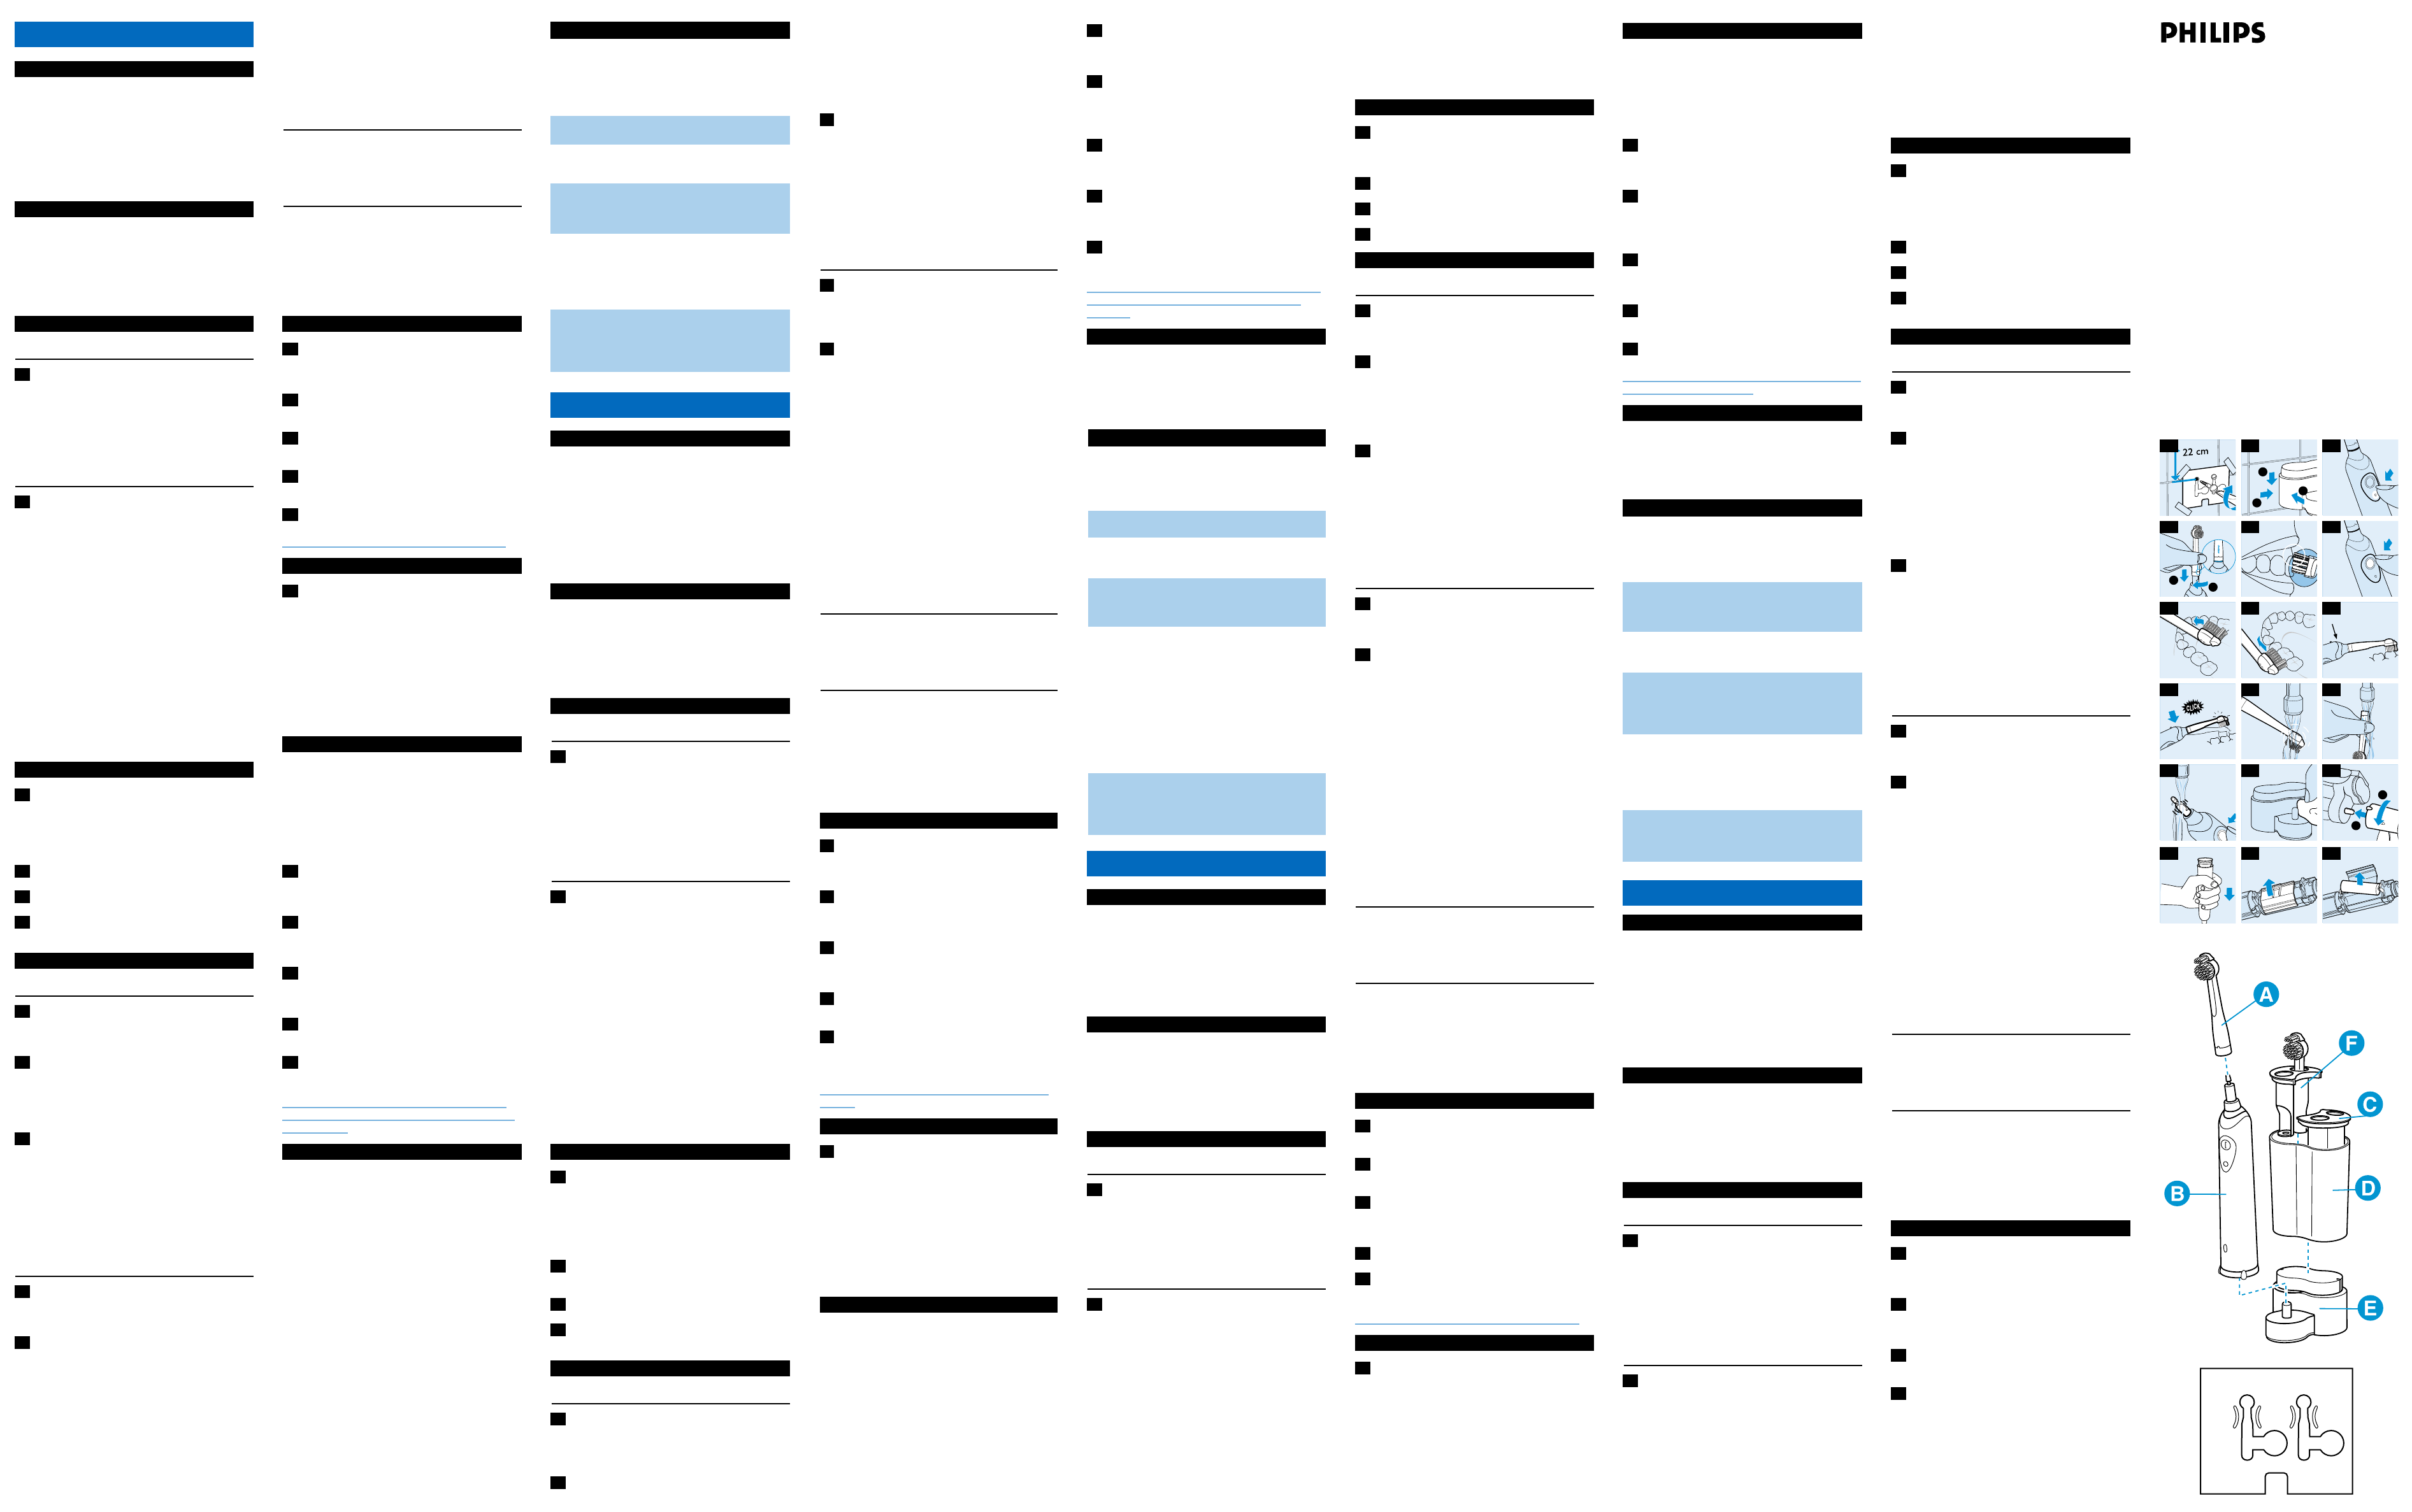
General description
A Brush
B Handle
C Insert for spare brush
D Storage container
E Charger
F Spare brush holder
Preparing the appliance for use
Mounting the appliance to the wall
1 Mount the charging unit to the wall, using 2 screws
(3.0x30mm) and 2 wall plugs (S5) (not included)
(fig. 1+2).
◗ To drill the holes in the right places, you can use the
drilling stencil on the last page of these directions
for use (fig. 2).
Charging the appliance
1 Charge the appliance for at least 16 hours before
using it for the first time.
◗ Make sure the appliance is switched off when you
start charging it (fig. 3).
◗ You can put the toothbrush in the stand and let it
charge continuously.
However, when you first start using the appliance, it is
recommended that you use it until the battery is empty.
To do so, use the appliance in the normal way without
recharging it between the brushing sessions. Recharge
the appliance when the motor almost stops running.
Repeat this procedure 3 times in a ro.
To extend the
lifetime of the battery, repeat this procedure
every 6 months.
◗ Types HX2585, HX2538 and HX1526 only:When the
battery is being charged,the green pilot light is on (fig.4).
◗ You can put the toothbrush in the stand and let it
charge continuously.
Using the appliance
1 Mount the brush attachment onto the toothbrush
by inserting it into the bayonet catch and turning
it clockwise a quarter of a turn (fig. 4).
This will make it impossible for the brush
attachment to become detached due to vibration.
2 Put toothpaste on the brush.
3 Place the brush head in your mouth (fig.5).
4 Press the on button and start brushing your teeth
(fig. 6).
Brushing Tips
Brushing
1 Place the brush head against the tooth in such a
way that it covers the surface of the tooth as well
as the gum line (fig. 5).
2 Hold the brush head in this position for a few
seconds and then move on to the next tooth (fig.7).
The round brush head removes plaque from the teeth
and beneath the gum line.The individually moving
Active Tip cleans between the teeth.
3 Guide the brush head carefully along the teeth
and molars (fig.8).
◗ Make sure you clean all surfaces of the teeth
(inside, outside and chewing surface) as well as the
gum line properly.A fixed brushing pattern will
prevent you from skipping certain areas.
◗ See also the brushing instructions on our Internet
site: www.philips.com.
Gum Protection
1 The Gum Protection system guarantees that you
will not exert too much pressure on the teeth
and gums (fig.9).
2 If you exert too much pressure on the toothbrush,
you will feel and hear a click when the brush head
flexes backwards.As soon as you reduce the
pressure, the brush head will return to its normal
position.This will protect your gums (fig.10).
This will probably happen a few times when you first
start using the brush.After some time you will have
discovered the optimal brushing pressure and the brush
head will flex backwards less often.
Tip: If plaque is removed properly, the gums will have a
pink colour and will firmly surround the teeth. Healthy
gums do not bleed when you eat or brush your teeth
(see also the section 'Optimal dental hygiene'). If,
nevertheless, your gums bleed slightly the first few times
you use the brush, this bleeding will generally stop after
a few days. If it does not, consult your dentist or dental
hygienist.
Minimum brushing time: 2 minutes
In general, 2 minutes will be enough to clean your teeth
properly.Naturally, you can also brush longer than
2 minutes.
Optimal dental hygiene
For optimal dental hygiene, it is recommended to use
dental floss and toothpicks in addition to the electric
toothbrush.
You will find more information about Philips Dental
Care and other Philips products on our Internet site:
www.philips.com.
Cleaning and storing the appliance
1 Switch the toothbrush on and rinse the brush
attachment under the tap with lukewarm water
(max. 60ºC) (fig.11).
2 Switch the toothbrush off. Detach the brush
attachment and rinse the inside (fig.12).
3 Switch the toothbrush on again to rinse
toothpaste residues from the drive shaft (fig.13).
4 Store the brush attachment on the pin on the
charging unit.
5 Clean the charging unit with a moist cloth (fig.14).
Unplug the charging unit before you start cleaning it.
Replacement
1 Replace the brush attachment every 3 months for
the best brushing results.
◗ The brush attachment should also be replaced
when the bristles start to bend outwards.
You can obtain new brush attachments from the shop
in which you purchased the toothbrush.
All-round PHILIPS replacement brush attachments can
be used.
Environment
When you discard the appliance in due course, remove
the battery and dispose of it in an environmentally safe
way.
◗ NB:You can also hand the appliance in at a Philips
Service Centre, which will dispose of the battery
for you .
1 The battery must be completely empty when you
remove it.You should therefore let the appliance
run until it stops before removing the battery.
2 Pick up the charging unit and place the toothbrush
on the pin.Turn the toothbrush anti-clockwise to
unscrew the bottom of the toothbrush (fig.15).
3 Turn the toothbrush upside down and press it
down on a hard surface to remove the battery
holder (fig. 16).
4 Open the lid of the battery holder by hand or by
means of a screwdriver (fig.17).
5 Lift the battery out of the battery holder by
means of a screwdriver (fig.18).
After the bottom has been unscrewed, the appliance
may not be watertight anymore and the guarantee will
become invalid.
Troubleshooting
If you are unable to solve your problem by means of
the troubleshooting guide below, please contact the
nearest Philips service centre, the Philips Customer
Care Centre in your country or contact us online at
www.philips.com.
DEUTSCH
Solution
Make sure that the plug of the
charging unit is properly connected
to the mains.
Make sure the socket is live (see
also the section 'Important').
Make sure the toothbrush is
switched off and recharge it for at
least 16 hours.
Check if the brush attachment has
been properly connected to
appliance (see also the section
'Using the appliance').
The toothbrush must be
recharged. If you normally leave the
toothbrush in the charging unit
continuously, you may have to
revive the battery as described in
the 'Charging' section.
Remove the brush attachment and
start using a new one.
Problem
The toothbrush
does not work at
all, although it has
been in the
charging unit
overnight.
The motor of the
toothbrush works,
but the brush head
doesn't.
The brushing
power of the
appliance has
greatly decreased.
The teeth-cleaning
performance of
the toothbrush is
not optimal
anymore.
sensiflex
power toothbrush
15
Wichtig
◗ Das Netzkabel an der Ladeeinheit kann nicht
ersetzt werden. Bei einer Beschädigung oder einem
Defekt des Kabels kann die Ladeeinheit nicht
repariert werden. Sie ist zu entsorgen.
◗ Prüfen Sie vor dem Aufladen des Akkus, ob die
Steckdose kontinuierlich Strom führt. Manche
Steckdosen in Nasszellen, über Waschbecken und
Rasierer-Steckdosen werden nämlich zusammen mit
der Raumbeleuchtung ausgeschaltet.
Allgemeine Beschreibung
A
Bürste
B Griff
C Einsatz für Ersatzbürst
D Behälter zur Aufbewahrung
E Ladeeinheit
F Esatzbürstenhalte
Vor dem Gebrauch
Die Ladeeinheit an der Wand anbringen
1 Bringen Sie die Ladeeinheit an der Wand an. Sie
benötigen hierzu 2 Schrauben (3,0 x 30 mm) und
zwei Dübel (S 5);sie sind im Lieferumfang nicht
enthalten (abb.1+2).
◗ Auf der letzten Seite dieser Gebrauchsanweisung
finden Sie eine Schablone zur Platzierung der
Löcher für die Dübel.
Den Akku aufladen
1 Laden Sie vor dem ersten Gebrauch den Akku
mindestens 16 Stunden lang auf.
◗ Achten Sie darauf, dass das Gerät ausgeschaltet ist,
bevor Sie mit dem Laden beginnen (abb.3).
◗ Sie können die Zahnbürste zum kontinuierlichen
Nachladen im Ladegerät belassen.
Es empfiehlt sich aber,die Zahnbürste nach dem ersten
Laden solange ohne Nachladen zu benutzen, bis der
Akku leer ist. Benutzen Sie darum die Zahnbürste in der
gewohnten Weise,
ohne sie nachzuladen. Laden Sie
den Akku erst dann auf, wenn der Motor beinahe
aufgehört hat zu arbeiten.Wiederholen Sie diesen
Vorgang dreimal nacheinander.
Die Nutzungsdauer des Akkus erhöht sich, wenn Sie alle
6 Monate so verfahren.
◗ Sie können die Zahnbürste zum kontinuierlichen
Nachladen im Ladegerät belassen.
Der Gebrauch des Geräts
1 Bringen Sie den Bürstenaufsatz auf dem
Grundgerät an, indem Sie ihn auf die Antriebswelle
mit dem Bajonettverschluss setzen und mit einer
Vierteldrehung im Uhrzeigersinn sichern (abb.4).
Danach kann der Bürstenaufsatz nicht mehr durch die
Vibrationen gelockert werden.
2 Tragen Sie etwas Zahncreme auf den Bürstenkopf
auf.
3 Halten Sie die Bürste an Ihre Zähne (abb.5).
4 Drücken Sie den Ein-/Ausschalter,und putzen Sie
Ihre Zähne (abb.6).
Hinweise zur Zahnpflege
Die Zähne bürsten
1 Setzen Sie den Bürstenkopf in einem Mundwinkel
so an Ihre Zähne, dass er sowohl die Oberfläche
der Zähne als auch einen Teil des Zahnfleisches
bedeckt (abb. 5).
2 Halten Sie den Bürstenkopf einige Sekunden in
dieser Position,und führen Sie ihn dann zum
nächsten Zahn (abb. 7).
Der runde Bürstenkopf entfernt die Plaque vom Zahn
und vom Zahnhals in der Nähe des Zahnfleisches.
Die Interdentalbürste, die sich unabhängig von der
runden Bürste bewegt, reinigt die Zahnzwischenräume.
3 Führen Sie die Bürste sorgfältig an allen Zähnen
vorbei (abb.8).
◗ Achten Sie darauf, dass alle Zahnflächen - d. h.
Innenseite,Außenseite und die Kaufläche, sowie die
Zahnhälse am Zahnfleischrand - gereinigt werden.
Ein festes Pflegeschema verhindert, dass Sie
irgendwelche Bereiche vernachlässigen.
◗ Hinweise zur Zahnpflege finden Sie auch über
unsere Homepage:www.philips.com.
Schutz des Zahnfleisches
1 Die Druckkontrolle (das Gum Protection Sytem)
verhindert, dass Sie bei der Zahnpflege mit der
Bürste einen zu starken Druck auf Zähne und
Zahnfleisch ausüben (abb. 9).
2 Drücken Sie den Bürstenkopf zu stark an,schnellt
der Bürstenaufsatz hörbar ("Klick") und spürbar
zurück. So wird Ihr Zahnfleisch vor
Beschädigungen geschützt.Wenn Sie den Druck
mindern, schnellt der Bürstenkopf in die
Ausgangsstellung zurück (abb. 10).
Während der Eingewöhnungsphase wird Ihnen das
häufiger passieren. Bald aber finden Sie automatisch den
richtigen Andruck, und der Bürstenaufsatz wird nur
noch selten zurückschnellen.
Hinweis: Haben Sie die Plaque korrekt entfernt, hat das
umgebende Zahnfleich eine rötliche Färbung und liegt
fest am Zahn an. Gesundes Zahnfleisch blutet nicht
beim Essen oder beim Zähneputzen. - Vgl. den
Abschnitt "Die optimale Zahnpflege". - Ähnliche leichte
Blutungen unterbleiben nach einigen Tagen. Sollte das
nicht der Fall sein, so konsultieren Sie bitte Ihren
Zahnarzt.
Mindestens 2 Minuten die Zähne putzen
Im Allgemeinen sind 2 Minuten ausreichend, um die
Zähne korrekt zu putzen. Sie können die Zähne
selbstverständlich auch länger putzen.
Die optimale Zahnpflege
Zur optimalen Zahnpflege wird als Ergänzung zur
elektrischen Zahnbürste die Verwendung von
Zahnseide und von Zahnstochern empfohlen
Weitere Hinweise auf Philips Geräte zur Mund-
und Zahnpflege und auf andere Philips Geräte
finden Sie auch über unsere Homepage:
www.philips.com.
Reinigung und Aufbewahrung
1 Schalten Sie die Zahnbürste ein, und spülen Sie
den Bürstenaufsatz unter fließend lauwarmem
Wasser von max. 60ºC (abb. 11).
2 Schalten Sie die Zahnbürste aus. Nehmen Sie den
Bürstenaufsatz ab, und spülen Sie das Innere des
Bürstenaufsatzes aus (abb. 12).
3 Schalten Sie die Zahnbürste erneut ein, und
wischen Sie die Reste der Zahncreme vom
Grundgerät ab (abb. 13).
4 Bewahren Sie den Bürstenaufsatz auf dem Stift
der Ladeeinheit auf.
C
5 Die Ladeeinheit können Sie mit einem feuchten
Tuch reinigen, auf das Sie bei Bedarf ein wenig
Spülmittel aufgetragen haben (abb. 14).
Ziehen Sie den Netzstecker, bevor Sie die Ladeeinheit
reinigen.
Ersatz
1 Das beste Ergebnis erhalten Sie, wenn Sie den
Bürstenaufsatz alle 3 Monate ersetzen.
◗ Ersetzen Sie die Bürstenaufsätze auch schon dann,
wenn sich die Borsten nach außen verbiegen.
Neue Bürstenaufsätze erhalten Sie dort, wo das Gerät
gekauft wurde.
Sie können All-Round PHILIPS Bürstenaufsätze
verwenden.
Umweltschutz
Wenn Sie das Gerät zu gegebener Zeit außer Betrieb
nehmen, so entnehmen Sie bitte den Akku, und
entsorgen Sie ihn in der vorgeschriebenen Weise. -
Batterien und Akkus gehören nicht zum Hausmüll! Sie
sind als Verbraucher verpflichtet, gebrauchte Batterien
und Akkus der Wiederverwertung zuzuführen. Geben
Sie sie bei einer öffentlichen Sammelstelle Ihrer
Gemeinde ab, oder bei einer Verkaufsstelle für
entsprechende Geräte bzw. für Batterien und Akkus.
◗ Sie können den Akku auch dem Philips Service
Center zustellen.Wir kümmern uns dann um eine
ordnungsgemäße Entsorgung.
1 Der Akku muss leer sein, wenn Sie ihn aus dem
Gerät entnehmen. Lassen Sie darum den Motor
laufen, bis er stillsteht.
2 Nehmen Sie den Bürstenaufsatz ab, und setzen Sie
ihn auf die Ladeeinheit. Schrauben Sie die
Unterseite des Grundgeräts gegen den
Uhrzeigersinn ab (abb. 15).
3 Drehen Sie das Grundgerät herum,und drücken
Sie es fest auf eine harte Unterlage,um den
Akkuhalter entnehmen zu können (abb.16).
4 Öffnen Sie den Deckel des Batteriehalters mit der
Hand oder mit Hilfe eines Schraubendrehers
(abb. 17).
5 Nehmen Sie den Akku mit einem Schraubendreher
aus dem Akkuhalter (abb. 18).
Wenn die Unterseite des Grundgeräts geöffnet wurde,
ist es nicht mehr wasserdicht. Die Garantieist dann
erloschen.
Verhalten bei Problemen
Sollten Sie eventuell auftretende Probleme anhand der
folgenden Liste nicht lösen können, so wenden Sie sich
bitte an das Philips Service Center in Ihrem Lande, oder
nehmen Sie online über www.philips.com mit uns
Kontakt auf.
Abhilfe
Prüfen Sie, ob der Stecker der
Ladeeinheit fest in der Steckdose
steckt.
Prüfen Sie, ob die Steckdose Strom
führt. - Vgl. den Abschnitt "Wichtig".
Schalten Sie das Gerät aus, und laden
Sie den Akku mindestens 16
Stunden lang auf.
Prüfen Sie, ob der Bürstenkopf
korrekt auf dem Grundgerät
angebracht ist.- Vgl.den Abschnitt
"Der Gebrauch des Geräts".
Der Akku muss aufgeladen werden.
Wenn Sie die Zahnbürste
normalerweise in der Ladeeinheit
aufbewahren, ist es notwendig, den
Akku der Zahnbürste leerlaufen zu
lassen. Laden Sie ihn dann wieder
auf, und benutzen Sie die
Zahnbürste wie empfohlen, d.h.
ohne den Akku zwischen den
einzelen Putzvorgängen nachzuladen.
- Vgl. den Abschnitt "Den Akku
aufladen".
Nehmen Sie den Bürstenaufsatz ab,
und ersetzen Sie ihn durch einen
neuen.
Problem
Die Zahnbürste
funktioniert nicht,
obwohl Sie über
Nacht aufgeladen
wurde.
Der Motor läuft,
aber der
Bürstenkopf
funktioniert nicht.
Die Putzleistung ist
spürbar schwächer
geworden.
Die Pflegeleistung
des
Bürstenaufsatzes
ist nicht mehr
zufriedenstellend.
FRANÇAIS
Important
◗ Le cordon d'alimentation du chargeur ne peut être
remplacé.Si le cordon est endommagé, il convient
de remplacer le chargeur.
◗ Assurez-vous que la prise murale est bien alimentée
quand vous chargez la brosse à dents.Dans certaines
salles de bains, les prises ne sont alimentées en
électricité que si la lumière est allumée.
Description générale
A
Brosse
B Poignée
C Insert pour la brossette de rechange
D Compartiment de rangement
E Chargeur
F Support pour la brosse de rechange
Préparation à l'emploi
Fixation de l'appareil au mur
1 Fixez le chargeur au mur,à l'aide de 2 vis (3 x
30mm) et 2 fiches (S5) (non fournies) (fig 1+2).
◗ Pour percer les trous correctement,vous pouvez
utiliser le gabarit qui se trouve sur la dernière page
du mode d'emploi.
Charge de l'appareil
1 Lors de la première charge mettez l'appareil en
charge pendant 16 heures (fig 3).
◗ Assurez-vous que l'appareil est arrêté quand vous le
chargez.
◗ La brosse peut être replacée sur le chargeur et
laissée en charge continuellement.
Lors de la première utilisation de l'appareil, nous vous
recommandons de l'utiliser jusqu'à ce que
l'accumulateur soit complètement déchargé.Vous
pourrez le faire en utilisant l'appareil normalement sans
le recharger entre les périodes de brossage. Rechargez
l'appareil lorsque le moteur cesse de fonctionner.
Procédez de cette façon trois fois de suite.
Pour prolonger la vie de votre accumulateur, répétez
cette opération tous les six mois.
◗ La brosse peut être replacée sur le chargeur et
laissée en charge continuellement.
Utilisation de l'appareil
1 Fixez la brossette sur le corps de l'appareil en
l'insérant dans la baïonnette, puis vissez-la (fig 4).
Ainsi, la brossette ne pourra pas se dévisser.
2 Mettez du dentifrice sur la brossette.
3 Placez la brossette dans votre bouche (fig 5).
4 Appuyez sur le bouton marche (fig 6).
Suggestions de brossage
Le brossage
1 Placez la brossette contre vos dents,de telle sorte
qu'elle couvre aussi bien la surface des dents que
celle des gencives (fig 5).
2 Maintenez-la dans cette position quelques
secondes puis passez à la dent suivante (fig 7).
La tête ronde de la brossette ôte la plaque dentaire
située sur les dents et sous les gencives.
La tête Active Tip individuelle permet de brosser les
espaces interdentaires.
3 Dirigez la brosse soigneusement le long des dents
et des molaires (fig 8).
◗ Assurez-vous que vous atteignez correctement toute
la surface de vos dents (interne et externe) et de vos
gencives.Une méthode de brossage immuable vous
empêchera d'oublier certaines zones.
◗ Voir aussi les instructions de brossage sur notre
site d'Internet: www.philips.com.
Protection des gencives
1 Le système de Protection des Gencives vérifie la
pression que vous exercez sur les dents et les
gencives (fig 9).
2 Si vous pressez la brosse trop fortement sur vos
gencives,vous entendrez un déclic lorsque la
brosse basculera en arrière. Dés que vous réduisez
la pression,la brosse reprend sa position normale.
Cette opération protégera vos gencives (fig 10).
Ceci se produira probablement souvent lorsque vous
utiliserez la brosse pour la première fois.Avec le temps
vous découvrirez la pression de brossage optimale.
Suggestion: Si la plaque est éliminée correctement, vos
gencives seront d'une couleur rose et plus fermes
autour des dents. Des gencives saines ne doivent pas
saigner pendant le repas ou lors du brossage (voir aussi
le paragraphe intitulé "Hygiène dentaire optimale"). Si
néanmoins, vos gencives saignent légèrement lors des
premières utilisations, ce saignement s'arrête
généralement après quelques jours d'utilisation. Dans le
cas contraire, consultez votre dentiste.
Durée minimale du brossage:2 minutes
En général, 2 minutes suffisent à nettoyer les dents
correctement. Naturellement, vous pouvez vous brosser
les dents pendant plus de 2 minutes.
Hygiène dentaire optimale
Pour une hygiène dentaire optimale, il est recommandé
d'utiliser du fil dentaire et des cure-dents en plus de la
brosse à dents électrique.
Vous trouverez plus d'informations sur le Soin Dentaire
Philips et d'autres produits Philips sur le site Internet:
www.philips.com.
Nettoyage et rangement de l'appareil
1 Mettez la brosse en marche et rincez la tête de la
brosse à l'eau tiède (max.60ºC) (fig 11).
2 Arrêtez la brosse. Détachez la tête et rincez
l'intérieur (fig 12).
3 Remettez la brosse en marche pour rincer les
résidus de dentifrice collés sur l'arbre
d'entraînement (fig 13).
4 Rangez la brossette sur le chargeur.
5 Nettoyez le chargeur à l'aide un chiffon humide
(fig 13).
Mettez le chargeur hors tension avant de le nettoyer.
Remplacement
1 Remplacez la brossette tous les 3 mois pour de
meilleurs résultats de brossage.
◗ La brossette doit être changée dès que les poils se
replient vers l'extérieur.
De nouvelles brossettes sont disponibles chez votre
revendeur ou Centre Service Agréé.
Vous pouvez utiliser des brossettes Philips aux poils
arrondis.
Environnement
En fin de vie ou si vous désirez vous débarrasser de
votre appareil, retirez l'accumulateur et déposez-le dans
un endroit assigné à cet effet.
◗ NB:Vous pouvez aussi apporter l'appareil à un
Centre Service Agréé Philips qui s'en chargera.
1 Avant d'ôter l'accumulateur;assurez-vous qu'il est
totalement déchargé. Laissez donc l'appareil en
marche jusqu'à l'arrêt total.
2 Prenez le chargeur et mettez la brosse sur le
support.Tournez la brosse dans le sens inverse
des aiguilles d'une montre pour dévisser la base
de l'appareil (fig 13).
3 Tenez la brosse à l'envers et pressez-la contre une
surface dure pour retirer le compartiment à
accumulateur (fig 16).
4 Ouvrez le couvercle du compartiment à la main
ou à l'aide d'un tournevis (fig 17).
5 Retirez l'accumulateur du compartiment (fig 18).
La garantie n'est plus valable une fois la base dévissée et
l'appareil perd son étanchéité.
En cas de problème
Si vous ne pouvez pas résoudre le problème à l'aide du
petit guide, adressez-vous à un Centre Service Agréé, au
Service Consommateurs Philips de votre pays ou
contactez-nous en ligne à www.philips.com.
Solution
Assurez-vous que le chargeur est
correctement branché.
Assurez-vous que la prise de courant
est alimentée, même lorsque la
lumière est éteinte (voir le chapitre
'Important').
Assurez-vous que la brosse à dents
est arrêtée et rechargez-la pendant
au moins 16 heures.
Vérifiez que la brossette soit
correctement connectée à l'appareil
(voir également le chapitre
'Utilisation de l'appareil').
La brosse à dents doit être
rechargée. Si vous laissez la brosse
dans le chargeur continuellement,
vous devrez effectuer une recharge
complète comme décrit dans le
chapitre "Charge".
Remplacez la brossette.
Problème
La brosse à dents
ne fonctionne pas,
bien qu'elle ait été
chargée pendant la
nuit.
Le moteur de
l'appareil
fonctionne, mais la
tête de brossage
ne fonctionne pas.
La puissance de
brossage a diminué
considérablement.
La performance de
nettoyage des
dents n'est plus
optimale.
NEDERLANDS
Belangrijk
◗ Het snoer van de oplader kan niet vervangen
worden. Indien het snoer beschadigd is, dient de
oplader afgedankt te worden.
◗ Zorg ervoor dat er stroom op het stopcontact
staat wanneer u de tandenborstel gaat opladen. Het
is mogelijk dat de stroomtoevoer naar
stopcontacten in spiegelkastjes boven wastafels
wordt afgebroken wanneer het licht in de badkamer
wordt uitgedaan.
Algemene beschrijving
A
Opzetborstel
B Handvat
C Inzetstuk voor opzetborstels
D Opbergcontainer
E Oplader
F Houder voor opzetborstel
Klaarmaken voor gebruik
Het apparaat aan de muur bevestigen
1 Bevestig de oplader aan de muur met behulp van
twee schroeven (3,0 x 30 mm) en twee
muurpluggen (S5) (niet bijgeleverd) ( fig 1+2).
◗ Om er zeker van te zijn dat u op de juiste plaatsen
gaatjes boort, kunt u gebruik maken van de
boormal op de laatste pagina van deze
gebruiksaanwijzing.
Het apparaat opladen
1 Laad het apparaat ten minste 16 uur op voordat u
het voor de eerste keer gebruikt.
◗ Zorg ervoor dat het apparaat uitgeschakeld is
wanneer u het gaat opladen ( fig 3).
◗ U kunt de tandenborstel continu in de oplader
laten opladen.
Echter, wanneer u het apparaat voor het eerst gaat
gebruiken, raden we u aan het niet tussen de opladen
poetsbeurten op te laden, maar te wachten met
opladen totdat de motor bijna ophoudt met draaien.
Herhaal dit 3 keer achter elkaar.
Herhaal deze procedure elk half jaar om de levensduur
van het apparaat te verlengen.
◗ U kunt de tandenborstel continu in de oplader
laten opladen.
Gebruik van het apparaat
1 Bevestig de opzetborstel op de tandenborstel
door deze in de bajonetsluiting te plaatsen en een
kwartslag rechtsom te draaien ( fig 4).
Hierdoor kan de opzetborstel niet van de
tandenborstel af trillen.
2 Doe tandpasta op de borstelkop.
3 Plaats de borstelkop in uw mond ( fig 5).
4 Druk op de aan/uitknop en begin te poetsen
( fig 6).
Poetstips
Poetsen
1 Plaats de borstelkop zo tegen de tand dat deze
zowel het tandoppervlak als de rand van het
tandvlees bedekt ( fig 5).
2 Houd de borstelkop enkele seconden in deze
positie en ga dan verder met de volgende tand
( fig 7).
De ronde borstelkop verwijdert plak van de tanden en
onder de rand van het tandvlees.
De onafhankelijk bewegende Active Tip reinigt tussen
de tanden.
Vervolg Nederlands
3 Beweeg de borstelkop voorzichtig langs alle
tanden en kiezen ( fig 8).
◗ Zorg ervoor dat u alle oppervlakken van uw tanden
en kiezen (binnenkant, buitenkant en kauwvlak) en
de tandvleesrand goed reinigt.Door een vast
poetspatroon te volgen voorkomt u dat u bepaalde
gebieden overslaat.
◗ U kunt ook de poetsinstructies op onze website
raadplegen: www.philips.com
Tandvleesbescherming
1 Het poetsdrukcontrolesysteem voorkomt dat u te
veel druk uitoefent op uw tanden en tandvlees
( fig 9).
2 Als u te veel druk uitoefent op de tandenborstel,
hoort en voelt u de opzetborstel naar achteren
klikken. Zodra u de druk vermindert, keert de
opzetborstel terug naar zijn normale positie.
Hierdoor wordt uw tandvlees beschermd ( fig 10).
Dit zal waarschijnlijk in het begin enkele keren
gebeuren. Na een tijdje zult u echter vanzelf de
optimale poetsdruk ontdekt hebben, en zal de
opzetborstel dus minder vaak naar achteren klikken.
Tip: als plak goed verwijderd wordt, heeft het tandvlees
een roze kleur en zit het stevig om de tanden. Gezond
tandvlees bloedt niet wanneer u eet of uw tanden poetst
(zie ook het hoofdstukje 'Optimale gebitsverzorging').
Mocht uw tandvlees de eerste keren licht bloeden tijdens
het gebruik van de tandenborstel, dan zal dit over het
algemeen na enkele dagen ophouden. Zo niet, raadpleeg
dan uw tandarts of mondhygiënist.
Minimale poetstijd: 2 minuten
Over het algemeen zal 2 minuten poetsen voldoende
zijn om uw tanden goed te reinigen. U kunt natuurlijk
ook langer dan 2 minuten poetsen.
Optimale gebitsverzorging
Voor optimale gebitsverzorging is het aan te raden om
naast de elektrische tandenborstel ook tandenstokers te
gebruiken en te flossen.
Meer informatie over Philips tandenborstels en andere
Philips producten vindt u op onze website:
www.philips.com
Het apparaat schoonmaken en opbergen
1 Schakel de tandenborstel in en spoel de
opzetborstel af onder de warme kraan (max.
60ºC) ( fig 11).
2 Schakel de tandenborstel uit. Haal de opzetborstel
eraf en spoel de binnenkant van de opzetborstel
schoon ( fig 12).
3 Schakel de tandenborstel nogmaals in om restjes
tandpasta van de aandrijfas af te spoelen ( fig 13).
4 Bewaar de opzetborstel door hem op de pin op
de oplader te plaatsen.
De opbergcontainer en de inzetstukken kunnen van de
oplader verwijderd worden en in de afwasmachine
worden schoongemaakt.
Vervolg zie ommezijde