369075
77
Zoom out
Zoom in
Previous page
1/80
Next page
C
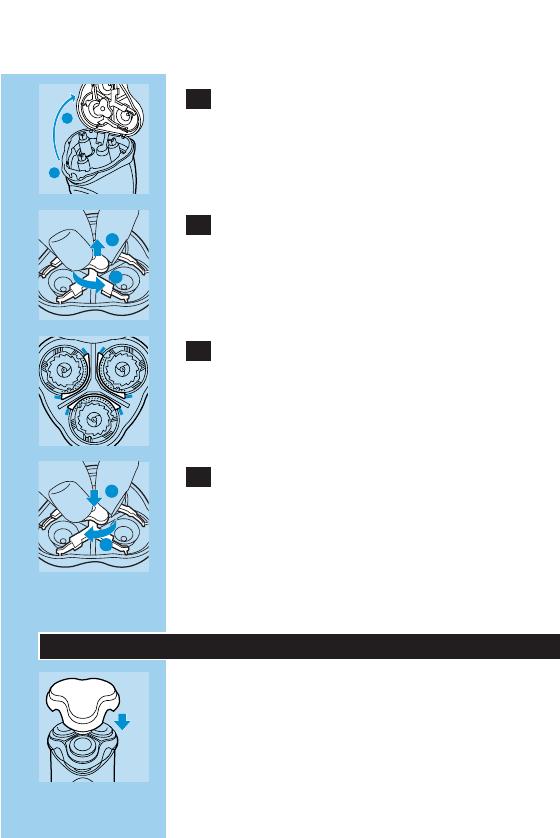
2 Tıraş ünitesini açmak için kapak açma
düğmesine basınız.
C
3 Çarkı saat yönünün tersinde döndürerek,
tıraş başlıklarının durduğu çerçeveyi
çıkartınız.
C
4 Tıraş başlıklarını kaldırınız ve yenilerini,
küçük delikleri bulunan bölümler ortaya
yöneltilmiş şeklinde yerleştiriniz.
Tıraş başlıklarından çıkan 'kanatçıklar'ın oyuklara
tam olarak yerleşmesine dikkat ediniz.
C
5 Çarkı içeri bastırarak saat yönünde
döndürerek tıraş ünitesini yeniden monte
ediniz.Tutucu çerçeveyi tekrar yerleştiriniz.
Tıraş başlıkları doğru yerleşmişse, tıraş ünitesinin
üst yüzünde parlak bir daire görülür.
Hasarlı veya yıpranmış tıraş başlıklarını sadece
HQ6 Quadra Action tıraş başlıkları ile değiştiriniz.
Saklama
C
Hasara yol açmamak için koruma kapağını
kullanınız.
TÜRKÇE 79
1
2
1
2
1
2
77


Need help? Post your question in this forum.

Forumrules


Report abuse

Libble takes abuse of its services very seriously. We're committed to dealing with such abuse according to the laws in your country of residence. When you submit a report, we'll investigate it and take the appropriate action. We'll get back to you only if we require additional details or have more information to share.

Product:

For example, Anti-Semitic content, racist content, or material that could result in a violent physical act.

For example, a credit card number, a personal identification number, or an unlisted home address. Note that email addresses and full names are not considered private information.

Forumrules

To achieve meaningful questions, we apply the following rules:

Register

Register getting emails for Philips hq 6890 at:


You will receive an email to register for one or both of the options.


Get your user manual by e-mail

Enter your email address to receive the manual of Philips hq 6890 in the language / languages: English, German, Dutch, French, Italian, Portuguese, Turkish, Spanish as an attachment in your email.

The manual is 1,18 mb in size.


You will receive the manual in your email within minutes. If you have not received an email, then probably have entered the wrong email address or your mailbox is too full. In addition, it may be that your ISP may have a maximum size for emails to receive.

The manual is sent by email. Check your email

If you have not received an email with the manual within fifteen minutes, it may be that you have a entered a wrong email address or that your ISP has set a maximum size to receive email that is smaller than the size of the manual.

The email address you have provided is not correct.

Please check the email address and correct it.

Your question is posted on this page

Would you like to receive an email when new answers and questions are posted? Please enter your email address.


Info