Thank you for purchasing the Solvit Products Front Seat Net Pet Barrier™. This barrier is designed for installation
behind the front seat in all vehicles with headrests.
WARNING: The mesh barrier is attached to a coiled metal frame which might “pop open” when removed from the
pouch - remove carefully in an open area. The pouch should contain the mesh barrier, support rod and 2 cinch straps.
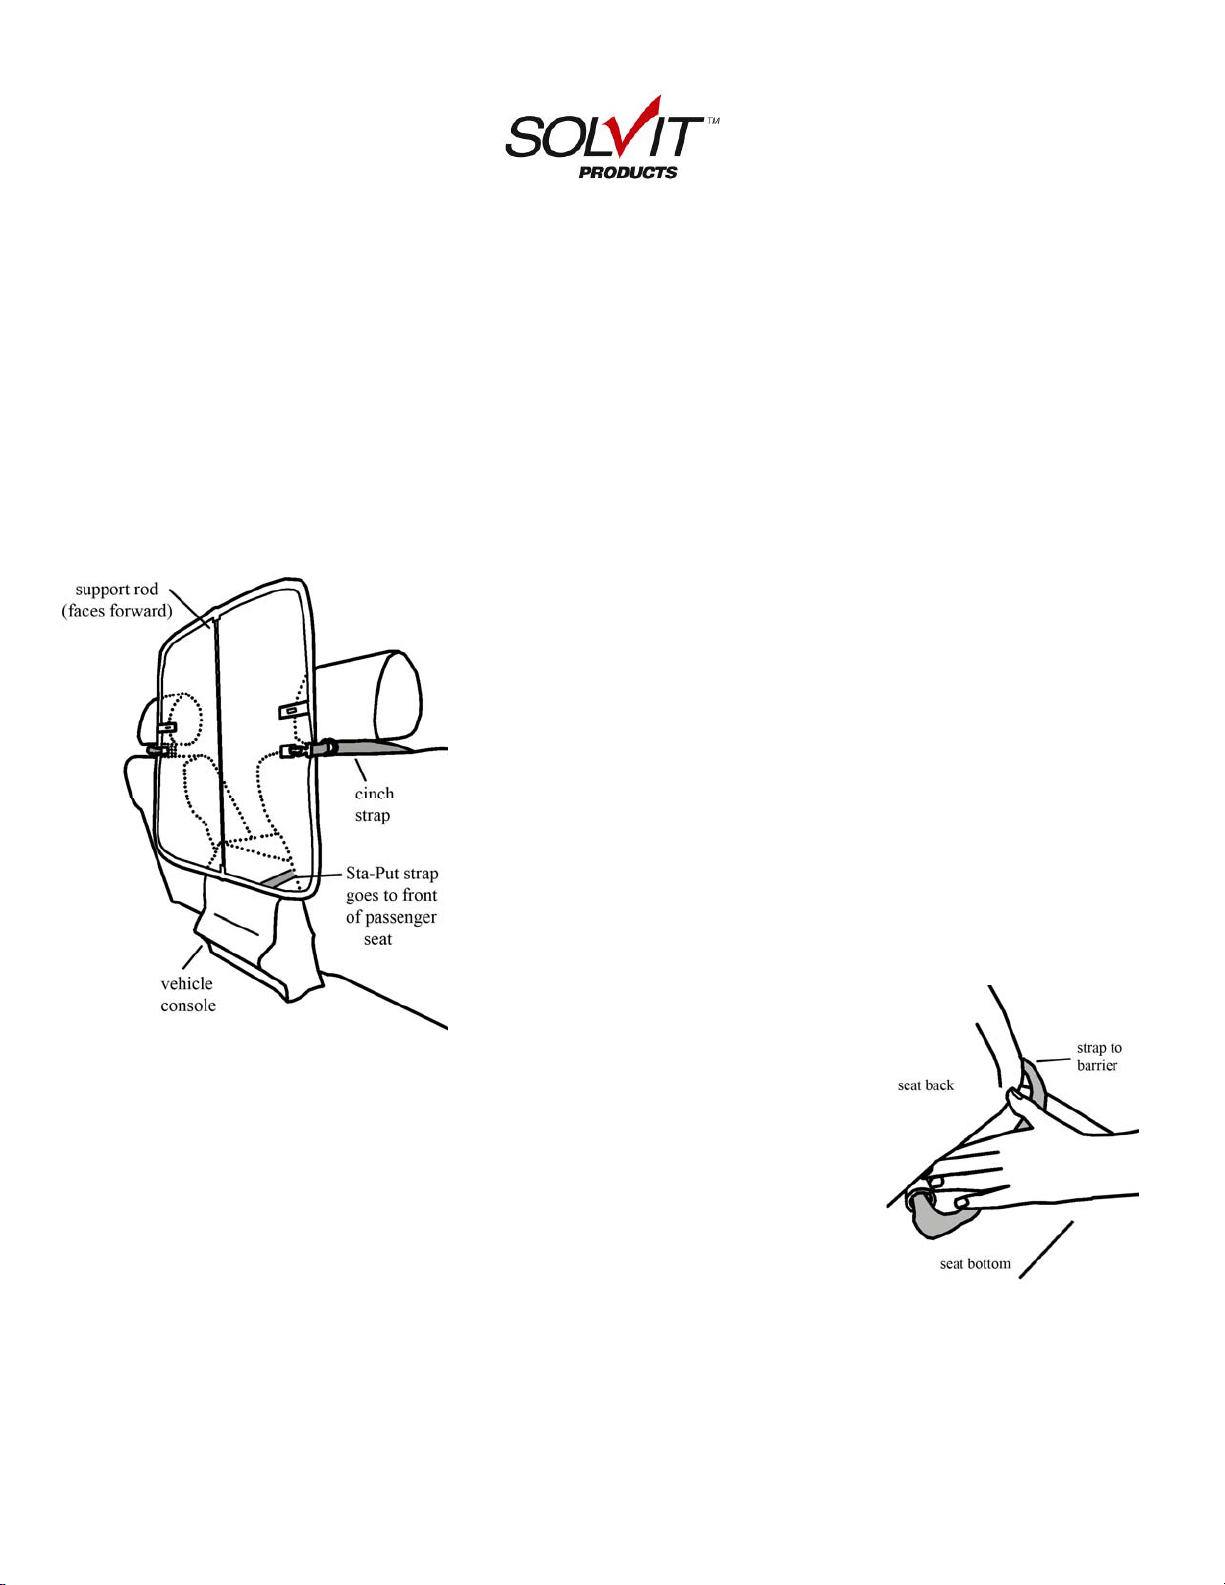
Installation: To ease installation, consider raising each front seat head rest to clearly expose the metal headrest posts
(they can be returned to their normal position after installation). Allow the mesh barrier to “pop open” to its natural,
square shape. Assemble the support rod with the coupler between the two straight sections. Insert one end of the
support rod into the small “pocket” at the bottom edge of the barrier. While bending the support rod slightly, insert
the other end into the pocket at the top edge of the barrier.
Attach the swivel hooks from each cinch strap onto one of the fabric loops
sewn into the sides of the barrier. There are two loops on each side – most
vehicles will fit best using the lower loops. With the support rod on the
“front seat” side of the barrier, thread the cinch straps around the outer
headrest posts and loop back through the cinch rings. Tighten each cinch
strap so the barrier is centered between the two seats. If the barrier rides
too high, consider changing the swivel hooks to the upper fabric loops.
but
ot
Install the Sta-Put™ tube in the front passenger seat by pushing the plastic
tube into the space between the seat back and seat bottom. Tighten the Sta-
Put™ strap so the bottom edge of the barrier rests firmly against the back
of the seats and/or console (it might be necessary to hold the Sta-Put™ tube
in place when adjusting the strap). Tuck any extra strap material between
the seat cushions. The Sta-Put™ tube can be removed with a strong tug,
should stay in place under normal conditions.
To “fold down” the barrier for storage,
remove the support rod, then while holding
the left and right sides, twist hands in opposite directions while bringing hands
together. The wire frame should form three concentric circles. Align the circles then
place barrier in the storage pouch. Handle carefully as the barrier can “pop open” if n
held in this stowed position.
Cleaning & Safety: Wipe with damp cloth or sponge and mild cleaner. No machine
wash. Never leave pets in vehicle unattended.
Warranty: The Front Seat Net Pet Barrier is warranted to be free from
defects in materials or workmanship for a period of one (1) year from the
date of purchase. A copy of the original sales receipt is required for warranty issues.
Solvit Products is dedicated to offering innovative solutions to improve pets’ quality of life. Please feel free to
contact us with and questions, comments, or warranty issues. Thank you for your purchase!
Need help? Post your question in this forum.
Report abuse
Libble takes abuse of its services very seriously. We're committed to dealing with such abuse according to the laws in your country of residence. When you submit a report, we'll investigate it and take the appropriate action. We'll get back to you only if we require additional details or have more information to share.
Product:
Forumrules
To achieve meaningful questions, we apply the following rules:
First, read the manual;
Check if your question has been asked previously;
Try to ask your question as clearly as possible;
Did you already try to solve the problem? Please mention this;
Is your problem solved by a visitor then let him/her know in this forum;
To give a response to a question or answer, do not use this form but click on the button 'reply to this question';
Your question will be posted here and emailed to our subscribers. Therefore, avoid filling in personal details.
Register
Register getting emails for Petsafe 62338 at:
new questions and answers
new manuals
You will receive an email to register for one or both of the options.
Get your user manual by e-mail
Enter your email address to receive the manual of Petsafe 62338 in the language / languages: English as an attachment in your email.
The manual is 0.07 mb in size.
You will receive the manual in your email within minutes. If you have not received an email, then probably have entered the wrong email address or your mailbox is too full. In addition, it may be that your ISP may have a maximum size for emails to receive.
The manual is sent by email. Check your email
If you have not received an email with the manual within fifteen minutes, it may be that you have a entered a wrong email address or that your ISP has set a maximum size to receive email that is smaller than the size of the manual.
The email address you have provided is not correct.
Please check the email address and correct it.
Your question is posted on this page
Would you like to receive an email when new answers and questions are posted? Please enter your email address.